Clean Trimmer Blades: The Right Way to Maintain Them
This post contains affiliate links. As an Amazon Associate, we earn from qualifying purchases.
Cleaning trimmer blades requires matching the tool type to the correct cleaning agent and always finishing with a specialized lubricant. For grass and hedge trimmers, use a stiff brush and a damp cloth with mild soap for sap; avoid water near the motor. For beard and hair clippers, use isopropyl alcohol for disinfection. The final step is applying clipper oil to the cutting surfaces, skipping this causes friction, heat, and rapid dulling.
Most people think a quick wipe-down is enough. They brush off the big chunks, maybe spray some all-purpose cleaner, and call it a day. The problem isn’t the visible dirt. It’s the sap that hardens between the teeth, the microscopic metal filings from the blades wearing against each other, and the moisture left behind that starts rust in the gearbox. You won’t see the damage until the trimmer starts pulling hair, struggling through grass, or just won’t start next season.
This guide walks through the right way to clean every type of trimmer blade, string trimmer heads, hedge trimmer teeth, and grooming clipper cutters. We’ll cover the tools you actually need, the one cleaning step everyone skips that ruins motors, and how to make your blades last years longer.
Key Takeaways
- Disconnect power first. For electric trimmers, unplug them. For battery models, remove the battery. For gas trimmers, let the engine cool. This isn’t just a suggestion.
- Use the right cleaner. Isopropyl alcohol for grooming blades, mild soapy water for plant sap on garden tools. Never hose down a trimmer unless it’s IPX7 waterproof rated.
- Lubricate every single time. Clipper oil reduces friction and prevents rust. Cooking oil gums up and carbonizes on the hot metal, creating a grinding paste that wears blades down.
- Dry everything completely. Moisture left in the housing or gear train causes internal corrosion. That corrosion is often silent until the motor seizes.
- Inspect while you clean. Look for cracked plastic, loose screws, and worn teeth. Catching a loose bolt now prevents a blade ejection later.
What You’ll Need to Clean Trimmer Blades
Gathering the right tools before you start keeps the process quick and prevents you from using the wrong thing in a pinch. You don’t need a professional workshop.
A soft-bristle nylon brush removes dry debris without scratching blade coatings. Isopropyl alcohol (70% or higher) disinfects grooming blades by breaking down oils and evaporating quickly, leaving no residue that can attract more grime.
The core kit is simple: a cleaning brush, some cloths, and the correct lubricant. The brush that came with your trimmer is a good start, but it’s often too soft. A stiffer nylon or brass-bristle parts brush from the auto section works better for baked-on grass and sap. Have a few clean, lint-free cloths, old t-shirts work, but microfiber doesn’t leave fibers behind.
For solvents, you need two. For beard trimmers and hair clippers, a bottle of 70% or higher isopropyl alcohol is mandatory. It disinfects and evaporates. For garden trimmers with tree sap or sticky plant residue, a spray bottle with a few drops of mild dish soap in warm water is enough. Never use harsh degreasers or brake cleaner; they can degrade plastic housings and rubber seals.
The lubricant is non-negotiable and must be purpose-made. Wahl Clipper Oil, Andis Cool Care Plus, or 3-IN-ONE Multi-Purpose Oil are common picks. Have a flathead screwdriver or the correct hex key set handy if your blades are removable. A small container for screws prevents loss.
| Tool/Supply | Purpose | Common Mistake |
|---|---|---|
| Stiff Nylon Brush | Removes caked-on debris from teeth and vents. | Using a wire brush that strips protective coatings. |
| Isopropyl Alcohol (70%+) | Disinfects and cleans grooming blades without water damage. | Using window cleaner or rubbing alcohol with additives that leave film. |
| Mild Dish Soap Solution | Cuts through plant sap and oils on garden tool blades. | Using a high-pressure hose, forcing water into motor bearings. |
| Specialized Clipper Oil | Lubricates cutting surfaces to prevent friction and rust. | Substituting with vegetable oil, which polymerizes into a hard, abrasive carbon layer. |
| Hex Key / Screwdriver Set | Safely removes blades for deep cleaning. | Using the wrong size and stripping screw heads. |
Before You Start: The Safety Non-Negotiables
Before you start: The cutting teeth on a hedge trimmer can close with enough force to sever a fingertip even when the motor is off. Always assume the tool is live until the battery is physically removed and stored separately. For gas trimmers, the muffler stays hot enough to cause a second-degree burn for at least 30 minutes after shutdown.
This isn’t fussiness. I watched a neighbor try to pick a wrapped blade of grass from his Ryobi trimmer while it was still plugged into the extension cord. His knee bumped the switch. The tool jumped, and the spinning head caught his pant leg.
Nothing was cut, but the scare was real. The rule is absolute: power off, unplug, remove battery. For gas tools, wait. Touch the muffler, if it’s warm, you’re not ready.
Wear gloves. Not just for sharp blades, but because the solvents can dry your skin. Safety glasses are cheap insurance against a flicked piece of debris or a spray of alcohol. Work in a well-ventilated area, especially when using any aerosol lubricant. Clear your workspace so you’re not balancing a trimmer over concrete while fumbling for a brush.
Step-by-Step Cleaning Process
The steps are similar across tool types, but the details for a string trimmer head versus a set of hair clipper blades are different. Follow the sequence.
1. Power Down and Disassemble (As Needed)
Unplug, remove the battery, or ensure the gas engine is cool. For a complete hedge trimmer cleaning, you might only need to brush the exterior. For a deep clean, remove the blades. Most hedge trimmers have two or three screws holding the blade set to the drive mechanism. Hair clippers often have a lever or a single screw.
Place every screw and washer into a small bowl or cup. I’ve lost the tiny spring from a Wahl Magic Clip lever into shop-floor sawdust. It took an hour to find a replacement. Don’t let that be you.
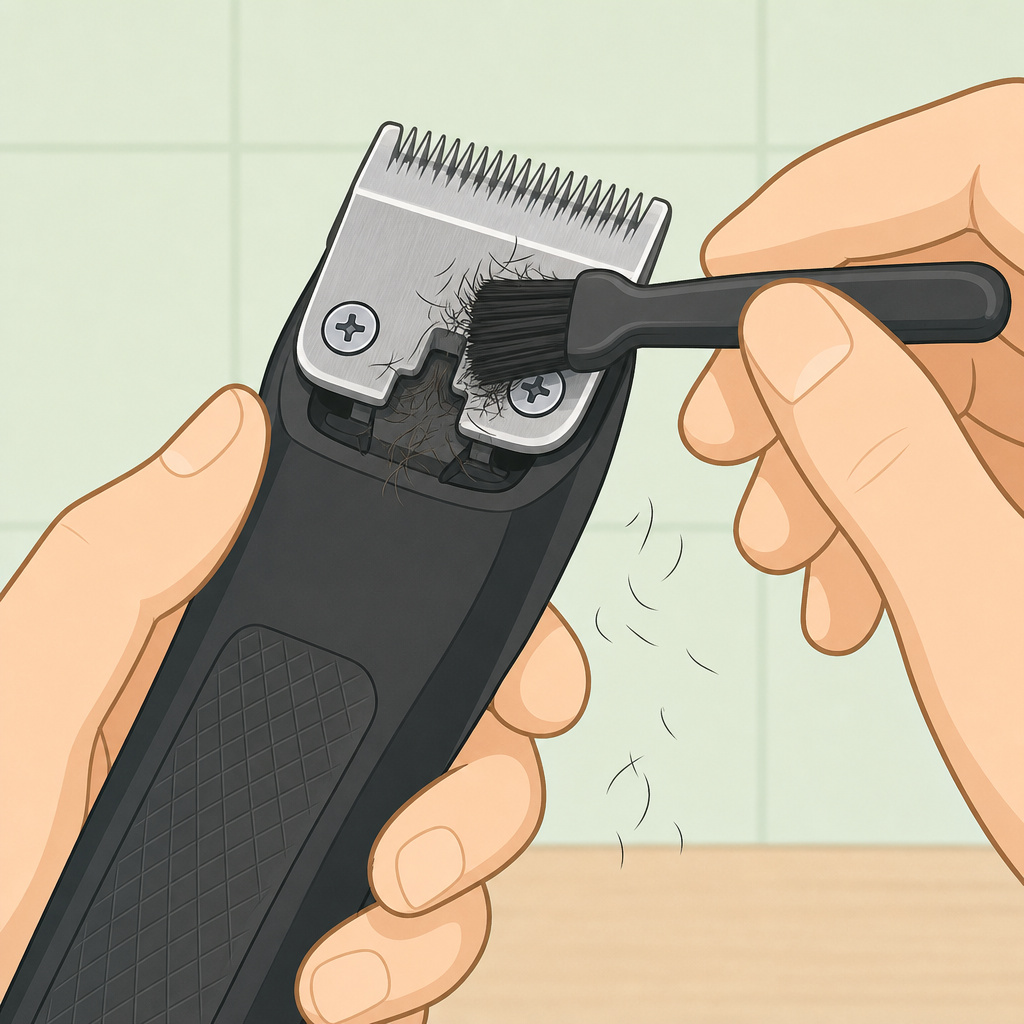
2. Dry Brush Removal
Use your stiff brush to scrub off all loose material. Brush in the direction opposite the cutting motion, from the tip of the teeth back toward the base. This pulls debris out instead of packing it in. Pay attention to air vents on the housing; clogged vents cause the motor to overheat. A can of compressed air can blow out dust from electrical contacts, but don’t use it on wet gunk.
For string trimmers, brush the entire head, including the spool housing and the exit holes. Grass seeds and dirt love to hide here, grinding down the new line as it feeds out.
3. Wet Cleaning (The Right Way)
This is where people ruin tools. You must match the method to the tool’s waterproof rating.
- Non-Waterproof Trimmers (Most Corded Tools): Dampen a cloth with your soapy water solution or isopropyl alcohol. Wipe the blades thoroughly. For stubborn sap, let the damp cloth sit on the spot for a minute to soften it. Use a toothpick or plastic pick to gently scrape between teeth. Never pour or spray liquid directly onto the tool.
- Waterproof Grooming Trimmers (IPX7 Rated): You can rinse the blade assembly under a gentle tap. Some, like certain Wahl models, are even designed for a quick dunk in disinfectant. Check your manual first.
- String Trimmer Heads: Avoid water entirely. The bearings in the head are rarely sealed. Use a dry brush and a cloth dampened with a light lubricant like WD-40 Specialist Dry Lube to wipe away residue. It displaces moisture.
The goal is to clean the metal, not the whole unit. If you get the housing wet, dry it immediately and completely.
4. The Dry-Off That Matters
Drying is not passive. Use a dry cloth to wipe all components. Then, let them air-dry on a clean cloth for at least 10-15 minutes. Look for hidden moisture in screw holes and around pivots. A hairdryer on a cool, low setting can help, but keep it moving to avoid concentrating heat.
Any remaining water will mix with the lubricant, creating a sludge that attracts more abrasive particles. It also starts the oxidation process on unprotected steel. I left a Stihl hedge trimmer blade slightly damp once before oiling. Two months later, I found a fine line of orange rust along the cutting edge where the oil had beaded away from the moisture.
Lubrication is Non-Negotiable
If you only do one thing after cleaning, make it this. Lubrication is what separates a maintained tool from a dying one.
I used canola oil on my first set of hair clippers for a year because it was “natural.” The blades slowly got louder and hotter. When I finally took them apart, the underside of the blades was coated in a black, tar-like carbon deposit. It took a solvent soak and a razor blade to scrape it off. The cutting performance never fully returned. Specialized oils have additives that resist this polymerization at high friction points.
The mechanism is simple. Metal-on-metal contact at high speed creates friction, which creates heat. Heat expands the metal microscopically, increasing drag. Oil forms a protective film that separates the surfaces. Without it, you get accelerated wear, heat buildup that can warp blades, and that horrible pulling sensation.
Here’s how to do it right:
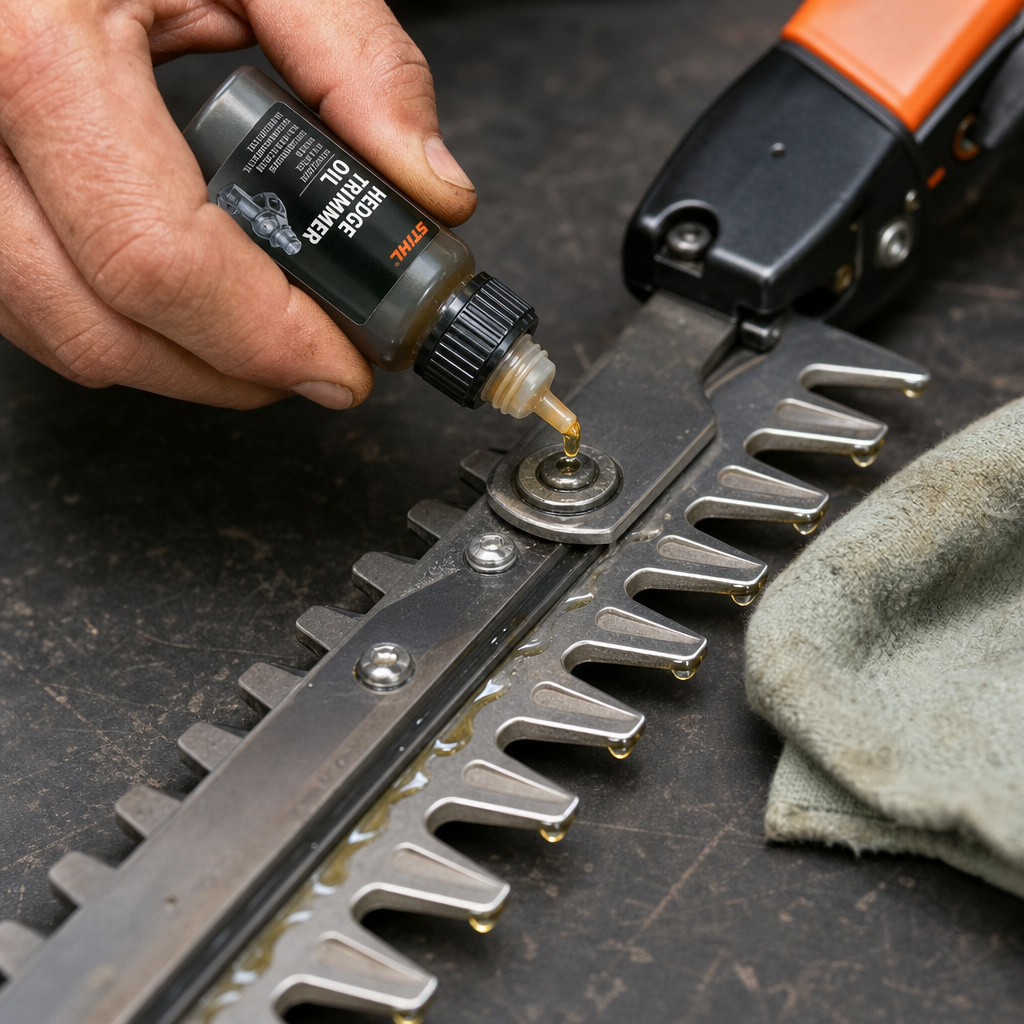
1. Apply 2-3 drops of clipper oil along the cutting edge of the blade.
2. For garden trimmers, apply a drop at each pivot point where the teeth mesh.
3. Turn the tool on and let it run for 10-20 seconds. This distributes the oil across the entire cutting path.
4. Wipe off any excess oil with a cloth. A thin film is what you want, not a dripping mess.
Make oiling trimmer blades part of your regular post-use routine, not just a deep-clean chore.
How Often Should You Clean Trimmer Blades?
Frequency depends on use, but a good rule is more often than you think. Waiting for a performance drop means damage is already happening.
| Tool Type | Light Use | Heavy/Professional Use | Signs It’s Overdue |
|---|---|---|---|
| String Trimmer | Every 2-3 uses | After every use | Line feeds poorly, head wobbles, excessive vibration. |
| Hedge Trimmer | After each major job | Every 1-2 hours of runtime | Leaves ragged cuts, sap buildup on teeth, motor strains. |
| Hair Clippers | After every client | Every 15-20 minutes of cutting | Pulls hair, gets hot quickly, loud buzzing sound. |
| Beard Trimmer | After every 2-3 uses | Weekly | Tugs, leaves uneven stubble, hairs stuck in the blade. |
For the DIYer, a quick brush and oil after each weekend of use is perfect. A full disassembly and deep clean can happen once a season, ideally before long-term trimmer storage.
Troubleshooting Common Post-Cleaning Issues
You cleaned and oiled it, but it’s still not right. Here are the likely culprits.
- Blades Still Pulling Hair: The blades are likely misaligned or dull. After reassembly, the top and bottom cutters might not be seated perfectly. Loosen the screws slightly, align the blades so the teeth intermesh evenly, and retighten. If that doesn’t work, they need sharpening hedge trimmer blades.
- Trimmer Won’t Start After Cleaning: You got moisture where it shouldn’t be. On an electric trimmer, water in the switch or motor housing can cause a short. Remove the battery, open the housing if you’re comfortable, and use a hairdryer on cool to dry everything thoroughly. Let it sit for 24 hours in a warm, dry place.
- Excessive Vibration: You didn’t re-tighten the blade screws evenly or to the proper torque. An imbalanced blade causes violent shaking. Loosen all screws, reseat the blade, and tighten in a criss-cross pattern, a little at a time. Don’t over-tighten, you can strip the threads or crack the housing.
- Rust Appearing Quickly: You didn’t dry thoroughly, or you used a lubricant that doesn’t contain rust inhibitors. Wipe off the rust with a cloth and fine steel wool (0000 grade), then apply a proper rust-inhibiting oil like WD-40 Specialist Corrosion Inhibitor.
Frequently Asked Questions
Can I use WD-40 to clean my trimmer blades?
WD-40 is a water-displacer and light penetrant, not a cleaner or a long-term lubricant. It’s fine for displacing moisture after cleaning a garden tool, but it will evaporate. For the cutting surfaces, you must follow up with a dedicated clipper or tool oil. Using only WD-40 leaves the blades unprotected within hours.
Is it safe to use water on my electric hedge trimmer?
Check the manual. Most electric hedge trimmers are not waterproof. Water can enter the motor housing or switch, leading to corrosion and electrical failure. The safe method is to use a damp cloth for the blades only, keeping water away from any vents, seams, or the handle.
How do I clean the inside of a string trimmer head?
For a general trimmer cleaning that includes the head, you often need to remove the spool. Brush out any wound-up grass, dirt, and old line fragments. A blast of compressed air can help. Avoid water, as it will wash grit into the head’s rotation bearings. A light spray of dry lubricant on the moving parts after cleaning is a good idea.
Why do my blades get dull so fast?
The most common reason is a lack of lubrication, which causes heat and friction that softens and rolls the cutting edge. The second reason is cutting dirty material, sandy soil, gritty bark, or hair with product buildup acts as an abrasive. Regular cleaning and oiling are the best ways of maintaining sharp blades.
What’s the best way to dispose of used trimmer oil?
Don’t pour it down the drain. Soak it up with a paper towel or rag and dispose of it in your regular household trash. For larger amounts, check with your local recycling center for hazardous waste disposal. Many auto parts stores also accept used oil.
Can I sharpen my own trimmer blades?
Yes, for simple straight blades like on many hedge trimmers, you can use a flat file. For the curved, precision blades of hair clippers, it’s a job for a professional sharpening service or a replacement blade. The cost of ruining a blade set is higher than the sharpening fee.
The Bottom Line
Cleaning trimmer blades isn’t about making them look new. It’s about removing the abrasive contaminants that wear down the edge and ensuring the metal is protected against friction and rust. The sequence is simple: disconnect power, brush off debris, clean with the correct solvent, dry completely, and lubricate with purpose-made oil. Do this regularly, and your trimmer will cut better, last longer, and be safer to use every single time. The five minutes you spend after each job saves you fifty dollars on a premature replacement. That’s a trade worth making.