
How Do You Drill a Hole in a Seashell Without Cracking It
This post contains affiliate links. As an Amazon Associate, we earn from qualifying purchases.
To drill a hole in a seashell without cracking it, match three things: a slow-speed drill (manual pin vise or variable-speed rotary tool), a diamond-coated or carbide-tipped drill bit, and constant water lubrication. The bit material is non-negotiable for anything harder than a pearl; the included drills in a Pearl Drilling Vise are for soft materials only. Water prevents the friction heat that turns a shell into a pile of shards.
That bit-material clause is where most first attempts fail. A shell isn’t uniform material. Its hardness varies from the chalky inner layer to the glossy, dense outer surface. A bit that can handle the outer layer will grab and shatter the inner one if you don’t control pressure and speed.
What follows: the manual vs. Power tool trade-off, the exact setup for water cooling, and the one step everyone skips that guarantees a split shell. You will also know which common household item works as a vise and why you should never use a standard twist drill bit.
Key Takeaways
- A diamond-coated or carbide-tipped drill bit is mandatory for all but the softest shells. Standard metal bits will grab and crack the material.
- Water lubrication is not optional. It cools the bit, reduces dust, and prevents the thermal shock that causes shells to fracture. A wet sponge in a dish works.
- Use a pilot hole on fragile or curved shells. Start with a bit half your target diameter to create a guide that prevents the main bit from skating.
- A manual Pin Vise offers total control for small, delicate shells but takes time. A variable-speed Dremel is faster but requires a steadier hand.
- Secure the shell absolutely. Any movement during drilling transfers lateral force into the shell wall. That force cracks it.
The Three Things That Decide a Crack vs. A Clean Hole
You can have the steadiest hand in the world. If you mismatch the tool, the bit, or the cooling, the shell will give way. This process is about matching three physical properties of the shell to three specs on your equipment.
Drilling a seashell requires a drill bit harder than the shell’s composite calcium carbonate structure. Diamond (10 on the Mohs scale) and carbide cut by abrasion, not grabbing. A standard high-speed steel twist bit (Mohs ~6.5) will catch on the shell’s crystalline matrix and lever it apart.
First, the drill. You have two real choices for clean work: a manual Pin Vise Hand Drill or a variable-speed rotary tool like a Dremel. A standard power drill is overkill. Its high RPM and torque are for wood and metal, not brittle composite.
The Pin Vise is all control. You turn the bit by hand, so the speed is inherently slow. There’s no chance of overheating from friction if you’re patient. The trade-off is time and arm fatigue. Drilling through a thick whelk shell with a Pin Vise is a twenty-minute commitment. For small scallops or jingle shells, it’s perfect.
A Dremel wins on speed and consistency. Set it to its lowest speed setting—usually between 5,000 and 10,000 RPM. You need the variable speed trigger. A single-speed rotary tool runs too hot. The Dremel’s collet system also holds bits more precisely than a drill chuck, which minimizes wobble.
Second, the bit. This is the single biggest point of failure.
The Pearl Drilling Vise instructions state its included pearl drills are “suitable for pearls and other soft materials only.” For harder materials, you need a diamond drill. A pearl drill is a specific, gentle tool for a specific soft material. A common seashell is not a pearl.
For almost all shells, you need a diamond-coated bit or a solid carbide-tipped bit. These cut by grinding, not by shearing. They don’t have sharp flutes that can grab and torque the shell. A set of diamond-coated bits from 1mm to 3mm covers every jewelry and craft need.
Third, lubrication. Water does two critical jobs. It keeps the bit and shell cool, preventing thermal expansion cracks. It also turns the shell dust into a slurry, which is then flushed out. This keeps the hole clear and stops the bit from binding.
| Component | Wrong Choice | Right Choice | Why It Matters |
|---|---|---|---|
| Drill Type | Standard cordless drill | Pin Vise or Variable-Speed Dremel | High RPM causes instant heat cracks; low speed grinds without shock. |
| Drill Bit | High-speed steel twist bit | Diamond-coated or carbide-tipped bit | Steel grabs and levers; diamond grinds the calcium carbonate without catching. |
| Lubrication | Dry drilling | Constant water drip or submerged sponge | Friction heat exceeds the shell’s thermal tolerance in under 10 seconds. |
| Work Holding | Hand-held shell | Shell secured in vise or clamped to a block | Lateral movement turns the bit into a pry bar. The shell cracks at the hole edge. |
The table defines the difference between a usable drilled shell and a bag of fragments.
Manual vs. Power: Picking Your Tool for the Shell
Your shell’s size and thickness pick the tool for you. This is a mechanical limit.
For shells under 2 inches and relatively thin—like scallops, jingle shells, or small cowries—the Pin Vise is the safe bet. The manual operation eliminates the risk of over-speed. One user noted their Pin Vise came with a range of bits, “the tiniest drill bit about the size of a sewing needle.” That precision is ideal for delicate work.
The process is slow. You place your palm on the top of the vise and apply slight pressure while turning the handle with your other hand. You’ll feel the bit grind. If you feel it catch, you’re pushing too hard. Let the bit do the work.
For larger, thicker shells like whelks, conchs, or thick clam shells, you need the torque and speed of a Dremel. A Pin Vise will take forever and likely stall. The Dremel’s higher RPM, when paired with a diamond bit and water, will grind through efficiently.
Common mistake: Using a power drill on a small, delicate shell. The weight and power are too much. The shell will either skate across the work surface or fracture from vibration before the bit even bites.
The Dremel also wins for capiz shells. These are specifically mentioned as requiring a diamond or carbide-tipped bit in a drill. Their flat, plate-like structure is fragile. The Dremel’s precision and light weight let you drill at a perfect 90-degree angle with minimal downward pressure.
The Non-Negotiable Setup: Water, Vise, and Tape
You have the right tool and bit. Now you need the setup that makes the hole possible. Skip any one of these three, and you’re gambling with every shell.
Water Lubrication. This isn’t a damp cloth. You need active cooling at the drilling point. For a Dremel, the safest method is to place the shell on a wet sponge resting in a shallow dish of water. The sponge cushions the shell and the water wicks up to the drilling site. You can also use a small drip bottle aimed at the hole.
For a Pin Vise, some argue water isn’t needed because speed is so low. The consensus from gemstone drilling is clear: water lubrication is “very highly recommended” for shells. It reduces dust and guarantees no heat buildup. Use the sponge method or simply dip the shell in water every few seconds.
Secure Holding. Your hand is not a vise. Even slight movement translates into lateral force on the shell wall. You have options: * A bench vise padded with soft cloth or rubber. * A handheld clamp securing the shell to a block of wood. * The Pearl Drilling Vise, if your shell fits its jaws. * A modeling clay bed pressed around the shell’s base on a non-slip mat.
The goal is zero movement in any direction but the drill’s axis.
Tape the Spot. Place a small piece of painter’s tape or masking tape over your marked drill point. This serves two proven purposes. It gives the drill bit a slightly grippier surface to start on, preventing the “skate.” It also can help contain minor splintering on the surface layer of the shell. Mark your hole center on the tape with a fine-point pen.
Step-by-Step: Drilling Without a Crack
 Follow this sequence exactly. Changing the order introduces variables that crack shells.
- Clean and Dry Your Shell. Ensure no organic matter is inside. A hollow, clean shell drills cleanly. A shell with sand or debris inside can vibrate differently and crack.
- Mark and Tape. Mark your desired hole location with a pen. Apply a small square of painter’s tape over the mark. Re-mark the dot on the tape.
- Secure the Shell. Place the shell in your chosen vise or clamp. Tighten it enough that it cannot wiggle, but not so much that it deforms or crushes. For a very irregular shell, embed it in a bed of modeling clay on a stable surface.
- Set Up Lubrication. Position your wet sponge and dish or have your drip bottle ready. The water must be present before you start drilling.
- Start with a Pilot Hole (For Fragile or Curved Shells). If you’re drilling a delicate shell like a capiz or a highly curved surface, start with a bit half the diameter of your final hole. Drill slowly just until the bit penetrates the outer layer. This creates a guide that prevents the larger bit from wandering.
- Drill with the Final Bit. Install your diamond or carbide bit. Position the tool at a 90-degree angle to the shell surface. Start at the slowest speed. Apply gentle, steady pressure. Let the bit grind; do not force it.
- Use Bursts and Clear Debris. Drill for 2-3 seconds, then lift the bit to let water flood in and clear the slurry. This keeps the hole clean and the bit cool. Continue in these short bursts.
- Ease Off at the Break-Through. You’ll feel a slight drop in resistance as the bit is about to exit the other side. Reduce pressure significantly for the last millimeter. A heavy hand here will blow out a chip on the exit side.
- Clean Up. Remove the shell from the vise. Rinse it to remove any drilling slurry. Peel off the tape. You now have a clean, round hole.
Where this goes sideways: Skipping the pilot hole on a curved surface. The drill bit will skate along the curve, marring the shell and often slipping off entirely, which can slam the bit into your finger or crack the shell from the sudden impact.
Bit Selection Deep Dive: When Diamond is the Only Answer
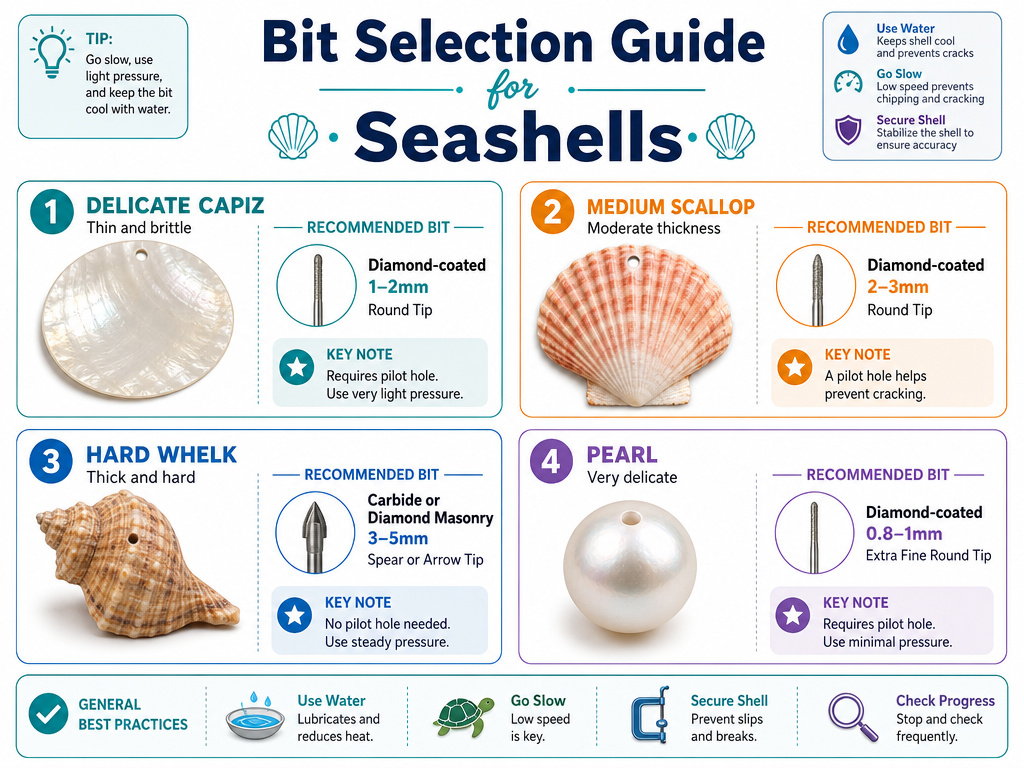 Not all “hard” bits are the same. Understanding the difference between a tungsten carbide bit and a diamond-coated bit saves you money and shells.
Diamond-coated bits have microscopic diamond particles bonded to a steel shank. They are consumable. The coating wears away over time, especially if used dry. They excel on hard, brittle materials like glass, ceramic, and seashells. They are the default choice for a reason.
Solid Carbide-tipped bits are more durable and can be re-sharpened, but they are also more expensive. They are excellent for production work where you’re drilling hundreds of shells. For a hobbyist, diamond-coated is more cost-effective.
Pearl Drills are a specific class of tool. As the Pearl Drilling Vise instructions specify, they are for soft materials. They are made of tungsten vanadium steel and have a very specific geometry to drill pearls without cracking them. Using one on a hard clam shell is a guaranteed failure.
What about a standard masonry bit? Don’t. Masonry bits are designed for hammering action. Their carbide tip is shaped for impact, not precision grinding. They will shatter a shell.
| Shell Type | Recommended Bit | Alternative | Notes |
|---|---|---|---|
| Delicate (Capiz) | Diamond-coated, 1-2mm | Carbide-tipped | Must use pilot hole technique. |
| Medium (Scallop) | Diamond-coated, 1.5-3mm | Carbide-tipped | Pin Vise works well here. |
| Hard/Thick (Whelk) | Diamond-coated, 2.5-4mm | Carbide-tipped | Requires power tool (Dremel) and constant water flow. |
| Pearl | Tungsten Vanadium Pearl Drill | N/A | Use only with dedicated Pearl Drilling Vise and pearl lube. |
Troubleshooting: Cracks, Chips, and Stuck Bits
You followed the steps and still heard that sickening pop. Here’s what likely went wrong and how to fix it next time.
The shell cracked radially from the hole.
- Cause: Too much downward pressure, especially with a power tool. The shell flexed and fractured.
- Fix: Use lighter pressure. Let the bit grind. Secure the shell better to absorb the force.
The exit side chipped out a large piece.
- Cause: You didn’t reduce pressure as the bit broke through. The bit acted like a punch.
- Fix: The moment you feel resistance drop, ease up. Drill the last millimeter with the weight of the tool alone.
The bit gets stuck and won’t turn.
- Cause: Debris has packed into the hole, or the bit is overheating and binding in the shell material.
- Fix: Stop immediately. Do not force it. Lift the tool out, clear the slurry with water and a pin, and ensure lubrication is flowing. Resume with shorter drilling bursts.
The drill bit skates and won’t start the hole.
- Cause: The shell surface is too smooth or curved, or you’re not starting at a 90-degree angle.
- Fix: Use the tape trick. For severe curves, create a small flat spot with a fine file or start with a pilot hole. Double-check your drill’s angle.
The shell smells burnt and the hole is discolored.
- Cause: Drilling dry or with insufficient water. The friction heat carbonizes the organic matrix in the shell.
- Fix: This shell is likely weakened. For the next one, ensure water is actively cooling the bit at the point of contact.
Frequently Asked Questions
Can I use a regular drill bit on a seashell?
No. Standard high-speed steel or even cobalt twist bits are designed for metal and wood. Their sharp cutting edges will catch on the shell’s crystalline structure and lever it apart, causing a crack. You must use a bit that cuts by abrasion, like a diamond-coated or carbide-tipped bit.
Do I have to use water when drilling shells?
For any power drilling, yes. Water prevents the friction heat that causes thermal shock and cracking. For manual drilling with a Pin Vise, water is still highly recommended to reduce dust and guarantee no heat buildup, though the risk is lower due to the slow speed.
What’s the best tool for a beginner?
Manual Pin Vise Hand Drill. It’s inexpensive, nearly impossible to over-speed, and teaches you the feel of drilling brittle material without the risk of instantly destroying shells. Practice on some thick, less-prized shells first to get the pressure right.
How do I drill a hole in a capiz shell?
Capiz shells are flat and exceptionally fragile. Use a variable-speed Dremel with a 1mm diamond-coated bit. Secure the shell on a wet sponge. Apply a piece of tape over your mark. Start with a very light touch at the lowest speed, using a constant drip of water. A pilot hole is strongly advised.
Can I enlarge an existing hole in a seashell?
Yes, but proceed with extreme caution. Use a diamond-coated bit only slightly larger than the existing hole. Secure the shell perfectly. Drill at slow speed with plenty of water, and apply almost no pressure—let the bit’s sides grind the material away. Any side pressure will crack the shell from the inside out.
Before You Go
Drilling seashells is a test of patience, not force. The shell will win every argument you try to have with it through speed or pressure. Your job is to give the right tool—a grinding bit, a slow speed, and a constant trickle of water—the chance to do its work without interference.
Remember the hierarchy: securing the shell comes first, then cooling, then the drill bit’s contact. If you feel yourself pushing, stop. Lift the bit, let the water flow, and start again with a lighter touch. That pause is what stands between you and a usable shell versus a memory of a cracking sound.
For most hobbyists working on jewelry or small crafts, the combo of a Pin Vise and a set of 1mm-3mm diamond-coated bits is the practical starting point. It’s quiet, controlled, and almost foolproof with a little practice. Save the power tool for the thick, sturdy shells that would otherwise test your endurance.
