
How Deep Should You Drill a Maple Tap? Essential Depth Guide
This post contains affiliate links. As an Amazon Associate, we earn from qualifying purchases.
To drill a maple tap, aim for a depth of 1.5 to 2 inches into the sapwood (including bark) when using modern 5/16-inch spouts and a vacuum collection system. Drilling deeper than 2.5 inches creates a larger wound, hits less conductive wood, and can reduce your long-term sap yield by creating stained, non-conductive wood that future taps will hit.
That number is the result of years of field research that measured exactly where the sap is and what happens to the tree when you drill past it. The old 3-inch rule from the bucket-and-gravity era is obsolete for anyone using today’s tools.
What follows is the drill-and-data version: why the 2-inch ceiling exists, how to hit it every time, and the single visual cue that tells you if you’ve drilled into dead wood.
Key Takeaways
- For modern 5/16″ systems under vacuum, 1.5 to 2 inches deep is the operational sweet spot. Drilling to 3 inches cuts into wood that transports less sap and creates a larger wound.
- The shavings tell the story. Creamy white shavings mean you’re in healthy, conductive sapwood. Dark brown or grey shavings mean you’ve hit stained, non-conductive wood from an old wound, and that tap will produce little to no sap.
- Use a sharp, dedicated maple tapping bit. A standard twist bit can burnish the hole, trap shavings, and promote bacterial growth that shuts down sap flow within days.
- Drill straight and once. Wobbling creates an oval hole that leaks vacuum. Re-drilling a hole smears wood fibers and drastically reduces sap yield.
- Tree size dictates tap count. A 10-12 inch diameter tree gets one tap. A 20-inch tree can handle two. Never put more than three taps in a single tree, regardless of its size.
The 2-Inch Rule: Why Depth Matters More Than You Think
Head into any old sugaring handbook from the 1960s and you’ll find a recommendation to drill 3 inches deep. That was the standard for 7/16-inch spouts on gravity buckets. The thinking was simple: deeper hole, more sap. For a system relying solely on natural pressure, that logic held a certain weight.
Modern tubing and vacuum systems changed the equation entirely. A pump pulling 20-24 inches of mercury (Hg) of vacuum can pull sap laterally through the wood. The research from the UVM Proctor Maple Research Center shows that under high vacuum, sap yield increases with depth up to about 2.5 inches, but then the negatives start to outweigh the gains.
Drilling a taphole is a controlled injury to the tree. The tree responds by creating a column of stained, non-conductive wood around the wound. The volume of this dead zone is directly proportional to the size of the wound—a deeper hole creates a larger cylinder of wood the tree can never use for sap transport again.
The 2006 North American Maple Syrup Producers Manual codified this shift, recommending tapholes extend no more than 2 inches into the wood (excluding bark) and be as shallow as practicable. This isn’t about being gentle; it’s about sustainability. A shallower wound means the tree compartmentalizes a smaller area. New growth can more quickly bury that wound, allowing you to tap in the same general area years sooner without hitting the stained wood.
The short version: Deeper drilling is destructive. Your goal is to intersect the active sapwood, not the heartwood.
5/16″ vs. 7/16″: How Spout Size Changes Your Drill Depth
Your spout size is the first variable. It dictates your drill bit size, which in turn sets the physical limits of your taphole.
| Spout Type | Drill Bit Size | Historical Depth (Gravity) | Modern Depth (Vacuum Recommended) | Primary Use Case |
|---|---|---|---|---|
| Traditional | 7/16-inch | 2 – 2.5 inches | Not recommended for new vacuum systems | Legacy bucket systems, very low-pressure gravity lines. |
| Modern Standard | 5/16-inch | N/A | 1.5 – 2 inches | All modern tubing systems, especially with vacuum. |
| Health Spout | 19/64-inch | N/A | 1.5 – 2 inches | Systems using check-valve spouts to prevent backflow. |
The move from 7/16″ to 5/16″ wasn’t just about smaller hardware. The smaller hole causes less wounding, and the tighter fit with a 5/16″ spout maintains better vacuum seal. If you’re setting up a new operation, the 5/16″ system is the default. The correct drill bit for a 5/16 tap is therefore your most important bit purchase.
How to Drill the Perfect Tap Hole (Every Single Time)
You have one shot per hole. The difference between a round, clean hole and an oval, ragged one can be 30% of your potential sap from that tap. The procedure is straightforward, but the details are everything.
Before you start: Wear eye protection. Wood shavings will fly. Ensure your drill battery is charged or you have a secure extension cord. Drilling halfway and stopping to power up ruins the hole.
- Mark Your Drill Bit. This is the non-negotiable first step. Wrap a tight band of electrical tape or use a commercial depth stop at 1.5 inches and again at 2 inches from the tip of your maple tapping bit. This gives you a visual ceiling and a target.
- Find Your Spot. Choose a spot on the tree at a comfortable height, between 2 and 4 feet off the ground. Ensure it’s at least 6 inches away from any old taphole (side-to-side) and 2 feet above or below an old hole. The bark should look healthy.
- Set Your Stance and Angle. Plant your feet firmly. Hold the drill with both hands. Angle the drill slightly upward (about 5 degrees). This helps sap drain when the season ends, keeping the hole drier and less prone to decay.
- Drill in One Smooth Motion. Pull the trigger and apply steady, firm pressure. Drill straight in until your depth stop hits the bark, then immediately pull straight out. Do not wiggle. Do not “ream” the hole by going in and out. One continuous motion.
- Inspect the Shavings. This is your quality control. The shavings should come out in a continuous curl and be a creamy white or pale tan color. If they are dark brown or grey, you’ve drilled into stained wood.
Where this goes sideways: Wobbling the drill or re-drilling. An oval hole won’t seal tightly around the spout. You’ll lose vacuum pressure across your entire line, and that tap will suck air instead of sap. The leak is often silent but devastating to your yield.
The Tools You Actually Need (Not the Marketing List)
You can use a standard cordless drill, but the right bit is what separates a working tap from a dud. A dedicated maple tapping bit has a sharper, more aggressive flute design that pulls shavings out cleanly. A standard twist bit tends to pack shavings into the hole, which you then have to dig out, damaging the walls.
Your kit should have: * A cordless drill (18V or 20V Max is ideal for all-day tapping). * A genuine 5/16″ maple tapping bit (brands like Zephyr or Leader are standard). * A depth stop or electrical tape. * A small, clean nail or piece of wire to clear any stray shavings if necessary. * A light plastic or rubber mallet for setting spouts—never a metal hammer.
For drilling into other tricky materials, like the soft alloys often found in old sap collection hardware, the principles of sharp bits and clean holes still apply, which you can read about in our guide on drilling soft metal.
Diagnosing a Bad Tap Hole Before You Hang a Bucket
The shavings are your first and best diagnostic tool. Their color and condition tell you exactly what you’ve hit inside the tree. Ignoring this is how you end up with a line of taps that look perfect but produce nothing.
| Shaving Color & Condition | What It Means | Sap Yield Prognosis | What To Do |
|---|---|---|---|
| Creamy White, Long Curls | Healthy, conductive sapwood. Ideal. | Excellent. | Proceed. Install spout. |
| Light Tan, Short Chips | Possibly drier sapwood or edge of conductive zone. | Good to Fair. | Proceed. Yield may be slightly lower. |
| 50% White, 50% Dark Brown/Grey | You’ve drilled into the edge of an old stained wood column. | Poor. Significantly reduced flow. | Judgment call. For a hobbyist, use it. For production, consider a new hole 6+ inches away. |
| Mostly Dark Brown/Grey | Solid stained, non-conductive wood. | Very Poor to None. | Do not use this hole. The tree cannot transport sap through this wood. Drill a new hole in a different location. |
| Black, Gritty, Smells Burnt | Dull drill bit burning the wood. | Poor. Burnished wood fibers will block flow. | Sharpen or replace your bit. Drill a new hole. |
This table comes directly from the peer-reviewed maple tap depth findings which proved tapholes drilled into stained wood produce “significantly less sap.” If you get dark shavings, it’s not just a bad spot—it’s a window into the tree’s injury history. Forcing a spout in anyway wastes a season on that tap.
This is also why knowing your drill bit size and keeping it sharp is critical. A dull bit requires more pressure, heats up, and smears the wood cells shut. It creates the same flow problem as hitting dead wood.
Tree Size, Tap Spacing, and Long-Term Sap Health
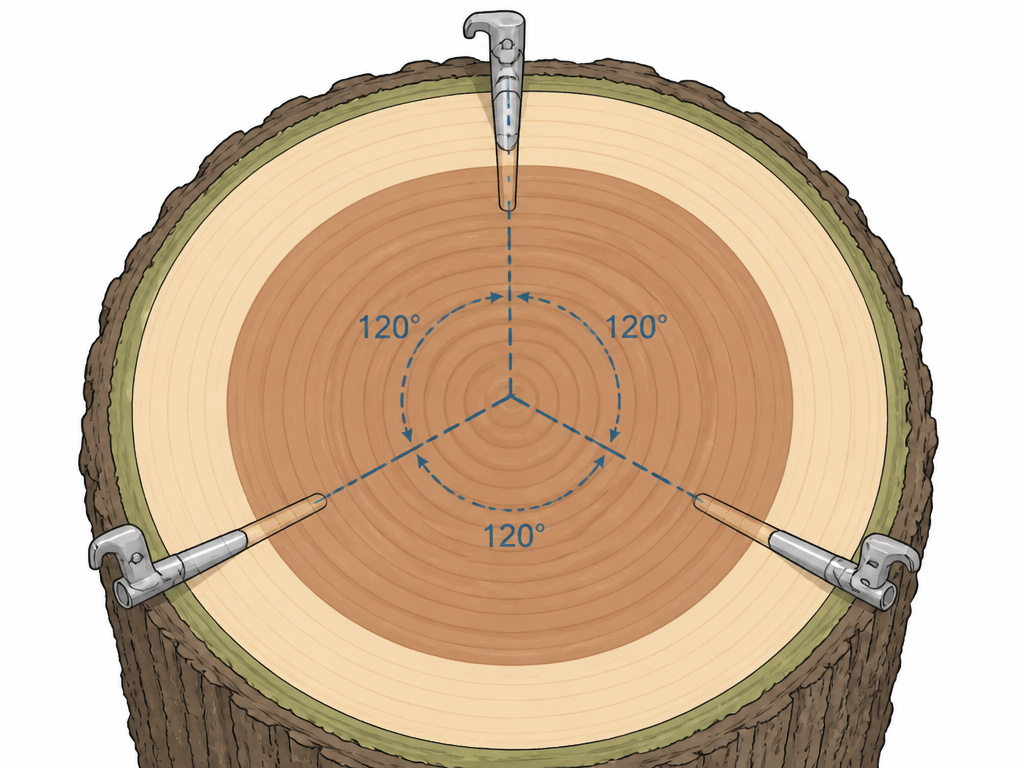
Drilling the right depth is useless if you’ve tapped a tree that’s too small or too crowded. Overtapping is the fastest way to turn a healthy sugarbush into a collection of stressed, low-yielding trees. The guidelines are simple and exist for a mechanical reason: a tree only has so much conductive sapwood to go around.
- 10-12 inches in diameter: One tap. This is the absolute minimum.
- 18-20 inches in diameter: Two taps.
- Over 25 inches in diameter: Three taps maximum.
Space your taps around the tree’s circumference. If you’re putting in two taps, place them on opposite sides of the tree. For three, space them roughly 120 degrees apart. Always go up and down the trunk, not in a straight line. This spreads the wound load and gives each tap access to its own vascular territory.
The part nobody mentions: A tree’s diameter isn’t just about circumference. It’s a proxy for sapwood volume. A 12-inch tree has been shown in studies to maintain about 90% functional wood after tapping. Go smaller, and that percentage drops fast. You’re not just taking sap; you’re compromising the engine that makes it.
This concept of managing wood integrity is similar to the precision required when selecting a tap drill for metal threading—the right size preserves the material’s strength for the fastener. In a tree, the right tap count preserves the living tissue for future seasons.
Frequently Asked Questions
Can I drill a maple tap too shallow?
Yes, but it’s a less common mistake than drilling too deep. The UVM Proctor study found suboptimal sap yields at depths of 1.25 inches or less under vacuum. The spout needs enough wood to grip securely, and you need to be deep enough to intersect a good number of active sap vessels. Staying between 1.5 and 2 inches avoids both pitfalls.
What happens if I hit an old tap hole?
You’ll know immediately. The shavings will be dark. The old hole is filled with non-conductive stained wood. Sap will not flow through it. Pull the bit out, and drill a new hole following the spacing rules: at least 6 inches to the side and 2 feet above or below the old one. This is detailed in the USDA GTR-NE-47 report on tree wound response.
Is a cordless drill powerful enough for tapping?
Absolutely. A modern 18V or 20V Max cordless drill is the preferred tool for most producers. It’s lightweight, maneuverable, and avoids tangled cords. The key is using a sharp bit and a fully charged battery. Lithium-ion batteries perform much better in cold weather than older NiCad models.
Why do some people still drill 3 inches deep?
It’s legacy knowledge from the gravity/bucket era, often passed down through generations. For a system without vacuum, a deeper hole provided access to more sap vessels. It also allowed for a longer spout to better support a heavy bucket. For any system using tubing and especially vacuum, it’s an outdated practice that harms the tree’s long-term productivity.
How many times can I tap the same tree?
Healthy, well-managed sugar maple can be tapped every year for well over a century. The sustainability comes from correct depth, spacing, and tree health. The official maple syrup production manual provides the framework for this. It’s not the act of tapping that kills trees; it’s poor tapping practices like excessive depth, overcrowding, and using dirty equipment.
Before You Go
The right tap depth is 1.5 to 2 inches for a 5/16-inch system.Drill straight, drill once, and let the color of the shavings be your guide. White is right; dark means start over.
This rule exists because drilling into a tree is a trade. You’re asking for sap in exchange for a wound. The research is clear: a shallower, cleaner wound heals faster and leaves more working wood for next year. A deep, ragged hole takes more than it gives. Your drill, your bit, and your technique are how you manage that deal. Get it right, and the tree will keep giving for decades.
