How to Edge a Lawn Without an Edger: 3 Proven DIY Methods
This post contains affiliate links. As an Amazon Associate, we earn from qualifying purchases.
You can edge a lawn without a dedicated edger by using one of three common tools: a string trimmer held vertically, a flat-head shovel or half-moon edger to cut a trench, or manual edging shears for precision work. The process requires marking your line first, cutting to a consistent depth of about two inches, and cleaning up the debris afterward. It’s more about technique and patience than having a specialized machine.
Most people grab their string trimmer, hold it like they’re trimming weeds, and end up with a wavy, shredded mess that looks worse than when they started. They skip the marking step, cut too deep or too shallow, and leave a pile of dirt that gets tracked back onto the lawn or sidewalk.
This guide walks you through the three most effective methods, the exact tools you need for each, and the mistakes that will ruin your curb appeal if you’re not careful. We’ll cover the string trimmer flip, the shovel stomp, and the shear method for tight spots.
Key Takeaways
- Always mow first and mark your line with a hose or string. Skipping this guarantees an uneven, amateurish edge you’ll regret every time you look at it.
- A string trimmer must be held at a perfect 90-degree angle with the cutting head rotated. If the guard is facing the ground, you’re trimming, not edging.
- Cutting deeper than two inches with a shovel compacts soil against the grass roots and risks hitting buried utility lines or sprinkler heads.
- Clean up all soil and debris immediately after edging. Leftover dirt kills the grass it covers and gets walked onto hardscapes, leaving stains.
- Manual shears are for refining and maintenance, not for cutting a new edge through established turf. Using them for the latter is a fast track to blisters and frustration.
What Do You Need to Edge Without an Edger?
You likely own at least one of the three core tools already. The right choice depends on whether you’re establishing a new edge, maintaining an existing one, or working around delicate landscaping.
A string trimmer is the fastest option for maintenance, but it requires a specific model with enough power to handle vertical edging. A lightweight, cordless model like the Ryobi 40V or a gas-powered Stihl FSA 57 works. You’ll need the correct trimmer line diameter, usually 0.080 to 0.095-inch for these tasks, and a fully charged battery or fresh fuel mix.
For cutting a new edge or redefining a badly overgrown one, a sharp, flat-head shovel or a dedicated half-moon edger is non-negotiable. The flat-head shovel is a multitasker you probably have. The half-moon edger, a hand tool with a curved, sharpened blade, requires more upper-body strength but gives a cleaner, more vertical cut. Don’t use a rounded spade; it tears the turf instead of slicing it.
Manual edging shears, the kind with long handles and a footplate, are your finishers. They’re for cleaning up ragged bits the trimmer missed or for working in tight curves around tree roots and flower beds where a power tool is too clumsy.
The most critical specification for edging with a string trimmer is the line diameter. A 0.095-inch line on a 40V trimmer provides the necessary mass to maintain rotation speed when held vertically against thick grass, preventing bog-down and delivering a cleaner cut than lighter 0.065-inch lines.
Beyond the cutter, you need marking tools. A garden hose is perfect for laying out curves. For straight lines, use two wooden stakes and a taut mason’s line.
Have a leaf rake or a stiff garden broom ready for cleanup. And this is not optional: wear safety glasses and sturdy gloves. Trimmer line throws debris, and shovel handles can blister bare hands in minutes.
How Do You Edge with a String Trimmer?
This is the most common method and the one most people do wrong. You’re not trimming; you’re using the tool in an entirely different orientation.
Before you start: The trimmer head spins at over 7,000 RPM and will throw stones, mulch, and debris with enough force to break glass or cause injury. Always wear wrap-around safety glasses, long pants, and closed-toe shoes. Clear the area of loose rocks and sticks.
First, mow your lawn. This gives you a clear view of the grass line and ensures your edge won’t be hidden by long blades. Next, mark your edge.
For a sidewalk or driveway, you can often use the concrete itself as a guide. For a bed border, lay a garden hose in the shape you want. View the hose line from a second-story window or the street, it’s easier to spot awkward curves from a distance.
Now, the crucial maneuver. You must rotate the entire trimmer so the cutting head is vertical. On most models, this means the motor will be horizontal, and the guard will be facing forward, not down.
The trimmer line should be perpendicular to the ground. If your trimmer’s head spins clockwise, work from right to left. This throws debris away from you and the lawn, into the bed or onto the driveway for easier cleanup.
Engage the trigger and lower the spinning line onto your mark. Don’t force it. Let the tool’s weight and the line’s speed do the cutting. Walk sideways, maintaining a steady pace. A slow, consistent creep gives a cleaner line than stop-start jabs.
I burned out the motor on a mid-range corded trimmer the first season I tried edging my long driveway. I was forcing it, holding it at an angle, and working against the rotation direction. The motor overheated and seized after 20 minutes. Now I use a Stihl FSA 57 gas model for big jobs, let the tool do the work, and it handles 100 feet of edging without a hiccup.
If the line seems to be “bouncing” off the turf or not cutting cleanly, you’re likely going too fast, or your line is too worn. Extend fresh line. The goal is a crisp, one-pass cut. Going over the same spot multiple times creates a ragged, chewed-up edge.
After completing a section, rake the cuttings and dirt away immediately. This reveals your work and prevents the debris from smothering the grass or being walked back onto your clean edge. For a deeper look at the technique, our guide on string trimmer edging covers handling angles and pacing in detail.
| Problem | Likely Cause | Fix |
|---|---|---|
| Wavy, uneven edge | No guide line; relying on freehand | Always mark with a hose or string before starting. |
| Torn, ragged grass | Dull trimmer line or moving too fast | Extend fresh 0.095-inch line and slow your walking pace. |
| Debris sprayed on lawn | Trimmer held at wrong angle or wrong rotation dir | Rotate tool so guard faces forward; work right-to-left for clockwise head. |
| Tool bogs down or stalls | Cutting too deep, forcing tool, or weak battery | Let tool weight cut; maintain 1/2-inch depth; ensure battery is charged. |
How Do You Cut a Lawn Edge with a Shovel?
When you need to establish a brand-new border or reset one that’s completely grown over, the shovel method is the most permanent solution. It’s physical work, but the results last for years with minimal upkeep.
Start with the same prep: mow and mark your line. A shovel demands a more visible guide. For straight lines, use landscaping spray paint or a string line. For curves, a garden hose you don’t mind nicking is perfect.
Use a sharp, flat-head shovel. Stand with the line between your feet. Position the shovel’s blade vertically, with its back against the lawn side and the cutting edge right on your mark.
Use your foot to drive the blade straight down into the soil. Aim for a depth of two inches. That’s deep enough to sever grass roots and create a clear barrier, but shallow enough to avoid major roots, sprinkler lines, and buried utilities. Call 811 before you dig any new trench.
Never cut an edge deeper than five inches with a shovel. Beyond that depth, you compact the soil wall against the grass roots, restricting oxygen and water. The grass along your beautiful new edge will turn brown and thin out within three weeks, undermining the whole point.
With the blade buried, push the handle forward, toward the flower bed or away from the lawn. This pries out a wedge of soil and turf. Lift the shovel out, move forward about six inches, and repeat. Overlap your cuts slightly. This creates a continuous, smooth trench.
The soil and grass wedge you remove is your “edge berm.” You have two choices: flip it into the bed as compost (grass side down), or discard it. If you flip it, make sure the grass is completely buried, or it will reroot. The finished trench should have a clean, vertical wall on the lawn side and a gentle slope into the bed.
Your arms and lower back will feel this. Work in sections of 10-15 feet, then take a break. Hydrate.
The temptation is to hunch over the shovel. Instead, keep your back straight, use your leg muscles to drive the blade, and let the tool’s leverage do the prying. This is where a dedicated manual grass edger (the half-moon type) is easier on the body, it’s designed specifically for this rocking, slicing motion.
Cleanup is critical. Remove every bit of loose soil from the trench and the lawn. Any dirt left on the grass blades will kill them, leaving a yellow-brown stain that looks like dog damage. Use a leaf rake, then follow with a stiff broom on hardscapes.
When Should You Use Manual Edging Shears?
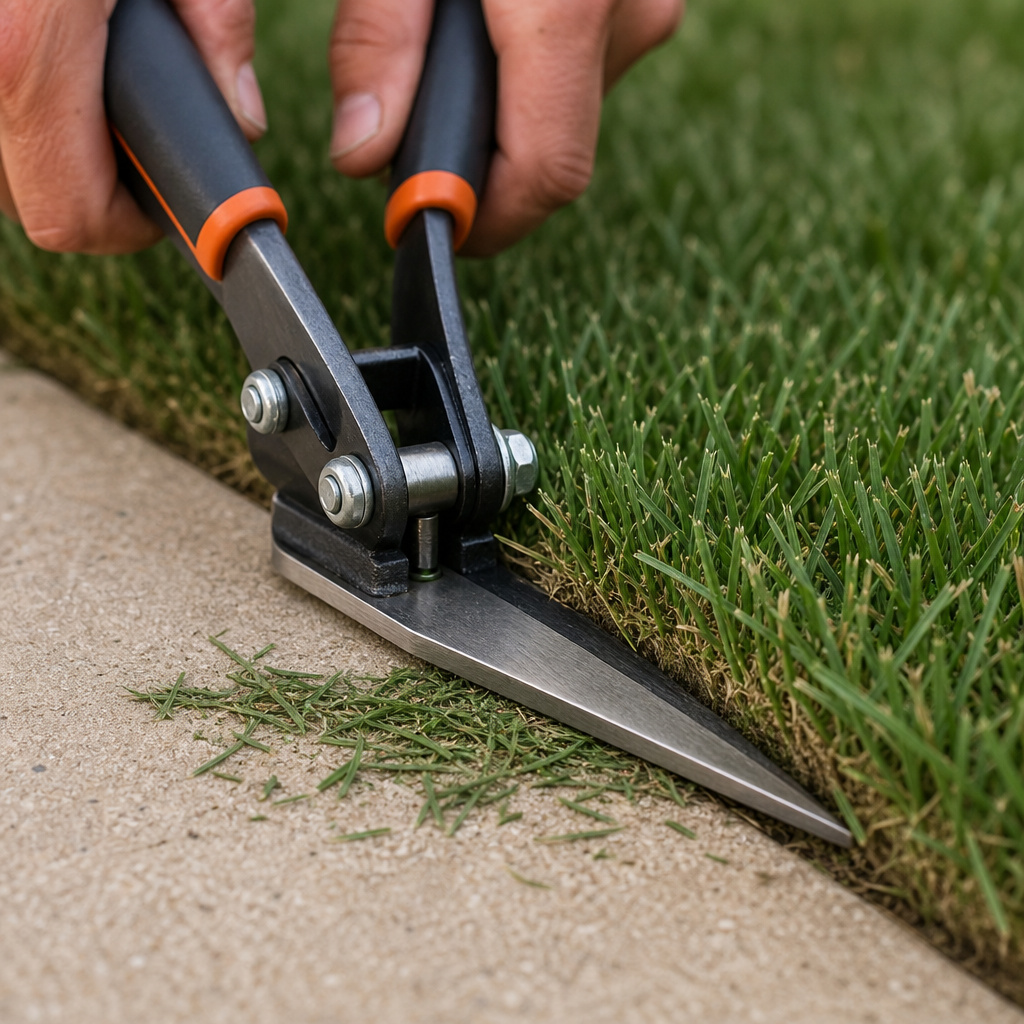
Shears are your surgical instruments. They are not for heavy lifting. Their role is precision and touch-up after the primary tool has done the bulk of the work.
You reach for shears in three specific scenarios:
1. To clean up ragged, uneven spots left by the string trimmer.
2. To redefine a small section of edge without power-tool overkill.
3. To edge in impossibly tight spaces, around the base of a fence post, between pavers, or against delicate shrub stems where a spinning line or shovel would cause collateral damage.
The technique is straightforward but requires patience. Position the shears so the footplate is on the non-lawn side (the bed or sidewalk). The bottom blade slides under the grass edge.
Close the handles with a firm, smooth motion to slice through the turf. It’s a scissor cut, not a tear. Take small bites, no more than an inch or two at a time.
The physical limit here is your hands and forearms. Doing more than 20 linear feet will cause fatigue, and your cuts will become sloppy. That’s the signal to stop. This tool is about finesse, not endurance.
For maintaining a crisp edge, shears are perfect for a monthly “touch-up” between major edging sessions. Simply walk the line and snip any grass runners that have dared to cross into the trench. It takes five minutes and keeps the edge looking sharp with zero noise or fumes.
String Trimmer vs. Shovel vs. Shears: Which Method Wins?
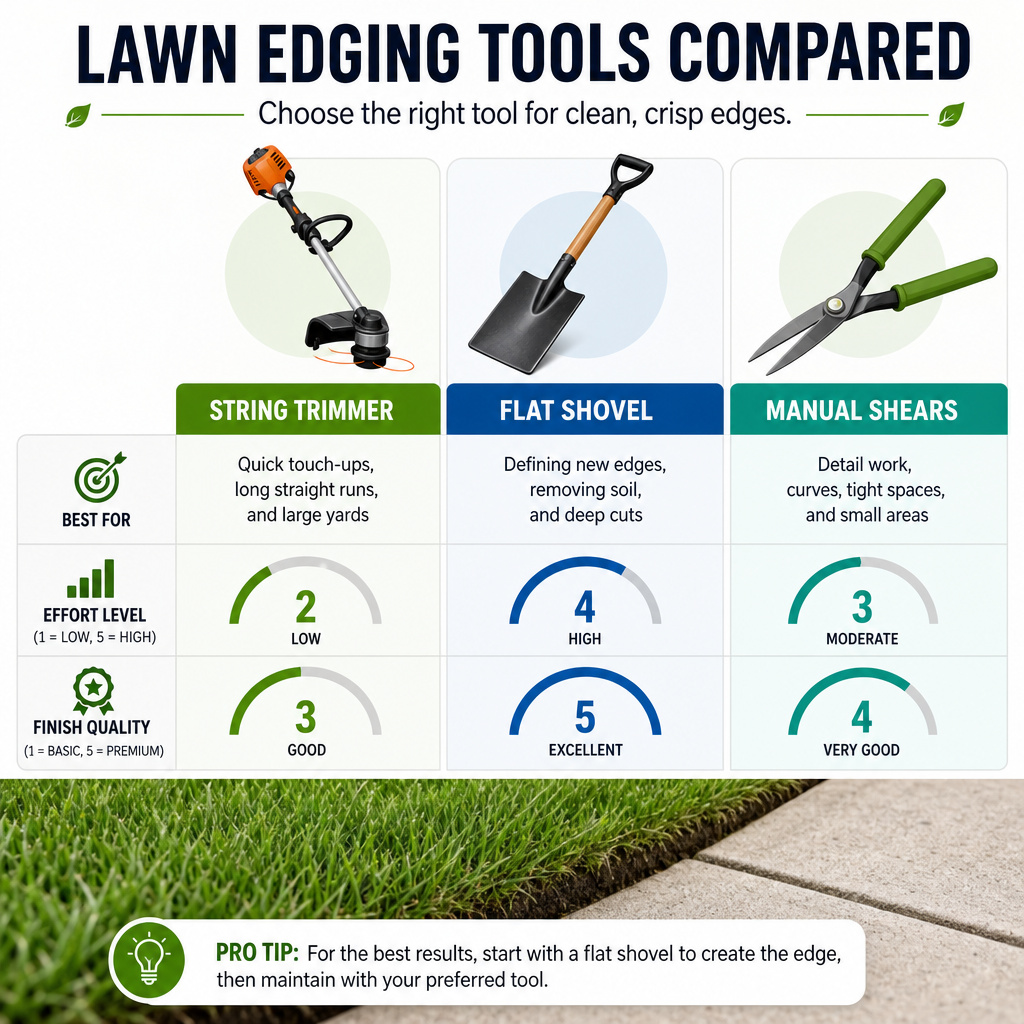
Each tool has a dominant use case. Picking the wrong one turns a simple job into a chore.
| Tool | Best For | Effort Level | Finish Quality | Risk If Misused |
|---|---|---|---|---|
| String Trimmer | Quick maintenance of existing edges. | Low | Good (with skill) | Wavy lines, damaged hardscapes, thrown debris. |
| Shovel | Cutting new edges or resetting old ones. | High | Excellent | Soil compaction, utility strikes, physical strain. |
| Manual Shears | Precision touch-ups and tight spaces. | Medium | Perfect | Blisters, incomplete cuts on thick turf. |
The string trimmer is your weekly or bi-weekly maintenance partner. It’s fast. The shovel is your seasonal renovation tool, used once or twice a year. The shears are your detail finisher, used as needed.
Don’t try to cut a new bed border with a trimmer. You’ll be there all day, and the edge will be shallow and uneven. Conversely, don’t break out the shovel just to tidy up a slightly fuzzy edge, that’s massive overkill. And never, ever try to cut 50 feet of new edge with shears. Your hands will cramp, and you’ll give up with a half-finished, jagged line.
The real pro move is to combine them. Use the shovel to establish a perfect edge in the spring. Maintain it all summer with the string trimmer every other mow.
Use the shears for a quick once-over before a backyard party. This hybrid approach minimizes total effort and maximizes curb appeal. Understanding the edger purpose helps clarify why these alternative methods work: you’re replicating the slicing and trenching function with different mechanics.
Common Mistakes and How to Avoid Them
I’ve made every one of these errors. They’re learning opportunities, but you can skip the pain.
Skipping the “Call 811” Step.
This isn’t a suggestion. It’s free, it’s the law in most places, and it prevents you from severing a gas line, fiber optic cable, or sprinkler system. The mark-out crews use flags and spray paint. Respect the marks. Digging without calling is gambling with your safety and your wallet. The utility locate ticket is good for a limited time, usually 10-14 days, so plan your project accordingly.
Cutting When the Ground is Too Wet or Too Dry.
Edging in mud tears the turf instead of slicing it, creating a ragged, clumpy mess that’s hard to repair. The soil sticks to your tools, tripling the cleanup time. Conversely, edging in bone-dry, hard-packed soil is exhausting and can crack the ground. The sweet spot is a day or two after a good rain, when the soil is moist but not soggy.
Neglecting Tool Maintenance.
A dull shovel or shears requires twice the force and gives half the quality. A trimmer with old, brittle line delivers a pathetic cut. Before you start, sharpen your shovel blade with a file. Inspect your trimmer line for wear and extend fresh line. Lubricate the pivot point on your shears. Twenty minutes of prep makes two hours of work feel effortless.
Forgetting the Cleanup.
An edge isn’t finished until the debris is gone. Leftover soil on the grass smothers it. Clippings on the sidewalk get walked into the house. Always, always rake and sweep immediately after cutting. It’s the difference between a pro job and a hack job.
Frequently Asked Questions
Can I use a regular lawn mower to edge?
No. A lawn mower’s deck and wheel placement prevent it from getting close enough to create a vertical edge. You’ll scalp the lawn and leave a torn, horizontal cut that looks terrible and encourages weed growth right at the border. Use the right tool for the job.
How often should I edge my lawn without an edger?
For maintenance, edge with your string trimmer every other time you mow. For a definitive, shovel-cut edge, you typically only need to do it once per growing season, usually in late spring. Manual shear touch-ups can be done monthly as needed.
What’s the best trimmer line for edging?
thicker, round line performs best. For most homeowner-grade cordless trimmers (like 40V models), a 0.095-inch diameter line is ideal. It has enough mass to maintain momentum when held vertically and cuts cleanly through tough grass. Avoid star-shaped or serrated lines for edging; they’re designed for weeding and can tear turf.
Will edging with a shovel hurt my lawn?
Done correctly, no. Cutting a clean, vertical trench two inches deep severs horizontal grass runners (stolons) and creates a clear boundary. This actually helps contain your lawn. The risk is soil compaction against the trench wall, which is why you shouldn’t go deeper than recommended and should avoid working in wet conditions.
Is it worth buying a half-moon edger if I already have a shovel?
If you have more than 50 feet of edge to maintain or establish, yes. The half-moon edger’s curved blade and footplate are engineered for this specific rocking, slicing motion. It’s more efficient and creates a cleaner, more vertical cut with less physical strain than a flat shovel. For small yards, the shovel you own is perfectly adequate.
The Bottom Line
You don’t need a dedicated edger to have a lawn that looks sharp. You need the right technique for the tool you already own. Mark your line first, every single time.
Match the tool to the task: the trimmer for upkeep, the shovel for creation, the shears for detail. Cut to a consistent two-inch depth, no more. And clean up your mess before you walk away.
The clean line between your lawn and your garden isn’t just about looks. It’s a functional barrier that makes mowing easier, defines your landscape, and shows you pay attention to the details. Grab your string trimmer, rotate it, and make the first cut. The difference is immediate.