Can You Cut Steel with a Miter Saw? The Real Answer
This post contains affiliate links. As an Amazon Associate, we earn from qualifying purchases.
A miter saw can cut thin, mild steel if you use a specialized metal-cutting blade, clamp the workpiece rigidly, and apply cutting lubricant. The saw’s high RPM (3,000–5,000) is not ideal, generating significant heat and sparks, so this should be reserved for occasional, light-duty cuts on materials like angle iron, thin-wall tubing, or rebar under 1/2-inch diameter.
Most people grab their wood blade, figure steel is just harder wood, and end up with a ruined blade, scorched metal, and a saw that smells like a burning alternator. The mistake isn’t trying to cut metal. It’s assuming the tool doesn’t care what material it eats.
This guide walks through the exact blades that work, the non-negotiable safety steps most articles skip, and the specific types of steel you should never attempt. We’ll also cover what happens to your miter saw’s motor and bearings over time if you make a habit of this, and when you should just buy a different tool.
Key Takeaways
- Use only a carbide-tipped blade with a high tooth count (80+) and a negative or zero hook angle, like the Diablo D1080N. A standard wood blade will shatter.
- Clamp every piece of steel, every time. Hand-holding leads to kickback that can twist the saw or throw the metal.
- Apply a cutting lubricant (WD-40 Specialist Cutting Wax or Tap Magic) to the cut line. Dry cutting overheats the blade, welds steel to the carbide teeth, and ruins the temper of thin metal in seconds.
- Limit cuts to mild steel (A36), aluminum, and thin-wall tubing. Avoid stainless steel, hardened tool steel, and any material thicker than 1/4 inch for 10-inch saws or 3/8 inch for 12-inch saws.
- This is an occasional-use hack. For more than a few cuts per year, invest in a low-RPM metal-cutting chop saw or a portable bandsaw. Your miter saw’s motor and spindle bearings are not built for the constant vibration and heat.
What Blade Do You Need to Cut Steel with a Miter Saw?
The blade is the only thing between a successful cut and a dangerous failure. A wood-cutting blade has a positive hook angle, the teeth lean forward to grab and pull the material. On steel, that aggressive grab causes chatter, binds the blade, and can snap teeth off.
A carbide-tipped blade with a Triple Chip Grind (TCG) and a negative hook angle is required for cutting ferrous metals like steel. The TCG design alternates a flat-top raker tooth with a bevelled chamfer tooth, which fractures the metal chip cleanly instead of forming long, stringy swarf. The negative hook angle (-5° is common) positions the cutting edge to scrape rather than dig, reducing grab and heat generation.
You need a blade physically rated for the RPM of your miter saw. A typical 10-inch miter saw spins at about 5,000 RPM. The blade’s packaging must list a maximum RPM at or above that number. Using an abrasive cutoff wheel rated for 3,800 RPM on a 5,000 RPM saw is asking for it to disintegrate.
Here are the blade specs that matter for steel:
| Blade Type | Best For | Tooth Count | Key Feature | Risk If Wrong |
|---|---|---|---|---|
| Carbide-Tipped TCG | Thin steel, aluminum, brass | 60–100 | Negative hook angle, triple-chip grind | Teeth fracture, welded swarf ruins blade |
| Abrasive Cutoff Wheel | Rebar, angle iron, fast cuts | N/A | Fiberglass-reinforced resin | Can explode if RPM rating is exceeded |
| Cold Cut (HSS) Blade | Clean, burr-free cuts on mild steel | 60–80 | High-speed steel, slow feed | Extremely expensive, dulls quickly on dirty metal |
For the occasional DIYer, a carbide-tipped blade is the most versatile pick. The Diablo D1080N 10-inch 80-tooth blade is a common choice, but confirm it matches your saw’s arbor size. Freud’s LU98M010 is another solid option with an aluminum-specific coating that also works on mild steel.
I burned through a DeWalt DW3128 “general purpose” blade on a single 4-foot cut of 1/8-inch angle iron. The cut was slow, the steel turned blue with heat, and the blade was so hot I couldn’t touch the carbide tips for ten minutes. It never cut wood cleanly again, the steel had polished the carbide edges smooth. That was a $45 lesson in using the right tool for the job.
The Step-by-Step Process for a Safe Cut
Before you start: Metal chips are sharp and hot enough to embed in skin. Sparks can travel 10 feet and ignite sawdust. A bound blade can twist the entire saw head off its pivot. Wear a full-face shield over safety glasses, heavy gloves, and natural-fiber clothing. Clear the area of all flammable material.
Step 1: Prepare the Saw and Workspace
Unplug the saw. Remove the wood-cutting blade and clean the arbor and washers of any sawdust or pitch. Metal dust mixed with wood resin creates a grinding paste that accelerates bearing wear. Install your metal-cutting blade with the teeth pointing in the correct rotation direction (marked on the blade). Tighten the arbor nut firmly with the wrench, vibration can loosen it.
Clear a minimum 10-foot radius around the saw. Sweep up all wood shavings, paper, and dry leaves. If you’re in a garage, wet the concrete floor around the saw stand. Have a fire extinguisher rated for Class A (wood/paper) and Class C (electrical) fires within reach.
Step 2: Secure the Workpiece
This is the step people think they can skip. You cannot.
Use at least two clamps. I prefer locking pliers like Irwin Vise-Grip models because they bite into the metal and won’t shake loose. Clamp the steel firmly against the saw’s fence and down to the base. The goal is zero movement in any direction.
If you’re cutting short pieces, use a sacrificial wood backup block behind the cut to support the metal and prevent the thin edge from tearing. That block also protects the saw’s base from getting gouged.
Step 3: Apply Lubricant and Make the Cut
Run a bead of cutting lubricant along your marked cut line. WD-40 Specialist Cutting Wax or a dedicated fluid like Tap Magic works. Do not use standard WD-40, it’s a degreaser and penetrant, not a lubricant. The wax reduces friction and carries heat away in the metal chips.
Plug in the saw. Put on your face shield and gloves. Start the saw and let the blade reach full operating speed, you’ll hear the pitch stabilize. Lower the blade smoothly into the metal. Do not force it.
Listen to the sound. A steady, high-pitched whine is good. A labored grunt means you’re feeding too fast or the blade is dull. Ease up. Let the blade cut at its own pace.
Step 4: Handle the Aftermath
Once the cut is complete, release the trigger and let the blade come to a complete stop before raising it. Do not touch the cut ends of the metal for at least two minutes. Steel retains heat much longer than wood.
The fresh cut edge will be razor-sharp and often have a wire-like burr. Use a metal file to knock down the burr before handling. Inspect the blade for any built-up swarf (metal chips welded to the teeth). If present, let the blade cool completely, then brush it off with a brass brush. Never use a steel brush on carbide teeth.
What Kind of Steel Can You Actually Cut?
Not all steel is the same. Your miter saw is barely adequate for the softest, most forgiving types.
Mild Steel (A36): This is your standard “hot-rolled” steel from the home center. It’s relatively soft and forgiving. You can cut angle iron, flat bar, and thin-wall square tubing (up to 1/8-inch wall thickness) if you go slow and use lubricant. The cut will have burrs and discolor from heat.
Rebar: Yes, but it’s messy. Rebar has a rough, irregular surface that vibrates the saw and is often dirty, which accelerates blade wear. Use an abrasive cutoff wheel if you have more than a few cuts. Expect a shower of sparks.
Aluminum and Brass: These non-ferrous metals are actually easier on a miter saw than steel. They’re softer and generate less heat. A dedicated aluminum-cutting blade like the Oshlun SBNF-080080 works beautifully. The chips are less hazardous, but they’re still sharp.
Metals to Avoid Completely:
- Stainless Steel: It work-hardens. The blade’s heat actually makes the cut line harder than the surrounding material, causing the blade to dull almost immediately and often leading to catastrophic tooth failure.
- Hardened Steel: This includes axles, springs, and tool steel. It’s too hard for a carbide tooth to penetrate. You’ll ruin the blade in seconds.
- Any Steel Over 1/4-inch Thick: The cross-sectional area creates too much friction and heat for the blade to dissipate. The cut will stall, the motor will bog, and you risk damaging the saw’s drive components.
For a deeper dive on the softer metals, our guide on cutting aluminum covers blade selection and techniques in detail.
The Real Risks and Long-Term Damage to Your Saw
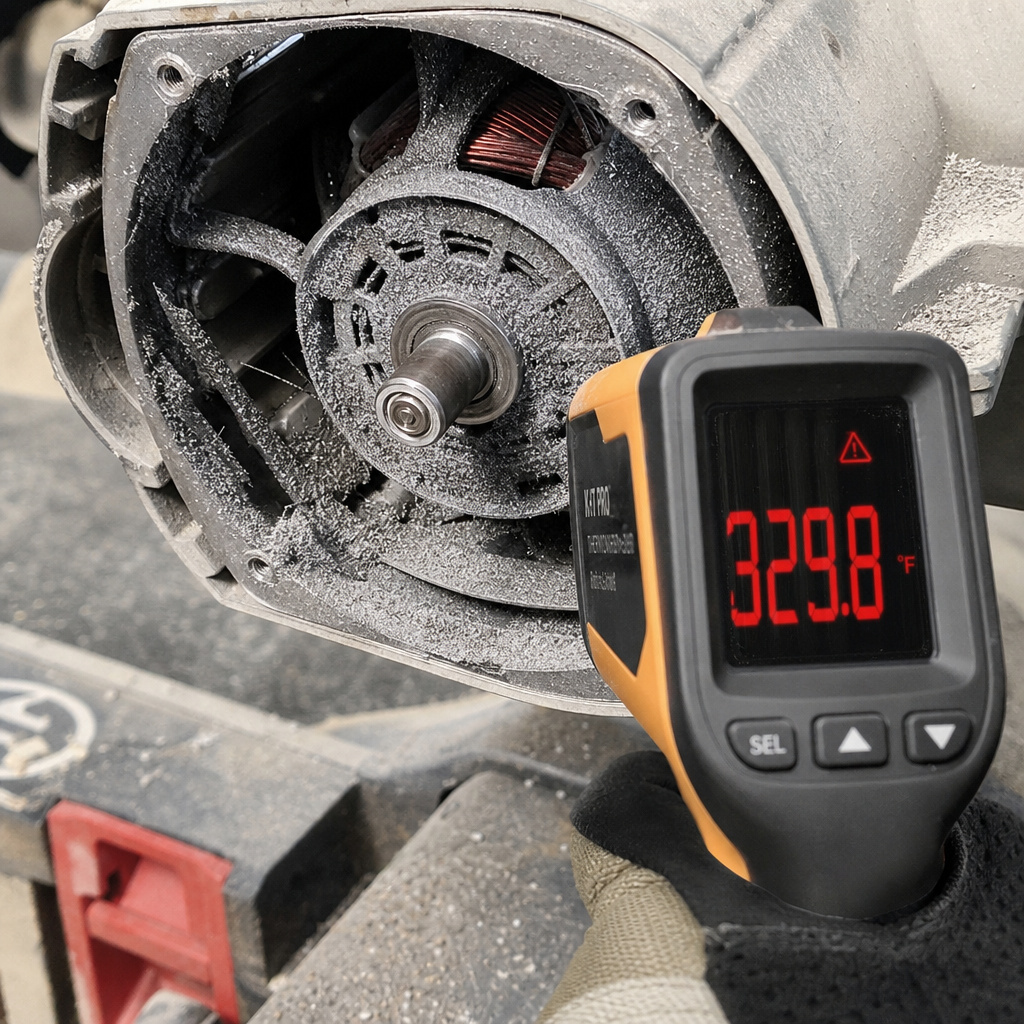
Everyone talks about immediate safety, sparks, blades breaking. Almost no one mentions what happens to your miter saw after a dozen metal cuts.
A miter saw motor is typically a universal brush motor. It’s designed for the short, high-torque bursts needed to crosscut wood. Cutting metal requires sustained load under high friction.
That builds up heat in the armature and the field coils. Over time, that heat degrades the insulation on the motor windings. The motor runs hotter, loses power, and eventually fails.
The spindle bearings are another weak point. They are shielded, not sealed, to keep wood dust out. Fine steel dust (much finer and harder than wood dust) works its way past the shields. It mixes with the bearing grease, creating a lapping compound that grinds the bearing races. You’ll first hear a high-pitched whine, then play in the blade, and finally a seized bearing.
Most miter saw warranties explicitly exclude damage from cutting metal. I learned this after the arbor on my first saw developed a slight wobble. The service center took one look at the steel dust fused to the inside of the blade guard and voided the repair.
Vibration is the other silent killer. Metal cutting sends high-frequency vibration back through the saw’s chassis and pivot points. This can loosen screws, crack plastic housings, and misalign the detent plates that give you accurate angle cuts.
When Should You Use a Different Tool?
If your project involves more than a few cuts, or the steel is thicker than 1/4 inch, stop. There are better tools that are safer, faster, and won’t destroy your woodworking equipment.
A dedicated metal-cutting chop saw is the real solution. These run at a much lower RPM (1,300–1,800) and use a heavy, abrasive cutoff wheel designed for the task. The slower speed reduces heat and sparking. The saw is built with a heavier duty motor and often a vise to clamp material. For a comparison of these tool types, see our breakdown of a heavy-duty chop saw.
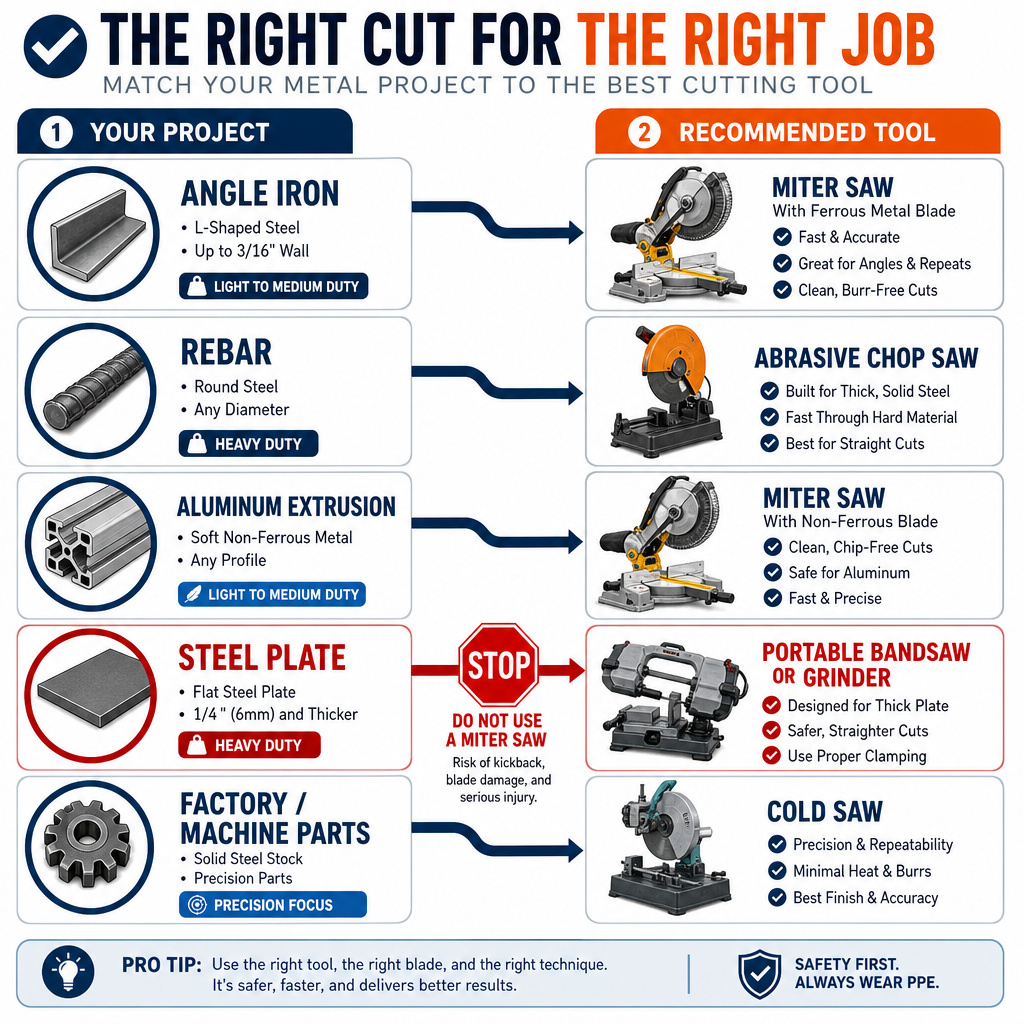
Here’s a quick decision table:
| Your Project | Best Tool | Why It’s Better |
|---|---|---|
| 1–2 cuts on thin angle iron | Miter Saw (with correct blade) | Convenient if you already have it set up. |
| Cutting 10 pieces of rebar for concrete | Abrasive Chop Saw | Faster, cleaner cuts, less blade wear, built for the abuse. |
| Trimming aluminum extrusion for a frame | Miter Saw (aluminum blade) | Clean, precise cuts with minimal setup. |
| Cutting 1/2-inch steel plate | Portable Bandsaw or Angle Grinder | Miter saw can’t handle the thickness; bandsaw is safer and more controlled. |
| Regular metal fabrication | Dry-Cut Cold Saw | Produces burr-free, mill-ready cuts with no heat distortion. Investment for pros. |
For straight cuts on thicker stock, a circular saw operation with a metal-cutting blade is often a more portable and capable option than forcing a miter saw.
Essential Safety Gear You Cannot Skip
Your standard woodworking safety kit isn’t enough. Metal creates unique hazards.
- Full Face Shield: Safety glasses alone won’t stop a hot, sharp metal chip from hitting your cheek or forehead. A shield attaches to your safety glasses or hard hat.
- Heavy-Duty Gloves: Leather or cut-resistant synthetic (like Dyneema). Cotton gloves can catch on the blade or melt from a hot chip.
- Natural Fiber Clothing: Cotton or denim. Synthetic fabrics like polyester can melt onto your skin from a spark.
- Hearing Protection: Metal cutting is loud, a high-pitched screech. Use earmuffs or fitted plugs.
- Respirator: A simple N95 mask is a minimum. Metal dust, especially from abrasive wheels, is harmful to lungs. A half-face respirator with P100 filters is better.
Keep a first-aid kit nearby with burn gel and bandages suitable for cuts. Have a bucket of sand or a fire extinguisher ready. Tell someone you’re cutting metal so they can check on you.
How to Clean and Maintain Your Blades After Metal Work
Metal chips weld themselves to the blade’s carbide teeth due to heat and pressure. This built-up edge (BUE) ruins cutting performance. You need to clean the blade after every metal-cutting session.
Let the blade cool completely. Use a brass-bristle brush (brass is softer than carbide) to scrub the teeth from the back of the blade toward the front. Never scrub side-to-side across the cutting edge. For stubborn deposits, use a dedicated blade cleaner like Simple Green or a citrus-based degreaser. Spray it on, let it sit for five minutes, then scrub.
Rinse with water and dry the blade immediately with a cloth to prevent rust. Store the blade in its original plastic case or a blade sleeve. Never toss a metal-cutting blade loose in a toolbox, the teeth will get chipped.
For abrasive cutoff wheels, tap them gently on a hard surface to dislodge any embedded metal particles. If the wheel is glazed (shiny surface), it’s worn out and needs replacement. A glazed wheel creates excessive friction and heat.
Frequently Asked Questions
Can I use the metal-cutting blade for wood again later?
Technically, yes, but I don’t recommend it. The blade’s geometry (negative hook) is terrible for wood, it will burn the cut and require excessive force. The teeth may also have microscopic damage from the metal that will tear wood fibers. Keep a separate blade for wood.
My cut edge is blue and hardened. What did I do wrong?
You cut too fast without lubricant. The excessive heat changed the steel’s temper at the edge, making it brittle. This is called “work hardening.” For your next cut, slow your feed rate by half and use more cutting wax. The edge should be silver, not blue.
How many steel cuts can I get from one blade?
It depends entirely on the steel and your technique. Cutting clean, thin mild steel with ample lubricant, a good carbide blade might last for 50–100 cuts. Cutting dirty rebar or pushing too hard can kill it in under 10. Abrasive wheels are consumables, expect 20–30 cuts per wheel.
Why does my saw vibrate violently when the blade touches the metal?
This is usually caused by an improperly secured workpiece or using a blade with the wrong hook angle. The blade is grabbing the metal instead of shearing it. Stop immediately. Re-clamp your workpiece and double-check you’re using a negative-hook-angle blade designed for metal.
Is a cordless miter saw okay for cutting metal?
It’s less ideal. Cordless saws often have brushless motors that can overheat and shut down under the sustained load of metal cutting. Their RPM is also usually lower, which can be a benefit, but the battery drain is immense. You’re better off with a corded tool for this job.
The Bottom Line
You can cut steel with a miter saw in a pinch. It requires the right blade, rigorous clamping, cutting lubricant, and full safety gear. Understand it’s a compromise that puts wear on a tool not designed for the task.
For a one-off project like trimming a steel fence post or cutting a piece of angle iron for a shelf bracket, it’s a viable hack. For anything more, regular fabrication, thicker stock, or stainless steel, the risks to your person and your tool outweigh the convenience. Buy a used metal-cutting chop saw or a good quality portable bandsaw. Your miter saw will thank you by lasting through your next trim project, and you’ll get cleaner, safer cuts on metal every time.