Understanding the Sliding Compound Miter Saw: A Full Guide
This post contains affiliate links. As an Amazon Associate, we earn from qualifying purchases.
A sliding compound miter saw is a power tool that combines three functions: it rotates left and right for miter (angled) cuts, tilts left or right for bevel (angled) cuts, and slides forward and backward on horizontal rails to cut through material wider than its blade diameter. This sliding action is what separates it from a standard compound miter saw and dramatically increases its crosscut capacity.
Most people see the price jump from a basic miter saw to a sliding model and assume it’s just for professionals. They buy the cheaper saw, then hit a wall the first time they need to trim a 2×10 or cut crown molding flat on the table. The limitation isn’t skill, it’s physics. A 10-inch blade that doesn’t slide can only cut about 5.5 inches wide. That’s fine for a 2×6, but it forces awkward, unsafe flipping for anything wider.
This guide breaks down exactly what this tool is, what the specs mean for your projects, and how to pick the right one without overbuying or creating a workshop traffic jam.
Key Takeaways
- The sliding mechanism adds 6 to 12 inches of crosscut capacity, letting you cut wide boards like 2x12s or sheet goods in a single pass without flipping the workpiece.
- You need at least 18 inches of clear space behind the saw for the rails to slide fully; compact rail designs exist but often sacrifice a few inches of cut width.
- A 10-inch sliding model handles 90% of DIY and trim work; step up to a 12-inch saw only if you regularly cut 6×6 posts or need to slice tall crown molding lying flat.
- The miter detent override is a non-negotiable feature, it lets you make micro-adjustments for perfect corners, because the preset detents are almost never perfectly square on a new saw.
- Cordless sliding miter saws with brushless motors are viable now, but for all-day use, a 15-amp corded model won’t bog down in dense hardwood and doesn’t need battery swaps.
What Does a Sliding Compound Miter Saw Actually Do?
It solves one specific problem: cutting wide stuff. A standard miter saw, even a compound one, is essentially a chop saw that angles. The blade comes straight down.
The maximum width it can cut is just under the blade’s radius. A 10-inch blade might cut a 5.5-inch wide board. A 12-inch blade gets you to about 7.25 inches. That’s it.
The sliding mechanism changes the geometry. The entire motor and blade assembly is mounted on rails. You pull the saw toward you, the blade spins past the front of the material, then you push it forward through the cut.
This lets a 10-inch blade cut up to 12 or 13 inches wide. A 12-inch slider can handle 15 or 16 inches. The difference is everything when you’re building a deck, a fence, or installing floor-to-ceiling trim.
A sliding compound miter saw’s cutting capacity is defined by its blade diameter and slide travel. A typical 10-inch model can crosscut up to 12 inches wide and vertically cut a 2×6 at 90 degrees. The compound function allows the blade to tilt for bevel cuts while simultaneously set at a miter angle, essential for complex trim work like crown molding.
The other half of the name, “compound”, means the head tilts to make bevel cuts. Combine a bevel with a miter, and you can make a compound cut. This is how you cut crown molding that sits at an angle against the wall and ceiling.
A “dual bevel” saw tilts both left and right, which is a massive time-saver. You set your complex angle once, cut your left piece, then simply tilt the head the other way to cut the matching right piece without rearranging the molding. If you’re doing any kind of crown molding installation or precise trim work, this feature pays for itself in saved frustration.
Key Features Explained
You’ll see a list of specs on any product box. Here’s what they actually mean for you in the shop.
The Sliding Mechanism
This is the core. Two parallel rails guide the saw head. Older and some budget models have rails that stick straight out the back. They require a lot of space. Newer “compact” or “shadow line” designs have rails that curve over, under, or around the back of the saw, reducing the footprint. The trade-off is usually a couple of inches of cutting width. The bearings inside need to stay clean. Sawdust gumming up the rails is the number one cause of a stiff, jerky slide. A quick wipe-down with a dry cloth after each use prevents this.
Miter and Bevel Adjustments
The table rotates for miter angles. Look for a solid miter lock and a detent plate with positive stops at common angles (0°, 15°, 22.5°, 31.6°, 45°). The detent override is critical. It disengages the stop so you can make a fine adjustment. Why? Because houses are rarely perfectly square. That 45-degree preset might actually need to be 44.5 degrees to make a perfect corner in your room. Without the override, you’re stuck.
The bevel adjustment tilts the blade. A single bevel saw only tilts one direction (usually left). A dual bevel tilts both ways. For a beginner, a single bevel is simpler and cheaper. But if you see yourself doing a lot of complex trim work that requires matching left and right compound angles, the dual bevel is worth the investment.
Motor and Power
Corded saws are typically 13 to 15 amps. This is plenty for hardwoods and dense composites. The “soft-start” feature is nice, it reduces the initial jerk when you pull the trigger. An electric brake stops the blade quickly when you release the trigger. Cordless saws have come a long way. A good 18V or 20V MAX brushless model with a 6.0Ah or larger battery can handle a day of trim work. For cutting 2×12 pressure-treated lumber all afternoon, you still want a cord.
Fence, Table, and Dust Collection
The fence is the vertical surface at the back your workpiece rests against. On good saws, it’s two pieces that can be adjusted or removed to allow for tall material. The table should be solid, not flex when you clamp a board. Dust collection is universally mediocre on miter saws. The bag that comes with it catches maybe 40% of the dust. Plan to connect it to a shop vacuum if you’re working indoors. It makes a visible difference.
| Feature | What It Does | Why It Matters |
|---|---|---|
| Sliding Rails | Allows blade to move forward/back | Cuts wider material (e.g., 2×12) in one pass |
| Dual Bevel | Head tilts left AND right | Cuts matching left/right compound angles without flipping workpiece |
| Laser Guide | Projects cut line onto material | Increases accuracy, especially in low light |
| Electric Brake | Stops blade spin quickly after trigger release | Improves safety and reduces wait time between cuts |
| Detent Override | Allows adjustment past preset angle stops | Enables fine-tuning for imperfect walls and corners |
Sliding vs. Standard vs. Compound: Clearing the Confusion
The naming convention is a hierarchy. It helps to understand the miter saw basics first.
- Basic Miter Saw: Rotates left/right for angled (miter) cuts. Blade chops straight down.
- Compound Miter Saw: Does everything above, PLUS the head tilts for bevel cuts. You can cut a miter and a bevel separately, but not necessarily at the same time on all models.
- Sliding Compound Miter Saw: Does everything a compound miter saw does, PLUS the head slides on rails for increased cutting width.
There’s also a “single bevel” and “dual bevel” distinction within both compound and sliding compound categories. A sliding compound miter saw can be either single or dual bevel. The sliding function is about width; the bevel function is about tilt direction.
I learned this distinction the hard way on a basement renovation. I had a basic compound miter saw. The baseboard was simple, but the window casings were wide, 6-inch poplar.
I couldn’t cut the 45-degree miters on the wide face in one shot. I had to cut partway, flip the board, try to align the blade perfectly, and finish the cut. The results were ragged, mismatched joints that needed a half-tube of wood filler. A sliding saw would have sliced through that poplar in one smooth motion, leaving a glue-ready joint.
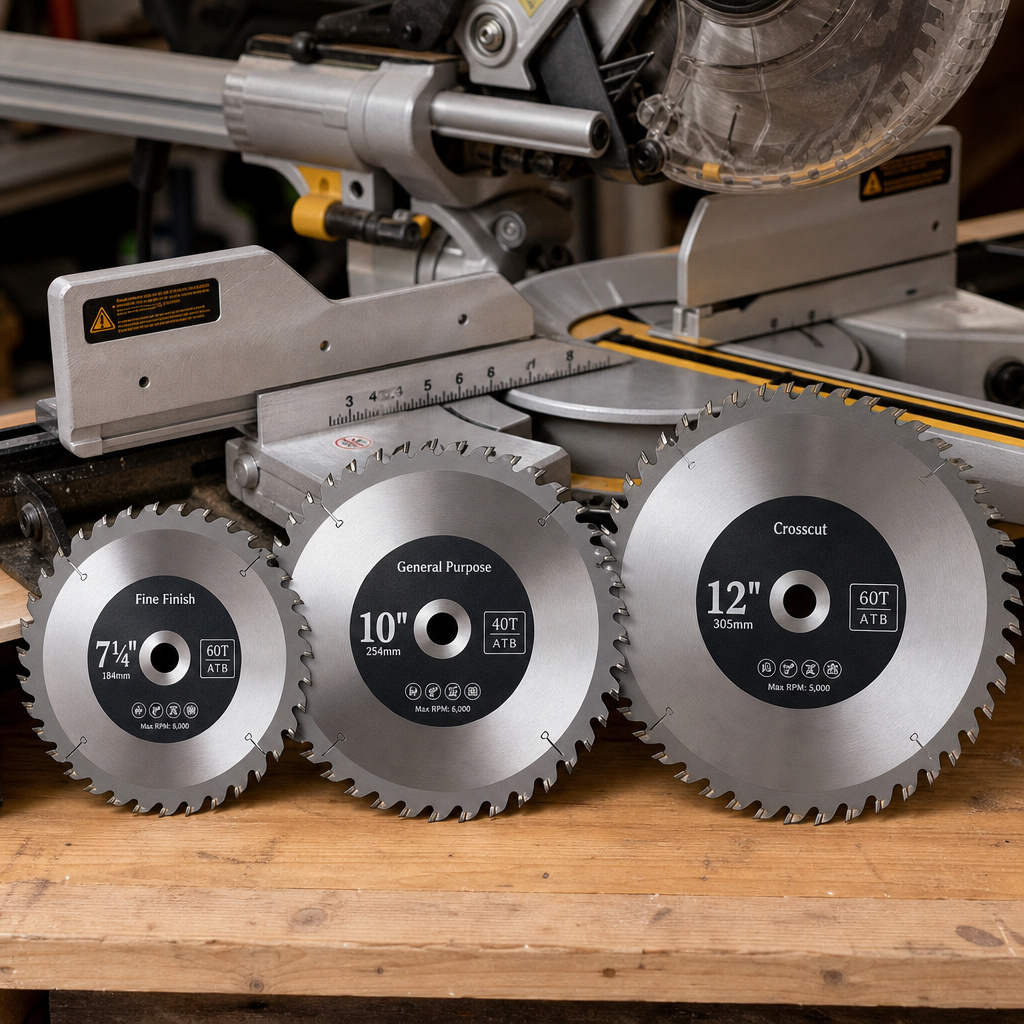
Choosing the Right Blade Size: 7¼”, 10″, or 12″?
This is the most common question after “what is it?” The answer depends on what you’re cutting, not what you might cut someday.
10-Inch Sliding Compound Miter Saw
This is the default recommendation for a reason. Its capacity hits the sweet spot for common DIY and professional trim.
* Crosscuts: Up to a 2×12 at 90 degrees.
* Vertical Capacity: Can cut a 2×6 (actually 5.5 inches) at 90 degrees, or a 2×4 on a 45-degree bevel.
* Best For: Deck building, fence building, general carpentry, window/door trim, baseboards, picture frames.
* Reality Check: This is the workhorse. It’s powerful enough, the blades are affordable and widely available, and it doesn’t dominate the workbench. For most people, this is the final answer.
12-Inch Sliding Compound Miter Saw
This is for heavier stock and specialized trim work.
* Crosscuts: Up to a 2×16 or a 4×12 at 90 degrees.
* Vertical Capacity: Can cut a 6×6 post at 90 degrees. This is its killer app.
* Best For: Large crown molding installed flat on the table, timber framing, cutting large dimensional lumber, repetitive cutting of big stock.
* The Trade-off: Everything is bigger, heavier, and more expensive. The saw itself costs more. The blades cost significantly more. It needs more space behind it. It’s overkill for someone building a garden shed or installing quarter-round.
7¼-Inch Compact Sliding Saw
A niche tool for portability and small spaces.
* Crosscuts: About 10 to 12 inches wide.
* Vertical Capacity: Limited. Often can’t quite cut a 2×4 at 90 degrees (needs about 3.5 inches, might only get 3).
* Best For: Jobsite carpenters who need a lightweight saw for trim, electricians/plumbers cutting conduit and PVC, very tight workshops.
* Warning: Check the vertical cut capacity spec carefully. If you need to cut a 2×4 standing up, many of these can’t do it.
I bought a 12-inch slider for a one-time deck project using 6×6 posts. It was glorious for that. Then it sat for two years, a massive space hog, until I sold it. For the next ten years of furniture and trim, my 10-inch slider has been perfect. Buy for your 80% use case, not the 20% dream project.
How to Pick the Right Blade (It’s Not Just Size)
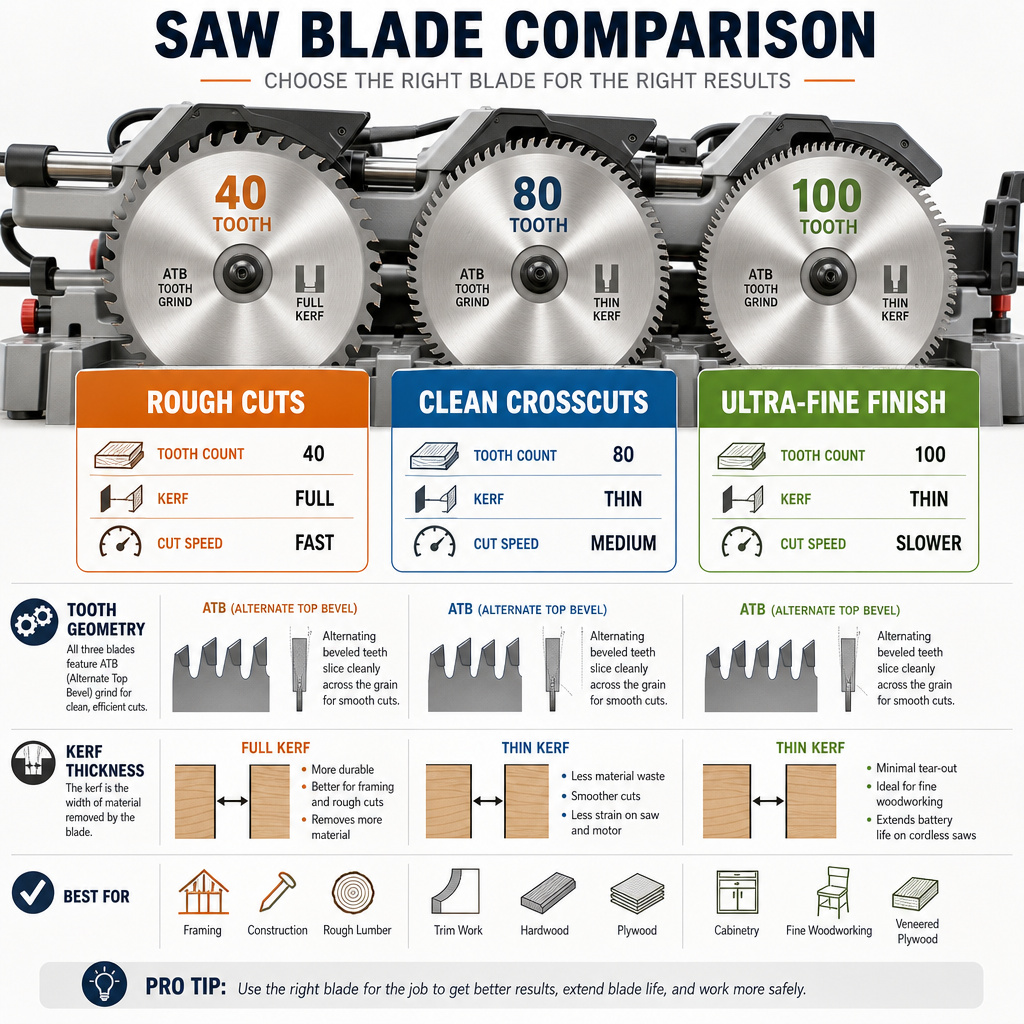
The saw comes with a blade. It’s usually a general-purpose 40-tooth or 60-tooth blade that’s… fine. For clean, tear-out-free cuts in finish material, you’ll want to upgrade. Here’s what the specs mean:
- Tooth Count: More teeth = smoother cut, slower cutting. Fewer teeth = faster, rougher cut.
- 24-40 teeth: Framing, rough lumber.
- 60-80 teeth: Trim, plywood, clean crosscuts.
- 90-100+ teeth: Ultra-fine finish work, melamine, laminates.
- Tooth Geometry: Alternate Top Bevel (ATB) is the standard for crosscutting wood. The teeth are angled left and right to slice through wood fibers cleanly.
- Kerf: This is the thickness of the blade. A “thin-kerf” blade (around 3/32″) removes less material, requires less power, and is great for cordless saws or cutting hardwoods. A “full-kerf” blade (1/8″) is more rigid, resists deflection better, and is preferred for precise finish work on a powerful corded saw.
Blade Maintenance is Non-Negotiable
A dirty, pitch-covered blade heats up, burns wood, and makes terrible cuts. Clean it with a dedicated blade cleaner or a simple solution of household detergent and water. Dry it immediately to prevent rust. A sharp blade is a safe blade. Dull blades require more force, increase the risk of kickback, and leave scorch marks. Learn to recognize when a saw blade needs sharpening or send it out to a professional service.
What to Look for When Buying One
Walk into a store or browse online with this checklist. It prioritizes function over flash.
- Cutting Capacity: Verify the “crosscut at 90°” and “vertical at 90°” numbers. These are the hard limits.
- Rail Design: Do the rails go straight back (needs space) or are they compact (saves space)? Your workshop layout decides.
- Bevel Type: Decide between single bevel and dual bevel miter saws based on your project plans. For general use, single is sufficient.
- Miter Detent Override: Must have. Test the miter lock. It should feel solid, not mushy.
- Dust Port: Is it a standard size (2-1/4″ or 2-1/2″) that will connect to your shop vac?
- Weight: If you need to move it, lighter is better. A 10-inch saw can weigh 45 to 60 pounds.
A final, practical note on setup. When you get it home, the first thing you must do is check and likely adjust the calibration. The blade needs to be perfectly square (90 degrees) to the table and the fence. The miter and bevel scales need to be accurate.
This isn’t optional. A saw that’s off by even half a degree will give you gaps in every joint. Our guide on squaring a miter saw walks you through the simple, essential process. Budget 20 minutes for this before you make your first real cut.
Frequently Asked Questions
Can a sliding miter saw replace a table saw?
No, not really. They excel at different tasks. A miter saw is for crosscuts, cutting boards to length at various angles. A table saw is for rip cuts, cutting boards lengthwise to a specific width. You need both for a complete workshop, though a circular saw can handle many ripping duties.
How much space do I need behind the saw?
For full-capacity sliding, measure the length of the rails when fully extended. For most 10-inch saws, plan on at least 18 to 24 inches of clear, empty bench space behind the saw’s base. Compact-rail models can reduce this to about 12 inches.
Are cordless sliding miter saws any good?
Yes, modern ones are excellent for job site portability and quick projects. Brands like DeWalt, Makita, and Milwaukee make 36V (two 18V battery) brushless models with power rivaling corded saws. The limitation is runtime for big jobs and the cost of multiple high-capacity batteries.
What’s the main drawback of a sliding miter saw?
The primary drawback is the space requirement and slightly reduced rigidity compared to a non-sliding chop-style miter saw. The sliding mechanism can introduce a tiny amount of flex if not kept clean and tight, potentially affecting absolute precision on microscopic-level finish work. For 99% of cuts, it’s irrelevant.
Can I use it to cut metal or aluminum?
With the correct blade, yes. You need a blade specifically designed for cutting non-ferrous metals (aluminum, brass) or ferrous metals (steel). These have a special tooth geometry and are often carbide-tipped. Always secure the metal firmly, go slow, and wear full face protection, metal chips are sharp.
The Bottom Line
A sliding compound miter saw is the most versatile tool you can add for cutting wood to length. It removes the width limitation that frustrates owners of basic miter saws. For building, remodeling, or serious DIY, it’s often the first major stationary power tool people buy because it’s so immediately useful.
Focus on a 10-inch model unless you have a specific, recurring need for a 12-inch saw’s capacity. Pay for the dual bevel feature if trim work is in your future, and never buy a saw without a miter detent override. Give it space on your bench, keep the rails clean, and use a sharp blade suited to your material. It will pay you back in straight, accurate cuts for years.