How to Unlock a Chop Saw | 3 Lock Types Explained
This post contains affiliate links. As an Amazon Associate, we earn from qualifying purchases.
To unlock a chop saw, first disconnect its power. Then identify which of its three main locks is engaged: the blade guard lock (a lever or button near the blade), the bevel lock (a lever on the saw’s rear), or the miter/angle lock (a large knob on the rotating table). Operate each according to its design, push, pull, rotate, or lift, to release the mechanism.
Most people grab the saw and start yanking on whatever looks like a handle. That’s a shortcut to a broken pin or a stripped thread. The real issue isn’t finding the lock; it’s knowing which of the three common locks you’re dealing with and the specific motion it requires. Force the wrong one, and you’ll be shopping for parts before your first cut.
This guide walks through each lock type, shows you how to spot them on popular brands, and gives you a clear sequence to follow, especially when a lock is stuck.
Key Takeaways
- Always unplug the saw or pull the battery before touching any lock. A live saw can kick on if the switch is bumped.
- Identify the lock first: blade guard (releases the cutting head), bevel (tilts the blade), or miter (swivels the base). Each has a different release action.
- Stuck locks usually need lubrication, not brute force. A drop of penetrating oil on the pivot pin solves 90% of problems.
- After unlocking, test the movement gently. If it’s grinding or binding, stop, something is misaligned or damaged.
- Re-tighten all locks securely before making a cut. A loose miter lock will drift during the cut and ruin your angle.
Before You Start: Safety Is Non-Negotiable
Before you start: The blade guard lock is under spring tension. If you release it suddenly without supporting the saw arm, the heavy motor head can slam down onto the table and crack the casting or chip the blade. Hold the arm with one hand while operating the lock with the other. Also, metal filings and sawdust jam the locking pins. Blow out the mechanism with compressed air before forcing anything.
Wear safety glasses. Sawdust packed into a lock mechanism will fly out when you dislodge it. Gloves protect your hands from sharp burrs on metal parts. Make sure the saw is on a stable, level surface. A wobbly stand makes fine adjustments impossible and increases the chance of the tool tipping when a lock releases.
The Three Main Locks on a Chop Saw
You’re not dealing with one mystery latch. Every chop saw has at least two, and usually three, distinct locking points. Confusing them wastes time and risks damage.
The blade guard lock secures the cutting head in the down position for transport or storage. It is typically a spring-loaded pin that engages a notch in the saw’s arm. Releasing it allows the arm to pivot upward on its return spring. The bevel lock fixes the saw’s tilt angle for angled cuts through the material’s thickness, while the miter lock secures the rotating table for angled cuts across its width.
The first time I worked on a contractor’s beat-up DeWalt DW708, I spent ten minutes trying to turn the bevel lock lever like it was a knob. It wouldn’t budge. I finally noticed the small arrow stamped next to it pointing “LIFT.” I pried it up with a flathead screwdriver, and it popped free with a dry squeak.
The mechanism was just gummed up with dried grease and aluminum dust. A shot of WD-40 Specialist Penetrant and it worked smoothly. The lesson was simple: look for the manufacturer’s markings first.
1. The Blade Guard Lock
This is the most common lock people need to release, especially on a new saw or after it’s been stored. Its job is to keep the heavy motor head from swinging freely.
What to look for: A lever, button, or recessed pin located on the top or side of the blade guard housing. On many models, like the Milwaukee 6955-20, it’s a prominent yellow or orange lever.
How it works: The lock physically blocks the guard’s rotation or pins the main pivot arm. The release action is usually a straight pull or a quarter-turn.
What happens if you force it: You can bend the thin metal latch or shear the plastic tab on the guard itself. A bent latch won’t fully engage later, letting the guard rattle.
2. The Bevel Lock
This lock holds the saw at a fixed tilt, typically for cutting bevels from 0 to 45 degrees.
What to look for: A lever, knob, or cam located at the rear of the saw, where the motor carriage meets the base. On a Ryobi saw, it’s often a black plastic lever you lift. On older Delta models, it might be a large wing nut you loosen.
How it works: It tightens a clamp against a curved bevel track. You must hold the lever open while you tilt the saw to a new angle, then release to lock.
What happens if you force it: Overtightening a bevel lock knob can warp the bevel track, making it impossible to set angles accurately. The saw will always drift back to a slightly different position.
3. The Miter or Angle Lock
This lock secures the rotating table at your desired angle, like 22.5 or 45 degrees for a picture frame.
What to look for: A large, knurled plastic or metal knob at the front or center of the miter table. Some higher-end models have a quick-release lever instead.
How it works: The knob threads into a clamping plate underneath the table. Tightening it pinches the table against the base, preventing rotation.
What happens if you force it: Cross-threading the knob is easy if you try to screw it in at an angle. Once the threads are damaged, the knob will never tighten securely, and your angles will shift mid-cut.
| Lock Type | Primary Location | Release Action | Common on Brands Like |
|---|---|---|---|
| Blade Guard | On blade guard housing | Pull lever, push button, turn pin | DeWalt, Milwaukee, Ryobi |
| Bevel | Rear of saw, near pivot | Lift lever, loosen knob | Delta, Bosch, Craftsman |
| Miter/Angle | Front-center of rotating table | Loosen knob (CCW), flip lever | Hitachi, Makita, Evolution |
Step-by-Step Unlocking Procedure
Follow this sequence. Skipping steps, especially the first one, is how accidents happen.
-
Cut the Power and Clear the Area. Unplug the cord from the outlet. For battery models, remove the battery pack. This eliminates any chance of the saw accidentally starting. Brush away any debris, offcuts, or sawdust from around the saw’s base and locking mechanisms. You need a clean workspace to see what you’re doing.
-
Identify the Stuck Component. Don’t just start pulling levers. Is the entire saw head locked down? That’s the blade guard lock. Does the saw tilt left or right but won’t swivel? That’s the miter lock. Does it swivel but won’t tilt? That’s the bevel lock. Gently try each type of movement to diagnose which axis is locked. This tells you which mechanism to target.
-
Operate the Correct Lock.
- For Blade Guard Lock: Find the lever. Support the saw arm with your non-dominant hand to control its rise. Use your other hand to pull the lever straight out or rotate it as marked. You should feel a solid click or release, and the arm will rise with spring pressure.
- For Bevel Lock: Locate the rear lever. Lift it fully. While holding it up, use your other hand to tilt the saw to the desired angle. Release the lever. You should hear it click into a detent at common angles (0°, 22.5°, 45°).
- For Miter Lock: Grip the large knob. Turn it counterclockwise (lefty-loosey) until you feel resistance disappear. Do not unscrew it all the way, just enough to free the table. Rotate the table to your angle, then turn the knob clockwise to re-tighten firmly.
-
Test and Verify. After releasing the lock, move the component through its full range of motion slowly. It should move smoothly without grinding or catching. If it binds only in one spot, there’s likely a burr on the track or a damaged detent. If movement is good, re-engage the lock to ensure it tightens securely. A lock that spins without tightening needs repair.
I prefer to loosen the miter lock knob just enough to allow movement, not so it falls off. Taking the knob all the way off risks dropping it, losing the washer underneath, or getting dirt in the threads. Two full counterclockwise turns is usually sufficient for adjustment, and you’re less likely to cross-thread it when re-tightening.
What If the Lock Won’t Budge?
A stuck lock is usually a dirty or dry lock. Rarely is it broken. Here’s how to troubleshoot without breaking anything.
First, double-check you’re using the right action. Is it a lift-lever you’re trying to turn? Is it a push-pin you’re trying to pull? Re-examine the mechanism. Look for arrows or icons stamped into the metal or plastic.
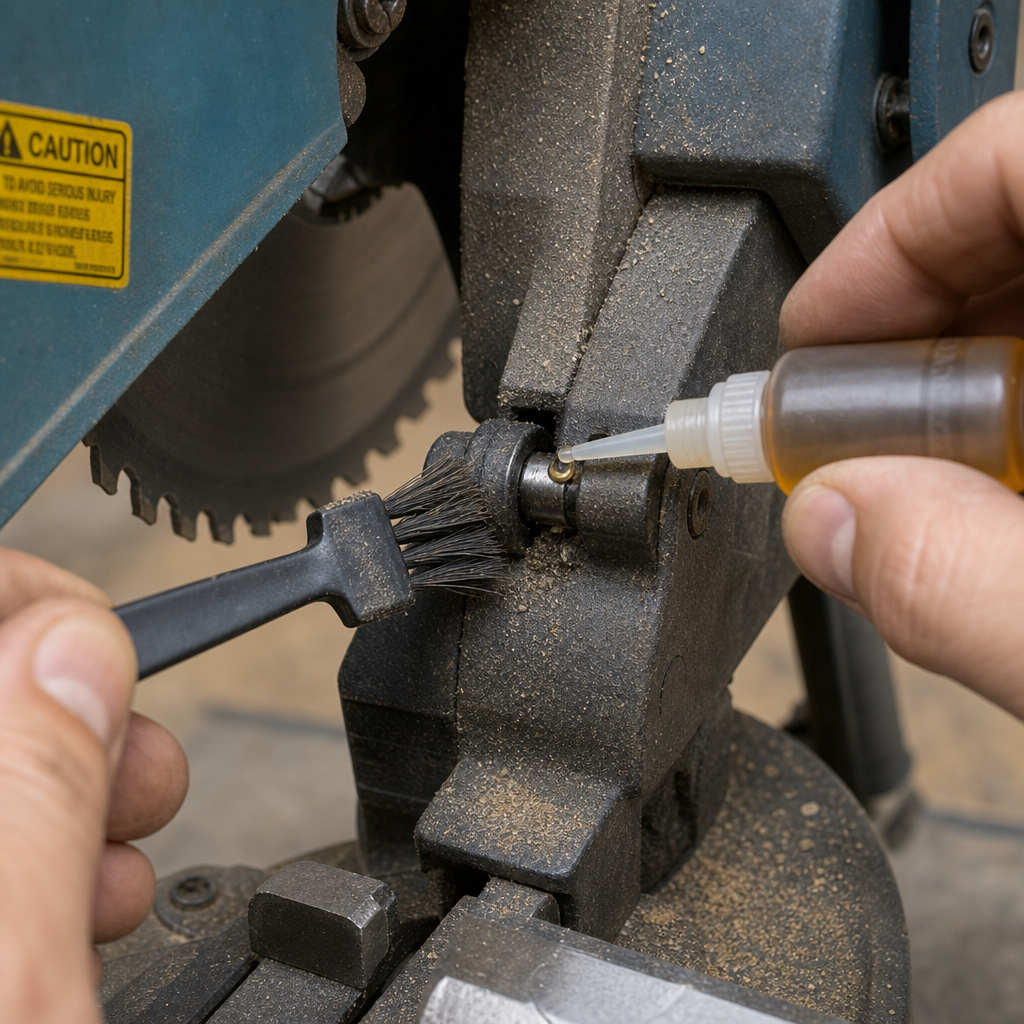
Second, clean it. Use a can of compressed air or a stiff-bristled brush (an old toothbrush works) to dislodge packed sawdust and grit from around the lock pin and its housing. This alone often frees things up.
Third, lubricate. Apply a single drop of a lightweight penetrating oil (like PB Blaster or Liquid Wrench) directly onto the seam where the lock pin enters the housing. Let it sit for two minutes. Then work the lock back and forth gently. Do not flood the area with oil, as it will attract more sawdust later.
| Symptom | Likely Cause | Immediate Fix | If It Persists |
|---|---|---|---|
| Lever moves but nothing unlocks | Sheared pin or disconnected linkage | Inspect for visible damage inside | Replace internal lock assembly |
| Knob turns but won’t tighten | Stripped threads | Try tightening at a different angle | Replace knob and/or threaded stud |
| Lock releases but component is still stuck | Corrosion or physical obstruction | Clean track/pivot; check for bent guard | May require disassembly to remove debris |
| Spring-loaded lever doesn’t return | Broken or weak spring | Manually return lever after use | Spring replacement needed |
If these steps don’t work, the mechanism may be internally damaged. Forcing it further will turn a simple fix into an expensive parts replacement. This is when you change a chop saw blade or perform other maintenance, as a full teardown might be needed.
Maintenance to Keep Locks Working Smoothly
Locks fail from neglect, not use. A thirty-second routine after each major job prevents most problems.
- Weekly: Wipe down all lock levers, knobs, and the surrounding areas with a dry cloth to remove loose dust.
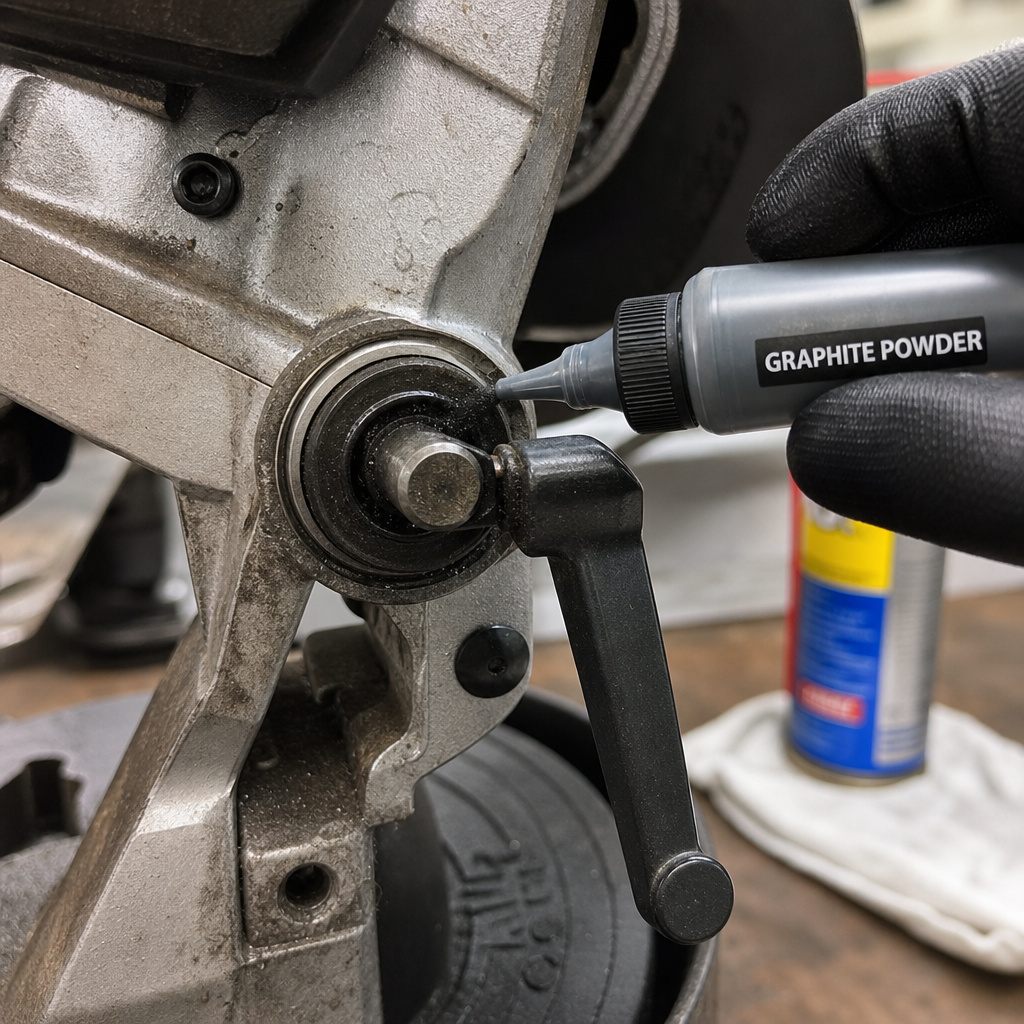
- Monthly: Blow out the lock mechanisms with compressed air. Apply a tiny amount of dry lubricant (like graphite powder) to locking pins and pivots. Avoid wet oils; they become grinding paste.
- Bi-Annually: Check the tightness of any lock mechanism mounting screws. Vibration from cutting can loosen them over time. Refer to your manual for torque specs if available.
- Storage: Always engage the blade guard lock when storing the saw. This relieves tension on the main spring and keeps the arm from bouncing during transport.
This simple upkeep is the difference between a saw that feels precise and one that feels sloppy. It’s the same discipline required for power saw operation across your whole workshop.
Frequently Asked Questions
My chop saw is brand new and the blade guard won’t unlock. Is it defective?
Probably not. New saws often have a shipping lock or a particularly stiff safety mechanism. Consult the manual for a specific “first-time setup” step. Often, you need to fully rotate the guard by hand while pulling the lever to seat the parts for the first time. Don’t hammer on it.
Can I use a wrench to loosen a stuck miter lock knob?
You can, but be very careful. Use an adjustable wrench that fits the knob’s flats snugly. Apply steady, moderate pressure.
If it doesn’t move, stop. You’re likely dealing with cross-threaded or corroded parts, and more force will break the knob. Apply penetrating oil and wait.
What’s the difference between unlocking a chop saw and a miter saw?
For the purposes of this guide, they are the same tool. “Chop saw” often refers to a basic model that only cuts straight down at 90 degrees. A “miter saw” adds the ability to rotate and tilt. The locking mechanisms for the blade guard and bevel are identical. The process for using a chop saw safely applies to both.
The angle lock on my saw won’t hold at 45 degrees. It drifts.
First, ensure you’re tightening the knob sufficiently. If it’s tight and still drifts, the locking teeth or the detent plate underneath the table are likely worn or damaged. This is a common wear item. You may need to replace the miter lock assembly or have the detent plate professionally repaired.
Is it safe to disable a lock if it’s broken?
No. Never permanently disable a safety or locking mechanism. A loose saw head or unsecured table is a severe kickback hazard. If a lock is broken, stop using the saw and repair it. Operating a saw with a faulty lock is an invitation for the workpiece to bind and the tool to jump.
The Bottom Line
Unlocking a chop saw is a basic skill, but doing it wrong has consequences. Find the power cord first. Identify which lock is actually stuck, guard, bevel, or miter. Use the specific action it was designed for, not the one you wish would work. When a lock resists, reach for penetrating oil before a pry bar.
A saw that unlocks and moves smoothly is a saw that makes accurate, safe cuts. That smoothness comes from understanding the three simple mechanisms covered here and giving them a basic clean now and then. Keep them functional, and your saw will last for years of clean projects.
{
“@context”: “https://schema.org”,
“@type”: “HowTo”,
“name”: “How to Unlock a Chop Saw”,
“totalTime”: “PT10M”,
“tool”: [
{
“@type”: “HowToTool”,
“name”: “Adjustable wrench or hex key set (optional)”
},
{
“@type”: “HowToTool”,
“name”: “Safety goggles and work gloves”
}
],
“step”: [
{
“@type”: “HowToStep”,
“name”: “Disconnect Power and Identify the Lock”,
“text”: “Unplug the saw or remove the battery. Visually locate which lock is engaged: the blade guard lock, the bevel lock, or the miter/angle lock.”
},
{
“@type”: “HowToStep”,
“name”: “Release the Blade Guard Lock”,
“text”: “Find the lever or button near the blade guard. Push, pull, or rotate it as indicated. The guard should spring open, and the blade arm will lift freely.”
},
{
“@type”: “HowToStep”,
“name”: “Disengage the Bevel Lock”,
“text”: “Locate the bevel lock lever, usually on the saw’s rear. Lift or push the lever while tilting the saw base to the desired angle, then release to lock.”
},
{
“@type”: “HowToStep”,
“name”: “Unlock the Miter or Angle Lock”,
“text”: “Find the large knurled knob or locking lever on the miter table. Loosen it by turning counterclockwise or flipping the lever. Rotate the table, then re-tighten.”
},
{
“@type”: “HowToStep”,
“name”: “Test Movement and Re-engage Safety”,
“text”: “Gently move each unlocked component to ensure smooth travel. Before cutting, verify all locks are securely tightened except the one you’re actively adjusting.”
}
]
}
{
“@context”: “https://schema.org”,
“@type”: “FAQPage”,
“mainEntity”: [
{
“@type”: “Question”,
“name”: “My chop saw is brand new and the blade guard won’t unlock. Is it defective?”,
“acceptedAnswer”: {
“@type”: “Answer”,
“text”: “Probably not. New saws often have a shipping lock or a particularly stiff safety mechanism. Consult the manual for a specific \”first-time setup\” step. Often, you need to fully rotate the guard by hand while pulling the lever to seat the parts for the first time. Don’t hammer on it.”
}
},
{
“@type”: “Question”,
“name”: “Can I use a wrench to loosen a stuck miter lock knob?”,
“acceptedAnswer”: {
“@type”: “Answer”,
“text”: “You can, but be very careful. Use an adjustable wrench that fits the knob’s flats snugly. Apply steady, moderate pressure.\n\nIf it doesn’t move, stop. You’re likely dealing with cross-threaded or corroded parts, and more force will break the knob. Apply penetrating oil and wait.”
}
},
{
“@type”: “Question”,
“name”: “What’s the difference between unlocking a chop saw and a miter saw?”,
“acceptedAnswer”: {
“@type”: “Answer”,
“text”: “For the purposes of this guide, they are the same tool. \”Chop saw\” often refers to a basic model that only cuts straight down at 90 degrees. A \”miter saw\” adds the ability to rotate and tilt. The locking mechanisms for the blade guard and bevel are identical. The process for using a chop saw safely applies to both.”
}
},
{
“@type”: “Question”,
“name”: “The angle lock on my saw won’t hold at 45 degrees. It drifts.”,
“acceptedAnswer”: {
“@type”: “Answer”,
“text”: “First, ensure you’re tightening the knob sufficiently. If it’s tight and still drifts, the locking teeth or the detent plate underneath the table are likely worn or damaged. This is a common wear item. You may need to replace the miter lock assembly or have the detent plate professionally repaired.”
}
},
{
“@type”: “Question”,
“name”: “Is it safe to disable a lock if it’s broken?”,
“acceptedAnswer”: {
“@type”: “Answer”,
“text”: “No. Never permanently disable a safety or locking mechanism. A loose saw head or unsecured table is a severe kickback hazard. If a lock is broken, stop using the saw and repair it. Operating a saw with a faulty lock is an invitation for the workpiece to bind and the tool to jump.”
}
}
]
}