How to Edge a Lawn with an Edger: The Pro’s 7-Step Method
This post contains affiliate links. As an Amazon Associate, we earn from qualifying purchases.
Edging a lawn correctly requires matching three things: the right tool for the job, a consistent cutting depth, and the proper walking technique to guide the cut. For hard surfaces like sidewalks, a power stick edger set to a 2-inch depth and walked at a steady pace produces the cleanest line. For curved garden beds, a manual half-moon edger offers the control needed for precise, sharp corners.
Most people grab their string trimmer, flip it, and hack away at the edge. It works, sort of. The line gets cut, but the result is a wavy, inconsistent groove that looks messy within a week. The problem isn’t the tool, it’s the technique. A dedicated edger, whether powered or manual, is built for one job: creating a vertical wall of soil and grass.
This guide walks you through the exact process I use, from picking the tool to the final cleanup. You’ll learn the difference between edging a driveway and a flower bed, how to handle slopes, and the one mistake that ruins the edge before you even start.
Key Takeaways
- Always mow your lawn first. Edging after mowing gives you a clear view of the true border and lets the mower vacuum up the debris you create.
- Set your power edger’s depth to 2 inches for standard borders against hardscapes. For creating a “no-grow” V-trench around beds, go 4 to 6 inches deep.
- Move slowly and deliberately, letting the tool’s weight and blade do the work. Rushing creates a jagged, uneven edge that’s impossible to fix without recutting.
- Never edge within a 3-foot radius of tree trunks. Severing surface roots compromises the tree’s stability and health, and the damage might not show for a year.
- Clean your edger blade or string head immediately after use. Dried-on clay and grass sap bind to the metal and accelerate wear, making your next job harder.
Before You Start: Safety is Non-Negotiable
Before you start: Wear impact-resistant safety glasses, not just sunglasses. A spinning blade or trimmer line can kick a rock or piece of metal with enough force to shatter a lens. Wear long pants, sturdy closed-toe shoes, and gloves. If you’re using a gas-powered edger, know that the exhaust and cutting head get hot enough to cause a burn within seconds of shutting down.
Check for buried irrigation lines, cable TV wires, or low-voltage landscape lighting cables along your intended path. Utility marking services are free, but they won’t mark private lines like sprinklers. If you hit a PVC irrigation line with a power edger, you’ll hear a sharp pop and see a geyser. The repair is a 30-minute job with a coupling, but you’ve just watered your shoes.
Choosing Your Weapon: Power vs. Manual Edgers
The best tool depends on the length of the edge, the surface you’re cutting against, and how much your back can handle.
I keep three tools ready: a gas-powered stick edger for the long sidewalk and driveway runs, a cordless model for quick touch-ups, and a manual half-moon edger for the curved beds. Most homeowners can get by brilliantly with just two: a capable battery-powered stick edger and a manual edger.
Here’s how they break down in a real-world scenario.
| Tool Type | Best For | Where It Fails | My Go-To Model |
|---|---|---|---|
| Gas Stick Edger | Long, straight edges on hard surfaces (driveways, sidewalks). Dense clay soil. | Curved beds, tight corners, quiet neighborhoods early on a Saturday. | Stihl FC 90. It’s overkill for a postage-stamp lawn, but for 100+ feet of edge, it’s a beast. |
| Cordless Stick Edger | Medium yards, all-around use. Quick weekly touch-ups. Less noise, zero fumes. | Thick, mature Bermuda grass roots or re-establishing a completely overgrown edge. Battery life on a single charge. | Ryobi 40V Expand-It. Uses the same battery as my trimmer and blower. For 90% of jobs, it’s perfect. |
| Manual Half-Moon Edger | Defining new curved garden beds. Precise corners. Small, intricate areas. | Long stretches of concrete. Your enthusiasm after the first 20 feet. | A basic steel model with a rolled foot platform. The cheap ones bend. |
If you’re trying to decide, rent a gas stick edger for an afternoon first. The vibration and noise are real. If you find it exhausting, a modern cordless model is a smarter long-term buy. For a complete breakdown of each type, our guide on types of edgers dives deeper into the pros and cons.
The 7-Step Process for Edging a Lawn
This isn’t a race. Hurrying is the fastest way to a wobbly, shallow edge that fills back in with grass within two mows. The goal is a clean, vertical cut that acts as a physical barrier.
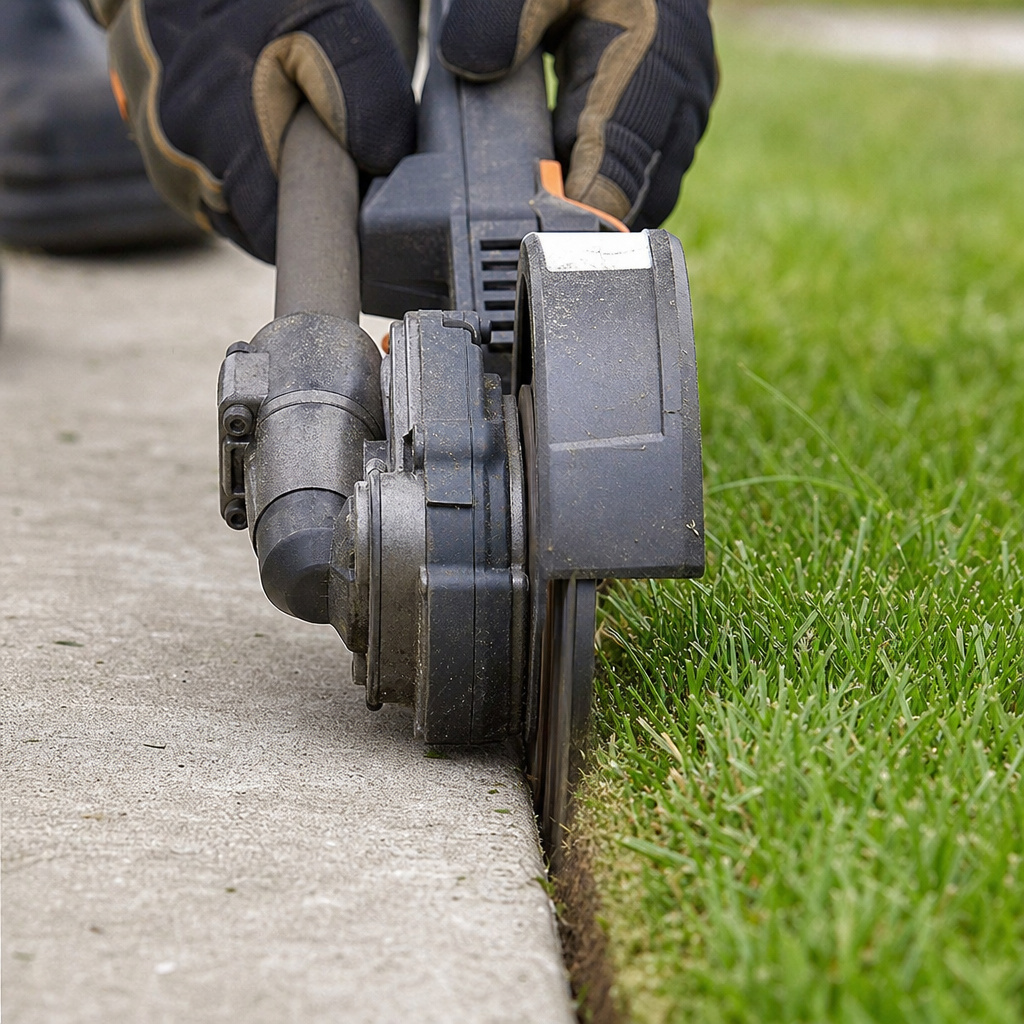
A gas or electric stick edger uses a vertically oriented, steel blade or reinforced cutting line that spins at high RPM to slice a narrow channel between the turf and an adjacent surface. The cutting depth is adjustable via a single bolt or wheel, typically offering a range from 1 inch to over 3 inches. The operator guides the tool along the desired path, with the blade guard containing ejected debris.
Step 1: Mow First, Edge Second (Always)
Mow your lawn to its normal height. This does two critical things. First, it reveals the actual border. Long grass flops over and hides the true edge of your soil. Second, if you bag your clippings, the mower will suck up most of the soil and grass plugs you kick out during edging. If you edge first, you’ll scatter that debris across your freshly cut lawn, and you’ll have to rake or blow it anyway. Do it in the right order.
Step 2: Define Your Path
For an existing edge you’re just cleaning up, you can follow the old line. For a new edge or one you’re redefining, use a garden hose or a rope to lay out the curve. For a straight line, a 2×4 or a string line between stakes works. Don’t use marking paint unless it’s absolutely windless. That overspray on your concrete is permanent until it weathers away in six months.
Step 3: Set the Depth and Test
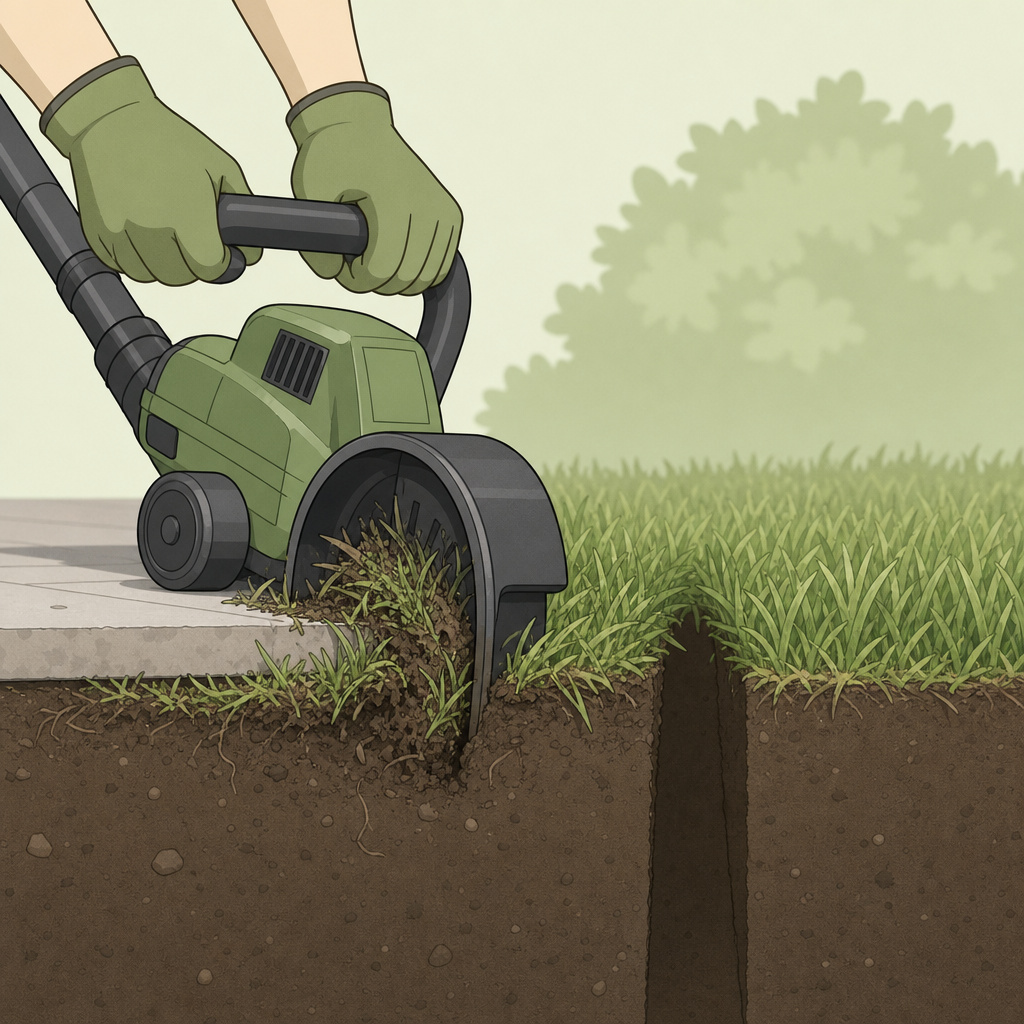
For a standard edge against a sidewalk or driveway, set the blade or cutting head to a 2-inch depth. This is deep enough to sever rhizomes and create a visible border, but not so deep that you undermine the concrete or hit major roots. For creating a deep V-trench around a garden bed, a “no-grow” zone, set it to 4–6 inches.
Find an inconspicuous spot and make a 2-foot test cut. Look at the channel. Is it vertical? Is the depth consistent? This is your chance to adjust before committing to the whole run.
Step 4: Start Cutting: The Walking Technique
This is where people mess up. They push the edger like a lawnmower.
Don’t push. Guide.
- Power Edger: Start the tool and let the blade reach full speed. Position the blade guard flush against the sidewalk. With your arms mostly straight, take a slow, deliberate step. Let the tool walk itself forward at its own pace. Your job is to keep it steady and on line. If you force it, the blade will bounce and chatter, creating a scalloped edge.
- Manual Edger: Place the blade on your line. Press down firmly with your foot on the foot platform. Rock the handle slightly side-to-side as you push the blade straight down into the soil. Lever the handle back to pull the cut section out. Repeat in a overlapping pattern.
For slopes, always edge across the slope (horizontally), not up and down. Going with the slope invites the tool to run away from you or dig in too deeply at the low point.
Step 5: Clear Debris as You Go
Every 10–15 feet, stop and kick the loose soil and grass plugs back onto the lawn or into a bed. If you let this debris pile up in the channel, it prevents you from seeing your guide line and gets packed down by the tool’s wheel, making final cleanup a chore. I keep a stiff broom or a leaf blower nearby for this.
Step 6: Handle Corners and Curves
For 90-degree corners with a power edger, cut past the corner on your first pass, then come back and square it off with a perpendicular cut. For curves with a manual edger, make smaller, more frequent cuts, overlapping each one slightly. The half-moon shape is designed to pivot for this.
Step 7: The Final Cleanup
Once the entire edge is cut, use a leaf blower to clear all loose material from the channel and the hard surface. This is crucial. Leaving damp soil and grass on concrete stains it. Leaving it in the channel fills your fresh edge back in halfway. Finally, hose off your edger’s blade guard and underside. Dried clay is like concrete.
Edging Garden Beds vs. Hard Surfaces
The technique shifts based on what’s on the other side of your cut.
Against Concrete/Asphalt (Driveways, Sidewalks):
You have a solid backstop. A power stick edger excels here because the blade guard rides against the immovable surface, guaranteeing a straight line. The goal is a clean, vertical cut right at the interface. No need for a deep trench, just a clear separation.
Around Garden Beds/Mulch Areas:
You have no backstop, and the line is often curved. This is manual edger territory. The goal is often a deeper, V-shaped trench that defines the bed and prevents grass from creeping in. The cut is angled slightly under the turf, creating a small overhang. This shadow line makes the bed look even crisper. For these curved areas, mastering manual edging technique is a game-changer.
Why Does My Edge Look Bad? Troubleshooting Common Problems
You followed the steps, but the result isn’t that sharp, magazine-cover look. Here are the likely culprits.
| Problem | Probable Cause | The Fix |
|---|---|---|
| Wavy, inconsistent line | Pushing the power edger too fast or with uneven pressure. | Slow down. Let the tool self-feed. Practice the guiding motion on a scrap board before hitting the lawn. |
| Shallow cut that disappears | Depth wheel set too high or blade is worn down. | Re-check depth setting. Inspect the blade. A dull blade mashes grass instead of slicing it. See our tips on maintaining blade sharpness. |
| Edge filled with soil immediately | Didn’t clear debris during the cut. Soil fell back into the channel. | Stop every few feet to blow or sweep the channel clean. Final cleanup is not enough. |
| Grass tearing, not cutting cleanly | Dull blade (power) or trying to cut dry, hard clay (manual). | Sharpen or replace the blade. For hard soil, water the edge area lightly an hour before you plan to edge. |
| Brown, dying grass along the edge | Cut too deep and severed the main root crown. | You scalped it. The grass will likely die back. Reset the depth shallower next time and let the area recover with watering. |
How Often Should You Edge?
This isn’t a set schedule. It’s a visual check.
During the peak growing season (spring/early summer), you might need to edge every 2–3 weeks to maintain the crisp line. In the slower heat of summer or the cool of fall, every 4–6 weeks might be plenty.
The signal is visual: when the vertical face of your edge starts to soften and grass blades begin to lean over the channel, it’s time. Letting it go too long means you’re not maintaining the edge, you’re re-cutting it from scratch, which is three times the work.
The Bottom Line
A clean edge transforms a mowed lawn from looking maintained to looking professional. The job is less about strength and more about patience and the right sequence: mow, set your depth, guide, don’t push, the tool, and clean as you go. Invest in a decent cordless stick edger for the long runs and a solid manual edger for the beds. Keep the blades sharp, wear your safety gear, and never edge near tree roots. Do that, and your curb appeal gets a permanent upgrade for about 30 minutes of work every month.