How to Start a STIHL Hedge Trimmer the Right Way (Step-by-Step)
This post contains affiliate links. As an Amazon Associate, we earn from qualifying purchases.
Starting a STIHL hedge trimmer requires matching three specific actions: priming the fuel system (5 pumps on the bulb), setting the choke lever to the cold-start position (marked with a diagonal line), and engaging the throttle lock or trigger lockout to hold the throttle open. For electric models, you verify the battery is charged or the cord is secure, then depress the safety switch and trigger.
Most people get this wrong because they treat every two-stroke tool the same. They prime until the bulb feels firm, which floods the carburetor. They guess at the choke position because the tiny icons wear off. Or they skip the throttle lock entirely and wonder why the cord pulls like it’s stuck in concrete. The process isn’t universal, and your HS 45 doesn’t start like your neighbor’s FS 38 grass trimmer.
This guide walks through the exact sequence for gas and electric STIHL hedge trimmers. You’ll get the pre-start inspection most articles skip, the model-specific control layouts that actually matter, and what to do when the engine fires once and dies.
Key Takeaways
- Prime the fuel bulb exactly 5 times for a cold start. More than 7 pumps almost guarantees a flooded carburetor, and you’ll wait 30 minutes for the fuel to evaporate.
- The throttle lock on compact trimmers (like the HS 45) is a separate button you press while squeezing the trigger. On pole trimmers, it’s often a sliding switch near the handle. Missing this step makes pulling the starter cord feel impossibly heavy.
- Let the engine idle for a full 10-15 seconds after starting before you touch the throttle. Revving a cold two-stroke washes oil off the cylinder walls and accelerates ring wear.
- Electric trimmers have a two-step safety interlock: depress the safety switch, then squeeze the trigger. If it doesn’t start, the battery isn’t fully seated 90% of the time.
- Always remove the blade scabbard before starting. Leaving it on forces exhaust heat back into the engine housing and can melt the plastic guard within two minutes of runtime.
Before You Start: The Non-Negotiable Safety Drill
Before you start: Hedge trimmers throw debris at high speed, operate at loud noise levels, and have exposed cutting blades. Wear ANSI Z87.1-rated safety glasses, not sunglasses. Use ear muffs or plugs (the HS 45 runs around 96 dB). Wear heavy-duty gloves and long pants. Clear your work area of bystanders, pets, and tripping hazards like loose branches or garden hoses.
This isn’t bureaucratic box-ticking. I watched a colleague nick his shin with a trimmer that kicked back on a hidden wire inside a hedge. The cut was shallow, but the infection from the plant sap took two rounds of antibiotics. Your gear is the difference between a story and a hospital visit.
Also, fuel outdoors. Always. Gasoline vapors are heavier than air and pool in low spots, like your garage floor. A single spark from the starter motor’s ignition system is enough. Fill the tank on a patch of dirt or gravel, at least ten feet from any structure.
What Type of STIHL Hedge Trimmer Do You Have?
Your starting procedure splits here. Gas models need fuel, air, and spark. Electric models need power and a clear path for the motor. Getting this wrong wastes time and risks damage.
Gas-Powered STIHL Hedge Trimmers (HS 45, HS 46, HS 56, HS 82, etc.)
These use a two-stroke engine. You must mix oil with gasoline. The standard ratio is 50:1, which means 2.6 ounces of STIHL two-stroke engine oil per gallon of 89 octane unleaded fuel. Do not use regular automotive oil or ethanol-blended fuel above E10. Ethanol attracts water, which separates in the tank and corrodes the carburetor’s aluminum components. You’ll know it’s happened when the engine runs unevenly and won’t hold an idle, even with a clean air filter.
Electric STIHL Hedge Trimmers (HSE 42, HSE 52, HSA 66, etc.)
These are either corded (plug-in) or battery-powered (STIHL AP series batteries). The starting procedure is simpler, but the safety rules are identical. The main failure point is the battery connection. The contacts get dirty or the battery isn’t pushed fully into the mount until it clicks. The tool acts dead even with a full charge.
The Essential Pre-Start Inspection (5-Minute Check)
Never pull the starter cord or press the trigger before this. A damaged blade or loose bolt turns a simple start into a dangerous failure.
- Blades and Guards: Visually inspect every cutter tooth. Look for deep nicks, cracks, or bends. Run your gloved finger along the cutter guard, it should be firmly attached with no cracks. A loose guard vibrates, distracting you and potentially pinching the blades.
- Fuel System (Gas Only): Check the fuel tank for cracks or leaks. Smell around the cap. If you detect strong fumes, the cap seal is likely degraded. Replace it before operating.
- Air Filter: Remove the cover and inspect the foam or felt air filter. It should be clean and dry. A clogged filter starves the engine of air, causing a rich fuel mixture that fouls the spark plug. Tap it clean or wash it in soapy water if it’s a foam type. Let it dry completely.
- Cables and Handles: Wiggle the throttle trigger. There should be no excessive play. Check where the control cables enter the engine housing for fraying. Ensure the handle is tight and doesn’t rotate in your grip.
- General Condition: Look for obvious damage: cracked housing, stripped screws, or missing parts. Set the trimmer on a flat surface. It should sit level without wobbling.
Skipping this inspection risks a thrown blade fragment, a fuel fire, or an engine that seizes from dirt ingestion. The time you save now is less than the time you’ll spend fixing the consequences.
What are the step-by-step starting instructions for a gas STIHL hedge trimmer?
Follow this sequence exactly. The most common mistake is rushing the steps or changing their order.
For a cold start on a STIHL gas hedge trimmer, set the on/off switch to “On” or “I”, press the primer bulb 5 times until fuel is visible, move the choke lever to the cold-start position (often a diagonal line), engage the throttle lock mechanism, place the unit on firm ground, and pull the starter cord with short, fast strokes until the engine ‘pops’. Immediately move the choke to the run position and pull again to start.
- Position the Trimmer: Place the trimmer on a clear, flat patch of ground. Hold it steady with your foot on the handle or rear guard. Never try to start it while holding it in the air, you lose leverage and control.
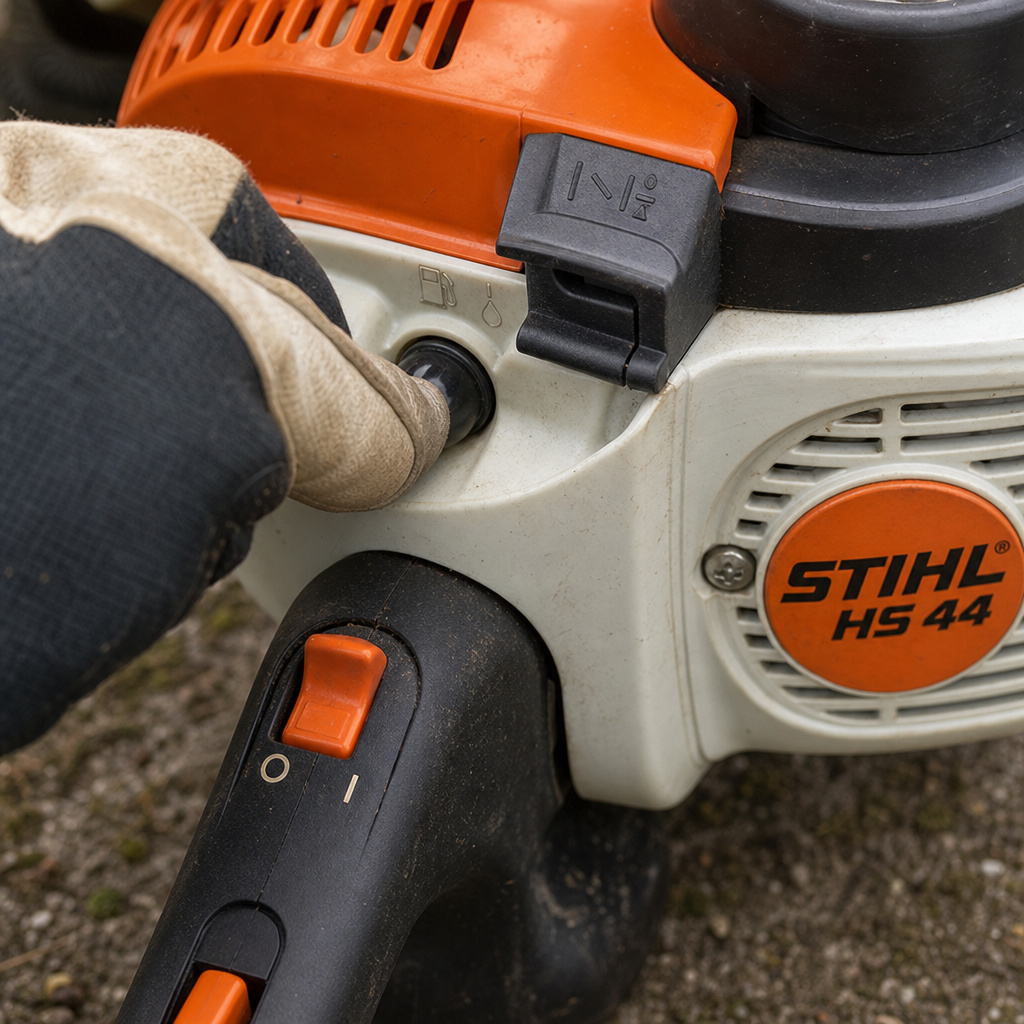
- Master Switch: Locate the on/off switch. On most STIHL trimmers, “I” or a downward position is ON. “O” or an upward position is OFF. Move it to ON.
- Prime the Fuel System: Press the rubber primer bulb firmly and slowly 5 times. You should see fresh fuel moving through the clear fuel lines into the bulb. Stop at 5. If you pump it 10 times because it “feels easier,” you’re flooding the carburetor. The symptom is a strong smell of gas and a cord that pulls with zero compression.
- Set the Choke: Move the choke lever to the cold start position. This is usually marked with a single diagonal line or the word “START.” On the HS 45, it’s a lever you push down. This restricts air flow to create a richer fuel mixture for starting.
- Engage the Throttle Lock: This is the step everyone misses. For compact trimmers, you must squeeze the throttle trigger fully, then push and hold the separate throttle lock button (usually on the side of the handle). Release the trigger while keeping the button depressed. The throttle should stay partially open. On some pole trimmers, you slide a physical lock switch to the “Start” position. If you don’t do this, the engine’s compression release valve won’t open, and pulling the cord feels like you’re trying to lift the tool itself.
- Pull the Starter Cord: Gently pull the starter handle until you feel resistance, this is the compression point. Then pull briskly and straight out in a short, smooth motion. Do not yank it to the full length of the rope. You’re aiming for a “pop” or cough from the engine.
- Choke to Run: As soon as you hear that pop, immediately move the choke lever to the “Run” position (often a vertical line or picture of a circle). This opens the air flow. If you leave the choke on, the engine will start and then die from an overly rich mixture within three seconds.
- Pull to Start: Now pull the starter cord again, with the same short, brisk motion. The engine should start and settle into a high idle (thanks to the throttle lock).
- Disengage Throttle Lock & Warm Up: Release the throttle lock button or switch. The engine RPM will drop to a normal idle. Let it run here for at least 10 seconds, preferably 30 if it’s the first start of the day. This allows oil to circulate and warm up. Revving a stone-cold two-stroke is how you score a piston.
Why does my STIHL hedge trimmer start and then immediately stall?
This is almost always a fuel or air issue. Use this diagnostic table to match the symptom to the cause.
| Symptom | Most Likely Cause | Immediate Fix |
|---|---|---|
| Starts, runs for 2-3 seconds, dies | Choke left in ‘Start’ position | Move choke lever to ‘Run’ immediately after the first pop. |
| Starts, idles roughly, dies when throttle touched | Clogged fuel filter or old gas | Drain fuel tank, replace in-line fuel filter, refill with fresh 50:1 mix. |
| Won’t start, no ‘pop’, cord pulls easily | Flooded carburetor (from over-priming) | Open choke, wait 30 min. Or remove spark plug, pull cord 10 times to clear cylinder. |
| Starts but lacks power, bogs down | Dirty air filter or spark arrestor screen | Clean foam air filter, check/clean spark arrestor on muffler. |
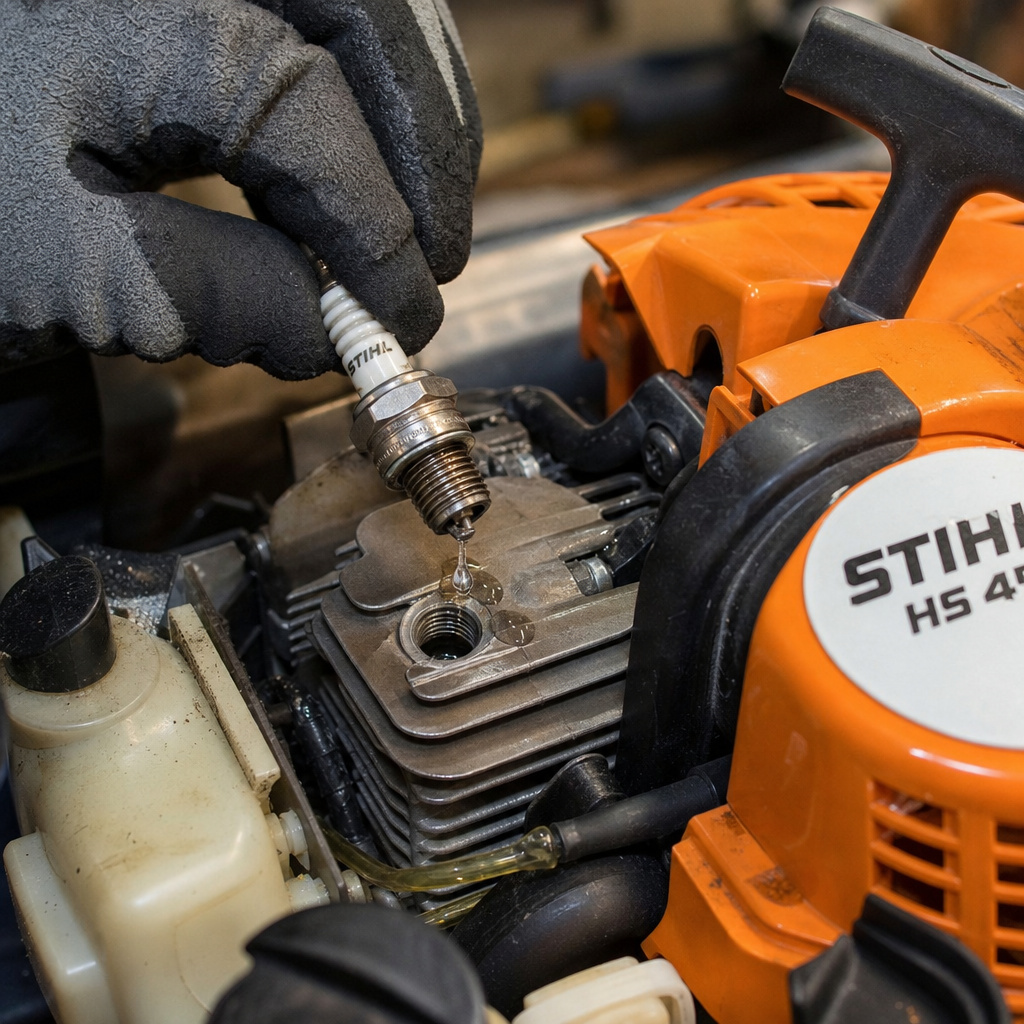
| Intermittent start, runs then cuts out | Faulty spark plug or bad ignition coil connection | Remove/inspect spark plug (NGK BPMR7A common). Check wire connection to coil. |
The flooded carburetor is the classic beginner error. You get impatient, prime 10 times, pull until your shoulder hurts, and smell nothing but gas. The fix is waiting or pulling the plug. I learned this the hard way with an HS 46 on a 90-degree day.
I primed it a dozen times thinking the bulb was faulty. After 20 minutes of futile pulling, I took off the spark plug, fuel dripped out. I cleared it, and it started on the second pull. Patience is a literal tool here.
How do you start an electric STIHL hedge trimmer?
The process is simpler, but the safety and inspection steps are just as critical. The most common issue is user error with the battery or safety interlocks.
- Battery or Cord Check: For cordless models, insert a fully charged STIHL AP battery (e.g., AP 100, AP 200, AP 300) until it clicks and the charge indicator lights, if present. For corded models, ensure the extension cord is rated for outdoor use (AWG 16 or lower) and is securely plugged in at both ends.
- Safety Switch and Trigger: Your electric trimmer has a two-step switch. First, depress the safety switch (usually located near the rear handle) and hold it down. Then, squeeze the trigger. The blades should engage immediately. Releasing either switch stops the blades.
- If Nothing Happens: Don’t force it. First, check that the battery is fully seated. Remove and reinsert it, listening for the click. For corded models, check your outlet with another device. If the tool still doesn’t run, the safety interlock switch or the motor brushes may be faulty.
Electric trimmers are brilliant for quick jobs, but they have a different failure mode. The motor brushes wear down over time. The first sign is intermittent operation, it works, then doesn’t, then works again after you jiggle it. If you’re past the warranty, this is a repair-or-replace decision point.
Post-Start Procedure and Immediate Checks
The trimmer is running. Don’t just dive into the hedge. Your next 30 seconds prevent damage and confirm everything is working.
- Listen to the Idle: The engine should sound even, not surging up and down. A surging idle often means an air leak in the fuel line or a dirty carburetor jet.
- Check for Vibration: Hold the tool lightly. Excessive vibration that wasn’t there before means a loose blade bolt, a damaged cutter tooth, or an unbalanced cutting blade. Stop immediately and investigate.
- Observe Exhaust Smoke: A small amount of blue-ish smoke from the muffler is normal (it’s the oil in the fuel mix). Thick, white smoke that persists indicates too much oil in your fuel mix or a leaking crankcase seal.
- Perform a Test Cut: Find a single, small branch or patch of soft growth. Engage the throttle and make a brief cut. The blades should slice cleanly without bogging the engine down. If the engine struggles, the blades are likely dull or you’re cutting material too thick for the tool.
This is where you catch problems before they ruin your project or your tool. A vibrating trimmer will fatigue your hands in minutes and can shake internal components loose.
Essential Maintenance to Ensure Easy Starts Next Time
A STIHL hedge trimmer that’s hard to start is usually a trimmer that hasn’t been cared for. This isn’t optional upkeep; it’s the price of reliable performance.
- After Every Use: Clean debris from the blades and housing with a stiff brush or blower. Wipe down the exterior. For gas models, let the engine run for a minute after cutting to burn off excess fuel in the carburetor before storing.
- Fuel Management (Gas Models): If you’re storing the trimmer for more than 30 days, either run the carburetor completely dry or add a fuel stabilizer (like STIHL MotoMix) to a full tank. Storing with untreated ethanol fuel guarantees starting problems next season.
- Air Filter Service: Check the filter every 10 hours of operation. A clogged filter is the number one cause of poor performance. Clean or replace as needed.
- Blade Care: Regularly lubricating your hedge trimmer blades with a dedicated cutter bar oil reduces friction and prevents rust. Dull blades strain the engine. Follow a guide for maintaining sharp blades.
- Spark Plug: Replace the spark plug annually or every 100 operating hours. Use the OEM-specified plug (often an NGK BPMR7A). A worn plug has a wider electrode gap, requiring more voltage to spark, which leads to hard starting, especially in damp conditions.
Neglecting the air filter costs you more than just a hard start. A dirty filter lets less air in, so the computer (or carburetor) adds more fuel to compensate. This “rich” mixture burns hotter and dirtier, coating the spark plug in carbon and gradually baking deposits onto the piston crown. You lose power over months, not days.
Frequently Asked Questions
Why does the starter cord on my STIHL trimmer pull so hard?
You haven’t engaged the throttle lock. The engine has a compression release valve that only opens when the throttle is set to the starting position. Without it, you’re fighting full engine compression. Find and use the lock button or switch.
Can I use the same gas from my lawn mower in my STIHL trimmer?
Only if your lawn mower is a two-stroke that uses a 50:1 mix. Most lawn mowers are four-stroke engines that use straight gasoline. Using four-stroke gas (without oil) in a two-stroke trimmer will destroy the engine from lack of lubrication within minutes.
My trimmer has been sitting for a year and won’t start. What should I do first?
Drain all the old fuel from the tank and carburetor. Replace the fuel filter inside the tank. Install a new spark plug. Then add fresh 50:1 fuel mix. Old fuel turns to varnish, clogging the carburetor’s tiny jets. This is the most common “long-term storage” failure.
Is it okay to start my electric trimmer inside my garage or shed?
Technically yes, but it’s not advisable. Even electric trimmers generate fine debris and dust when cutting. Starting it indoors just fills your enclosed space with that particulate. Always move outside to a clear area for both starting and operation.
The primer bulb on my trimmer is cracked and won’t fill with fuel. Can I still start it?
No. A cracked primer bulb breaks the fuel system’s prime and lets air into the line. The engine may start after dozens of pulls but will run poorly and stall. Replace the primer bulb, it’s a cheap, simple part available from any STIHL dealer.
The Bottom Line
Starting a STIHL hedge trimmer is a precise, mechanical ritual, not a guessing game. For gas models, remember the holy trinity: five primer pumps, choke on for the first pop, throttle lock engaged. For electric models, it’s a click and a squeeze. The difference between a one-pull start and an afternoon of frustration is following the sequence exactly as the engineers designed it.
Your pre-start inspection catches problems before they become failures. Your post-start listen-and-feel check confirms everything is right. And your commitment to basic maintenance, clean fuel, clean air, sharp blades, guarantees this tool starts for you season after season. Now go trim that hedge. It’s waiting.