How to Use a Hedge Trimmer Safely (The 4-Step Pro Method)
This post contains affiliate links. As an Amazon Associate, we earn from qualifying purchases.
Using a hedge trimmer safely requires a strict four-step method: wear full protective gear, plan a top-to-bottom cutting pattern, use a tool with adequate power for the hedge, and clean the blades immediately after use. This sequence prevents injury, ensures plant health, and keeps your trimmer running smoothly.
Most people grab the trimmer, plug it in, and start hacking at the middle of the hedge. They cut vertically, force the blades, and wonder why the lower branches are dead by next season or why the trimmer binds on every other branch. The tool isn’t the problem. The sequence is.
This guide walks through the pro sequence: from gearing up and inspecting the tool, to setting cutting lines, executing the cut with the right taper, and cleaning up so the hedge heals and the trimmer is ready for next time.
Key Takeaways
- Never cut without a full safety kit: Polycarbonate goggles, ear protection, gloves, and boots are non-negotiable. Debris flies sideways, and a corded trimmer will slice through an extension cord in a blink.
- Shape the sides with a “batter” (inward taper): Make the hedge base 10-15% wider than the top. Vertical sides shade the lower branches, which die out within a season, leaving you with a bare-bottomed hedge.
- Use loppers for anything over 1cm (3/8 inch): Hedge trimmer blades are for leafy growth and thin stems. Forcing them on thick branches dulls the blades instantly, strains the motor, and creates ragged wounds that invite disease.
- Clean and oil the blades after every use: Sap and plant residue harden on the blades within hours. Wipe them with a cloth and brush, then apply a light coat of machine oil. Skip this, and the next start-up will be sluggish, and rust follows.
- Check for bird nests before the first cut of the season: Disturbing an active nest is illegal in many places. Look deep inside the hedge in early spring; if you see a nest, trim around it or delay the job until fledglings have left.
The Non-Negotiable Safety Gear
Before you start: The blades move at over 2,000 strokes per minute. Eye protection is mandatory, a stray wood chip at that speed can penetrate a cornea. Hearing damage is cumulative; wear muffs or plugs. Keep all bystanders, especially children and pets, at least 30 feet away from the work zone. Never reach overhead with a running trimmer; use a stable ladder or a pole trimmer for height.
Open the manual. I know, it’s tedious. But the torque specs for the blade bolts and the oiling points for the gearbox are in there. A loose blade carrier vibrates itself to failure, and that failure happens mid-cut. Find the diagram.
Your gear list is short but specific. Polycarbonate safety glasses, not regular sunglasses. DeWalt or 3M muffs, or disposable foam plugs. Nitrile-coated work gloves for grip and splinter protection, leather if you’re trimming thorny barberry or pyracantha. Steel-toe boots aren’t overkill; a dropped trimmer lands blade-first.
If you’re using a corded electric model, the cord is your biggest hazard. Run it over your shoulder, not at your feet. Use a cord hook if your trimmer has one, or duct-tape the connection to the extension cord.
I learned this after slicing clean through a 50-foot 12-gauge cord on a damp morning. The spark and trip to the breaker panel added twenty minutes to a five-minute job. Now I check the path twice.
Gas trimmers add fuel and fumes to the list. Mix your two-stroke oil at the exact ratio printed on the trimmer, usually 40:1 or 50:1. Guess, and you risk seizing the piston. Fill up on solid ground, never over the hedge or near any ignition source. Let the engine cool for five minutes before refueling.
Choosing and Prepping Your Hedge Trimmer
The cutting capacity of a hedge trimmer is defined by its blade length and tooth spacing. A 24-inch double-sided blade with a 3/4-inch tooth gap (like the Stihl HSE 42) is designed for general hedge work, while a 30-inch single-sided blade with a 1-inch gap (EGO Power+ HT2410) is built for longer reaches and thicker, softer growth. Matching the tool to the plant’s density prevents bogging down and blade damage.
You have three power choices: gas, corded electric, and cordless battery. Your hedge size and location pick for you.
| Power Type | Best For | Biggest Limitation |
|---|---|---|
| Gas-Powered | Large properties, all-day use, thick stems | Heavy, noisy, requires fuel mixing, seasonal storage |
| Corded Electric | Small to medium hedges near an outlet, low cost | Cord management, limited range, shock risk if wet |
| Cordless Battery | Most residential jobs, quick work, quiet operation | Runtime anxiety, battery investment, power fade |
Gas is the muscle. A Stihl HS 82 or Husqvarna 325HE4 will chew through overgrown laurel all day. But you smell like exhaust afterward, and your neighbors will know you’re working by 7:01 AM.
Cordless is the convenience king. A Ryobi 40V or EGO 56V model starts every time, is light enough for overhead work, and won’t annoy the street. Just buy a second battery.
Corded models like the Greenworks 22022 or Black & Decker BEHT150 are cheap and reliable if you have an outlet within 50 feet. That’s the catch.
Before you even put on your gloves, do the five-point trimmer check:
1. Blade Guard: Is it intact and moving freely? A broken guard doesn’t stop the blade.
2. Blade Condition: Look for nicks, bends, or heavy rust. Dull blades tear instead of cut.
3. Fasteners: Are all screws and bolts tight? Use the supplied wrench to check.
4. Power Cord (if electric): No cuts, no exposed wire. Flex it along its length.
5. Fuel/Oil (if gas): Fresh mix in the tank, bar and chain oil topped up.
A loose bolt seems minor until the vibration works it out and the blade alignment shifts. The cut goes from clean to ragged in three seconds.
How to Use a Hedge Trimmer in 4 Steps
The actual cutting is the simplest part if you’ve done the setup right. Most instructional videos jump straight here. That’s why most DIY hedges look like they were trimmed by a distracted goat.
Step 1: Plan the Shape and Set Guides.
Decide on the final shape, flat top, rounded, or A-line. For a straight top, drive two stakes at the ends of the hedge and run a string line between them at the desired height. This is your visual guide. For the sides, you must plan for the batter. Mentally mark a line where the base will be 4-6 inches wider than the top. This taper is non-negotiable for plant health. If you skip it, the lower third of your hedge will be bare in 12 months. Sunlight simply can’t reach it.
Step 2: Trim the Sides from Bottom to Top.
Start at the bottom corner of the hedge. Hold the trimmer with both hands, one on the rear handle and one on the front guard or auxiliary handle. Position the blades so they cut on the upstroke. This lifts clippings away from the hedge and gives you a better view of your cutting line. Use smooth, sweeping arcs, moving upward along your planned tapered line. Don’t jam the blades into the foliage; let the teeth feed themselves. After each sweep, step back and look. You’re sculpting, not mowing.
Step 3: Cut the Top to Your Guide.
Now address the top. If you’re using a string line, keep the blade just below it. For a rounded top, follow the natural curve of the plant, tilting the trimmer slightly to match the arc. Work from one end to the other in a steady pass. If you need a second pass to clean up stragglers, go for it. Trying to take off too much in one bite will stall a cordless trimmer and make a gas model buck.
Step 4: Switch Tools for Thick Growth.
Your hedge trimmer is not a pruning saw. Its maximum capacity is usually printed on the blade, often 3/4 inch or 1 inch. That’s a best-case scenario for soft, green wood. For any branch that looks thicker than your pinky finger (about 1cm / 3/8 inch), put the trimmer down. Use bypass loppers or a pruning saw. Forcing the trimmer pinches the blades, overheats the motor, and leaves a crushed stem that won’t heal properly. This is the step pros never skip and DIYers always learn the hard way.
If your hedge is a large-leaved evergreen like cherry laurel or photinia, use secateurs (hand pruners) for the final finish. Hedge trimmer blades shred the big leaves, leaving brown, ragged edges that look terrible for weeks. Trim the bulk with the power tool, then walk the perimeter with secateurs to clean-cut any remaining large leaves.
Advanced Techniques for Specific Hedges
Not all hedges are simple boxwoods. Conifers, flowering shrubs, and overgrown monsters each have a rule you break at the plant’s peril.
Formal Hedges (Boxwood, Yew, Privet):
These tolerate frequent trimming. Aim for 2-3 cuts per season: a late spring shaping and a late summer tidy-up. Always maintain the batter. For a crisp, formal look, your electric trimmer technique needs to be smooth and consistent. After the power trim, go back with secateurs to snip any obvious stragglers the blades missed.
Conifer Hedges (Arborvitae, Leyland Cypress):
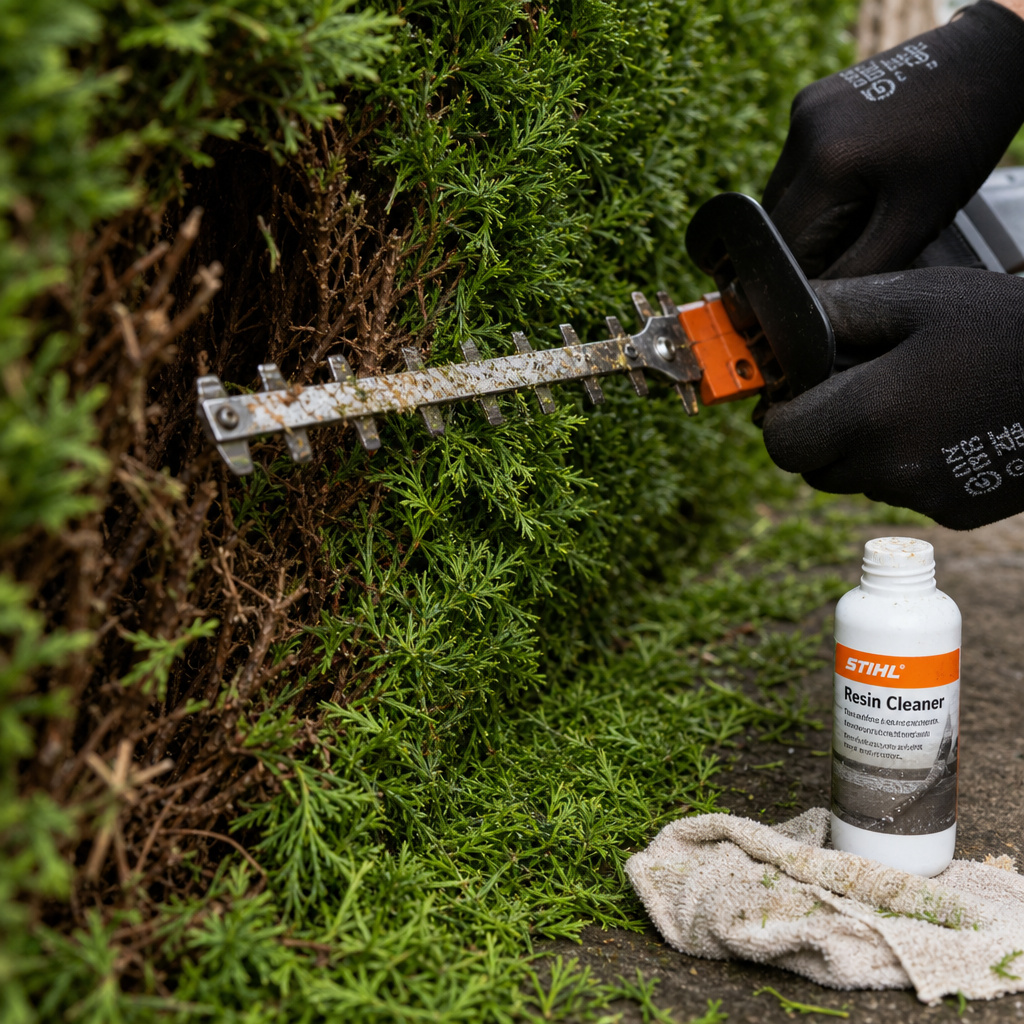
Here is the absolute rule: Never cut into the old, brown wood. Most conifers cannot regenerate from bare branches. You must keep your cuts within the green, leafy growth. If the hedge is overgrown, you can only cut back to where green exists. If you cut past that line, you have a permanent brown hole. Also, conifer sap is sticky. After trimming, you need to clean the blades with a resin solvent like Stihl Resin Cleaner or a citrus-based degreaser before applying standard machine oil.
Flowering Hedges (Forsythia, Lilac, Rose of Sharon):
Timing is everything. These shrubs bloom on old wood. If you trim in late fall or early spring, you’re cutting off the coming season’s flowers. The right method is to trim them immediately after they finish blooming. This gives them the whole summer to grow new wood for next year’s blooms. Use the trimmer to shape the overall form, but do detailed shrub maintenance with hand pruners to avoid damaging budding sites.
Renovating an Overgrown Hedge:
You cannot reclaim years of growth in one season. The plant will go into shock. The correct method is the three-year plan:
* Year 1: Cut back one side only. Reduce the width by up to a third.
* Year 2: Cut back the opposite side the same amount.
* Year 3: Address the top, lowering it gradually.
Use a pruning saw for any branches thicker than your thumb. Feed the plant after each major cut.
Post-Trim Cleanup and Tool Maintenance
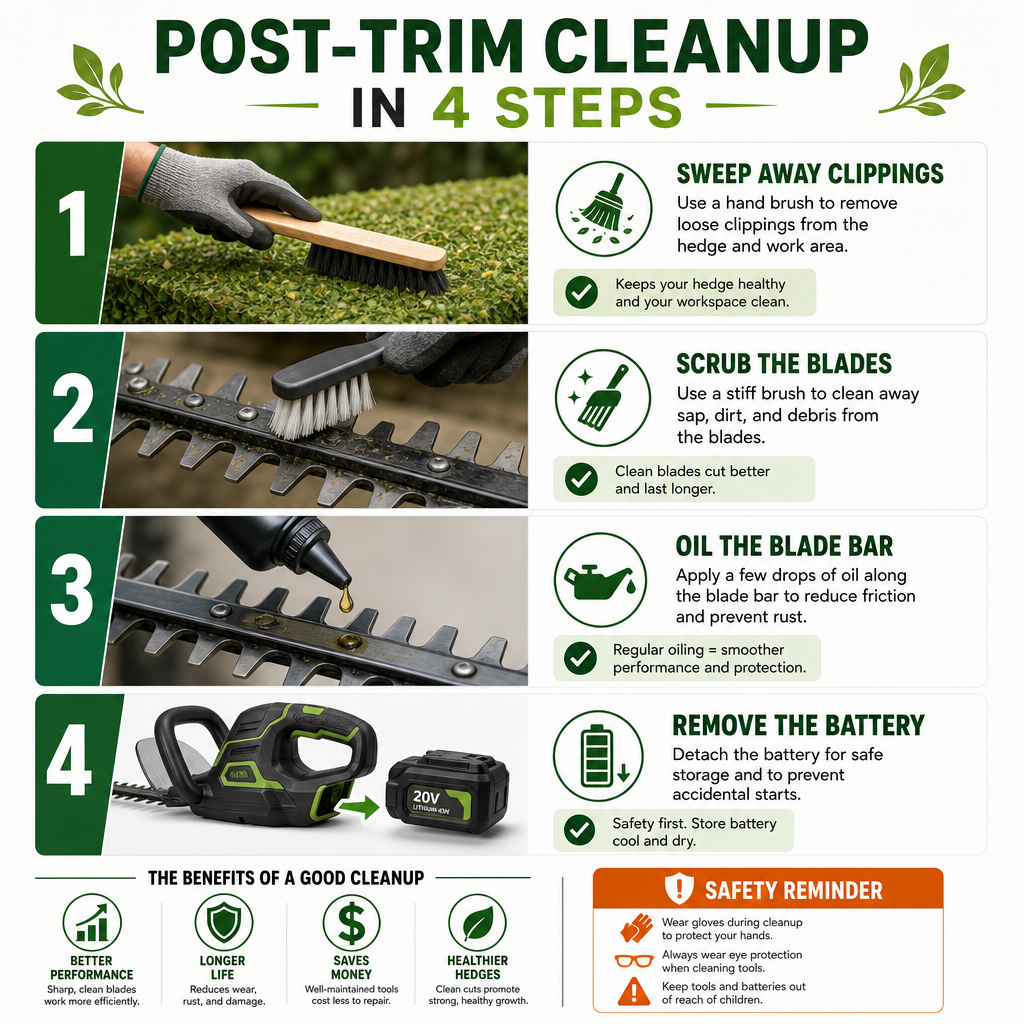
The job isn’t done when the hedge looks good. What you do in the next ten minutes determines if your trimmer starts easily next month.
- Clear the Debris. Rake or brush clippings off the top and sides of the hedge. This lets light hit the fresh cuts, which is critical for them to callous over and heal. If you leave a mat of clippings, it traps moisture and can promote fungal growth.
- Clean the Blades. Wipe down the blades with a dry cloth. Use a stiff brush (an old paintbrush works) to dislodge any packed-on sap or green matter from the teeth and guides. For conifer sap, dampen a cloth with resin solvent and wipe thoroughly.
- Lubricate the Blades. Apply a light coat of machine oil (3-in-1 oil or dedicated blade lubricant) to both sides of the blade bar. This prevents rust and ensures the blades slide smoothly in the guard for the next use. This is part of the essential post-use maintenance routine.
- Store Correctly. For cordless trimmers, remove the battery and store it indoors in a cool, dry place. For gas trimmers, run the engine dry or add fuel stabilizer to the tank for long-term storage. Hang the tool or store it in a case, don’t throw it in a damp corner of the garage.
| Problem | Likely Cause | Immediate Fix |
|---|---|---|
| Trimmer bogs down or stalls | Cutting too much material, blades dull, wood too thick | Take smaller bites, sharpen blades, use loppers for thick branches |
| Uneven, ragged cuts | Dull blades, loose blade bolts, user forcing tool | Sharpen blades, tighten all fasteners, use smooth sweeping motions |
| Hedge lower sections dying | Vertical sides (no batter) blocking sunlight | Reshape with taper on next cut; may not recover if already bare |
| Blades rusted or sticky | Sap residue left on blades, no post-use lubrication | Clean with solvent, scrub with brush, apply oil after every use |
I store my gas trimmer with a full tank treated with Sta-Bil. The first season I didn’t, the carburetor varnished shut over the winter. A $5 bottle of stabilizer saved me a $120 carb rebuild and an hour of disassembly I didn’t have. The ethanol in modern gas turns to gum in about 90 days.
When NOT to Use Your Hedge Trimmer
The tool has limits. Recognizing them saves your hedge and your equipment.
Don’t trim in the rain or when foliage is wet. Water conducts electricity, creating a shock hazard for corded tools. Wet clippings clump and clog the blade mechanism, creating drag and strain. The cuts also heal poorly, becoming entry points for disease. Wait for a dry, overcast day.
Don’t trim during local nesting season. This is often early spring through mid-summer. Actively disturbing nests is not just bad practice, it’s illegal under wildlife protection laws in many areas. Visually inspect the interior of the hedge before the first major cut of the year. If you see a nest, work around it or postpone.
Don’t trim in extreme heat or direct, scorching sun. Fresh cuts on a plant can desiccate (dry out) rapidly in high heat, causing die-back on the tips. Aim for a mild, cloudy day. Similarly, avoid trimming when a hard frost is imminent or has just happened; the frozen wood is brittle and cuts splinter.
Don’t use a hedge trimmer for “topping” trees or cutting anything not shrub-like. The long, single-sided blades of a hedge trimmer are not structurally designed for the lateral pressure of cutting tree limbs. You risk catastrophic blade or gearbox failure. That’s a job for a pole saw or pruning saw.
Frequently Asked Questions
What is the best time of year to trim a hedge?
For most non-flowering hedges, late spring and late summer are ideal. Avoid the peak heat of summer and the dormant period of late fall/winter. For flowering hedges, trim immediately after the blooms fade to avoid cutting off next year’s flower buds.
Can a hedge trimmer cut branches?
It can cut small, green stems up to the diameter specified by the manufacturer, usually 3/4 to 1 inch. For anything thicker, tougher, or woody, you must use loppers or a pruning saw. Using the trimmer on thick branches will dull the blades, strain the motor, and damage the plant.
How do I get a perfectly straight top?
You don’t eyeball it. You use a physical guide. Drive two stakes at either end of the hedge and tie a string line between them at your desired height. Use this line as a visual guide while you cut. For very long hedges, use a laser level for an unbeatable reference.
Why are the bottom of my hedge dying?
You almost certainly trimmed the sides perfectly vertical. This creates a “batter” in reverse, where the top shades the bottom. The lower branches die from lack of sunlight. The fix is to reshape the hedge so the base is wider than the top, allowing light to reach all parts.
How do I clean sap off hedge trimmer blades?
Use a dedicated resin solvent like Stihl Resin Cleaner or a citrus-based degreaser. Apply it to a rag and wipe the blades thoroughly. Follow up with a brush to clean the teeth, then dry and lubricate with machine oil. Don’t use water or gasoline.
Is it okay to trim a hedge in the morning on a weekend?
Check your local noise ordinances, many specify 8 AM on weekdays and 9 or 10 AM on weekends as the earliest start times for noisy power tools. Beyond the law, be a considerate neighbor. If you must start early, use a quieter cordless model for the first hour.
The Bottom Line
Using a hedge trimmer isn’t about brute force. It’s a four-part sequence: suit up with the right safety gear, pick the right tool for your hedge, cut with a plan that includes a healthy taper, and clean and protect your tool the minute you’re done. Skip the safety, and you risk a hospital trip. Skip the taper, and your hedge dies from the bottom up. Skip the cleanup, and your trimmer becomes a rusted paperweight.
Sharp blades make the work easier and safer. A tarp on the ground makes cleanup five minutes instead of thirty. And knowing when to put the trimmer down and pick up the loppers is what separates a hacked-up bush from a manicured landscape feature. Do the prep, follow the line, and put the tool away wet, with oil, that is.