How to Trim Shrubs with a Hedge Trimmer: Expert Techniques
This post contains affiliate links. As an Amazon Associate, we earn from qualifying purchases.
Most people grab a hedge trimmer and start hacking at their shrubs from the top down. They end up with a boxy shape that looks okay for a month, until the bottom half turns brown and sparse. The problem isn’t the tool. It’s the sequence, the angle, and a stubborn belief that faster is better.
Trimming shrubs correctly requires matching three things: the right season (dormant for most, after bloom for flowering types), the correct trapezoidal shape (wider at the bottom, narrower at the top), and sharp, clean blades. Use smooth, level strokes from the bottom upward, and never remove more than one-third of the plant’s height in a single session. This promotes sunlight penetration, dense growth, and long-term plant health.
Let’s walk through the exact process, from gearing up to putting the tool away, so your shrubs look professionally maintained and thrive season after season.
Key Takeaways
- Always cut shrubs in a trapezoid or “A-frame” shape, wider at the bottom, to allow sunlight to reach lower branches and prevent a bare, leggy base.
- The single most important maintenance task is keeping blades sharp and clean; dull blades tear plant tissue, inviting disease and causing brown, ragged edges on cuts.
- For overgrown shrubs, follow the “three-year rule”: remove one-third of the oldest, thickest stems at the base each winter to rejuvenate without killing the plant.
- Your safety gear is non-negotiable: wrap-around safety glasses, gloves, long pants, and hearing protection for gas models stop flying debris and prevent long-term injury.
- Water shrubs deeply 1-2 days before a major trim and apply a balanced, slow-release fertilizer (like a 10-10-10 formula) after trimming to support recovery and new growth.
Before You Start: The Non-Negotiables
Before you start: Hedge trimmers throw debris at high speed, a wood chip to the eye can cause permanent damage in under a second. Always wear ANSI-rated safety glasses. Gas-powered models operate around 100 dB, enough to cause hearing damage in under 15 minutes of exposure; use muffs or plugs. Inspect the cord on electric models for frays and clear the area of pets, kids, and trip hazards like hoses or rocks.
I learned the hard way about glasses. I was trimming a overgrown privet hedge with a Stihl gas trimmer, thinking my regular sunglasses were enough. A half-inch piece of hardened wood shot back, hit the lens, and chipped it. That chip was an inch from my cornea. I now use DeWalt Concealer safety glasses every single time, they don’t fog and they wrap around.
Choosing and Prepping Your Hedge Trimmer
You wouldn’t use a butter knife to carve a turkey. Picking the right trimmer for your shrub type matters more than you think.
For small, soft-leaved shrubs like boxwood or spirea, a cordless model like the EGO Power+ 24-inch is a dream. It’s light, quiet, and has enough battery life for a typical suburban yard.
For thick, mature privet or laurel hedges, you need the torque of a gas-powered unit or a high-voltage cordless. A corded electric trimmer is fine if your shrubs are close to an outlet and you don’t mind managing the cord, just be absolutely certain you know where it is at all times.
Blade length is about control, not just power. A 22-inch blade is manageable for most homeowners and helps you keep strokes level. A 30-inch blade is great for long, flat runs but is tiring to hold steady on detailed shaping.
The cutting capacity of a hedge trimmer, the maximum branch diameter it can cleanly shear, is determined by tooth spacing. Standard 3/4-inch spacing handles up to 3/4-inch softwood. For older, woody shrubs, look for a “2-step tooth” or “raker tooth” design on models like certain STIHL units, which can handle branches up to 1-inch thick by pulling them in before cutting.
Here’s a quick guide to match your situation:
| Shrub Type / Yard Size | Recommended Trimmer Type | Key Feature to Look For | When It’s the Wrong Choice |
|---|---|---|---|
| Small ornamental shrubs, townhouse | 18V–40V Cordless (e.g., Ryobi) | Lightweight, low noise | Thick, established hedges > 4 ft tall |
| Mixed shrubs, average suburban lot | 56V–80V Cordless or Corded Electric | Good runtime, 22-24″ blade | Very large property, far from outlets |
| Large, dense, or overgrown hedges | Gas-Powered (e.g., STIHL HS 56) | High torque, all-day runtime | Small spaces, noise-sensitive areas |
| High, tall formal hedges | Pole Hedge Trimmer (cordless or gas) | Extendable reach, articulating head | Low-growing, detailed topiary work |
Check the oil reservoir on gas models and the battery charge on cordless ones before you walk outside. Nothing kills momentum faster than a dead tool ten minutes in. Give the blades a visual check for deep nicks or heavy sap residue. A quick wipe with a rag dampened with rubbing alcohol can save you a cleaning session later.
Safety Gear You Actually Need
This isn’t a suggestion. Every item here stops a specific, common injury.
- Wrap-Around Safety Glasses: Not sunglasses. Not reading glasses. ANSI Z87.1-rated polycarbonate lenses. Debris flies sideways and upward from the cutting action.
- Firm-Fitting Gloves: Lightweight mechanix-style gloves improve grip and protect hands from thorns (hello, holly bushes) and minor blade contact if you slip while handling the tool.
- Hearing Protection: Gas trimmers are loud. Disposable foam plugs or over-ear muffs are cheap insurance against tinnitus. I keep a pair of 3M WorkTunes in my kit, they have AM/FM radio, which makes long trimming sessions less monotonous.
- Long Pants & Sturdy Shoes: Denim or canvas pants protect your legs from scratches and deflect minor debris. Closed-toe shoes with a solid sole prevent tripping and protect your feet if you drop the trimmer.
Notice I didn’t list a face shield as essential for basic shrub trimming. For healthy shrubs, safety glasses are sufficient. A shield is critical if you’re cutting back diseased or dead wood where dust and mold spores are a concern. That’s a different job.
When is the Best Time to Trim Your Shrubs?
Get the timing wrong, and you’ll sacrifice flowers or weaken the plant. It’s that simple.
The universal safe zone for most non-flowering shrubs is late winter or early spring, just before new growth starts. The plant is dormant, you can see the branch structure clearly, and the cuts will heal quickly as the growing season begins.
Flowering shrubs are on their own schedule. You must know if they bloom on “old wood” (last year’s growth) or “new wood” (this year’s growth).
* Old Wood Bloomers (Prune AFTER flowering): Lilac, forsythia, bigleaf hydrangea, rhododendron. If you chop these in spring, you’re cutting off all the flower buds. Wait until the blooms fade.
* New Wood Bloomers (Prune in late winter/early spring): Butterfly bush, panicle hydrangea (like ‘Limelight’), rose of Sharon. These set buds on new growth, so a spring trim encourages more flowers.
There’s one absolute, non-negotiable rule: Always check for active bird nests. From early spring through mid-summer, look deep inside the shrub. If you see a nest with eggs or chicks, stop. Work around it or postpone the job. It’s not just ethical; in many places, it’s the law.
What is the Best Way to Shape a Shrub?

The goal is an “A-frame” or trapezoid. The bottom is 2 to 6 inches wider than the top, depending on the shrub’s height. This slope allows sunlight to hit the lower leaves. A vertical or, worse, inverted shape shades the bottom branches. They die back. You’re left with a green roof on bare, woody legs.
Achieving a trapezoidal shape requires establishing a guide line. For formal hedges, drive two stakes at either end and run a string between them at the desired bottom width. Trim the sides to just outside this string. Raise the string for the next pass, moving it inward by an inch for every foot of height. For informal shrubs, use your eye, but step back every few cuts to verify the taper.
- Start with the sides, from the bottom up. Hold the trimmer so the blades are parallel to the side of the shrub. Begin at the base and make smooth, sweeping strokes upward, letting the cut debris fall away. Working bottom-up prevents you from burying uncut foliage under a pile of clippings.
- Move to the top. Use a slight arcing motion, like you’re painting a ceiling. Aim for a flat or gently rounded top. Don’t gouge. The common mistake is to pivot from the wrist, creating dips and waves. Move your whole arm from the shoulder for a level plane.
- Step back and assess. After each major section, walk back 10 feet and look. Your eyes from a distance will catch uneven spots better than they will up close.
What about those giant, overgrown monsters? The ones that are all leaf on the outside and dead wood inside? You can’t just shear them back to size. You’ll kill it. You need the three-year rule.
- Year 1 (Late Winter): Identify and remove one-third of the oldest, thickest stems. Cut them all the way back to the ground using loppers or a pruning saw. This opens the center to light and air.
- Year 2 (Late Winter): Remove another third of the remaining old stems.
- Year 3 (Late Winter): Remove the final third of the original old growth.
By the end of the third year, you have a completely rejuvenated shrub composed of vigorous new growth. It’s patient work, but it’s the only reliable way to save an overgrown plant.
Step-by-Step Shrub Trimming Process
Let’s tie it all together into a single, actionable sequence. This is the rhythm I follow for every job.
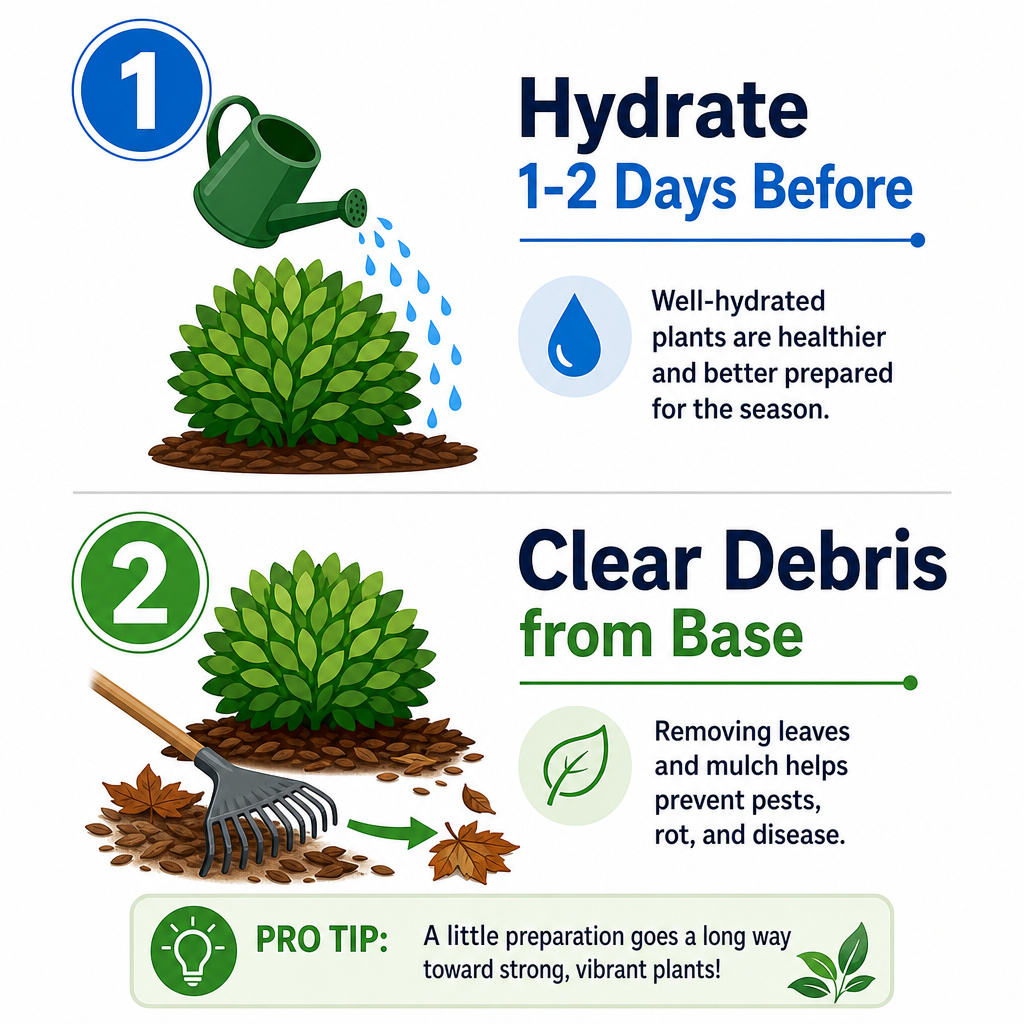
- Hydrate the Shrub: 1-2 days before a major trim, give the shrub a deep, slow watering. A hydrated plant is more resilient to the stress of pruning. Skip this, and the cut stems may brown back further than you intended.
- Clear the Zone: Rake away mulch, leaves, and debris from the base. Move patio furniture, toys, and garden hoses. Look up for low-hanging power lines or tree branches.
- Inspect and Fuel the Tool: Check blade tightness and condition. Fill the oil (gas) or charge the battery (cordless). Do a 10-second test run to ensure it operates smoothly.
- Establish Your Shape: Visualize or string your trapezoid guide. Mentally note the desired top height and bottom width.
- Trim the Sides (Bottom-Up): Start at the back corner of a side. Use long, level strokes, overlapping each pass by a few inches. Let the debris fall. Work your way around the entire shrub.
- Trim the Top: Adjust your stance so you can make comfortable, controlled arcs. Keep the blades flat. For a rounded top, imagine shaving the top of a giant, green loaf of bread.
- Fine-Tune and Clean Up: Use hand pruners to snip any stray, thick branches the trimmer couldn’t handle or to reach deep inside for selective thinning. Rake all clippings away from the base immediately, leaving them piled up promotes mold and pests.
The sensory reality? You’ll smell the sharp, green scent of crushed leaves. Your forearms will feel the high-frequency vibration of the blades after about twenty minutes. That’s your cue to take a break, shake out your hands, and drink some water.
Maintaining Your Hedge Trimmer
A clean trimmer is a safe, effective trimmer. Sap and plant residue build up on the blades, increasing friction and forcing the motor to work harder. That residue also holds moisture against the metal, leading to rust.
After every use, before you put it away:
* Disconnect the power source. Remove the battery or spark plug wire.
* Wipe the blades with a rag dampened with rubbing alcohol or a dedicated garden tool cleaner. A putty knife can gently scrape off thick gunk.
* Inspect for damage. Look for bent teeth, deep nicks, or cracks in the housing.
* Lubricate. Apply a light coat of a corrosion-inhibiting lubricant like WD-40 Specialist Long-Term Corrosion Inhibitor or 3-IN-ONE Garden Tool Oil to the blade metal.
Never store a hedge trimmer with wet, sap-covered blades. The organic material attracts moisture and will corrode the cutting edges within a few weeks, especially in a humid garage or shed. A five-minute wipe-down doubles the blade’s lifespan.
Sharpening is a separate, critical task. Dull blades don’t cut; they mash and tear. You’ll see brown, shredded ends on the stems you just cut. A properly sharpened blade leaves a clean, green slice.
You can follow a detailed blade sharpening steps guide, but the core idea is using a flat file held at the original tooth angle. It’s meticulous work. If you’re not confident, many local hardware stores or small engine shops offer sharpening services for under $20. It’s worth it.
For a full clean, including the air filter and cooling fins on gas models, our guide on post-trim cleaning has you covered.
Post-Trimming Shrub Care
You’ve stressed the plant. Now help it recover. This step is what separates a good job from a great one.
- Water Again: Give the shrub another deep watering a day or two after trimming. This helps it recover from the shock and supports new bud growth.
- Fertilize: Apply a balanced, slow-release granular fertilizer (look for a 10-10-10 NPK ratio) around the drip line of the shrub. Do this in early spring after a dormant-season trim. It provides the nutrients needed for the burst of new growth you’ve just encouraged.
- Monitor: Keep an eye on the cut ends. If you see signs of dieback (browning progressing down the stem) or disease (unusual spotting, oozing), you may have cut into diseased wood or used dirty blades. Note it for next time.
Frequently Asked Questions
Can I use a hedge trimmer on any type of shrub?
Almost, but with caveats. Hedge trimmers are ideal for small-leaved, dense shrubs like boxwood, yew, privet, and holly. For large-leaved shrubs like laurel or rhododendron, the blades will cut through the middle of leaves, leaving half-cut leaves that turn brown. For those, hand pruners are better for a natural look. For very thin, wispy shrubs like some spireas, a hedge trimmer can work but may leave a slightly “chopped” appearance.
How short can I cut my shrubs back?
As a strict rule, never remove more than one-third of the plant’s overall height or volume in a single growing season. Cutting back more than this can remove too much of the plant’s energy-producing foliage, causing severe stress or death. For a major size reduction, use the three-year rejuvenation pruning method outlined above.
My shrub looks bare and woody inside. Can I fix it?
Yes, but not with a hedge trimmer. This is called “foliage shelling.” The hedge trimmer has only ever cut the outer green growth, so the center gets no light and the branches die. To fix it, you need to use hand pruners or a pruning saw to selectively remove some of the thickest outer branches, opening “windows” to the interior. This allows light in and may encourage new internal growth over the next season or two.
What’s the difference between trimming and pruning?
Trimming (or shearing) is what you do with a hedge trimmer: cutting the outer foliage to maintain a shape. It’s a surface-level job. Pruning is a selective, surgical removal of specific branches, often with hand tools, to improve plant health, structure, or flowering. You trim a hedge. You prune a shrub or tree. Good shrub care involves both: shearing for shape and occasional pruning for health.
Why are my shrub’s leaves turning brown after I trimmed them?
There are three likely causes. First, you used dull blades, which tore the leaves and stems instead of cutting cleanly. Second, you trimmed in the heat of the day under direct, hot sun, which scalded the freshly exposed cut ends. Third, you may have trimmed at the wrong time for that species (e.g., trimming a spring-bloomer in late winter), forcing it to expend energy on healing cuts instead of supporting existing foliage.
Is it better to trim shrubs in the morning or evening?
The best time is on a cool, overcast day. If you must choose, morning is preferable to evening. Trimming in the morning gives the cuts all day to begin drying and callusing over in moderate temperatures. Trimming in the evening leaves wet, fresh wounds exposed to cool, damp nighttime conditions, which can encourage fungal growth.
The Bottom Line
Trimming shrubs with a hedge trimmer isn’t about brute force. It’s about patience, geometry, and timing. The tool is just the implement. The real work is in planning the shape, executing with steady hands, and caring for both the plant and the machine afterward. Remember the trapezoid. Keep the blades sharp. Listen to the plant’s schedule, not your own. Do that, and you’ll move from hacking away at overgrowth to conducting a precise, annual maintenance ritual that keeps your landscape looking sharp and your shrubs living long, healthy lives. Now go put those clippings in the compost.