How to Sharpen a Hedge Trimmer: The Right Way, First Time
This post contains affiliate links. As an Amazon Associate, we earn from qualifying purchases.
Sharpen a hedge trimmer by cleaning the blades, securing the tool, and using a mill file to follow the original bevel angle (typically 30-45 degrees) on each tooth with forward-only strokes. Finish by removing burrs with a whetstone and applying a protective lubricant. The process requires a file, whetstone, safety gear, and about 30 minutes of focused work.
Most people grab a file and start rubbing at the first tooth they see. That’s how you ruin a blade in five minutes. The real problem is often not dullness at all — it’s a blade gap you didn’t notice, or sap buildup hiding the true edge. You sharpen for an hour and it still tears branches.
This guide walks you through the diagnostic steps first. You’ll learn how to spot the difference between a blade that needs filing and one that just needs a two-minute alignment fix. We’ll cover the right tools, the exact filing motion, and the one post-sharpening step every YouTube tutorial skips that makes all the difference.
Key Takeaways
- A blade that won’t cut is often misaligned, not dull. Check for gaps between the moving and stationary blades before you ever touch a file.
- Use a single-cut mill file, not a rotary tool. The file gives you control; a Dremel melts the temper out of the steel if you linger for two seconds too long.
- File in one direction only — push the file away from you. A back-and-forth sawing motion rounds over the edge and makes it duller.
- Sharpen every tooth with the same number of strokes. Uneven sharpening creates a wobble in the cut that feels like vibration in your hands.
- The final step is de-burring with a whetstone. Skip it, and the tiny metal lip you created will fold over on the first cut and ruin your work.
Before You Start: Safety is Non-Negotiable
Before you start: The blades are under spring tension and can snap shut. A gas trimmer’s spark plug can generate a current even with the switch off. Electric corded trimmers are live at the outlet until you unplug them. Wear cut-resistant work gloves and safety glasses. Always secure the trimmer body to a stable work surface with C-clamps — your knee is not a workbench.
This isn’t a suggestion. I watched a neighbor try to hold his electric trimmer between his legs while filing. The blade guard slipped, his file skidded, and the glove took a gash that needed stitches.
The trimmer was fine. His hand wasn’t. Secure the tool first.
The Real Reason Your Hedge Trimmer Isn’t Cutting
You assume it’s dull. Half the time, you’re wrong.
Hedge trimmers work like scissors. The moving blade slides against the stationary blade to shear branches. If there’s a visible gap between these two blades, they can’t shear. They just mash the wood.
Inspect the blade assembly from the side. Look for daylight between the blades along their entire length. A gap wider than a sheet of printer paper means it won’t cut, regardless of sharpness.
This is the fix most people miss. The blades can splay apart from hitting a fence post or a rock. The solution isn’t sharpening; it’s alignment. You’ll often find a specific hedge trimmer blade sharpening guide starts with this exact inspection, because filing a misaligned blade is wasted effort.
How to check and fix blade alignment:
- Unplug/disable the trimmer (see safety above).
- Look down the blade length. Shine a flashlight from behind to highlight gaps.
- If you see a gap, insert a flathead screwdriver between the blades near the problem area and gently twist to realign them. Don’t pry hard — you’re nudging, not levering.
- Work the blades back and forth by hand to see if they move smoothly without binding.
If the blades are tight and aligned but still tear branches, then you move to cleaning and sharpening.
Tools and Materials You’ll Need
Gather everything first. Stopping mid-job to find a file is how you lose count of your strokes and sharpen unevenly.
| Tool/Material | Specifics & Why It Matters | What Happens If You Use the Wrong Thing |
|---|---|---|
| Mill File | 8-10 inch, single-cut (teeth in one direction). A “bastard cut” file is common. | A double-cut file or a rounded file won’t seat flat on the bevel. You’ll create a rounded edge that crushes stems instead of slicing them. |
| Whetstone | Fine grit (around 600 grit). Used for de-burring, not sharpening. | Skipping the stone leaves a microscopic metal burr that folds over on the first cut, making the blade feel dull immediately. |
| Resin Solvent | WD-40, citrus-based cleaner, or dedicated blade cleaner. | Water won’t dissolve sap. You’ll gum up your file on the first stroke and embed abrasive grit into the blade. |
| Safety Glasses | ANSI Z87.1 rated. | Metal filings are tiny, sharp, and travel. One in the eye is a trip to the ER. |
| Work Gloves | Cut-resistant (like Dyneema). Not bulky leather. | Protects from nicks while handling the blade. Bulky gloves reduce your feel for the file angle. |
| C-Clamps (2) | Minimum 3-inch throat. | An unsecured trimmer can shift, changing your filing angle. It can also snap shut on your hand. |
| Soft Cloth | Microfiber or old t-shirt. | Paper towels leave lint that hides the edge you’re trying to see. |
A note on rotary tools: I keep a Dremel 3000 with a 3/8-inch flat grinding bit in my shop. I almost never use it on hedge trimmers. The speed is wrong.
It’s too easy to overheat the thin blade metal, which draws the temper and leaves a soft edge that dulls after ten minutes of cutting. The file is slower, quieter, and foolproof. Use it.
How to Sharpen Hedge Trimmer Blades with a File (Step-by-Step)
This is the core of the job. Rushing here is how you turn a $150 trimmer into a paperweight.
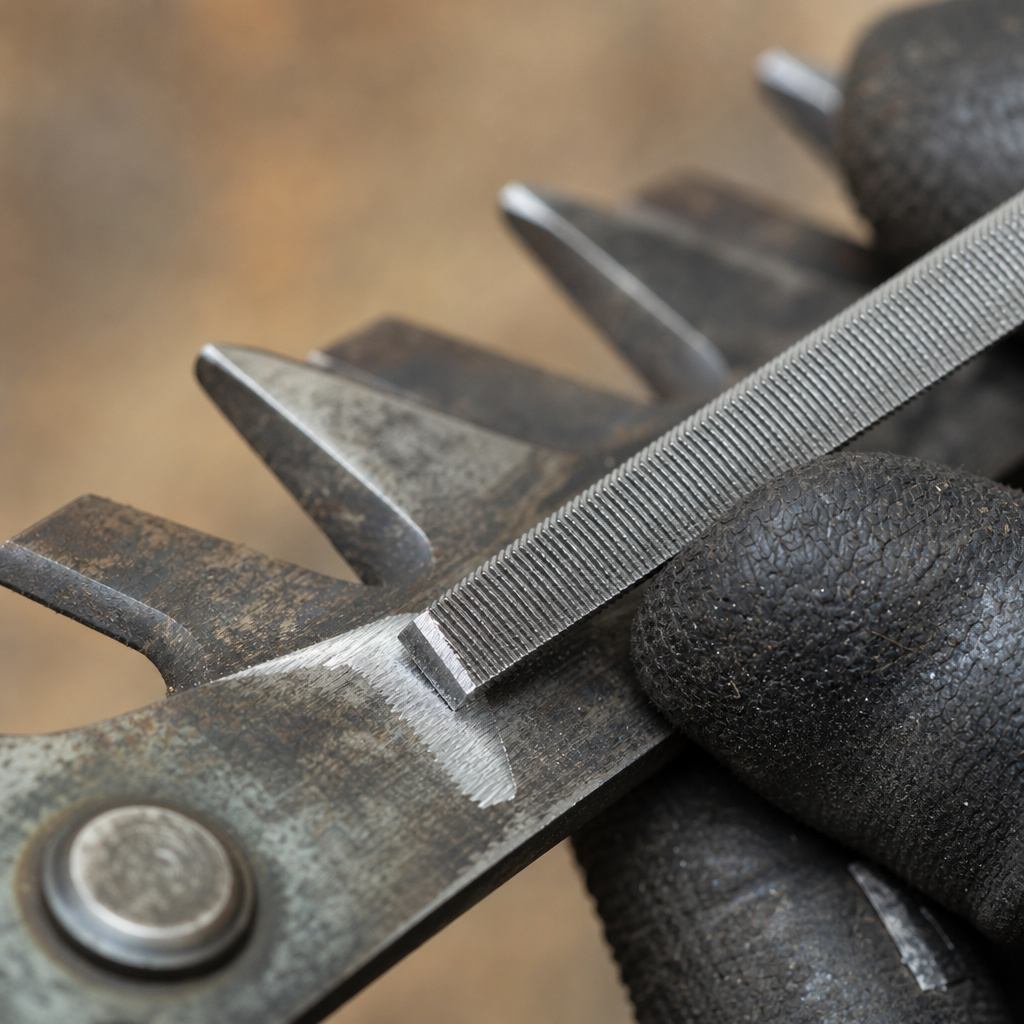
A hedge trimmer blade has a primary bevel angle, typically between 30 and 45 degrees, ground onto the top of each tooth. The flat underside of the tooth is not sharpened; it acts as a cutting anvil against the stationary blade. The goal is to refresh this existing bevel evenly across every tooth without altering its geometry.
Step 1: Secure and Clean the Blades
Clamp the trimmer’s shaft or motor housing firmly to your workbench. The blades should overhang the edge so you have clear access. Spray the resin solvent along the full length of the cutting teeth. Let it sit for two minutes to dissolve sap. Wipe vigorously with your cloth until the metal is clean and shiny. You should be able to see the distinct line between the bevel and the tooth face. If not, clean it again.
Why this matters: Sap and grit are abrasive. Filing over them grinds contaminants into the steel, creating a serrated edge that tears plant cells instead of slicing them. It also loads your file, making it less effective.
Step 2: Find and Match the Existing Angle
Don’t guess. Hold the file flat against the sloped surface of a tooth. That’s your angle. Your goal is to keep the file perfectly flush with that slope for every stroke on every tooth. If you can’t tell, a safe default is 35 degrees. Most Stihl and Husqvarna homeowner models fall between 30 and 40 degrees.
The trick for consistency: Mark the first tooth you sharpen with a dab of paint or a permanent marker. When your hand gets tired and your angle drifts, go back to that tooth, re-seat the file, and recalibrate your muscle memory.
Step 3: File Each Tooth with Purpose
Place the file on the bevel of the first tooth. Apply firm, even pressure and push the file forward and away from you in one smooth motion. Lift the file off the blade and return it to the start position for the next stroke. Do not drag it back. That’s called “draw-filing” and it dulls the file’s teeth against the hard blade steel.
- Number of strokes: 5 to 7 per tooth is usually sufficient. You’re not reshaping, just renewing the edge.
- Pressure: Enough to hear a consistent, light scraping sound. If you’re silent, you’re not cutting. If you’re grinding loudly, you’re forcing it and will wear the file.
- Pattern: Work from one end to the other in order. Don’t jump around. This prevents you from missing a tooth.
Count your strokes. If you do 6 strokes on tooth one, do 6 strokes on tooth fifty. An uneven blade cuts with a hitch you can feel in the tool’s vibration. It’s like a wheel out of balance.
Step 4: The Critical De-Burring Pass
After filing, run your fingernail lightly across the flat side (the back) of the tooth you just worked. You’ll feel a tiny, rough lip of metal — the burr. This is the enemy.
Take your fine whetstone and make 2-3 light passes along that flat side, holding the stone perfectly flat. You’re not sharpening; you’re wiping off the burr. You should feel the roughness disappear. Do this for every tooth you filed.
Consequence of skipping: That burr is weaker than the blade. On the first cut, it folds over to one side, creating a tiny rounded edge. Your freshly sharpened blade will feel dull instantly. This single step separates a professional sharpening from a hack job. It’s the difference between a blade that lasts a season and one that lasts a month.
Step 5: Lubricate and Perform a Test Cut
Wipe the entire blade clean with your cloth. Apply a very light coat of resin solvent or a light machine oil (3-in-1 oil works) to all metal surfaces to prevent rust. This is especially important if you live in a humid climate or won’t be using the trimmer again for a few weeks.
Reconnect the power source. Find a scrap branch or a patch of hedge you don’t mind testing. Make a cut.
It should sound crisp, like slicing celery, not a crushing thud. The cut end should be clean, not ragged. If it’s not, your blades might still be misaligned, or you may have missed the correct angle. For more detailed sharpening methods, our dedicated guide breaks down troubleshooting in depth.
How Often Should You Sharpen Your Hedge Trimmer?

The calendar is a liar. Your usage and the plants you cut tell the truth.
Sharpen at the start of every growing season. Blades dull from sitting over winter due to microscopic oxidation on the edge. Then, sharpen based on hours of use, not months.
| Usage Scenario | Sharpening Frequency | Visual/Physical Cue |
|---|---|---|
| Light Residential (trimming soft, new growth twice a year) | Once per season | Branches start to get pulled through instead of sliced. |
| Heavy Residential (mature hedges, boxwoods, 4-5 trims per season) | Every 25-30 hours of runtime | Noticeable increase in vibration. Tool requires you to push it through the hedge. |
| Professional/Landscaper | Every 10-15 hours of runtime | Constant jamming on pencil-thick branches. Blades feel hot to the touch after use. |
A good habit is to clean the blades with solvent after every major use. This prevents sap from hardening and makes your next cleaning hedge trimmer blades session trivial. It also lets you inspect for damage.
When to Call a Pro (or Buy New Blades)
Sharpening has limits. You can’t file your way out of physical damage.
Take it to a professional sharpening service if:
- You see deep nicks or chips in multiple teeth. Filing them out would require removing so much metal it would change the tooth shape and balance.
- The blades are visibly bent or twisted. This usually happens from hitting a hidden wire or pipe inside a hedge.
- You’re uncomfortable with the process. A pro with a specialized jig will do it in 10 minutes for about $25-$40. It’s cheaper than a new trimmer.
Consider replacement blades if:
- The trimmer is old and the blades are worn down from repeated sharpening. The teeth get shorter and lose their shearing geometry.
- Replacement blades are available and cost less than two professional sharpening sessions. For some older models, this is the more economical long-term choice.
Frequently Asked Questions
Can I use an angle grinder or a Dremel to sharpen my hedge trimmer?
You can, but you probably shouldn’t. The high speed generates heat instantly. If the metal turns blue, you’ve overheated it and softened the steel.
The edge will vanish quickly. A file is slow, cool, and forgiving. If you insist on a power tool, use a variable-speed rotary tool on its lowest setting, touch the blade for no more than two seconds per tooth, and keep a cup of water nearby to dip the blade in and cool it.
How do I know the correct angle if I lost my manual?
Look closely at the teeth. The shiny, worn part is the old bevel. Match your file to that.
If it’s too worn to see, start with 35 degrees. It’s a middle-ground angle that works for most deciduous hedges. For very soft growth, you can go to 30 degrees for a sharper, finer edge. For tougher, woody stems, 40 degrees provides more durable edge strength.
My trimmer still vibrates a lot after sharpening. What did I do wrong?
Uneven sharpening. You took more metal off some teeth than others, creating an imbalance. The blades don’t meet uniformly across their length, causing a chatter. The only fix is to re-sharpen, focusing on giving every single tooth the exact same number of file strokes with identical pressure. Clamp the tool even more securely this time.
Is it necessary to oil the blades after sharpening?
Yes, and not just after sharpening. A light coat of oil after every cleaning prevents rust. Rust pits the finely sharpened edge.
Use a dry lubricant spray or a light machine oil. Wipe off the excess so it doesn’t attract dirt. This is a simple step that dramatically extends the time between sharpening sessions.
The Bottom Line
Sharpening a hedge trimmer isn’t about brute force or fancy tools. It’s about patience, consistency, and a few non-negotiable rules. Secure the tool. Clean it until it shines. Match the angle that’s already there. File forward, never back. Count your strokes. And for the love of a clean cut, de-burr with a whetstone.
Do that, and your trimmer will glide through hedges with a satisfying snick. It will last for years longer than the one your neighbor replaces every other season. More importantly, your plants will thank you with clean, healthy cuts that heal fast and keep diseases out. That’s the real payoff.