Install a Universal Trimmer Head: A Step-by-Step Guide
This post contains affiliate links. As an Amazon Associate, we earn from qualifying purchases.
The most common mistake with a universal trimmer head isn’t buying the wrong one. It’s ignoring thread direction. You’ll feel the resistance, think it’s snugging up, and crank it tighter. Then you hear the plastic crack or feel the threads slip. The head wobbles, the line won’t feed, and you’re back to the store with a stripped shaft.
Installing a universal trimmer head requires matching three things: the shaft size (1 inch or 1-1/8 inch), the thread direction (standard right-hand or reverse left-hand), and the correct adapter from the kit. Thread clockwise for standard threads, counter-clockwise for Stihl-style reverse threads. Hand-thread first, then snug it firmly without over-torquing.
Follow those three matches and the swap takes about ten minutes. Skip them and you’ll spend the afternoon hunting down a replacement gear case or drive shaft. Here’s how to get it right, from checking compatibility to the final test run.
Key Takeaways
- “Universal” means it fits many trimmers, not all. You must verify shaft size, thread direction, and shaft type.
- Stihl trimmers almost always use left-hand (reverse) threads. Most Ryobi, Husqvarna, and Echo models use standard right-hand threads.
- Always disconnect the power source (remove battery, unplug cord, disconnect spark plug) before starting.
- Hand-thread the new head onto the shaft before using any wrench to avoid cross-threading.
- After installation, run the trimmer for a few seconds to check for wobble, vibration, and proper line feed.
The Critical Pre-Install Check
You can’t just grab any universal head off the shelf. The word “universal” is marketing optimism. It means the head comes with a bag of adapters to fit common shaft sizes and thread types, not that it will mate with every trimmer ever made.
Universal trimmer heads are designed to fit a range of trimmers by using interchangeable plastic or metal adapters. Compatibility hinges on three physical factors: the drive shaft diameter (commonly 1 inch or 1-1/8 inch), the thread direction (right-hand/standard or left-hand/reverse), and the shaft profile (curved, straight, solid, or split).
Ignore any one of those and you’ll either get a head that won’t seat or one that runs loose and shreds the gear case bearings within a month.
First, identify your trimmer’s shaft. Look at the exposed threaded end after you remove the old head. Measure the diameter.
Most homeowner-grade trimmers use a 1-inch shaft. Some commercial and higher-end models use 1-1/8 inch. The adapter kit will have sleeves marked for each size.
Second, determine thread direction. This is the step people skip, and it’s the one that costs them a new drive shaft. If you still have the old head, look for an arrow or text on it. “L” or “Left” means left-hand thread. No marking usually means right-hand.
If the head is gone, the definitive method is to feel it. Put a wrench on the shaft nut (if present) or use the shaft lock to hold it steady. Turn the shaft clockwise. If it loosens, it’s a left-hand thread. If it tightens, it’s standard right-hand. Stihl is famous for left-hand threads; Ryobi and most others use right-hand.
Third, check the shaft type. Is it a straight shaft trimmer or a curved one? Is the shaft solid or split (two halves that clamp together)? This matters for how the adapter seats and whether you need to remove any collar or retaining ring. A curved shaft often has a different gear case profile.
Before you touch anything, disconnect all power. For battery trimmers, remove the battery. For corded electric, unplug it.
For gas trimmers, pull the spark plug wire off the plug. This isn’t just about the motor not starting. It’s about the shaft spinning unexpectedly when you’re trying to loosen a nut and taking a chunk out of your thumb.
How to Remove the Old Head
Sometimes the old head is the problem. It’s cracked, the bump-feed mechanism is jammed with grass, or the threads are stripped. Other times, the head is fine but you’re upgrading to a fixed-line head for convenience. The removal process is the same.
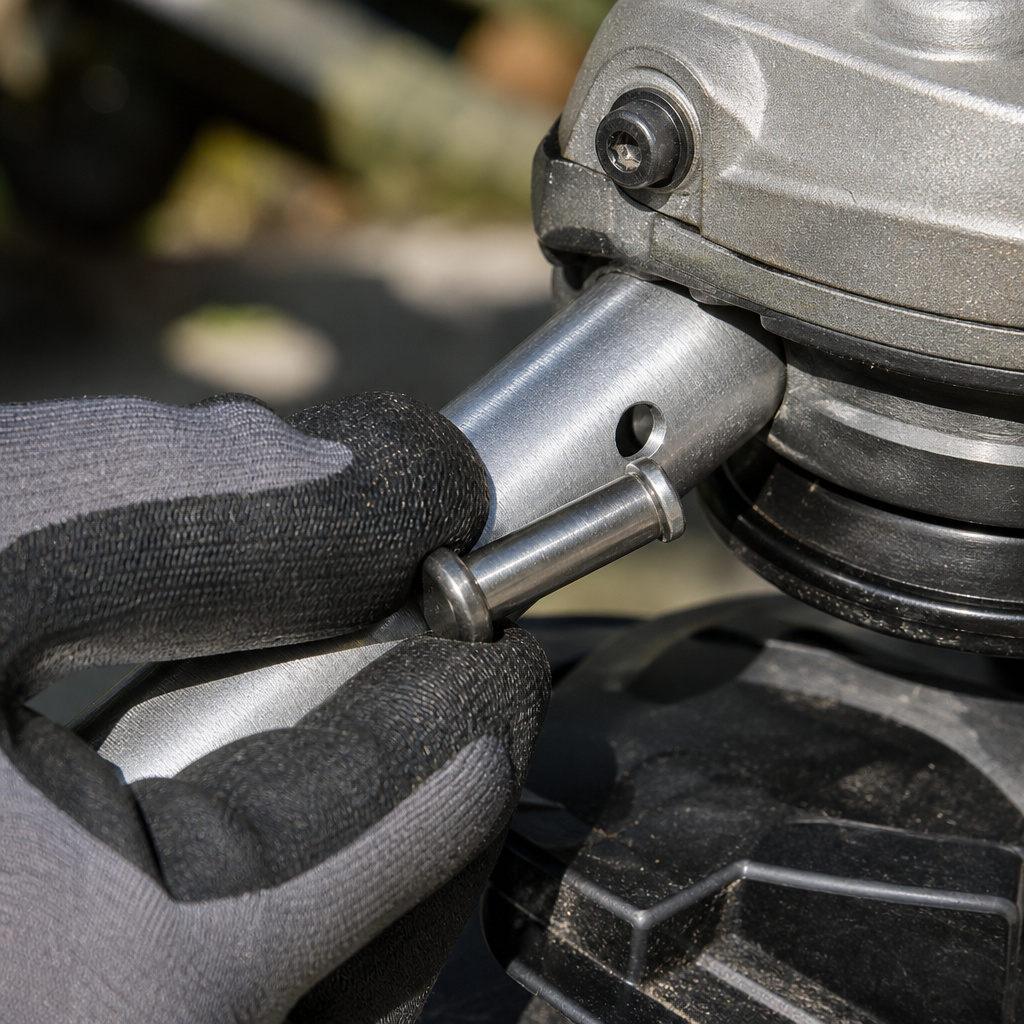
Find the shaft lock. Most trimmers have a button or a hole near the gear case. Press the button or insert a pin, screwdriver, or the Allen key that came with the trimmer into the hole. This locks the shaft so it can’t spin when you apply torque to the head.
If there’s a retaining nut, use a wrench (often 9/16 inch) to loosen it. Turn it counter-clockwise for standard right-hand threads, clockwise for left-hand threads. If the head is threaded directly onto the shaft, you’ll turn the head itself in the same direction.
If the head is stuck, don’t force it. Apply a drop of penetrating oil like WD-40 around the base and let it sit for five minutes. You can also use a hairdryer on low heat for thirty seconds to expand the plastic slightly. Force risks snapping the plastic collar inside the gear case—a part that costs more than the new head.
Once the head is off, clean the area. Grass clippings and dirt packed around the shaft threads will prevent the new head from seating flush. Use a brush or rag to clear the debris. This also lets you inspect the shaft threads for damage.
Selecting the Right Universal Head and Adapter
Not all universal heads are equal. The two main types you’ll encounter are bump-feed and fixed-line. Bump-feed heads require you to tap the head on the ground to advance fresh line. They’re common but can jam. Fixed-line heads use pre-cut segments that auto-feed as they wear; they’re more expensive but eliminate spool winding.
Your choice depends on how much you hate winding spools. I prefer fixed-line heads for routine trimming because they’re consistent. For heavy brush where line wears fast, a bump-feed head with a large spool capacity might be better.
The adapter kit inside the universal head package is your key to compatibility. It’s a bag of small plastic or metal sleeves and possibly a few nuts.
| Adapter Type | Matches | Risk If Wrong |
|---|---|---|
| Size sleeve (1″) | 1-inch diameter shaft | Head sits loose, wobbles violently at high RPM |
| Size sleeve (1-1/8″) | 1-1/8-inch diameter shaft | Won’t seat over shaft, forcing it cracks the adapter |
| Thread direction sleeve | Right-hand (standard) or Left-hand (reverse) threads | Cross-threads or overtightens, stripping shaft threads |
| Shaft profile collar | Curved or straight shaft gear case | Head sits angled, causing uneven line wear and vibration |
Pick the adapter that matches your shaft diameter first. Slide it into the head’s central hole. It should fit snugly but not require hammering.
If it’s loose, try the other size. Then, ensure the thread direction marked on the adapter or in the kit instructions matches your finding. Many kits have separate sleeves for left-hand and right-hand applications.
The last piece is often a flat metal washer or a nylon collar that sits against the gear case. This spaces the head correctly. If your old head had one, reuse it. If not, the kit may include one.
Step-by-Step Installation
Now for the actual install. This is where patience pays off.
Before you start: The trimmer shaft spins at several thousand RPM. A loose head becomes a projectile. The line cutter on the guard is sharp enough to slice skin if the trimmer spins unexpectedly. Secure the shaft with the lock pin. Wear gloves to protect against pinch points and accidental line contact.
- Insert the correct adapter. Press the selected size and thread-direction adapter into the central bore of the new head. It should click or seat flush. If it protrudes, it’s likely the wrong size. Forcing it in will crack the plastic housing of the head on first use.
- Hand-thread onto the shaft. Without any tool, thread the new head onto the cleaned shaft. Turn it clockwise if you have standard right-hand threads, counter-clockwise if you have left-hand threads. This initial hand-turn ensures the threads engage cleanly. If you feel gritty resistance or it won’t start, stop. You likely have the wrong thread-direction adapter. Re-check.
- Snug with a wrench. Once hand-tight, use the appropriate wrench (or the tool provided) to tighten further. The goal is firm, not heroic. You should feel a definite stop. Over-tightening cracks the plastic housing or compresses the adapter, which then fails to grip the shaft after a few hours of vibration. A head tightened correctly will not move when you try to wiggle it, but you won’t see white stress marks forming on the plastic.
- Reinstall the guard and line. If you removed the guard for access, put it back. Load your trimmer line. For bump-feed heads, follow your standard line replacement process. For fixed-line heads, insert the segments as directed. Ensure the line length sticking out is even—about 6-8 inches total. Uneven line causes immediate vibration.
- Test run. Reconnect power. Start the trimmer and let it run for ten seconds at low speed. Listen. Look. A correctly installed head spins smoothly with minimal vibration. If you see wobble or hear a rhythmic knocking, stop immediately. The head is either loose, cross-threaded, or the adapter isn’t seated correctly. A wobbling head at high RPM will shear the adapter or damage the shaft bearings in under a minute of operation.
Why Does Thread Direction Matter So Much?
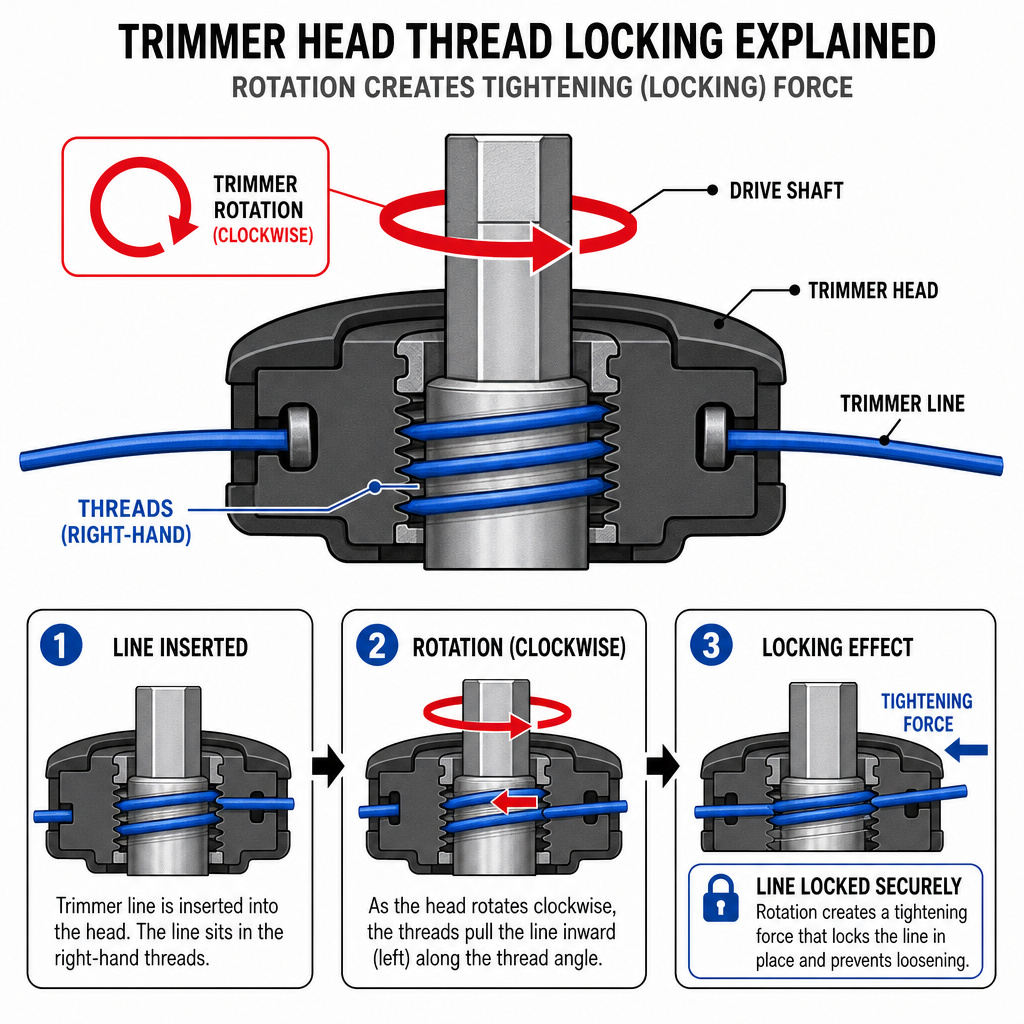
Thread direction isn’t a trivia question. It’s a physical lock.
Standard right-hand threads tighten when turned clockwise, loosen counter-clockwise. Left-hand (reverse) threads tighten counter-clockwise, loosen clockwise. This design isn’t arbitrary. On a trimmer, the head’s rotation during operation exerts a force on the threads.
Standard threads on a standard rotation trimmer naturally want to tighten slightly under load. Reverse threads on a reverse-rotation trimmer do the same. If you install a standard-thread head on a reverse-thread shaft, the operational rotation force works to loosen it every time you use the tool. You’ll crank it down extra hard to compensate, which strips the softer plastic or aluminum threads. The head then works loose during use, leading to wobble, poor cutting, and eventual failure.
Most universal kits include adapters for both directions. The adapter itself has the thread pattern molded or machined into it. You must match the adapter to your shaft’s native direction. The head’s external threads are usually standard; the adapter converts them.
Troubleshooting a Bad Installation
You followed the steps but the trimmer vibrates or the line doesn’t feed. Here’s what to check, in order.
- Adapter seating. Remove the head. Is the adapter still firmly inside the head, or did it pop out? If it popped out, it was the wrong size or wasn’t pressed in fully. A loose adapter allows the head to sit off-axis.
- Cross-threading. Look at the shaft threads. Are they gouged or shiny in a spiral pattern? Look at the adapter’s internal threads. Are they deformed? Cross-threading happens when you force the head onto misaligned threads. It creates permanent damage. If the shaft threads are damaged, you may need a new drive shaft. If only the adapter is damaged, replace it with another from the kit.
- Line balance. Uneven line lengths cause immediate imbalance. Cut them to equal length. For bump-feed heads, ensure the line is wound tightly and evenly in the spool following the proper line winding direction. A loose wind inside the head creates a weight imbalance that manifests as vibration.
- Guard interference. Is the guard bent or misaligned? A guard touching the head or line will cause noise and resistance. Realign it.
If the head still vibrates after checking these, the universal head itself might be poorly balanced—a manufacturing flaw. Rare, but possible. Return it and try a different brand.
Maintaining Your New Universal Head
A universal head isn’t maintenance-free. The adapters are often plastic and wear.
Every few months, or after any particularly heavy use, remove the head and check the adapter. Look for cracks, deformation, or wear marks. Plastic adapters can wear down from vibration, losing their grip on the shaft. If the adapter shows significant wear, replace it with a spare from your kit or order a new one.
Clean the head regularly. Grass and dirt build up inside the bump-feed mechanism or around the fixed-line exits, causing jams. A quick brush-out after each major use prevents this. For a deeper cleaning of attachments, use a soft brush and mild soapy water, then dry thoroughly.
Store the trimmer with the head removed if it’s going into long-term storage. This prevents the adapter from settling under pressure and deforming.
Frequently Asked Questions
Will a universal head fit my specific trimmer model?
It will if your trimmer has a standard 1-inch or 1-1/8-inch drive shaft and the kit includes an adapter for your thread direction. Check your trimmer’s manual or measure the shaft yourself. Models with proprietary shaft designs (some older Echo, certain Honda) may not fit.
How do I know if my trimmer has left-hand or right-hand threads?
If the old head is still on, look for an “L” marking or arrow. If it’s off, use the shaft lock to secure the shaft and turn it clockwise. If it loosens, it’s left-hand. If it tightens, it’s right-hand. Stihl trimmers are almost exclusively left-hand.
Can I over-tighten a universal trimmer head?
Absolutely. Plastic components crack under excessive torque. Tighten until you feel a firm stop, then add only a slight extra turn. You should not see the plastic whitening or straining. Over-tightening also makes future removal nearly impossible.
Why is my new universal head wobbling?
Three likely causes: the adapter isn’t seated fully inside the head, the adapter is the wrong size for your shaft, or the line lengths are uneven. Remove the head, check adapter seating and size, and balance the line.
The Bottom Line
Installing a universal trimmer head is straightforward if you match the three things: shaft size, thread direction, and correct adapter. The thread direction is the killer. Get it wrong and you’ll strip threads. Hand-thread first to avoid cross-threading. Snug it firmly, but don’t crank it like you’re trying to win a contest.
After it’s on, run the trimmer for a few seconds. Listen for smooth operation. Look for wobble. If it vibrates, stop and check the adapter seating and line balance immediately. A good installation lasts for years; a bad one fails before the first lawn is finished.