
Install Plastic Anchor Without Drill: 3 Proven Techniques
This post contains affiliate links. As an Amazon Associate, we earn from qualifying purchases.
To install a plastic anchor without a drill, you have three proven options: use a sharp awl and hammer to create a pilot hole, install a self-drilling anchor like the TOGGLER SnapSkru with a screwdriver, or use an adhesive anchor like the Nephros C-Clip on a smooth, non-porous surface. The method is dictated by your wall material and the anchor type you already own.
The awl method works only on standard drywall and requires you to match the pilot hole size to the anchor’s diameter. Self-drilling anchors skip the pilot hole entirely but demand a specific screw size — a #6 or #8 sheet metal screw — and a minimum drywall thickness of 3/8 inch. Adhesive anchors fail on painted drywall.
What follows: the step-by-step breakdown for each method, the exact tools you need, and the wall conditions that make each one the right or wrong choice. You’ll also get the load ratings so you know what each anchor can actually hold.
Key Takeaways
- The classic awl-and-hammer method only works for soft, single-layer drywall. It will crack plaster, tile, or wood.
- Self-drilling anchors like the TOGGLER SnapSkru require a #2 Phillips driver and a specific screw size (#6 or #8) to function. They have a built-in stop to prevent over-drilling.
- Adhesive anchors, such as the Nephros C-Clip kit, are for smooth, non-porous surfaces like tile or metal only. They will not hold on painted drywall.
- Every anchor has a minimum wall thickness. Going under 3/8 inch for a self-drilling anchor or 1/2 inch for a DEWALT Zip-All means it won’t lock.
- Industry safety standards recommend using only one-quarter of an anchor’s ultimate load rating for actual hanging weight.
The Awl & Hammer Method (For Standard Drywall)
This is the old-school technique for basic plastic expansion anchors. It uses friction and pressure, not cutting.
You need a sharp, pointed awl or a sturdy Phillips screwdriver and a hammer. The goal is to create a clean, compressed hole slightly smaller than the anchor’s body. A drill bit would remove material; the awl displaces it, which helps the anchor grip.
Technical Snapshot: For a standard 1/4-inch plastic anchor, use an awl with a tip diameter of approximately 3/16 inch. The hole must be deep enough for the anchor to sit flush with the wall surface, but not so deep that it loses backing material. This method is not recommended for plaster, concrete, brick, or wood studs.
Step 1: Mark and puncture.
Press the awl’s tip firmly into your marked spot on the drywall. Tap it lightly with a hammer to start the puncture. The tip should bite about 1/8 inch.
Step 2: Enlarge the hole.
Remove the awl. Re-insert it at a slight angle and twist it back and forth to widen the hole. Do not hammer while twisting. You are reaming, not drilling. Check the anchor’s fit frequently.
Step 3: Seat the anchor.
Once the hole is tight, insert the plastic anchor by hand. If it won’t go, twist it in. Never force it with the hammer — that splits the anchor’s wings and ruins its expansion. Tap it gently flush with the wall surface.
Step 4: Drive the screw.
Insert your screw and tighten it. The screw expands the anchor’s body against the back of the drywall.
Where this goes sideways: Using this method on plaster or double-layer drywall. Plaster is brittle and cracks radially from the puncture point. Double-board is too dense for hand pressure; the awl will bend before it penetrates.
If you encounter a wood stud behind your drywall, stop. You don’t need an anchor. Drive a wood screw directly into the stud for a far stronger hold. This is a common discovery during manual screw installation.
Self-Drilling Drywall Anchors
These anchors combine a drill bit tip with a locking mechanism. You install them with a screwdriver or a low-RPM drill. They are the most reliable drill-free option for drywall.
The TOGGLER SnapSkru is the benchmark here. It’s a nylon anchor with a metal drill tip. You drive it like a screw until a built-in “positive stop” seats it flush. Then, driving the screw expands a locking mechanism behind the wall with an audible pop.
| Anchor Model | Best For | Critical Spec | What Happens If Wrong |
|---|---|---|---|
| TOGGLER SnapSkru (SP Regular) | General drywall hanging (#8 screw preferred) | Min. Wall thickness: 3/8″ | In 1/4″ drywall, the anchor spins and never locks. |
| TOGGLER SnapSkru (SPM Mini) | Light-duty fixtures (#6 screw preferred) | Min. Screw length: 1″ + item thickness | A short screw won’t trigger the locking “pop”. |
| DEWALT Zip-All (Zamac alloy) | Heavy-duty point loads in 1/2″+ drywall | Not for overhead use | Overhead vibration loosens the mechanical lock. |
The installation is straightforward but strict.
- Press and start. Place the anchor’s tip on the mark. Using a #2 Phillips bit in a screwdriver or low-speed drill, apply firm pressure and drive it clockwise. The tip will cut its way in.
- Drive to the stop. Keep driving until the anchor’s head is flush with the wall. The positive stop prevents you from driving it through the other side. This is the fail-safe.
- Attach your item and drive the screw. Place your shelf bracket or object over the anchor. Insert the correct screw — a #6 or #8 sheet metal screw for the SnapSkru. As you tighten, you’ll hear or feel a distinct pop. That’s the lock engaging.
The strength comes from compressing the drywall between the locked mechanism and the anchor head. According to TOGGLER’s specs, a #8 screw in 1/2″ drywall has an ultimate tensile strength of 79 lbs. The safe working load is one-quarter of that: about 20 lbs.
Worth knowing before you start: These anchors are not for solid walls. If you hit a wood stud, you’ve just dulled the anchor’s tip for no reason. For mixed-material walls, understanding drill types explains why a hammer drill is the right tool for masonry, not a self-drilling anchor.
Adhesive Anchors for Smooth Surfaces
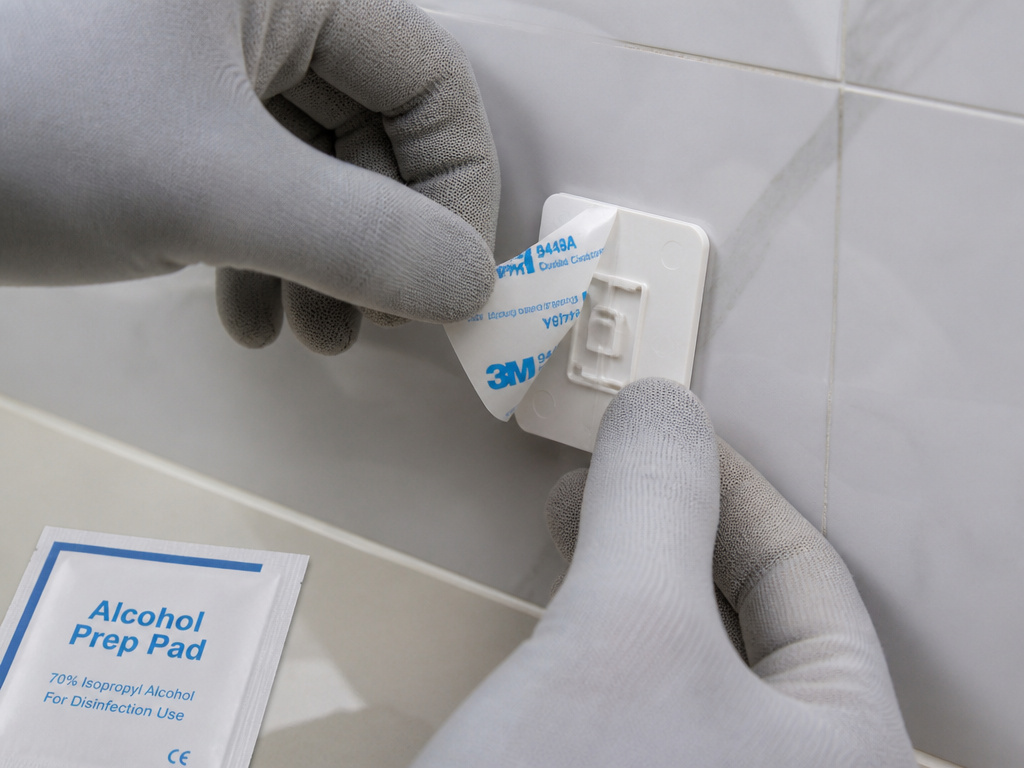
This is a niche solution. Adhesive anchors like the Nephros Drill-Free C-Clip kit use a high-strength foam tape instead of mechanical expansion.
They are designed for one specific scenario: mounting lightweight items on smooth, non-porous surfaces where drilling is impossible or undesirable. Think of a soap dispenser on a ceramic tile backsplash or a wire clip on a metal locker.
The rules are absolute.
- Surface must be smooth and non-porous. Ceramic tile, glass, metal, finished granite.
- Surface cannot be painted. The Nephros guide states clearly: “WARNING: Will not hold and may damage painted surfaces.”
- Surface must be clean and at room temperature. Clean with the included alcohol pad. Do not mount on hot surfaces.
The installation is all about preparation.
- Clean the surface thoroughly with the alcohol pad. Let it dry.
- Peel the protective liner from the adhesive anchor. Do not touch the sticky surface.
- Align and press firmly for 30 seconds, applying pressure across the entire anchor to remove air bubbles.
- Wait several minutes for the adhesive to bond before attaching the screw and clip. Full strength develops over 24 hours.
Skip any of these steps and the bond fails. The adhesive does not chemically fuse with painted drywall or porous plaster. It will peel off under the slightest load. This method is the opposite of a universal fix; it’s a specialist tool.
For other alternative methods for making holes, an adhesive anchor is not one of them. It doesn’t create a hole at all.
Choosing the Right Anchor & Screw
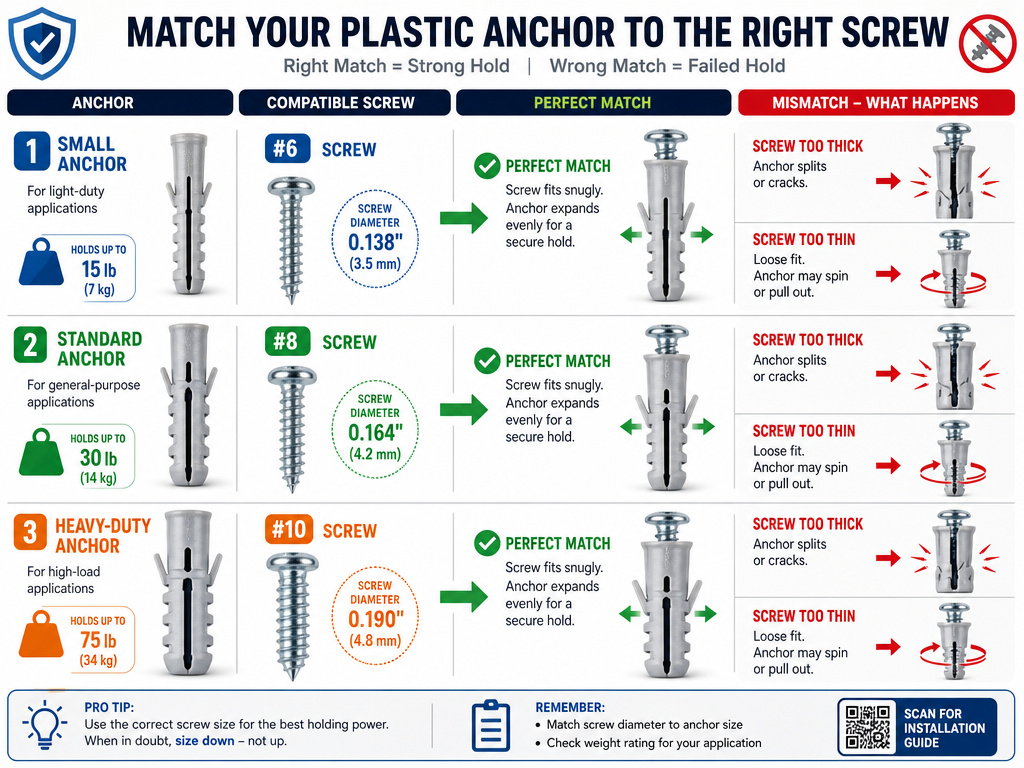
Your anchor is part of a system. The screw is not interchangeable.
For traditional plastic expansion anchors, use the screws they came with. They are designed to expand that specific anchor body. A longer screw might bottom out; a thicker one might split the anchor.
For self-drilling anchors, the screw specification is critical. The TOGGLER SnapSkru requires a fully-threaded sheet metal screw. The screw length must be at least 1-1/4 inches plus the thickness of the item you’re hanging. A #8 screw is the preferred size for the SP Regular model because its diameter correctly activates the locking mechanism.
| Screw Size (#) | Typical Use | Anchor Compatibility | Why It Matters |
|---|---|---|---|
| #6 | Light pictures, small hooks | SnapSkru SPM Mini, small plastic anchors | A #8 screw in a #6-designed anchor will split it. |
| #8 | Shelves, curtain rods, thermostats | SnapSkru SP Regular, standard plastic anchors | The most common size for drywall; balances strength and wall integrity. |
| #10 | Medium-duty shelves, handrails | Some heavy-duty plastic anchors | Requires a sturdier anchor and thicker drywall. Often needs a pilot hole. |
If you need to later remove the screw but leave the anchor in place for reuse, the SnapSkru allows it. Standard plastic anchors usually deform permanently.
Selecting the wrong screw is a primary cause of anchor failure. It’s as important as choosing the correct drill bit size for a traditional installation.
When Your Wall Says “No”
Not every wall will cooperate. The material behind the drywall dictates your next move.
You hit a wood stud. This is the best-case scenario. Abandon the anchor. Drive a 2-1/2 inch wood screw directly into the stud. It will hold more weight than any anchor.
The wall is plaster and lath. The awl method will crack it. Self-drilling anchors struggle with the hard, brittle plaster and the empty space behind the lath. The correct approach is to use a drill with a masonry bit to create a clean hole, then install a toggle bolt or a specialty plaster anchor. This is a job where avoiding a drill creates more problems.
The wall is concrete, brick, or tile. You cannot start a plastic anchor here without a drill. For tile, you risk cracking it. For masonry, you need a hammer drill and a masonry anchor. This is the hard limit of drill-free methods.
The drywall is too thin. If your wall is less than 3/8 inch thick, a self-drilling anchor has nothing to grip. The anchor will spin freely. Your only options are to use an adhesive anchor on a compatible surface or relocate your project to a section with a stud.
These are the moments that separate a quick fix from a proper repair. Knowing when to switch tactics saves the wall and your time. Sometimes, the right answer is to execute a proper drywall anchor installation guide with the correct tools from the start.
Frequently Asked Questions
Can you really install an anchor without a drill?
Yes, but only in specific drywall or smooth tile scenarios. The three methods are the awl technique for soft drywall, self-drilling anchors for standard drywall, and adhesive anchors for smooth surfaces like tile. Each has strict material limits.
What can I use instead of a drill to make a hole?
For drywall, a sharp awl or a Phillips screwdriver and hammer can create a pilot hole for a standard plastic anchor. For other materials, alternatives are limited. Techniques like manual hole creation cover options for wood or soft materials, but for masonry or tile, a power drill is the only reliable tool.
Do self-drilling anchors work on plaster walls?
They are not recommended. Plaster is harder and more brittle than drywall. The self-drilling tip can crack the plaster face, and the anchor may not lock securely against the irregular lath backing. A pre-drilled hole with a masonry bit and a mechanical toggle bolt is a stronger solution.
How much weight can a no-drill anchor hold?
It depends entirely on the anchor type and wall thickness. A TOGGLER SnapSkru with a #8 screw in 1/2″ drywall has an ultimate tensile strength of 79 lbs. The safe working load is about 20 lbs per industry safety standards. Always use multiple anchors for heavier items and distribute the weight.
Can I reuse a self-drilling anchor?
The TOGGLER SnapSkru is designed for reuse. You can remove the screw and the locking mechanism retracts, leaving the anchor body seated in the wall. Standard plastic expansion anchors usually deform permanently and cannot be reused reliably.
What if I need to patch an old anchor hole?
Small holes from plastic anchors are easy to repair. Remove the old anchor, fill the hole with a lightweight spackle, let it dry, sand it smooth, and touch up with paint. Our guide on filling holes walks through the process for holes of any size.
The Bottom Line
You can install a plastic anchor without a drill if you match the method to your wall. For drywall, a self-drilling TOGGLER SnapSkru is the most robust choice. For a tile backsplash, an adhesive Nephros C-Clip works. The old awl method is only for basic, single-layer drywall.
The critical details are the wall thickness, the screw size, and the surface material. Ignore any of those three and the anchor will fail. When you hit a stud, be thankful and use a wood screw. When you hit plaster or brick, get the right drill. This isn’t about avoiding tools; it’s about using the right one for the job in front of you.
