
Drilling into Plaster Walls: The Complete Safety Protocol
This post contains affiliate links. As an Amazon Associate, we earn from qualifying purchases.
To drill into plaster walls, you must first identify whether it’s traditional plaster-on-lath or modern plasterboard, choose a fastener rated for the material’s lower holding strength, and follow a specific procedure to prevent cracking. For plaster-on-lath, use a masonry drill bit, drill slowly, and anchor with a toggle bolt or plaster screw. For plasterboard, use a stud finder to locate framing or use specialized hollow-wall anchors. The process fails if you use a standard wood bit on plaster, over-tighten screws, or ignore hidden hazards like wiring and asbestos.
That distinction between plaster and plasterboard changes everything you buy and every step you take. Most guides treat them as one material, but their construction, one is a brittle, hand-troweled matrix over wood or metal lath, the other is a factory-made panel, dictates completely different failure points. Get it wrong and your shelf pulls out of the wall the first time it holds more than a paperback.
What follows is the breakdown that matters: the sourced load ratings for real plaster, the two-step detection method for asbestos risk in older homes, and the four-tool kit that keeps you from cracking the wall before the bit even breaks through.
Key Takeaways
- Use a masonry drill bit, not a standard twist bit, on traditional plaster to prevent crumbling and cracking as you penetrate the hard surface.
- Anchor choice is non-negotiable: for plaster-on-lath, a 1/4-inch toggle bolt holds up to 175 lbs in withdrawal; for plasterboard, find a stud or use a heavy-duty hollow-wall anchor.
- Always check for asbestos in plaster homes built before 1980. If suspected, the safe drill protocol requires a HEPA-filtered vacuum and wet methods, drilling dry is a health hazard.
- Locate studs with a quality stud finder, but know that behind plaster, wiring and pipes may be set back only 1-1/4 inches from the stud edge, requiring a protective metal plate if you drill too close.
- Drilling into a load-bearing wall stud has strict code limits: the hole cannot exceed 40% of the stud’s width, and its edge must be at least 5/8 inch from the stud’s edge.
The 4 Tools That Replace a $200 Service Visit
You don’t need a pro’s truck. You need the right four things. Missing one turns a simple hole into a repair bill.
First, a stud finder with deep-scanning capability. The basic magnetic ones fail on plaster because the lath confuses them. A decent electronic finder that detects live AC wiring is the minimum. The Zircon MultiScanner i520 is a reliable mid-range pick for this job.
Second, a carbide-tipped masonry drill bit. A standard high-speed steel (HSS) bit for wood will skate, overheat, and crack the plaster’s hard finish coat. You need the carbide tip to grind through the sand-and-gypsum matrix. A 3/16-inch bit is a good starter size for most screw anchors.
Third, a cordless drill with variable speed and a clutch. Speed control lets you start slow to score the surface without skidding. The clutch prevents over-driving screws, which strips the anchor’s grip in the brittle material. A DeWalt 20V MAX or a Milwaukee M18 Fuel drill gives you that fine control.
Fourth, a HEPA-filtered shop vacuum. Plaster dust is ultra-fine. If there’s any chance of asbestos in an older home, this is your primary dust containment tool. A standard shop vac blows the most dangerous particles back into the air.The DeWalt DWV012B is a jobsite-grade option that pairs with your drill.
Where this goes sideways: Using a hammer drill setting on plaster. The impact function shatters the key between the lath, creating a hidden crater behind the wall surface. Your toggle bolt has nothing solid to grip, and the fixture fails within a week.
What’s the Difference Between Plaster and Plasterboard?
The answer changes your drill bit, your anchor, and your success rate. Most DIYers learn the difference after the first shelf falls.
Traditional plaster is a three-layer system: wood or metal lath nailed to the studs, a rough brown coat, and a hard, smooth finish coat. It’s dense, often over an inch thick, and rings solid when you knock on it. Plasterboard, what most people call drywall, is a single sheet of gypsum sandwiched between paper, screwed directly to studs. It sounds hollow.
Why does this matter for drilling? Holding strength. Plaster itself is brittle, but it’s supported by the lath grid. Your fastener must get behind that lath to grip. Plasterboard has no lath; its strength comes only from the paper skin and the gypsum core, which crumbles if you over-tighten.
Plaster walls, particularly those installed before the mid-1970s, can contain 2–5% asbestos fibres within the matrix. Drilling, sanding, or breaking these walls without controlled dust containment violates occupational health standards and poses a long-term inhalation risk. The Memorial University of Newfoundland safety protocol mandates HEPA vacuuming, wet methods, and treating all waste as hazardous.
The pushpin test is free and foolproof. Press a pin or small nail into the wall. If it goes in with little resistance and you feel empty space behind it, you’re likely dealing with plasterboard. If it fights you, makes a gritty sound, and you hit a solid, granular mass, it’s traditional plaster. That gritty feel is the finish coat, which will destroy a standard wood drill bit.
How Much Weight Can a Fastener Actually Hold in Plaster?
The numbers from manufacturer data sheets are lower than you think. Guessing leads to broken TVs.
The USG technical appendix provides allowable resistance values for fasteners in plaster systems. These figures assume the plaster has a compressive strength of at least 900 psi. They are the engineering baseline, not marketing claims.
| Fastener Type | Best For | Max Weight (Approx.) | Why It Works |
|---|---|---|---|
| #8 Plaster Screw | Light pictures, small hooks | 20 lbs withdrawal | Threads cut into the lath and plaster key, creating a mechanical lock. |
| 1/8″ Toggle Bolt | Medium shelves, mirrors | 75 lbs withdrawal | Wings open behind the lath, distributing load across a wider area of the brittle plaster. |
| 1/4″ Toggle Bolt | Heavy shelves, wall cabinets | 175 lbs withdrawal | Larger wings bear against the back of the plaster and lath, offering the highest safe pull-out strength. |
| Plastic Expansion Anchor | Plasterboard only | Not recommended for plaster | Relies on expansion in a soft core; plaster crumbles and won’t hold the expansion. |
A #8 screw into plaster and lath holds 20 pounds in straight pull-out. A 1/4-inch toggle bolt in the same material holds 175 pounds. That’s not a small difference, it’s the difference between a framed photo and a fully loaded bookshelf. The toggle bolt works because its wings swing open behind the lath, bearing against the backside of the solid plaster key.
The plaster key is the whole game. When plaster is applied, it oozes through the gaps in the lath, forming a mushroom-shaped “key” that hardens and locks the wall to the framing. Your fastener must engage with this key or the lath itself. Drilling too large a hole destroys the key around the hole, leaving nothing for the anchor to push against.
The 7-Step Process for Drilling into Plaster Without Cracks
Follow this sequence. Swapping steps two and three is how you hit a pipe.
Step 1: Detect Hazards Behind the Wall. Use your stud finder in its wire-detection mode. Mark any live AC signals clearly. Know that in older plaster homes, wires and pipes are often run through holes in the studs, not in the cavity. According to the National Electrical Code, if a cable runs through a stud hole closer than 1-1/4 inches from the face, it requires a 1/16-inch thick steel nail plate for protection. If your drill point is near a stud edge, assume a plate is needed.
Step 2: Locate and Mark Studs. Switch your finder to stud-scan mode. Plaster and lath can cause false edges, so find both edges of the stud and mark its center. The center is your target for maximum holding power and to avoid edge-protection plates.
Step 3: Apply Masking Tape. Place a small “X” of painter’s tape over your drill mark. This keeps the drill bit from skidding on the hard, smooth finish coat of plaster. It’s a trivial step that prevents the most common surface crack.
Step 4: Select and Set Up the Drill. Insert your carbide-tipped masonry bit. Set your cordless drill to drill mode (hammer function OFF) and a medium-low speed setting. You are grinding, not pounding or cutting.
Step 5: Drill the Pilot Hole. Hold the drill perfectly perpendicular to the wall. Start at the slowest speed to create a dimple, then increase speed slightly. Apply steady, moderate pressure. You’ll feel and hear a change as you break through the plaster and hit the lath or empty cavity. Slow down as you penetrate the lath to avoid splintering it.
Common mistake: Switching to a larger bit immediately after the pilot. The plaster around the pilot hole is already stressed. For a hole larger than 1/4 inch, use a step-bit or ream the hole slowly with the final size bit from the start. Stepping up cracks the key.
Step 6: Clear Dust and Set the Anchor. Use your HEPA vacuum with a brush attachment to clean dust from the hole. For a toggle bolt, insert the bolt through your fixture, fold the wings, and push it through the hole until you feel it pop open. Pull gently to seat the wings against the back of the plaster.
Step 7: Tighten the Fastener. Hand-tighten the screw until the fixture is snug. Use a screwdriver for the final quarter-turn. Do not use a drill/driver on the final tightening, the torque will spin the anchor and strip its grip in the plaster. You’re looking for firm contact, not crushing force.
Skip the vacuum step, and dust fills the cavity behind the wall, preventing the toggle wings from opening fully. The anchor feels tight but pulls straight out under load.
When Your Plaster Wall Might Contain Asbestos
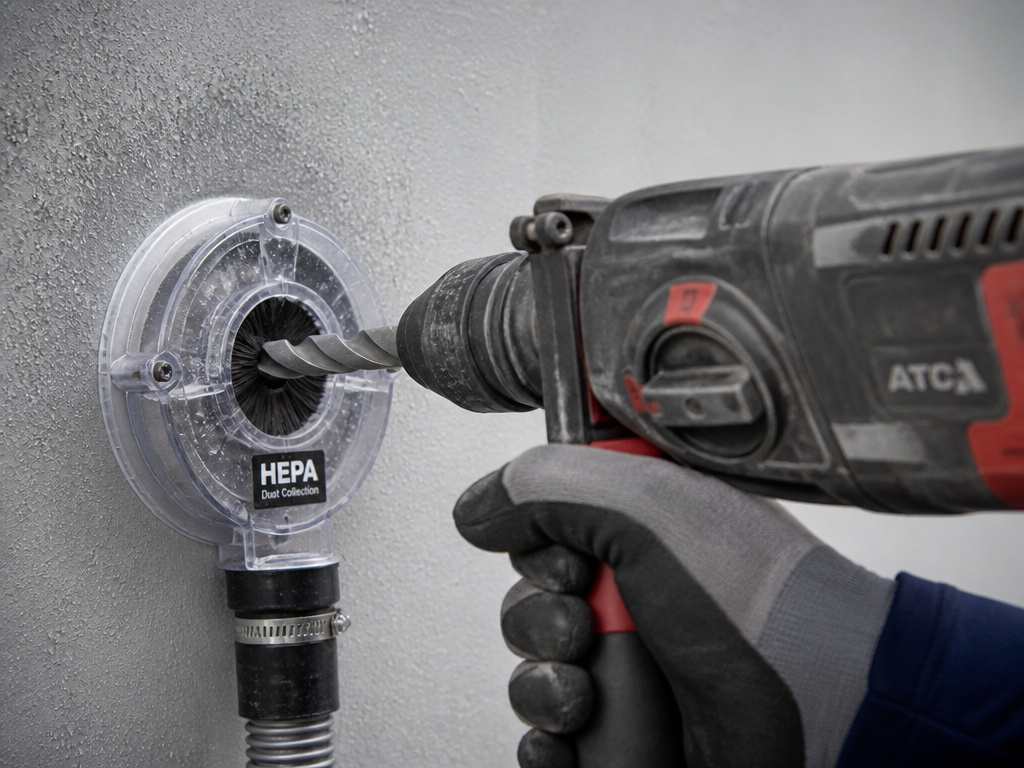 This is the non-negotiable stop sign. If your home was built or renovated before 1980, assume the plaster could contain asbestos until proven otherwise.
The Memorial University safety procedure for drilling into asbestos-containing plaster (2-5% content) is specific. It requires restricting access, pre-cleaning the area with a HEPA vacuum, misting the drill point, using a drill with a HEPA-filtered dust collector attached, and wet-wiping afterwards. All waste, wipes, drop cloths, even the vacuum bag, must be disposed of as asbestos-contaminated material.
You cannot see asbestos fibres. The only way to know is a lab test of a sample collected by a professional. If you’re not prepared to follow the full containment protocol, your safe options are to avoid drilling altogether, mount items only into confirmed studs using a method that minimizes dust, or hire an asbestos-abatement contractor.
Worth knowing before you start: Compressed air is banned for cleanup in asbestos procedures. It aerosolizes the fibres, increasing inhalation risk and spreading contamination far beyond the work area. The rule is HEPA vacuum and wet wipe only.
This is the documented standard for a low-risk operation in a regulated environment. Ignoring it because “it’s just one hole” is how fibres get embedded in carpets and upholstery, creating a long-term exposure source.
How to Choose the Right Anchor for Plaster vs. Plasterboard
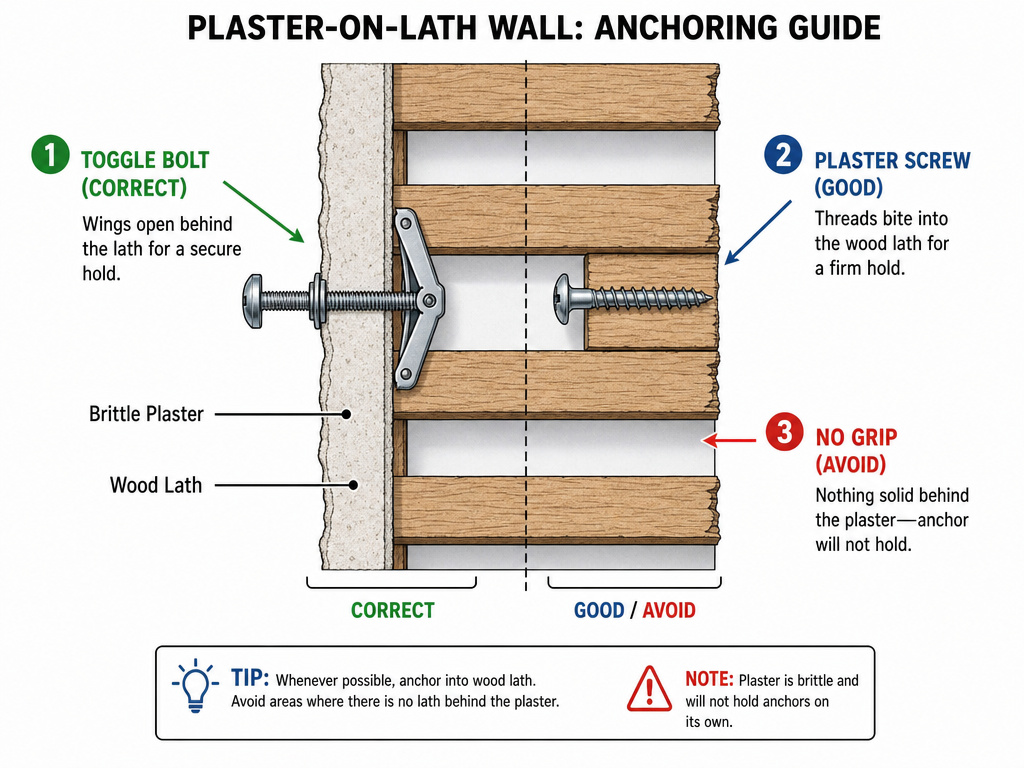 The anchor is the bridge between your fixture and the wall’s hidden structure. Pick the wrong type and the bridge collapses.
For traditional plaster-on-lath: * Toggle Bolts (Zinc or Steel): The default for medium to heavy loads. The 1/4-inch size is the workhorse. It requires a hole large enough for the folded wings to pass through, which is why precise drilling matters. * Plaster Screws (Coarse Thread): For light duty. These have a wide, sharp thread that cuts into the lath. They work only if you hit the wood or metal lath dead-on. If you drill into a cavity between lath strips, they have zero grip. * Plastic Expansion Anchors: Never use these in plaster. They work by expanding against the sides of a hole in a malleable material. Plaster is brittle and crumbles; the anchor just spins.
For plasterboard (drywall): * Stud: Always the best option. Screw directly into the wooden stud with a #8 or #10 wood screw. * Heavy-Duty Hollow-Wall Anchor (like a SnapToggle or E-Z Anchor): For when you can’t hit a stud. These spread the load across a large area of the backside of the board. * Plastic Expansion Anchors: Acceptable for very light loads (under 10 lbs) in plasterboard, but they are the weakest link and pull out easily if overtightened.
The choice flowchart is simple: Are you hanging something over 30 pounds? If yes, use a toggle bolt in plaster or find a stud in plasterboard. Under 30 pounds in plaster, a plaster screw into a located lath strip is sufficient. In plasterboard for light items, a hollow-wall anchor is fine.
Frequently Asked Questions
Can I use a regular drill bit on plaster?
No. A standard twist bit for wood is designed to cut fibers. Plaster is an abrasive, granular material. The bit will overheat, dull instantly, and likely crack the plaster surface as it skids. You need a carbide-tipped masonry drill bit to grind through it cleanly.
How do I find a stud behind plaster?
Use an electronic stud finder with deep-scan capability. Start in a corner where a stud is guaranteed, calibrate the tool there, and then scan across the wall. Because plaster and lath are thick, cheaper magnetic finders often fail. Tapping for a solid sound is unreliable. The most reliable secondary method is to look for outlet or switch boxes, which are almost always nailed to the side of a stud.
What if my drill bit keeps slipping on the plaster wall?
The hard, smooth finish coat is like glass. Apply a small “X” of painter’s tape over your mark. This gives the drill bit immediate purchase. Also, ensure you are starting at the slowest possible drill speed to create a starter dimple before applying full pressure.
How do I repair a hole in plaster after drilling?
For small screw holes, use a vinyl spackle like DAP Fast ‘n Final. Press it into the hole with a putty knife, let it dry, and sand lightly. For larger holes from toggle bolts or mistaken drilling, you need a plaster patching compound like Durabond 90. This sets hard and can be sanded. The key is to underfill slightly, as plaster patchers don’t shrink like spackle.
Is plaster stronger than drywall?
For impact resistance and sound dampening, traditional plaster is significantly stronger. For holding a screw, drywall mounted directly to a stud is stronger because the screw has a solid wood grip. Plaster’s strength for fasteners depends entirely on the integrity of the lath and the plaster key behind the wall, which can be brittle. A screw in pure plaster without lath has almost no holding power.
The Bottom Line
Drilling into plaster involves identifying the wall system, respecting its hidden structure, and choosing a fastener that works with that structure. The 1/4-inch toggle bolt is your anchor of choice for anything substantial, the carbide masonry bit is your only bit choice, and a HEPA vacuum is your non-negotiable partner if your home is from the asbestos era.Find the stud, drill slow and straight, and tighten by hand. Skip any of those, and you’re not hanging a shelf, you’re planning a repair.
