
How to Use a Hyper Tough Air Compressor for Tires & Tools
This post contains affiliate links. As an Amazon Associate, we earn from qualifying purchases.
To use a Hyper Tough air compressor, connect your air hose to the regulator outlet, set the tool pressure using the regulator knob, turn the unit on, and let the tank pressurize before pulling the trigger on your tool. Always drain the tank of moisture after every use to prevent internal rust.
The process is the same for nearly every small, portable oil-free compressor. The brand name doesn’t change the physics, air goes in, gets squeezed, and comes out under pressure. Where new owners get stuck isn’t the theory; it’s the sequence of connections and the one daily habit that prevents a $200 tool from becoming a rusted paperweight in two seasons.
This guide walks through the unboxing, the mandatory first-time setup, and the routine for tires, nailers, and spray guns. You’ll learn how to match the compressor’s output to your tool’s demand, why the tank drain valve is the most important part on the machine, and what to do when the motor hums but no air comes out.
Key Takeaways
- Connect the air hose to the compressor BEFORE turning it on. Pressurizing an open coupler can launch the fitting with enough force to break drywall.
- Set the outlet pressure with the regulator knob, not the cut-off switch. The switch controls tank pressure only; the regulator controls tool pressure.
- Drain the tank after every single use. Water condenses inside the steel tank every time it cools, and that water rusts the tank from the inside out within a year.
- Match your tool’s CFM requirement to your compressor’s output. A framing nailer needs about 2 CFM; a small Hyper Tough unit delivers 2-4 CFM at 90 PSI.
- Store the unit with the drain valve open. This lets any residual moisture evaporate and prevents a sealed, wet environment during storage.
The 6-Step Setup & Safety Checklist
Skip a step here and you risk damaging the compressor, the tool, or yourself. This isn’t a suggestion order, it’s the sequence that keeps metal fragments out of your eyes and the compressor from overheating on its first cycle.
Step 1: Place it on level, solid ground. The motor and pump vibrate. On soft dirt or a slanted driveway, the compressor will “walk” and strain the fittings. Concrete garage floor or a leveled plywood sheet is ideal.
Step 2: Check the oil level if yours is an oil-lubricated model. Most Hyper Tough compressors are oil-free, meaning the pump pistons run on sealed bearings. If your unit has an oil fill cap, it needs SAE 30 non-detergent motor oil to the midpoint of the sight glass. Running it dry seizes the pump.
Step 3: Connect the air hose to the regulator outlet. Hand-tighten the hose’s quick-connect plug into the coupler on the compressor. You should feel it click and lock. Tug on it to confirm.
Step 4: Close the tank drain valve. This is the small petcock or lever on the bottom of the tank. It must be fully closed for the tank to hold pressure. A half-open drain valve is the number one reason a new compressor seems to leak.
Step 5: Plug the compressor into a dedicated outlet. These motors draw a high startup current. Sharing an outlet with a freezer or another tool can trip the breaker or cause a voltage drop that overheats the motor windings.
Step 6: Set the regulator pressure before turning the unit on. Turn the regulator knob counter-clockwise to lower the pressure, then clockwise to increase it. Set it to the lower end of your tool’s required range, you can always go up.
Before you start: Wear safety glasses. Compressed air can blow debris into your eyes from several feet away. Never point a blowgun at your skin, air can enter the bloodstream through a cut and cause an embolism. Keep loose clothing and hair clear of the motor’s cooling fan.
How to Adjust Pressure for Tools, Tires, and Spray Guns
The regulator is your control center. The large gauge shows tank pressure (how much air is stored); the small gauge shows outlet pressure (how much air is delivered to your tool). They are not the same thing.
For a brad nailer (requires ~70 PSI), turn the regulator knob until the small gauge reads 70 PSI. For car tires (typically 32-35 PSI), set it to 35 PSI. The compressor’s cut-off switch, usually set at 100-125 PSI at the factory, will keep the tank filled to that maximum. The regulator ensures your tire doesn’t see 100 PSI and explode.
For a HVLP spray gun, consult the gun’s manual. Most need 25-40 PSI at the inlet, but that’s after the air passes through a filter/regulator at the gun itself. Start with the compressor regulator set to 40 PSI, then fine-tune at the gun.
| Tool / Task | Recommended Outlet PSI | Risk If Set Too High |
|---|---|---|
| Car / Bike Tires | 35 PSI | Overinflation blows the tire off the rim. |
| Brad Nailer | 70 PSI | Nails drive too deep, split wood, or jam. |
| Framing Nailer | 90 PSI | Excessive recoil, bent nails, premature wear. |
| Blow Gun | 30 PSI | Launches debris at dangerous velocity. |
| HVLP Spray Gun | 40 PSI (start) | Orange peel texture, paint runs, overspray. |
The tank gauge will always read higher than the outlet gauge when the compressor is running. That’s normal. If the outlet pressure drops while you’re using a tool, the tool is consuming air faster than the pump can replenish the tank. Stop and let the compressor catch up.
Connecting Hoses, Tools, and Accessories
All Hyper Tough compressors use a standard 1/4-inch industrial quick-connect fitting. The coupler (female part) is on the compressor; the plug (male part) is on your hose.
To connect: push the plug into the coupler until it clicks. The sleeve on the coupler will retract and lock. To disconnect: pull the coupler sleeve back and pull the plug out. Never try to disconnect a pressurized hose, bleed the air first by pulling the relief ring on the coupler.
Common mistake: Using Teflon tape on the quick-connect threads. This isn’t a pipe thread; it’s a straight thread that seals with an O-ring. Tape can shred and clog the tool. If it leaks, replace the O-ring.
For tires, you’ll need a tire chuck with a built-in gauge. Screw it onto the end of your air hose. For nailers or impact wrenches, you need a pneumatic tool oiler in the line if your tools aren’t self-oiling. A few drops of air tool oil in the tool’s inlet each day also works.
If you’re running multiple tools, a manifold or splitter lets you connect two hoses. Just ensure the combined CFM of both tools doesn’t exceed your compressor’s output.
Daily Operation and the Non-Negotiable Shutdown Routine
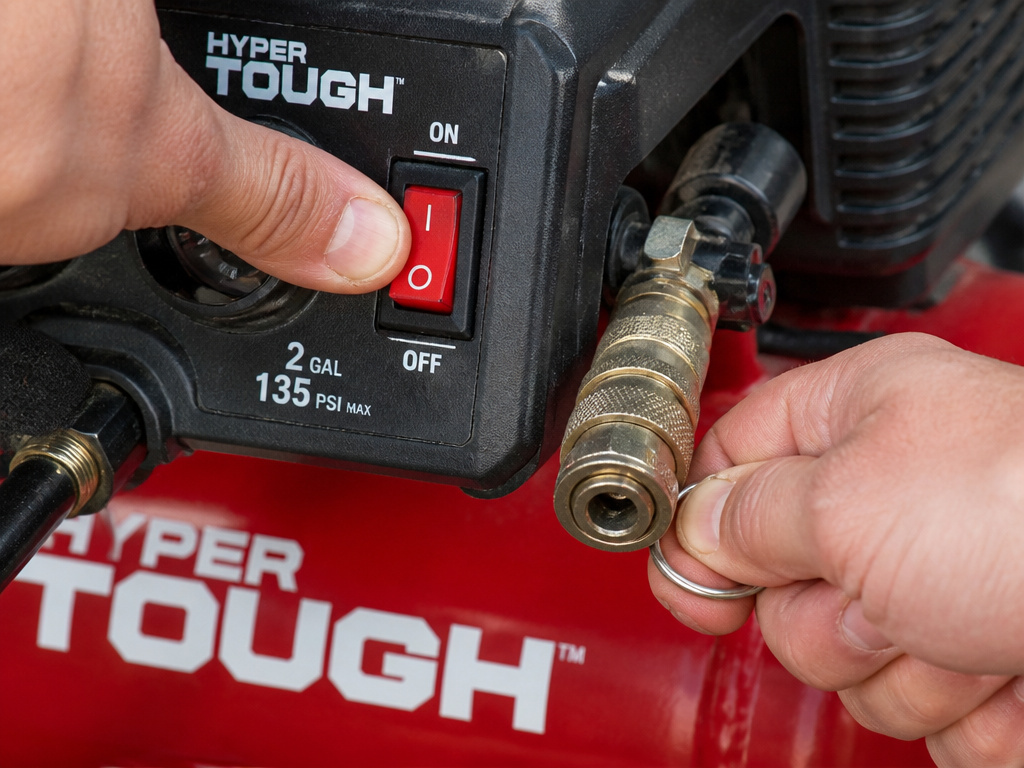 Turn the power switch to ON. The motor will start, and the pump will begin compressing air into the tank. You’ll hear it cycling, loud pumping when filling, silence when the cut-off pressure is reached. Let it complete its first full cycle to pressurize the tank before using any air.
When you’re done working for the day, follow this shutdown sequence: 1. Turn the power switch OFF. 2. Pull the ring on the coupler to bleed all pressure from the hose. 3. Open the tank drain valve fully. You’ll hear a hiss as air escapes, followed by a sputter of liquid water. Let it drain until only a faint trickle of air comes out. 4. Leave the drain valve open overnight. This airs out the tank.
Where this goes sideways: Skipping the drain. A 6-gallon tank can collect a cup of water in a week of humid summer use. That water sits against the steel, and surface rust begins in days. By the end of the season, the rust weakens the tank wall. A rusted air tank is a bomb, it can fail catastastically when pressurized.
Store the hose coiled and hung, not kinked on the floor. Kinks create weak points that eventually burst.
Troubleshooting: When Your Compressor Won’t Start or Build Pressure
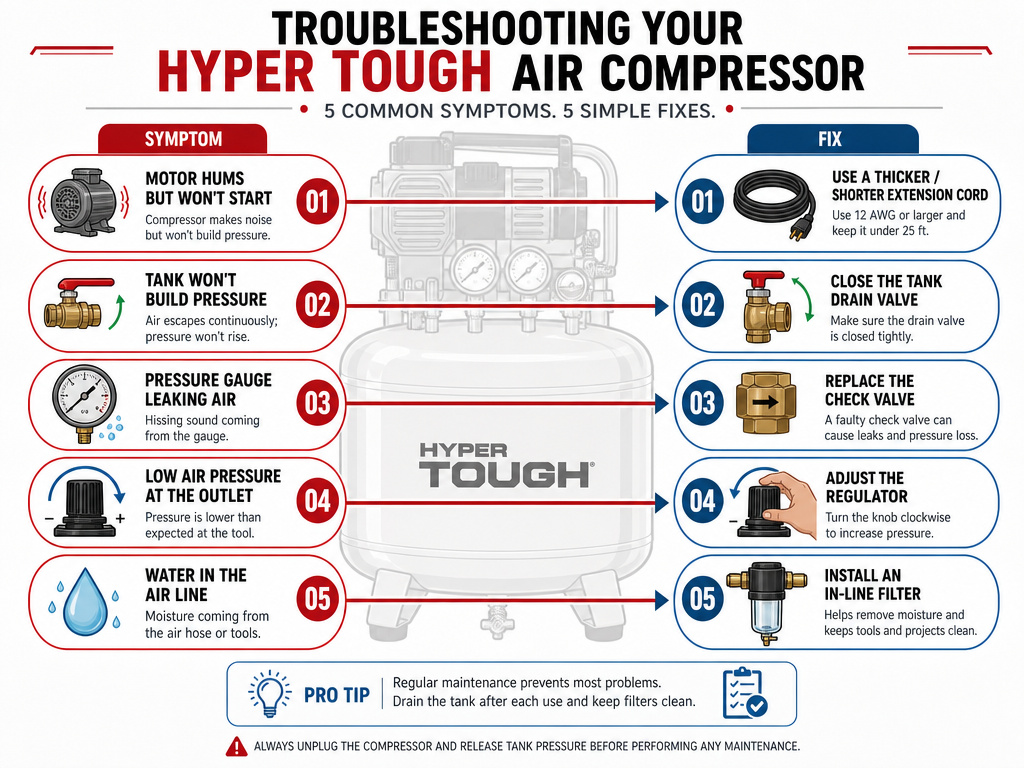 The motor hums but doesn’t turn? The tank fills slowly? These are the first things to check, in order.
| Symptom | Likely Cause | Fix |
|---|---|---|
| Motor hums, won’t start | Low voltage from extension cord | Use a 12-gauge cord under 50 feet. Plug directly into wall. |
| Tank won’t pressurize | Open drain valve | Close the petcock on the tank bottom. |
| Pressure leaks down quickly | Faulty check valve | Located where the pump meets the tank; may need cleaning or replacement. |
| Outlet has no pressure | Regulator knob turned all way down | Turn regulator clockwise to increase outlet pressure. |
| Excessive moisture at tool | No in-line filter | Install a coalescing filter/dryer between hose and tool. |
If the compressor runs but air output is weak, check the pump’s intake filter, a small foam piece under a cover on the pump head. A clogged filter starves the pump. Clean it with soapy water, dry it, and reinstall.
Most Hyper Tough compressors have a thermal overload reset button on the motor. If it overheats, it clicks off. Let it cool for 30 minutes, then press the red button to reset.
Matching Your Compressor to the Job: CFM and Tank Size
Not every job is right for a 6-gallon pancake compressor. The limit is CFM (cubic feet per minute), the volume of air the pump can deliver. Your tool’s CFM demand must be at or below your compressor’s output.
A Hyper Tough 6-gallon unit typically delivers about 2.5 CFM at 90 PSI. That’s perfect for: – Brad nailers (0.3 CFM) – Framing nailers (2 CFM) – Tire inflation – Occasional impact wrench use (with pauses)
It will struggle with: – Die grinders (4-6 CFM) – Sandblasters (8+ CFM) – Continuous spray painting
For those high-demand tasks, you need a larger portable air compressor with a higher CFM rating or a two-stage pump. For a home garage running a single nailer or inflating tires, the smaller unit is the right pick. Our guide on choosing the best air compressor for home use breaks down the specs further.
If you’re running multiple air tools from one outlet, consider a compressor with a larger tank (20+ gallons) to act as a reservoir, giving the pump time to catch up. The right air compressor accessory kits will also include the filters and regulators needed for clean, dry air.
Frequently Asked Questions
Can I leave air in my Hyper Tough compressor?
No. Always drain the tank after use. Storing it pressurized stresses the tank welds and seals, and it traps moisture inside that accelerates rust. The only time to leave air in is if you’re using it again within the same hour.
What kind of oil does it take?
Most Hyper Tough models are oil-free. If your specific model has an oil fill cap, use standard SAE 30 non-detergent motor oil. Do not use automotive detergent oil or synthetic blends unless the manual explicitly says to.
Why does my compressor keep cycling on and off?
That’s normal operation. The pressure switch turns the motor on when tank pressure drops to a “cut-in” pressure (e.g., 70 PSI) and off when it reaches the “cut-out” pressure (e.g., 100 PSI). If it’s cycling every few seconds, you have a large air leak. Spray soapy water on fittings to find bubbles.
Can I use it to paint a car?
You can, but an HVLP spray gun requires a steady, clean air supply. You’ll need a dedicated air filter and water separator at the gun, and you must be meticulous about draining the tank. For best results, a larger compressor with higher CFM is recommended for using a spray gun.
How long will a Hyper Tough compressor last?
With proper maintenance, draining the tank daily, keeping the intake filter clean, and storing it indoors, the oil-free pump should last 500-1000 hours of use. The most common point of failure is the tank rusting out from the inside due to neglected drainage.
The Bottom Line
Using a Hyper Tough air compressor isn’t about brand-specific tricks. It’s about universal compressed air principles: connect before you pressurize, control pressure at the regulator, and drain the tank every single time. That last habit is the difference between a tool that lasts a decade and one that’s dangerous junk in two years.
For inflating tires, driving nails, or blowing out a garage, the small portable units are reliable workhorses. Just respect their limits, check your tool’s CFM needs before you buy. Keep the manual for your specific model’s maintenance intervals, and invest in a good in-line filter if you’re doing any painting. The compressor is simple, but the discipline to maintain it is what separates a seasoned user from a frustrated owner.
