7 Proven Ways to Use an Edge Trimmer the Right Way (And What to Avoid)
This post contains affiliate links. As an Amazon Associate, we earn from qualifying purchases.
Using an edge trimmer correctly means holding it upright, swinging it smoothly in arcs, and keeping the string parallel to the ground. Always wear safety gear, avoid rocks and fences, and maintain a sharp, properly loaded line. Never tilt the tool or force it into thick vegetation.
Edge trimmers (also called string trimmers or weed eaters) are essential tools for creating crisp, clean lines along driveways, sidewalks, flower beds, and lawns. They cut grass and weeds in places your lawnmower can’t reach. Using one effectively isn’t just about turning it on and waving it around—doing it right protects your tool, your lawn, and most importantly, yourself.
Key Takeaways
- Safety First: Always wear long pants, closed-toe shoes, safety glasses, gloves. Clear the area of debris first.
- The Right Angle is Key: Hold the trimmer head so the string spins parallel to the ground at a 90-degree angle to the surface you’re trimming.
- Master the Movement: Move the trimmer head in a smooth, steady arc, letting the tool do the work. Work from left to right if you’re right-handed.
- Maintenance Matters: Keep the line at the proper length, clean the tool after use, and store it properly to ensure longevity.
What is an Edge Trimmer?
An edge trimmer is a power tool designed to cut vegetation using a rapidly spinning monofilament line. The line extends from a rotating head at the end of a long shaft. When held vertically, it can cut grass and weeds along vertical surfaces like walls, fences, and garden borders. When tilted on its side, it becomes an edger, slicing a clean, vertical edge between your lawn and a driveway or flower bed.
This versatility separates it from a dedicated lawn edger, which is a single-purpose tool designed only for cutting a vertical edge. Most homeowners find a string trimmer is the more versatile and practical choice.
Safety First: Gear Up and Clear Out
Before you even start the engine or battery, take these critical safety steps. This isn’t just bureaucratic advice—it prevents trips, falls, protects your eyes from flying debris, and shields your skin.
Before you start:
- Clear the work area of rocks, sticks, toys, wires, and other debris. These can become dangerous projectiles or damage the trimmer line.
Wear Proper PPE (Personal Protective Equipment):
- Eye Protection: Safety glasses or goggles are non-negotiable. The trimmer can throw small stones and debris at high speed.
- Hearing Protection: Gas-powered trimmers are loud. Use earplugs or earmuffs.
- Leg Protection: Wear long, sturdy pants (like denim) to protect your legs.
- Footwear: Closed-toe shoes with good grip are essential. Steel-toe boots are ideal.
- Gloves: They improve grip and protect your hands from vibration and debris.
Check the Tool: Ensure the trimmer head is securely attached and the guard is in place. Check that the line is at the correct length (not too long, which strains the motor, or too short, which reduces effectiveness).
How to Operate Your Edge Trimmer Correctly
Starting the Trimmer
Follow your manufacturer’s instructions exactly. For gas models, this typically involves priming the bulb, setting the choke, and pulling the starter cord. For battery or electric corded models, ensure the battery is charged or the cord is safely routed away from the cutting path before pressing the trigger.
The Proper Holding Technique
- Stance: Stand with your feet shoulder-width apart for balance.
- Grip: Use both hands. Your dominant hand goes on the primary handle with the trigger, and your other hand supports the shaft on the auxiliary handle.
- Position: Keep the shaft parallel to the ground and the spinning head at a comfortable distance from your body. Don’t overreach.
The Correct Cutting Angles
This is the most important technique to master.
- For Trimming (cutting overgrown grass): Hold the trimmer so the string spins parallel to the ground. The tip of the line should lightly touch the grass. Use a gentle sweeping motion from side to side, letting the speed of the line do the cutting. Avoid forcing it down into the soil.
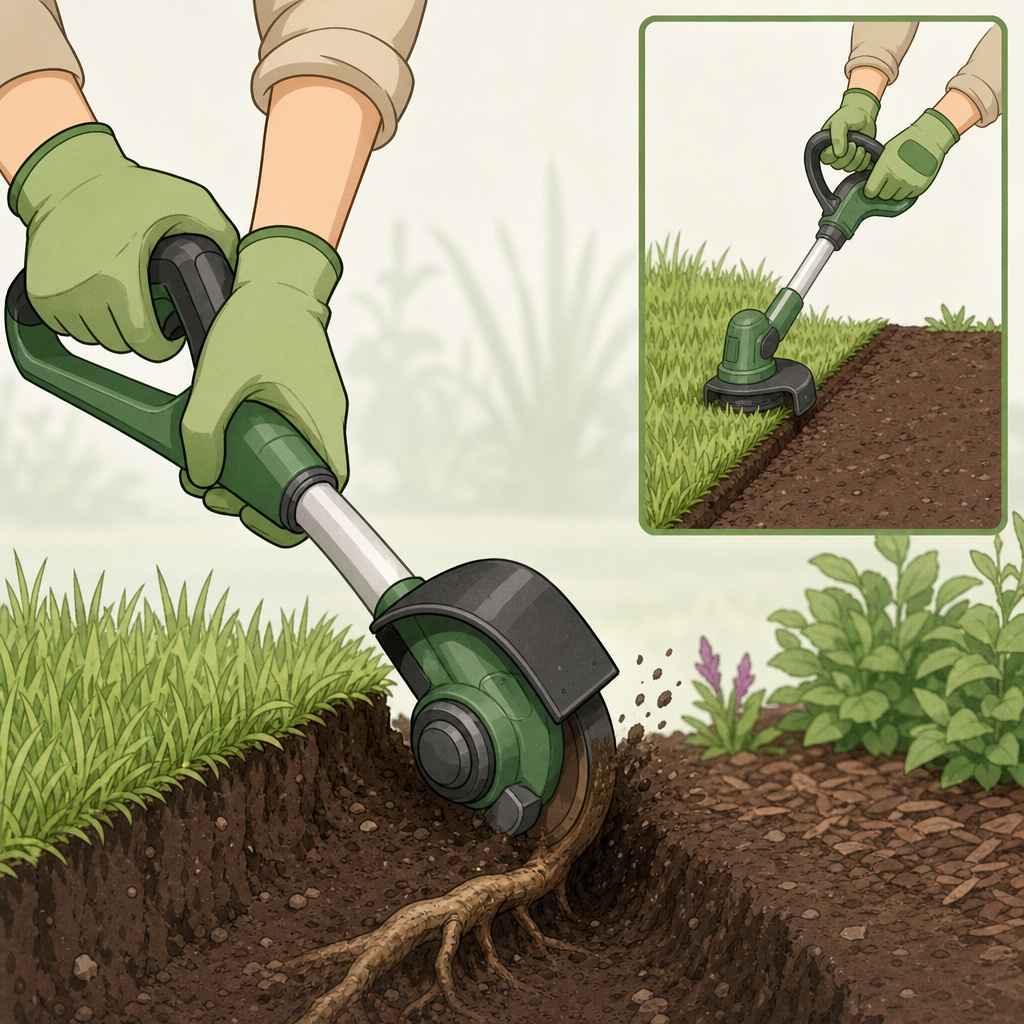
- For Edging (creating a clean vertical edge): Tilt the trimmer about 90 degrees so the string spins vertically. Lower the spinning line onto the edge of the lawn where it meets the driveway or walkway. You want to slice a clean vertical line. Guide the tool slowly forward along the edge.
Efficient Movement Patterns
- Work Smart: For trimming, large area, start at one corner and work your way around systematically, not randomly.
- Direction: If you’re right-handed, work from left to right. This moves the debris away from you and into the already-cut area. The opposite is true for left-handed users.
- Overlap Passes: Slightly overlap each pass to ensure you don’t miss any spots.
- Let the Tool Work: Don’t press down or swing the trimmer like a scythe. A steady, controlled pace yields the best results. If the trimmer is bogging down, you’re either moving too fast or the grass is too thick for one pass.
Step-by-Step: How to Edge a Lawn with a String Trimmer
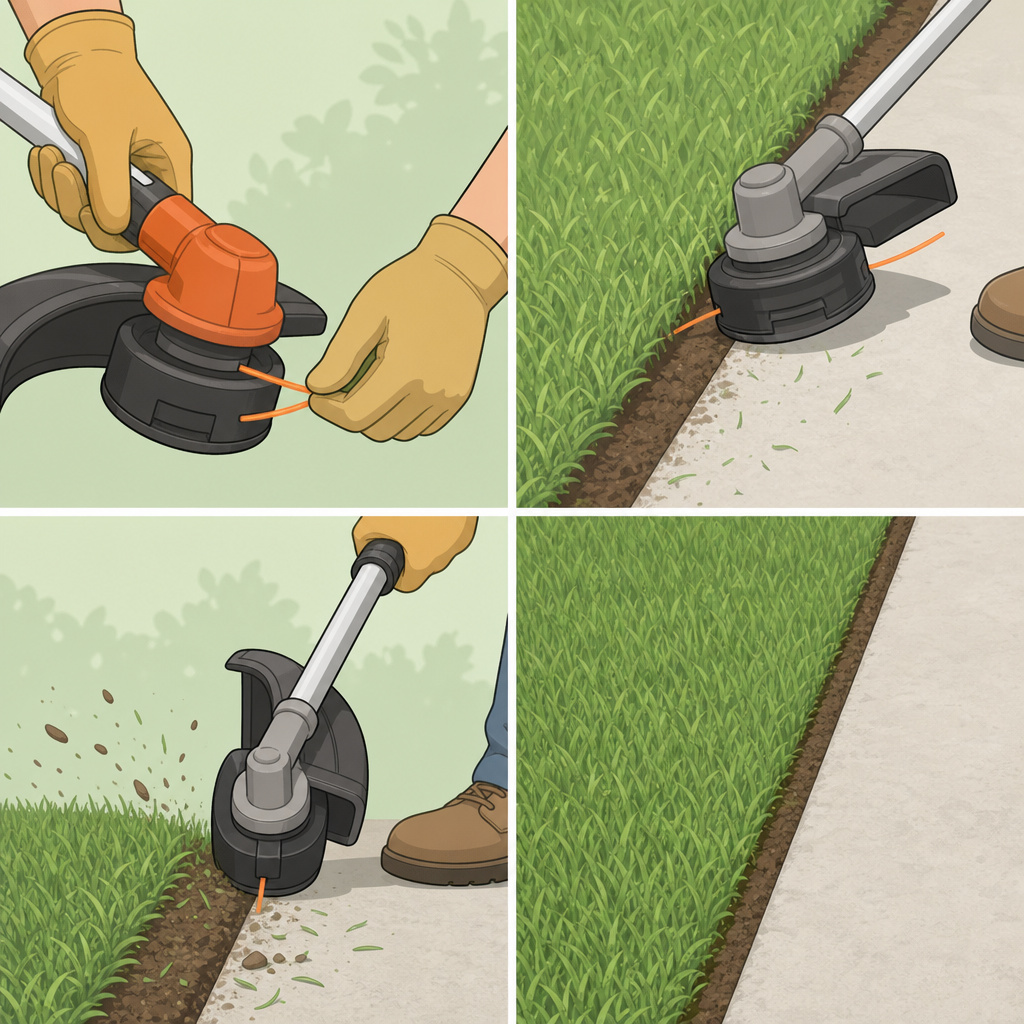
This process turns your trimmer into an edger.
Step 1: Define your edge line. Use a hose, string, spray paint to mark a straight guide if you’re creating a new edge.
Step 2: Mow your lawn first. Trimming before mowing allows the mower to collect the clippings. STIHL recommends this order.
Step 3: Tilt the trimmer head 90 degrees. Position the spinning line directly over the edge of your lawn.
Step 4: Lower the head until the string cuts a inch or so into the soil at the edge of the grass line. This creates a slight trench that defines the edge.
Step 5: Walk backward slowly, guiding the trimmer along your marked line. Keep the head steady at the same depth.
Step 6: Once the edge is cut, you can use the trimmer in its normal horizontal position to clean up any overhanging grass along the new vertical edge.
Common Mistakes to Avoid
- Holding the Trimmer Incorrectly: Failing to hold the trimmer at a consistent angle leads to uneven edges, scalping (cutting grass too short), or damaging the tool.
- Skipping Safety Gear: It only takes one small rock to cause a serious eye injury.
- Using Dull or Worn Line: A frayed brittle line cuts poorly and strains the motor. Replace the line promptly. Soaking nylon line in water for a day can make it more flexible and less brittle, extending its life.
- **Cutting Too Deeply When edging, don’t dig the trench more than 1–1.5 inches deep. This can expose tree roots and create an erosion channel.
- Trimming Against a Hard Surface: Avoid running the line directly against concrete, brick, or metal fences. It will wear down the line extremely fast and can damage the surface. Leave a tiny gap.**
Trimmer Maintenance 101: Keep It Running Smoothly
Basic care after every use will make your trimmer last for years.
- Clean the Head: After use, turn off the trimmer and disconnect the spark plug (gas) or battery (electric). Scrape away grass, mud, and debris wrapped around the head and guard.
- Check the Line: Ensure the line is at the proper length. Bump the head on the ground (for bump-feed models) to advance fresh line as needed.
- Inspect for Damage: Look for cracks in the housing, loose parts, or worn guards.
- Air Filter & Spark Plug (Gas Models): Clean or replace the air filter regularly. Check the spark plug at the start of the season.
- Store Properly: Store the tool in a clean, dry place. Hang it up or place it on a shelf—don’t just throw it in a corner where it can be damaged. For long-term storage, gas models, run the carburetor dry.
Frequently Asked Questions
Can I use any string trimmer as an edger?
Yes, most string trimmers can be tilted to function as edgers. However, dedicated lawn edgers often have a weighted wheel for guidance and cut a more consistent edge.
How often should I edge my lawn?
Edge every time you mow for consistent results. During the peak growing season, you may need to edge every other mowing.
What’s the difference between trimming and edging?
Trimming refers to cutting grass in places the mower missed, like around trees and fences. Edging is the specific act of cutting a clean vertical boundary between the lawn and a hardscape like a driveway.
My trimmer line keeps breaking. What’s wrong?
You’re likely hitting hard objects (rocks, curbs), the line is old and brittle, or you’re advancing too much line at once. Use fresh, high-quality line and avoid contact with hard surfaces.
Bump feed vs. automatic feed—which is better?
Bump feed gives you control by tapping the head to advance line. Automatic feed releases line as needed but can be wasteful. Most homeowners prefer the control of bump feed.
Gas, battery, or electric corded?
Gas is most powerful for large yards. Battery offers great balance of power and convenience with no fumes. Electric corded is lightweight and cheap but limited by cord length.
The Bottom Line
Mastering your edge trimmer is about combining safety, the right technique, and basic maintenance. Hold it at the proper 90-degree angle, let the spinning line do the cutting, and always wear your safety gear. With this approach, you’ll transform from someone who just whacks weeds into someone who creates the crisp, professional-looking edges that define a well-kept lawn. The right technique saves you time, protects your investment, and delivers results you can be proud of.