How to Use a Pole Saw Safely: The Right Cuts & Gear
This post contains affiliate links. As an Amazon Associate, we earn from qualifying purchases.
Using a pole saw requires matching three things: the right type of tool for the job (manual, electric, battery, or gas), the correct safety gear from head to toe, and a specific cutting sequence for branches over two inches thick. The tool does the reaching so you don’t need a ladder, but that only works if you stand in the right spot and let the saw do the cutting.
Most people grab their pole saw, look up at the branch, and stand directly under it. That’s the first and last mistake. You’re in the drop zone.
A falling six-inch oak limb doesn’t drift, it accelerates. By the time you hear the crack, it’s too late to move. The right position is always off to the side, with your feet planted and the pole extended just enough to reach, not so much that it wobbles.
This guide walks through the gear you cannot skip, the step-by-step cuts that prevent bark tearing, and how to handle the common surprises like a jammed blade or a dead branch that snaps unpredictably. We’ll also cover which saw type actually makes sense for your yard and when to put the tool down and call a pro.
Key Takeaways
- Never use a pole saw while standing on a ladder, stool, or uneven surface. The combination of overhead weight and potential kickback creates an unstable fall hazard every time.
- Full safety gear is non-negotiable: ANSI Z87.1 safety glasses, a hard hat with a face shield, cut-resistant gloves, sturdy boots, and hearing protection for gas models. Falling debris and sawdust aim for your eyes.
- For any branch thicker than your wrist (about 2 inches), you must use the three-cut method. Skipping the initial undercut guarantees the bark will strip down the trunk, creating a large wound that invites disease and insects.
- Let the saw do the work. Forcing the blade or chain causes binding, kickback, and premature wear. If the cut isn’t progressing, the blade is likely dull, the chain is loose, or you’re trying to cut something beyond the tool’s capacity.
- Know your limits. Homeowner-grade pole saws handle branches up to 6-8 inches in diameter. For anything larger, or if the branch is over a roof, driveway, or power line, hire a professional arborist.
What Safety Gear Do You Absolutely Need?
This isn’t optional landscaping. You’re swinging a sharp blade or a fast-moving chain at head height, often above your head. The debris it generates, sawdust, wood chips, bark flakes, and occasionally whole twigs, falls directly toward your face. Your regular yardwork jeans and sunglasses won’t cut it.
Before you start: A gas-powered pole saw operates at 100-110 decibels, enough to cause permanent hearing damage within 15 minutes of exposure. The chain can throw debris at over 50 mph. A falling branch carries hundreds of pounds of force. Mitigate these with earmuffs, a face shield, and positioning yourself outside the fall zone.
You need a head-to-toe system. Start with eye protection that meets the ANSI Z87.1 standard. These glasses have side shields and are impact-rated. Regular safety glasses from the hardware store usually qualify; check the stamp on the temple. A face shield attached to a hard hat is better, it protects your entire face and scalp from falling debris.
Gloves should be cut-resistant, like those made with Dyneema or Kevlar fibers. They guard against nicks if your hand slips on the pole and against the sharp edges of cut branches during cleanup. Wear sturdy, closed-toe boots with slip-resistant soles. The ground under a tree is often uneven and covered in twigs.
For your torso, wear a long-sleeve shirt and pants made of a dense fabric like denim or canvas. This protects against scratches from brush and reduces the severity of any accidental contact with the moving chain. If you’re using a loud gas-powered model, add hearing protection, muffs are more reliable than foam plugs for extended use.
A shoulder strap or harness is the final piece most people skip. It seems like an accessory. It’s not.
After ten minutes of holding a fully extended 15-pound gas pole saw at arm’s length, your shoulders burn and your grip weakens. A harness like the one for the Makita power head system transfers the weight to your torso. Your control improves immediately, and you can work longer without fatigue-induced mistakes.
Which Type of Pole Saw Actually Fits Your Job?
Pole saws come in four flavors, each with a different power source and best-use case. Picking the wrong one means either struggling through a simple task or owning a tool that’s overkill and a hassle to maintain.
| Type | Best For | Biggest Limitation | Maintenance Required |
|---|---|---|---|
| Manual (Hand-Powered) | Occasional pruning of thin branches (under 2″), quiet neighborhoods, small budgets. | Physical effort. Cuts over 5-6 inches require multiple passes and stamina. | Blade sharpening, joint lubrication. |
| Corded Electric | Suburban yards with outdoor outlets, medium-duty trimming (branches up to 4-5″). | Cord management. Limited by extension cord length and gauge (use 12-gauge minimum). | Chain tension, bar oil, cleaning. |
| Battery-Powered (Cordless) | Most residential properties, mobility without gas fumes, moderate branches (up to 4-6″). | Runtime and power fade. Battery life dictates work pace; thick cuts drain charge fast. | Chain tension, bar oil, battery care. |
| Gas-Powered | Large properties, professional use, frequent cutting of thick hardwood (up to的阿8″). | Noise, weight, fumes, and complex maintenance. Heaviest and loudest option. | Fuel mixing, air filter, spark plug, chain, bar oil, annual professional service. |
The manual saw is a simple telescoping pole with a pruning blade at the end. It’s light, silent, and cheap. You pull it down in a sawing motion. It works for deadwood and small live branches, but cutting anything over about five inches thick becomes a serious upper-body workout. The blade can also bind in green wood.
Corded electric models, like some from Oregon or Remington, offer consistent power. You’re not waiting for a battery to charge. The limitation is the cord. You need a heavy-duty outdoor extension cord, and you must constantly be aware of its location to avoid cutting it. This adds a significant tripping hazard and limits your range.
Battery-powered pole saws, such as the EGO Power+ or DeWalt models, are the sweet spot for most homeowners. They’re powerful enough for most residential pruning, start instantly, and are relatively quiet. The trade-off is battery life.
Cutting a series of three-inch branches might take one 5.0Ah battery; a full day of clearing overgrowth will require two or three batteries and a charger on standby. For heavy-duty trimming, consider a system like the Makita XUX02SM1X4 power head with a pole saw attachment. The power transfer through the shaft is efficient, and you can share batteries with other tools.
Gas-powered saws from Stihl or Husqvarna are the most powerful. They’ll chew through thick, hard branches that would stall an electric motor. They’re also the heaviest, loudest, and require the most upkeep. You must mix oil and gas, clean the air filter, and service the engine annually. They’re for users who already understand two-stroke engine maintenance and have acres to manage.
How Do You Prepare the Area and the Tool?
Rushing this step guarantees a problem. You either hit something you didn’t see, trip over a root, or discover your saw won’t start when you’re already aiming at a branch.
First, walk the area. Look up for power lines. The rule is a minimum ten-foot clearance in all directions.
If a branch is near a line, call your utility company, they often provide free trimming for line clearance. Look for wasp nests or bird nests in the canopy. Look down for rocks, garden hoses, toys, or uneven ground that could twist your ankle.
Clear the drop zone. Move patio furniture, potted plants, and vehicles. Establish a perimeter and keep people and pets outside it. The falling zone is often wider than you think; branches can bounce or roll.
Now inspect the tool. For a manual saw, check that the telescoping sections lock securely and the blade is tight. For powered models:
1. Chain Tension: The chain should be snug against the bar but still pull freely by hand. A loose chain will derail or throw; an overly tight chain overheats and damages the bar.
2. Bar Oil: Fill the reservoir. A chain running without oil ruins the bar and chain in under a minute. The oil flings off as it operates, so check it every 15-20 minutes of runtime.
3. Power Source: For cordless, use a fully charged battery. For gas, use fresh fuel mix (typically 50:1). Old gas is the number one reason gas saws fail to start or run poorly.
4. Function Check: With the chain clear of anything, start the saw briefly (if powered) to ensure it runs smoothly. Listen for unusual noises.
A pole saw’s effective reach is the pole length plus your height plus your arm extension. A 10-foot pole in the hands of a 6-foot person can reach a branch tip about 18-20 feet high. Manual poles can be longer because they’re lighter, but control diminishes with each extra foot of extension.
Finally, plan your cuts. Start with the lowest branches you need to remove. This opens up the canopy, gives you better visibility, and often makes higher branches easier to reach. Identify which branch you’ll cut first, second, and third. Having a plan prevents you from making a random, destabilizing cut that traps your saw or brings down more than you intended.
What’s the Correct Stance and Grip?
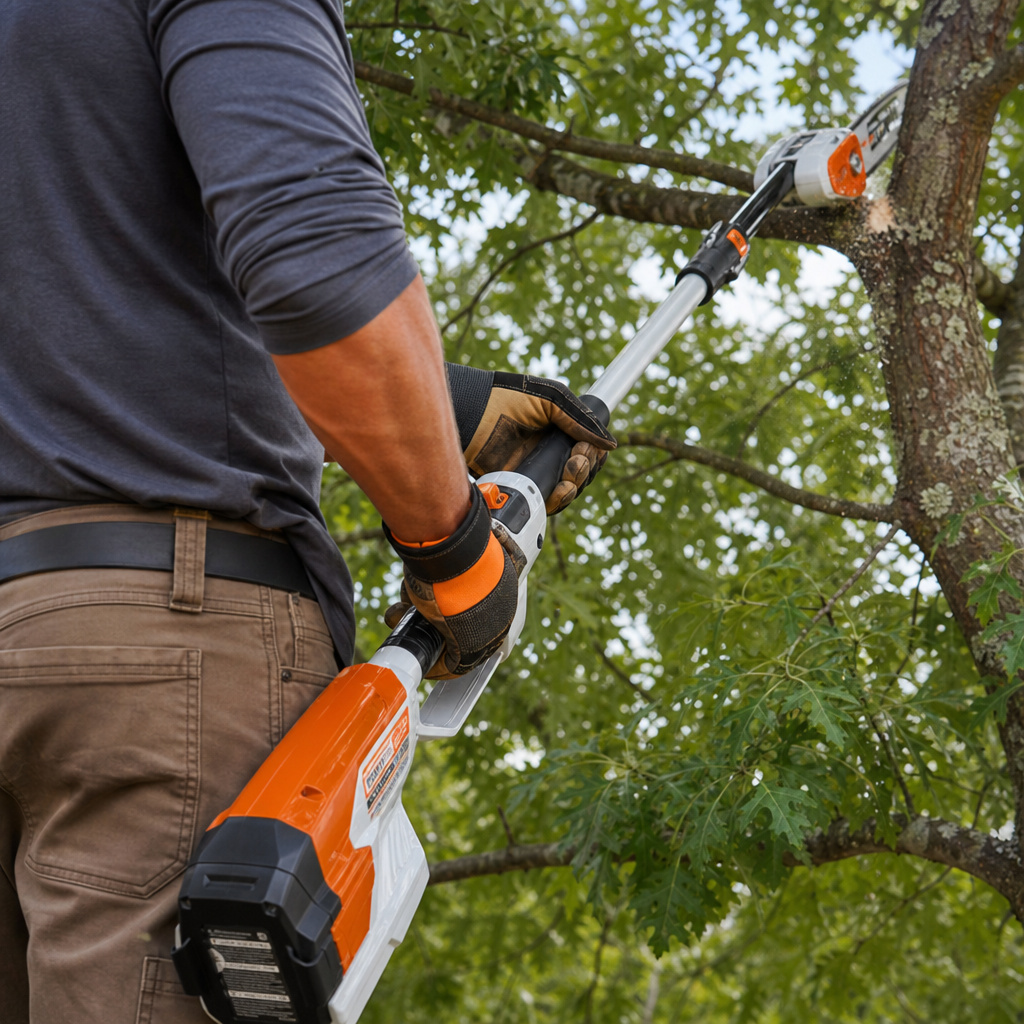
Your body position is your primary safety system. Get it wrong, and even a perfect cut can go bad.
Stand with your feet shoulder-width apart, flat on solid ground. Never stand on a ladder, step stool, or the bed of a truck. The pole’s length already creates leverage; adding height turns a small slip into a long fall. Your footing must be 100% stable.
Grip the pole with both hands. Your dominant hand should be on the lower control handle (where the trigger is, if powered). Your other hand supports the pole further up, providing stability and guiding the cutting head. Keep a firm but not white-knuckle grip. Your arms will be at least partially extended, let your legs and core provide stability, not just your arms.
Critically, position your entire body to the SIDE of the branch’s fall line. Look at where the branch will hinge and fall. Place yourself so that when it drops, it lands well away from you. You should never be looking straight up through the branch you’re cutting. This keeps you out of the path of the falling wood and protects you if the saw kicks back.
If you’re using a shoulder harness, adjust it so the weight is balanced on your shoulders and the pole is easy to control without straining your arms. The harness isn’t for comfort, it’s for control. A controlled saw is a safe saw.
The Three-Cut Method for Thick Branches
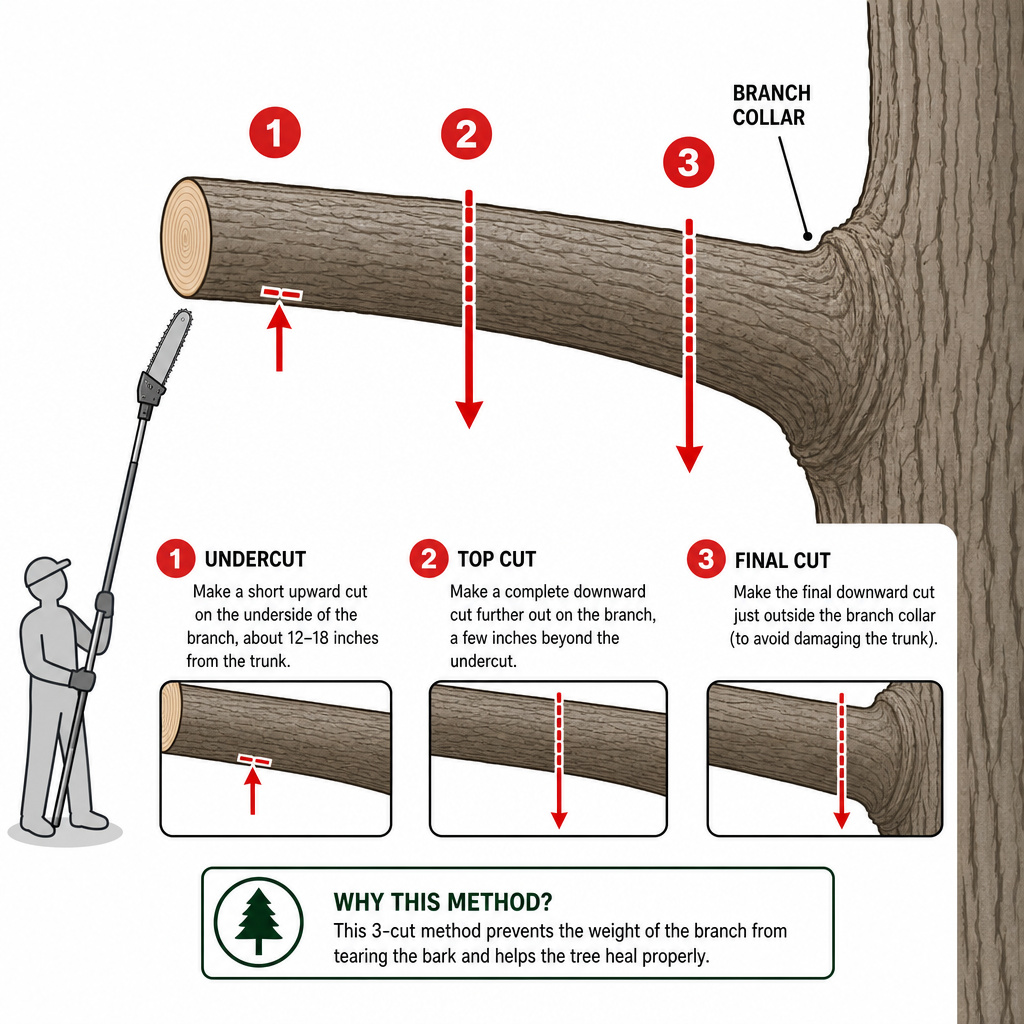
For small twigs under two inches, a single top-cut is fine. For anything larger, you need a three-part sequence. This prevents the branch’s weight from tearing the bark down the side of the tree as it falls, which creates a huge wound that heals poorly and invites pests.
Here is the sequence for a branch thicker than your wrist:
- The Undercut (Bottom Cut). Position the saw blade on the underside of the branch, about 6 to 12 inches away from the trunk. Cut upward about one-quarter of the way through the branch. This creates a clean fracture line on the bottom. Purpose: When the branch falls later, it will crack at this pre-cut line, preventing a long strip of bark from ripping off the tree.
- The Relief Cut (Top Cut). Move the saw a few inches further out along the branch from your undercut, toward the branch tip. Now cut straight down from the top, all the way through the branch. The branch will break at the undercut and fall away cleanly, leaving a stub. Purpose: This removes the main weight of the branch safely, without tearing.
- The Final Collar Cut. Now that the heavy section is gone, you can safely make the finishing cut. Cut the remaining stub off flush, just outside the branch collar, the slight swollen ring where the branch meets the trunk. Do not cut into the collar or leave a long stub. Purpose: This allows the tree to form a proper callus and heal the wound efficiently.
Skipping step one is the most common error. I’ve seen it tear a four-foot strip of bark off a mature maple. That wound took years to close and was a highway for borers the following summer. The three-cut method is slower, but it’s the difference between pruning and harming the tree.
For dead branches, be extra cautious. They are brittle and can snap unpredictably. Use the same three-cut method, but expect pieces to break off earlier. Wear your face shield.
How Do You Handle a Jammed Blade or Kickback?
Even with perfect technique, wood pinches, knots grab, and chains catch. Here’s what to do when the cut stops going smoothly.
If the Blade Binds (Manual Saw): Don’t force it. You’ll likely bend the blade or the pole. Ease off the pressure, then try to wiggle the saw slightly to open the kerf (the cut slot). Sometimes pulling the saw out a few inches and re-entering the cut from a slightly different angle frees it. If it’s truly stuck, you may need to use a second tool like a pruning saw on the stub to relieve pressure.
If the Chain Binds (Powered Saw): Immediately release the trigger. Forcing a bound chain can stall the motor, overheat it, or derail the chain. You’ll need to manually free the bar. Shut off the saw. Use a wooden wedge or a plastic felling wedge to gently tap into the cut behind the bar to open it up. Never use a metal wedge, it will damage the chain. Once the bar is free, restart and finish the cut with careful, steady pressure.
Kickback is the sudden, violent upward and backward motion of the guide bar. It happens when the moving chain’s nose contacts an object, like another branch, or when the wood pinches the chain near the bar tip.
I was trimming a pine limb with a Husqvarna gas pole saw when the tip glanced off a hidden, smaller branch behind my target. The saw kicked back so fast my left hand slipped off the pole. The bar missed my face by inches because I was standing to the side. If I’d been directly underneath, it would have been a direct hit. Now I scan for any secondary branches in the cutting arc twice.
To minimize kickback:
* Always be aware of the bar tip. Never let it contact anything.
* Maintain a firm, two-handed grip.
* Use a saw with a low-kickback chain and a functioning chain brake.
* Stand to the side, never in line with the cutting bar.
If you feel the start of a kickback, your instinct will be to hold on tighter. Instead, let go of the trigger immediately and let the saw fall away from you, while maintaining your grip on the pole to guide it down. The chain brake on modern saws should engage.
When Should You Put the Saw Down and Call a Pro?
A pole saw is a pruning tool, not a tree-felling tool. Knowing its limits protects your property and your safety.
Call a licensed, insured arborist for:
* Branches over 8 inches in diameter. Most homeowner saws struggle here, and the weight of the falling wood is dangerous.
* Any branch that is overhanging a structure (roof, garage, deck, power line). The risk of property damage is too high.
* Branches that are dead, cracked, or otherwise unstable at the connection point (the union). These can fall unpredictably.
* Work that requires climbing or that is beyond a safe reach from the ground. If you’re considering a ladder, it’s a job for a pro with climbing gear.
* If the tree is visibly diseased or the trunk is compromised. Your pruning cut could be the final stress that causes a larger failure.
The cost of an arborist for a few hours is less than the deductible on your homeowner’s insurance for a damaged roof or the medical bills from a fall. This is especially true when dealing with the precise angles required for crown molding or other finish work, precision matters.
Post-Cut Cleanup and Tool Maintenance
The job isn’t done when the last branch hits the ground. Leaving a mess is a hazard, and neglecting the tool guarantees problems next time.
First, clear all cut branches and debris from the work area. Drag them to a processing pile. This eliminates tripping hazards and lets you see if you dropped any tools. Inspect the ground for any small, sharp branch stubs you might have created.
Now tend to the saw. For all powered models:
1. Clean the Bar and Chain. Wipe off sap and wood residue with a rag. A clean chain runs cooler and lasts longer.
2. Check Chain Tension. The chain will have stretched from the heat of cutting. Adjust it to the proper tension while it’s cool.
3. Refill Bar Oil. Top off the reservoir.
4. For Gas Models: Let the saw idle for a minute to burn off excess fuel in the carburetor. If storing for more than a month, either run the carburetor dry or add fuel stabilizer to a fresh tank.
For manual saws, wipe the blade clean and dry it to prevent rust. Check the telescoping locks for wear.
Proper storage means a dry, secure place. Hang the saw if possible to avoid bending the pole or bar. For battery models, remove the battery and store it in a climate-controlled space.
This routine maintenance, much like the steps for blade replacement on other power saws, is what separates a tool that lasts a season from one that lasts a decade.
Frequently Asked Questions
How thick of a branch can a pole saw cut?
Most homeowner-grade pole saws, battery or electric, are rated for branches up to 6-8 inches in diameter. Gas-powered models can handle the upper end of that range more easily. For a manual saw, cutting a 6-inch branch is possible but requires multiple cuts and significant effort. Anything over 8 inches is professional territory.
Can you use a pole saw on a ladder?
Absolutely not. This is the most dangerous thing you can do with this tool. The long pole creates leverage and instability. Kickback or a simple loss of balance can pull you off the ladder. Always keep both feet on solid, level ground.
What’s the best time of year to prune with a pole saw?
For most deciduous trees, late winter or early spring, while the tree is still dormant but the worst of the cold has passed, is ideal. The tree’s energy is stored in the roots, wounds heal quickly as spring growth begins, and you can see the branch structure clearly without leaves. Avoid heavy pruning in late summer or fall.
Why does my pole saw chain keep coming loose?
All chains stretch as they heat up during use. You must check and adjust the tension when the chain is cool, before starting, and again after 15-20 minutes of cutting. If it’s repeatedly derailing, the chain might be worn out, the bar groove could be damaged, or the drive sprocket may be worn. Inspect all three components.
How high can a pole saw reach?
Reach is the pole length plus your height plus your arm extension. A typical 10-foot pole can reach a branch tip about 18-
20 feet high when used by an average-height person. Specialized manual poles can extend to 15-20 feet, but control and cutting power diminish significantly at maximum extension.
Is a battery-powered pole saw strong enough?
For 90% of residential pruning tasks, yes. Modern 40V and 80V battery systems provide ample power for branches up to 6 inches thick. The limitation is runtime, not power. For sustained, heavy-duty cutting on a large property, a gas saw still has the edge in endurance and torque.
The Bottom Line
Using a pole saw safely comes down to preparation and patience. Gear up completely every single time, your eyes and head are in the line of fire. Choose the right saw type for your property size and branch thickness; a battery model handles most suburban jobs. Always stand to the side, use the three-cut method for anything substantial, and let the tool’s weight and sharpness do the work.
When the branch is too thick, too high, or over something valuable, that’s not a challenge, it’s a signal to call a professional. The goal is a healthier tree and a tidier yard, not a story about the one that got away. Keep the blade sharp, the chain oiled, and your focus on the cut in front of you. The rest is just following the steps.