How to Sharpen Table Saw Blades: Expert DIY Steps & Safety
This post contains affiliate links. As an Amazon Associate, we earn from qualifying purchases.
Sharpening a table saw blade requires matching the original tooth geometry—the bevel angle, hook angle, and tooth height—across every tooth. You can do this by hand with a diamond file and a jig for precision, or send it to a professional sharpening service. The process starts with a thorough cleaning and inspection to assess the blade’s condition.
Most people think a blade is dull just because the cuts are rough. They’ll run it for months, burning wood and straining their saw’s motor. The real problem is usually hidden under a layer of hardened pitch and sawdust, or the carbide tips have developed a tiny, shiny rounded edge you can only feel with your thumb. You can’t sharpen what you can’t see, and you’ll ruin a good blade if you file the wrong angle.
This guide walks through both DIY and professional sharpening, how to spot a blade that’s too far gone, and the exact steps to bring a quality carbide blade back to life.
Key Takeaways
- You must clean the blade completely before even thinking about sharpening. Pitch and resin hide damage and cause uneven sharpening.
- Hand sharpening requires a jig to maintain consistent angles. Freehand filing will almost certainly ruin the blade’s balance and cutting performance.
- Carbide-tipped blades can typically be sharpened 3-5 times before the carbide becomes too thin and prone to chipping. After that, replacement is safer.
- If a professional sharpening service costs more than 60-70% of a new, comparable blade, it’s usually not worth it. This is especially true for lower-tier blades.
- The most common DIY mistake is changing the tooth’s hook angle (the forward lean). This directly controls how aggressively the blade feeds and can make it feel dangerous or sluggish.
Why a Dull Blade is More Than Just an Annoyance
A dull blade doesn’t just make bad cuts. It forces you to push harder, which increases the risk of kickback. The added friction generates heat, which burns the wood and can warp the thin steel plate of the blade itself.
I once burned through a batch of maple because I was too stubborn to stop and sharpen my Forrest Woodworker II. The cuts were so rough I had to sand each edge for an extra fifteen minutes. The motor on my saw started humming at a higher pitch—a clear sign it was working against the resistance of rounded teeth.
You’ll notice the burn marks first. Then, the backside of your cuts will have excessive tear-out, even on plywood. Finally, you’ll hear it. A sharp blade makes a clean zip sound. A dull one makes a labored whirr.
Sharpening a carbide-tipped table saw blade restores the microscopic cutting edge that has been rounded over through use. This rounding, often visible as a shiny flat spot on the tip of each tooth, increases the surface area contacting the wood, generating friction and heat instead of a clean shearing action.
What You’ll Need to Sharpen a Table Saw Blade by Hand
Gathering the right tools is the difference between a successful sharpening and a ruined blade. This isn’t a job for improvisation.
- Safety Gear: Safety glasses are non-negotiable. Tiny carbide fragments can splinter off. A pair of cut-resistant gloves protects your hands from the razor-sharp teeth during handling.
- Cleaning Supplies: A dedicated blade cleaner like Simple Green or a standard oven cleaner (the yellow-cap foam kind). A stiff nylon brush and a stack of clean rags.
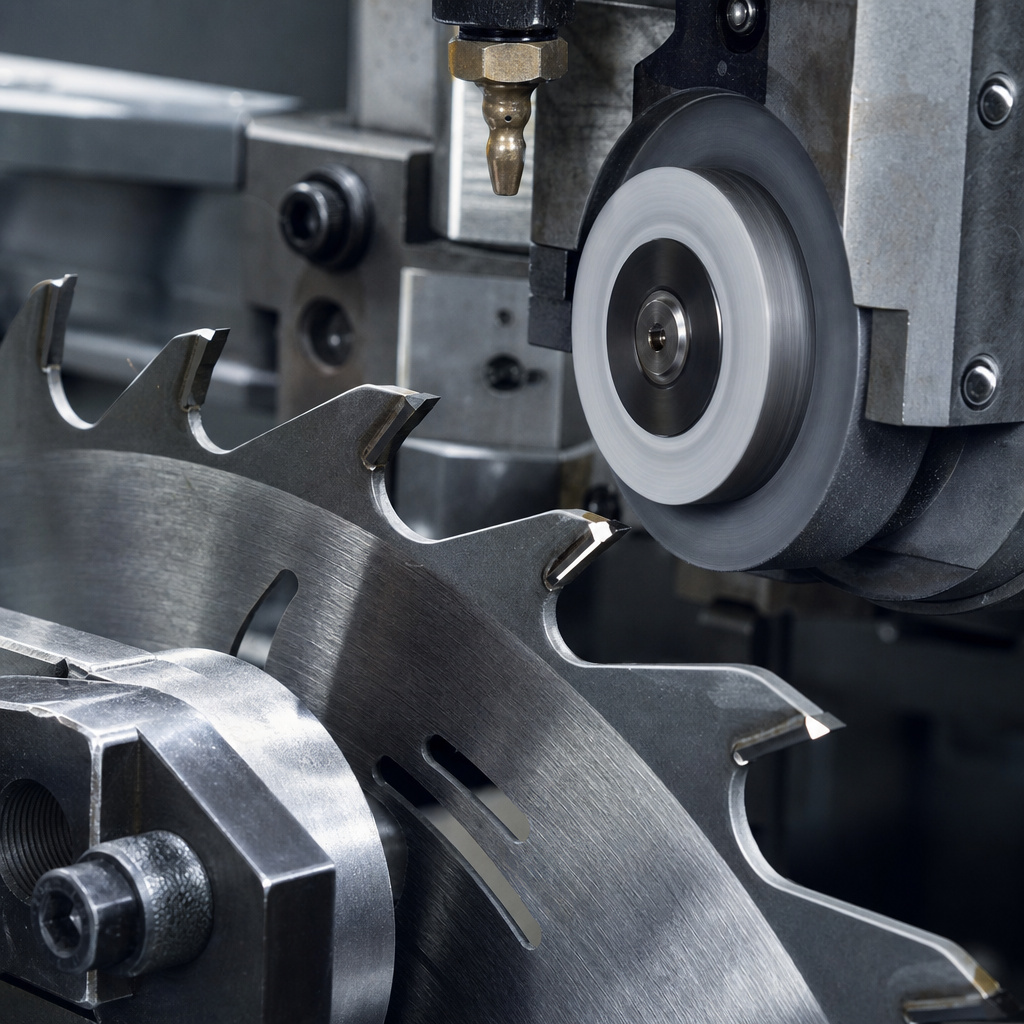
- The Sharpening Tools: For carbide teeth, you need a diamond file or diamond sharpening stone. A 6-inch diamond file in fine grit works. For old-school steel blades, a fine-toothed mill file.
- The Critical Jig: A commercial sharpening jig that clamps to the blade and sets the file angle is the best investment you’ll make. The cheap plastic ones can flex. Look for a cast aluminum model.
- Measurement Aids: A digital angle finder or a simple machinist’s protractor to identify the existing bevel angles on your blade.
| Tool | Purpose | What Happens If You Skip It |
|---|---|---|
| Sharpening Jig | Holds the file at a consistent angle for every tooth. | Inconsistent bevel angles create an unbalanced blade. The saw will vibrate violently, and cuts will be wavy and rough. |
| Diamond File (for carbide) | Hard enough to abrade the carbide without chipping it. | A standard metal file will skate over the carbide, dulling the file and polishing the tooth without sharpening it. |
| Blade Cleaner | Removes pitch and resin to expose the true tooth geometry. | You’ll be sharpening over gunk, masking cracks or chips. The file will clog instantly, and your sharpening will be uneven. |
| Angle Finder | Identifies the existing bevel angle to match. | Guessing the angle alters the blade’s cutting dynamics. A steeper hook angle can cause aggressive self-feeding and kickback. |
How to Sharpen a Table Saw Blade by Hand (Step-by-Step)
This is the method for a dedicated DIYer with a quality blade worth saving. It requires patience more than skill.
Step 1: Clean and Inspect the Blade
Unplug your table saw. Remove the blade. Soak it in a well-ventilated area with your chosen cleaner for 10-15 minutes. The pitch will dissolve into a black sludge. Scrub every tooth and gullet with the nylon brush. Rinse with water and dry immediately with a rag to prevent rust. This step alone can make a “dull” blade cut 50% better. Now, inspect. Hold the blade under a bright light and look at each carbide tip. Look for chips, cracks, or sections where the carbide is missing entirely. A blade with two or more adjacent damaged teeth is often a candidate for replacement, not sharpening. Learning the cleaning steps is foundational to all blade maintenance.
Step 2: Identify the Tooth Geometry
Not all teeth are sharpened the same. You must match the factory grind.
* ATB (Alternate Top Bevel): The most common. Teeth are bevelled left, then right, alternating. It’s a crosscut pattern.
* FTG (Flat Top Grind): The top of the tooth is flat. Used for rip blades.
* TCG (Triple Chip Grind): A trapeze-shaped tooth alternates with a flat-top raker. For hard materials like laminate and non-ferrous metals.
Use your angle finder on a few teeth to note the bevel angle (often 10-15 degrees for ATB). Mark one tooth with a permanent marker. This is your “tooth one.” When you’ve sharpened every tooth and returned to the marked one, you’re done.
Step 3: Secure the Blade and Sharpen
Clamp the blade in your jig or a vise with soft jaws. The goal is zero movement. Position your file in the jig to match the measured bevel angle. Start on your marked tooth. Apply 3-5 firm, forward strokes with the file. Don’t saw back and forth. Let the diamond abrasive do the work. The sound will change from a gritty scrape to a smoother shhh when the new edge is formed. Rotate the blade to the next identical tooth (e.g., every other tooth for ATB). Sharpen all teeth with that same orientation. Then, adjust your jig for the opposite bevel and repeat. For FTG blades, you’re only filing the flat top. The process is similar to general saw blade sharpening, but the angles are specific to the table saw’s job.
Step 4: Check Your Work and De-burr
After all teeth are filed, look down the edge of the blade. The tips should form a perfect circle. If one tooth sticks out, it will hit the wood first and bear all the load, causing vibration. Lightly file that high tooth down to match. Finally, lightly drag a fine 600-grit diamond stone flat across the backside of each tooth once. This removes the tiny wire burr created by filing the front.
Step 5: Reinstall and Test
Mount the blade correctly (teeth pointing toward the front of the saw). Tighten the arbor nut firmly. With all safety gear on, make a test cut in a scrap of pine or plywood. Don’t force it. Let the blade feed at its own pace. You’re listening for that clean zip and looking for a smooth, unburned edge with minimal splintering. If it’s not perfect, note the symptom—burning means the teeth are still dull; tear-out means the bevel might be off.
When to Send Your Blade to a Professional Sharpener
Hand sharpening is rewarding, but it has limits. Professional services use CNC grinding machines that restore the original geometry with laser precision, often jointing the teeth to ensure perfect height alignment.
Send your blade out if:
* It’s a high-end blade (Forrest, Freud Industrial, Amana).
* It has a high tooth count (80+ teeth for a finish blade).
* The blade has visible nicks or damage you’re not comfortable fixing.
* You need to sharpen more than 2-3 blades at once.
Local shops or mail-order services like Dynamic Saw are the standard. They charge by diameter and tooth count. A 10-inch 40-tooth blade might run $12-$18.
The turnaround is usually a week. It’s worth it. A professionally sharpened premium blade will often outperform a new mid-tier blade.
When a Blade Isn’t Worth Sharpening
Knowing when to stop is as important as knowing how to start. Throwing a blade away feels wasteful, but sometimes it’s the only safe, economical choice.
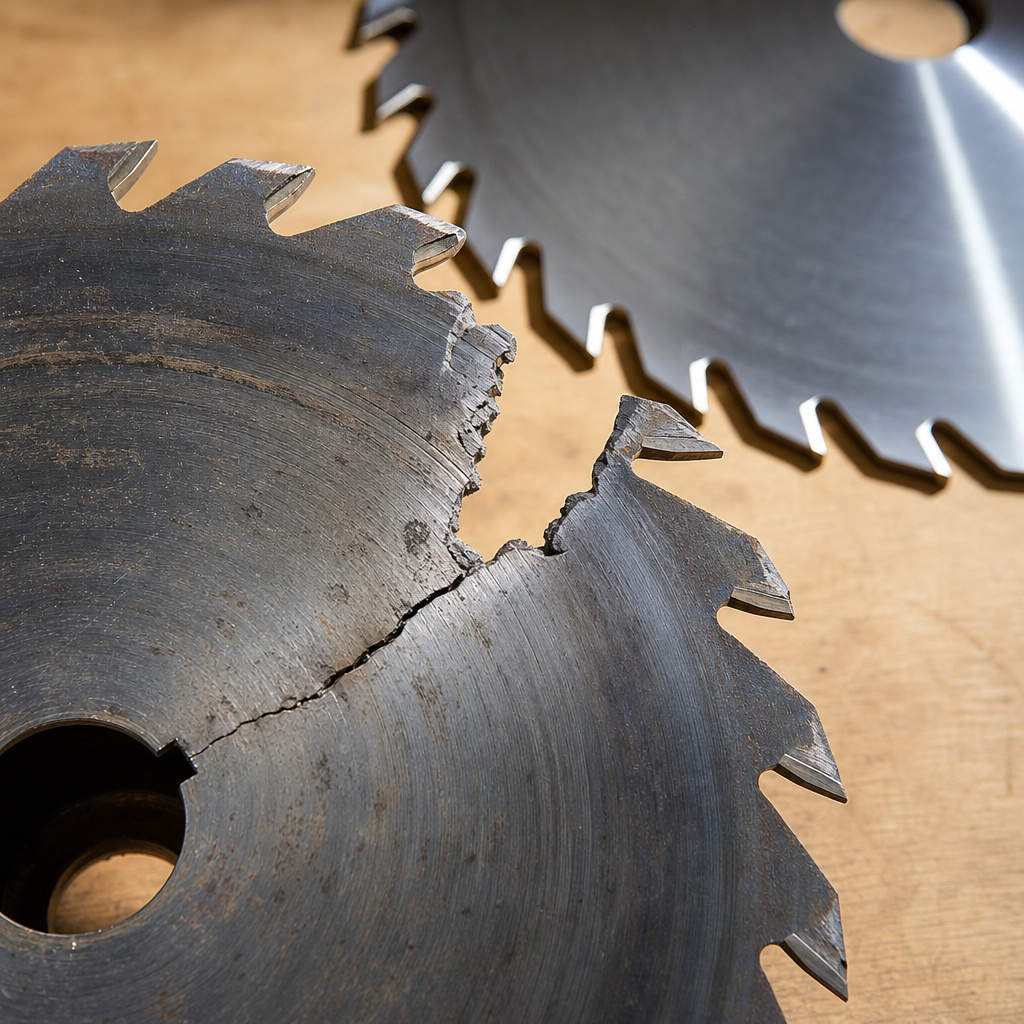
- Severe Physical Damage: Multiple missing or chipped carbide teeth, a cracked steel plate, or a bent blade. A crack near the arbor hole is an immediate discard.
- The “Cheap Blade” Rule: If you paid under $30 for the blade, a $15 sharpening doesn’t make sense. The steel and carbide quality is lower, and it won’t hold the edge long.
- Thin Carbide: After several sharpenings, the carbide tips become thin and fragile. Hold the blade sideways in the light. If you can see light through the edge of the carbide tip, it’s too thin. The next knot in a 2×4 will likely shatter it.
| Blade Condition | Action | Reason |
|---|---|---|
| 1-2 small chips on non-adjacent teeth | Sharpen (DIY or Pro) | The sharpening process will remove the chip and restore the edge. Performance impact is minimal. |
| Bent plate (wobbles when spun) | Replace | Cannot be corrected. Will cause dangerous vibration and inaccurate cuts. |
| Carbide tips visibly thin/translucent | Replace | Risk of catastrophic failure. A shattered carbide tooth becomes a high-speed projectile. |
| Professional sharpening quote > 70% of new blade cost | Replace | Not cost-effective. The money is better put toward a higher-quality new blade. |
How to Keep Your Blades Sharp Longer
Sharpening is maintenance. The real skill is delaying the need for it.
- Clean After Sticky Jobs: After cutting pine, pressure-treated lumber, or MDF, clean the blade immediately. That resin sets like concrete overnight. A quick spray and wipe beats a full soak later.
- Use the Right Blade for the Job: Don’t rip hardwood with a 40-tooth crosscut blade. You’re overworking it. A Freud Diablo 24T rip blade makes the job faster and keeps your finish blade sharp for its intended purpose. Understanding TPI and cutting helps you match the tool to the material.
- Store Them Properly: Don’t toss blades in a drawer. Use blade sleeves or a horizontal rack. Keep them dry. A thin coat of WD-40 Specialist Corrosion Inhibitor on the steel plate prevents rust during storage.
- Avoid the Unavoidable: Yeah, we all hit a nail or a screw once. But that’s usually the event that triggers the first sharpening. Be as sure as you can about what’s in your wood.
I stored a slightly damp CMT 10″ 40T blade in its cardboard sleeve in an unheated garage over a humid summer. By fall, a rust line had etched into the steel plate right at the base of every tooth. The sharpening service had to grind the plate down to remove the pitting, which changed the blade kerf slightly. It never cut quite the same again. Now, every blade gets a silicone-treated sleeve and goes in a sealed bin with a desiccant pack.
Frequently Asked Questions
Can you sharpen a table saw blade with a Dremel?
You can, but you probably shouldn’t. A Dremel with a diamond bit is hard to control consistently. It’s too easy to overheat the carbide (which ruins its hardness) or grind away too much material, changing the tooth geometry. It’s a last-resort method for a blade you’re otherwise ready to trash.
How many times can you sharpen a carbide table saw blade?
quality carbide-tipped blade can typically be sharpened 3-5 times. Each sharpening removes a small amount of carbide. Eventually, the tip becomes too thin and weak, risking a catastrophic chip. The steel body of the blade will last almost indefinitely if not damaged.
What’s the difference between sharpening and jointing a blade?
Sharpening creates a new cutting edge on the face of the tooth. Jointing is the process of making sure every tooth is exactly the same height by lightly sanding the very tips. Professionals always joint after sharpening. At home, you “joint” by filing down any high teeth you find during your final check.
Why does my blade still vibrate after I sharpened it?
Uneven tooth height or inconsistent bevel angles. One tooth is hitting the wood harder than the others, causing a harmonic vibration. Re-secure the blade and use a bright marker to color the tips.
Spin the blade by hand against a fixed block of wood. The high tooth will have its marker scraped off. File that tooth down slightly and re-test.
Is it better to sharpen or replace a table saw blade?
For a high-quality blade (brands like Forrest, Freud Industrial, Ridge Carbide), sharpening is always better and more economical. For a budget big-box-store blade, replacement is often cheaper and faster. Consider the 70% rule: if the sharpening cost is more than 70% of a comparable new blade, just replace it.
The Bottom Line
Sharpening your own table saw blades is a straightforward, satisfying skill that saves money and reduces waste. The keys are cleanliness, consistency, and respecting the original geometry of the blade. Use a jig, take your time, and don’t be afraid to send a valuable blade out for professional service when needed.
A sharp blade is safer, makes better cuts, and is kinder to your saw’s motor. Listen to the sound it makes. That clean zip is the sound of a tool working as it was designed to.
{
“@context”: “https://schema.org”,
“@type”: “HowTo”,
“name”: “How to Sharpen a Table Saw Blade by Hand”,
“totalTime”: “PT60M”,
“tool”: [
{
“@type”: “HowToTool”,
“name”: “6-inch fine-toothed mill file (for steel) or diamond file (for carbide)”
},
{
“@type”: “HowToTool”,
“name”: “Sharpening jig or sturdy vise with soft jaws”
},
{
“@type”: “HowToTool”,
“name”: “Safety glasses and cut-resistant gloves”
},
{
“@type”: “HowToTool”,
“name”: “Blade cleaning solution (oven cleaner or specialized pitch remover)”
},
{
“@type”: “HowToTool”,
“name”: “Stiff nylon brush and clean rags”
},
{
“@type”: “HowToTool”,
“name”: “Permanent marker”
}
],
“step”: [
{
“@type”: “HowToStep”,
“name”: “Clean and Inspect the Blade”,
“text”: “Unplug your saw and remove the blade. Soak it in a cleaning solution, scrub with a stiff brush to remove all pitch and resin, then dry it completely. Inspect each tooth for cracks, chips, or missing carbide tips.”
},
{
“@type”: “HowToStep”,
“name”: “Identify the Tooth Geometry”,
“text”: “Determine your blade’s grind: Alternate Top Bevel (ATB), Flat Top Grind (FTG), or Triple Chip Grind (TCG). Use a protractor to note the bevel angles. Mark one tooth with a permanent marker as your starting point.”
},
{
“@type”: “HowToStep”,
“name”: “Secure the Blade and Sharpen Each Tooth”,
“text”: “Clamp the blade in a vise or jig. Using a diamond file for carbide or a mill file for steel, match the original bevel angle. Apply 3-5 firm, consistent strokes to each tooth face, following the existing angle precisely. Rotate the blade and repeat for every tooth.”
},
{
“@type”: “HowToStep”,
“name”: “Check and Refine Your Work”,
“text”: “Visually inspect each tooth for a clean, uniform edge. Run your finger lightly (with gloves) across the teeth; they should all feel equally sharp. If one tooth feels taller, lightly file it down to match the others.”
},
{
“@type”: “HowToStep”,
“name”: “Reinstall and Test”,
“text”: “Reinstall the clean, sharp blade onto your saw, ensuring it’s tight and the teeth face the correct direction. Make a test cut on a piece of scrap wood. The cut should be smooth, with minimal feed pressure and no burning.”
}
]
}
{
“@context”: “https://schema.org”,
“@type”: “FAQPage”,
“mainEntity”: [
{
“@type”: “Question”,
“name”: “Can you sharpen a table saw blade with a Dremel?”,
“acceptedAnswer”: {
“@type”: “Answer”,
“text”: “You can, but you probably shouldn’t. A Dremel with a diamond bit is hard to control consistently. It’s too easy to overheat the carbide (which ruins its hardness) or grind away too much material, changing the tooth geometry. It’s a last-resort method for a blade you’re otherwise ready to trash.”
}
},
{
“@type”: “Question”,
“name”: “How many times can you sharpen a carbide table saw blade?”,
“acceptedAnswer”: {
“@type”: “Answer”,
“text”: “quality carbide-tipped blade can typically be sharpened 3-5 times. Each sharpening removes a small amount of carbide. Eventually, the tip becomes too thin and weak, risking a catastrophic chip. The steel body of the blade will last almost indefinitely if not damaged.”
}
},
{
“@type”: “Question”,
“name”: “What’s the difference between sharpening and jointing a blade?”,
“acceptedAnswer”: {
“@type”: “Answer”,
“text”: “Sharpening creates a new cutting edge on the face of the tooth. Jointing is the process of making sure every tooth is exactly the same height by lightly sanding the very tips. Professionals always joint after sharpening. At home, you \”joint\” by filing down any high teeth you find during your final check.”
}
},
{
“@type”: “Question”,
“name”: “Why does my blade still vibrate after I sharpened it?”,
“acceptedAnswer”: {
“@type”: “Answer”,
“text”: “Uneven tooth height or inconsistent bevel angles. One tooth is hitting the wood harder than the others, causing a harmonic vibration. Re-secure the blade and use a bright marker to color the tips.\n\nSpin the blade by hand against a fixed block of wood. The high tooth will have its marker scraped off. File that tooth down slightly and re-test.”
}
},
{
“@type”: “Question”,
“name”: “Is it better to sharpen or replace a table saw blade?”,
“acceptedAnswer”: {
“@type”: “Answer”,
“text”: “For a high-quality blade (brands like Forrest, Freud Industrial, Ridge Carbide), sharpening is always better and more economical. For a budget big-box-store blade, replacement is often cheaper and faster. Consider the 70% rule: if the sharpening cost is more than 70% of a comparable new blade, just replace it.”
}
}
]
}