
The Right Way to Drill Holes for Cabinet Pulls & Hardware
This post contains affiliate links. As an Amazon Associate, we earn from qualifying purchases.
To drill holes for cabinet pulls, you need the correct drill bit size, the right screw length, and a method for accurate placement. The standard hole size is a 3/16″ drill bit, but pulls with integrated mounting studs require a 1/4″ bit. Screws should be 1/4″ longer than the thickness of your cabinet door or drawer front material.
That bit size difference isn’t just a suggestion. A pull with a stud will not seat flush in a 3/16″ hole, leaving it wobbly and stressing the screw threads every time you open the drawer. The mismatch is visible the moment you try to install it.
What follows is the real-world process: the two drill bits you must have on hand, the screw-length math that catches everyone on their first kitchen, and the template trick that makes thirty holes look identical. We’ll also cover the edge cases—thick drawer boxes, backplates, and the one brand that tells you to never use a power driver.
Key Takeaways
- The default drill bit size is 3/16″, but always check your pull for integrated “studs”—these require a 1/4″ hole.
- Screw length is not universal. The rule is 1/4″ longer than your material thickness. A standard 1″ screw fails on any front thicker than 3/4″.
- Use painter’s tape on the drill site to prevent wood splintering, and drill from the finished side of the door or drawer.
- For pulls, measure center-to-center distance, not the total length of the pull. The most common spacing is 3 inches.
- Hand-tighten with a screwdriver for the final twist. A power driver can crack ceramic knobs or strip the threads inside the pull.
Tools and Materials You’ll Need
Gather these before you mark the first hole. Missing one item mid-job means a trip to the hardware store with half your cabinets undone.
- Drill & Drill Bits: A cordless drill is fine. You need a 3/16″ drill bit and a 1/4″ drill bit. A brad-point bit is better than a standard twist bit for cleaner entry holes in wood.
- Measuring & Marking: A quality tape measure, a sharp pencil, a combination square, and a level. A cabinet hardware template is the single best investment for consistency.
- Screws: Your pulls likely include screws. Check their length against your drawer fronts. For standard 3/4″ material, a 1″ screw is correct. For anything thicker, you need longer 8-32 or M4 machine screws.
- Safety & Prep: Painter’s tape (not masking tape—it’s less sticky), safety glasses, and a vacuum for cleanup.
- Fastening: A #2 Phillips head screwdriver. Have a flathead on hand for older or specialty screws.
Before you start: Unpack and inspect all your hardware for damage or mismatched finishes. Drilling a hole for a pull that’s chipped or the wrong color is a permanent mistake. Test-fit a screw into a pull to ensure the threads are clean and match.
The 3/16″ vs 1/4″ Drill Bit Decision
This is the first place a weekend project goes wrong. Most guides say “use a 3/16″ bit” and stop. The Amerock installation guide is more specific: “When drilling for a knob or pull, a 3/16″ hole is recommended for most styles. The exception is pulls that have ‘studs’.”
A stud is simply an extension of the molded screw holes. If a pull has a stud, then a 1/4″ hole is required with studs sitting securely in the wood.
Turn your pull over. If the screw holes are just plain tunnels through the metal, use a 3/16″ bit. If you see cylindrical posts (studs) extending from the base, you need a 1/4″ bit. Forcing a stud into a 3/16″ hole is impossible—you’ll either break the stud or strip the wood.
Modern Matter specifies a 7/32 inch drill bit, which is between 3/16″ and 1/4″. This is why checking the manufacturer’s sheet matters. Assume 3/16″, but verify.
| Pull Type | Drill Bit Size | Visual Check |
|---|---|---|
| Standard Pull (no studs) | 3/16″ | Screw holes are simple, clean passages. |
| Pull with Integrated Studs | 1/4″ | Small metal posts extend from the mounting base. |
| Modern Matter Hardware | 7/32″ | Check packaging; this is their stated spec. |
The wrong bit leaves you with a loose pull or a cracked cabinet front. Get it right the first time.
Measuring and Marking for Perfect Placement
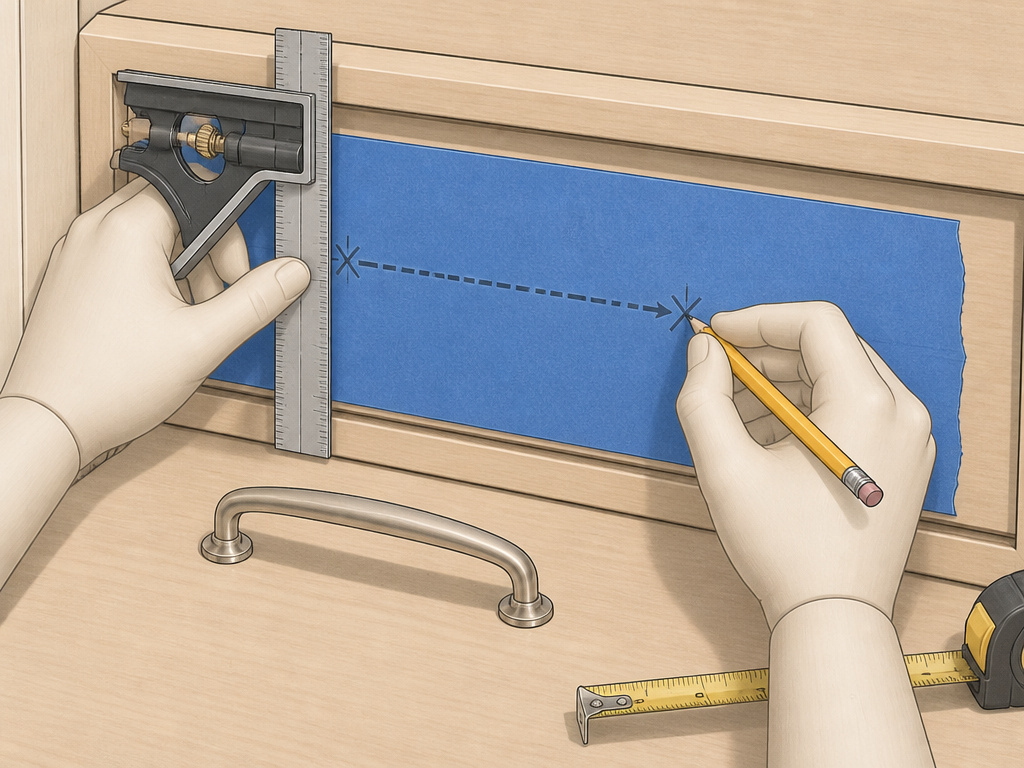 Placement is about eye level, hand feel, and consistency. There are conventions, but no absolute rules.
For drawer pulls, the classic placement is vertically centered. On a tall drawer, some installers place pulls in the upper third—it feels more natural when reaching down. For cabinet doors, the standard is to place a knob or pull in the corner opposite the hinges, 2-4 inches from the edge.
The real work is in the marking. Here’s the sequence that prevents “oops” holes:
- Apply a strip of painter’s tape over the area where you’ll drill. This stabilizes the wood fibers and prevents splintering when the bit exits.
- Use your tape measure and pencil to mark the exact spot. For a knob, this is one point. For a pull, you must mark two points corresponding to the center-to-center distance.
- Use a combination square to ensure your marks are square to the edge of the door or drawer. Then, place a level across the two marks for a pull to confirm they are perfectly horizontal or vertical.
- For multiple cabinets, use a template. You can buy a reusable cabinet hardware template or make one from scrap wood or cardboard. This guarantees every pull is in the same position.
Common mistake: Measuring the total length of the pull instead of the center-to-center hole spacing. A 5-inch pull might have 3-inch hole centers. The screw holes are what you’re drilling for, not the ends of the handle.
Drilling the Holes Without Splintering
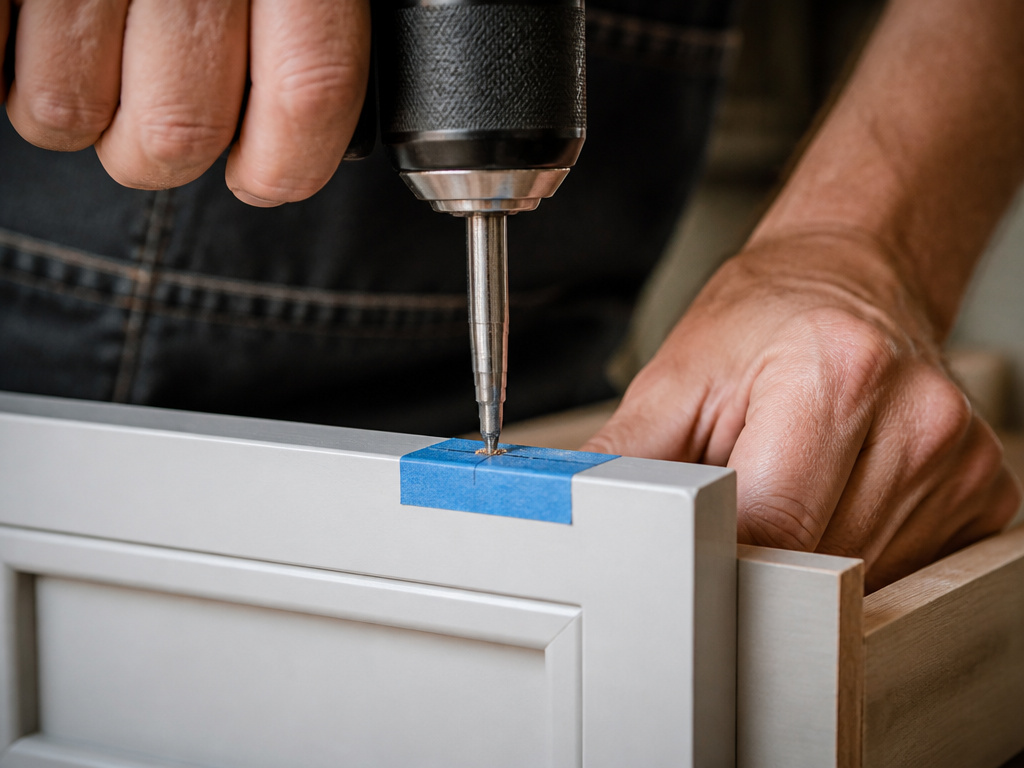 You have the right bit and perfect marks. Now don’t ruin the surface on the backside.
The key is to drill from the finished side of the door or drawer front. The brad point of your drill bit will make a clean entry hole. The exit side, where the bit breaks through, is where splintering happens. The painter’s tape helps, but your technique matters more.
- Set your drill to a medium speed. High speed generates heat and tears wood fibers.
- Hold the drill perfectly perpendicular to the surface. A slight angle makes an oval hole, and the screw won’t sit flush. If you struggle with drilling straight holes, consider a drill guide.
- Apply steady, moderate pressure. Let the bit do the cutting. Pushing too hard increases the chance of blow-out on the back.
- As you feel the bit about to break through, reduce pressure almost to nothing. Finish the hole with a slow, gentle push.
For drilling in wood this thin, you don’t need a pilot hole. The specified bit size (3/16″, 1/4″, 7/32″) is the final size. Drill all the way through for a standard pull.
Screw Length: The Formula Everyone Forgets
The screws in the box are a suggestion, not a guarantee. Amerock states they include 1″ long screws “because the typical cabinet door or drawer front is 3/4″ thick.” Then they deliver the crucial line: “In general, the screw length(s) used should be 1/4″ longer than the thickness of your cabinet door or drawer front material.”
This is non-negotiable. The screw must pass through the material and have enough thread length to engage fully inside the pull. If the screw is too short, only a few threads grip, and the pull will loosen with use. If it’s too long, it can protrude awkwardly or damage the inside of the drawer.
Here’s how to apply the formula: 1. Measure the thickness of your cabinet door or drawer front with a tape measure or calipers. 2. Add 1/4 inch to that measurement. That is your target screw length. 3. Check the included screws. If they match, use them. If not, you need to buy new ones.
Common scenarios: * Standard 3/4″ thick front: Requires a 1″ screw (3/4″ + 1/4″ = 1″). * 1″ thick solid wood front: Requires a 1 1/4″ screw. * Drawer with a 3/4″ front attached to a 3/4″ box: Total thickness is 1 1/2″. You need a 1 3/4″ screw.
Machine screws are sized by diameter and threads per inch (e.g., 8-32) or metric (e.g., M4). Take an old screw to the hardware store to match it. Don’t guess.
Installing the Pulls and Knobs
With clean holes and the right screws, installation is straightforward. This is where patience pays.
- Insert the screw into the hole from the back of the cabinet door or drawer front. For a surface-mounted pull, the screw goes in from the front.
- Thread the knob or pull onto the screw by hand. Turn it counter-clockwise until you feel the threads engage, then clockwise to tighten.
- When the pull is snug against the surface, switch to a screwdriver for the final tightening.
Modern Matter’s guide includes a clear warning: “To prevent damage to the hardware, do not use power tools for installation. Only use hand tools.”
A power driver delivers too much torque. It can crack a porcelain knob, strip the soft brass threads inside a pull, or over-tighten and dent the wood. Hand-tighten until the pull no longer wobbles. That’s enough.
Handling Edge Cases and Problem Solving
Not every installation is textbook. Here’s how to handle the curveballs.
Thick Drawer Boxes: As noted, use the 1/4″-longer screw rule. If the screw is too long and hits the drawer back, you have two options: buy a shorter screw, or place a washer between the screw head and the inside of the drawer front to take up space.
Using Backplates: A backplate goes between the pull and the cabinet surface. It hides old holes or adds decoration. Remember, a backplate adds thickness. You will need a screw that is 1/4″ longer than the combined thickness of the material plus the backplate.
Replacing Old Hardware with Different Spacing: New holes will be close to old ones. You can often reuse one hole and drill one new one. If the old holes are visible, fill them with a wood plug and touch-up finish, or use a backplate to cover them completely.
Stripped Screw Holes: If a hole becomes too large from a mis-drill or a stripped screw, the fix is simple. Dip a few wooden toothpicks in wood glue, pack them into the hole, and snap them off flush. Let the glue dry completely. Re-drill your pilot hole through the solid glue-and-toothpick plug. It will hold as well as the original wood.
Frequently Asked Questions
What if I don’t have a 3/16″ drill bit?
5mm drill bit is the closest metric equivalent to 3/16″ and will work in a pinch. For a 1/4″ hole, a 6mm bit is slightly smaller but usually acceptable. It’s always better to use the exact size, as a smaller bit makes threading the screw difficult, and a larger bit creates a sloppy fit.
Can I use an impact driver to install cabinet pulls?
Do not use an impact driver. The hammering action is designed to drive long screws into dense material and will almost certainly damage your hardware. The high torque can also shear the screw head off. Use a hand screwdriver for the final tightening.
How do I drill holes for cabinet pulls on a metal cabinet?
The process is similar, but you need different tools. Use a center punch to make a small dent at your mark to keep the drill bit from wandering. Use a sharp cobalt or titanium-coated drill bit designed for metal. Drill at a slow speed with steady pressure, and use a drop of cutting oil to keep the bit cool and extend its life.
What’s the difference between a knob and a pull?
Knob is a single point of attachment, requiring one hole. A pull has two points of attachment, requiring two holes spaced a specific distance apart (center-to-center). Knobs are typically used on cabinet doors, while pulls are common on drawers, though you can mix and match based on style and ergonomics.
My drawer front is laminate. How do I prevent chipping?
The painter’s tape method is essential. Also, use a brand-new, sharp brad-point drill bit. Drill at a slower speed with very light pressure as you break through the back layer. For extra insurance, place a scrap piece of wood behind the drawer front as a backup board to support the material as the bit exits.
The Bottom Line
Drilling holes for cabinet pulls comes down to three verified specs: the 3/16″ or 1/4″ drill bit chosen by your hardware’s design, the screw length that is 1/4″ longer than your material, and the center-to-center measurement of the pull itself. Rushing the marking or using the wrong bit guarantees a sloppy result you’ll see every day.
Invest in a template for consistency, use painter’s tape to protect the wood, and finish the job with a hand screwdriver. That combination turns a finicky upgrade into a one-afternoon project that actually looks professional.
