How to Fold a Band Saw Blade Safely (3 Proven Methods)
This post contains affiliate links. As an Amazon Associate, we earn from qualifying purchases.
Folding a band saw blade requires matching three things: the right safety gear, a controlled bending motion with the teeth facing away from your body, and a secure fastening method to keep the coil from springing open. The blade’s spring steel construction is designed to flex, not snap, when handled this way.
Most people get this wrong by skipping the gloves or trying to muscle the blade into a tight circle. They force a sharp bend, fight the natural coil, and end up with a blade that wants to whip back at their legs. Or worse, they grab it with the teeth facing their palm.
This guide walks you through the three proven folding methods, the non-negotiable safety steps, and the storage tricks that keep your blades sharp and your fingers intact. We’ll cover what to do with a broken blade, how to unfold a new one without incident, and why the figure-eight coil exists.
Key Takeaways
- Never handle a band saw blade without heavy-duty, cut-resistant gloves and eye protection. The teeth are sharper than they look and can slice through skin with minimal pressure.
- Always bend the blade with the teeth pointing away from your body. Folding teeth-inward is the single most dangerous mistake, turning the coil into a spring-loaded hand trap.
- Secure the finished coil immediately with a Velcro strap, zip tie, or blade clip. An unsecured coil can unravel unexpectedly, causing injury and damaging the blade’s set.
- For blades over 1/2 inch wide or longer than 10 feet, use the figure-eight coil method. The standard three-loop coil puts too much stress on wide, stiff blades and can kink the steel.
- Listen to the blade. A healthy spring-steel blade will flex with a quiet, smooth resistance. If you hear a sharp ping or a creaking sound, stop, you’re forcing a bend it doesn’t want to take.
What You Need Before You Start
Gather your gear on a cleared, stable surface like a workbench or clean garage floor. Distractions lead to mistakes here.
Before you start: A band saw blade under tension is a loaded spring. If you attempt to fold it before fully releasing the tension from the saw’s wheels, it can snap straight with enough force to break skin or cause deep lacerations. Always confirm the tension knob is fully backed off and the blade hangs slack before removal.
The mandatory items aren’t suggestions. I learned this the hard way with a cheap pair of nylon-coated gloves. I was coiling a 1/4-inch carbon steel blade that had a tiny, almost invisible crack.
Halfway through the first bend, it let go with a sound like a staple popping. A three-inch section whipped across the back of my hand, right through the glove fabric. It didn’t need stitches, but it bled for an hour and left a scar that still tingles when the weather changes. Now I only use palm-reinforced leather.
| Item | Specification / Brand Example | Why It’s Non-Negotiable |
|---|---|---|
| Gloves | Palm-reinforced leather work gloves (e.g., Mechanix Wear M-Pact, Ironclad Ranchworx) | The teeth are miniature hooks. Cloth or thin nylon offers zero protection against a slipping grip or a blade segment snapping back. |
| Eye Protection | ANSI Z87.1-rated safety glasses or a full face shield | Metal dust, debris, and the unlikely but catastrophic blade breakage can all send particles toward your face. |
| Footwear | Closed-toe shoes or boots | Dropping a coil on your foot is a classic workshop injury. The weight alone can bruise or break toes. |
| Fastener | 10-inch Velcro strap, heavy-duty zip tie, or dedicated blade clip | Prevents the coiled blade from springing open during storage or transport, which damages the blade’s temper and is a trip hazard. |
| Workspace | Flat, clutter-free surface (workbench, plywood on sawhorses) | Gives you room to maneuver the blade’s full length without tripping over cords or other tools. |
You don’t need special tools. Your hands, the right gloves, and a clear floor are the system. The process is about finesse, not force.
How to Release Tension and Remove the Blade
This step happens at the band saw itself. Do not skip it.
First, power off the saw and unplug it. Rotate the upper wheel by hand to position the blade’s weld seam at the front of the upper wheel, where it’s easiest to access. Loosen the blade tension knob or lever completely, turn it until it stops. You should see the blade go visibly slack between the wheels. Open the saw’s blade guard doors.
Now, gently guide the blade off both the upper and lower wheels. Support its weight as it comes off; don’t let it drop and kink on the table. I prefer to walk the blade off the wheels in a controlled manner, letting it pile in loose loops on the saw table or directly onto the floor where I’ll be folding it.
This is a good moment for a quick visual inspection. Look for cracks, especially near the weld, or teeth that are missing or badly damaged. A damaged blade is more likely to fail during folding.
If you’re dealing with a blade that’s still on the saw and you’re unsure, follow our step-by-step tool guide for safe removal fundamentals. The principle is the same: control the tool, respect the tension.
The Standard Coil Method (For Blades Under 1/2″ Wide)
This is the go-to for most woodworking blades. The goal is three loops of roughly equal diameter.
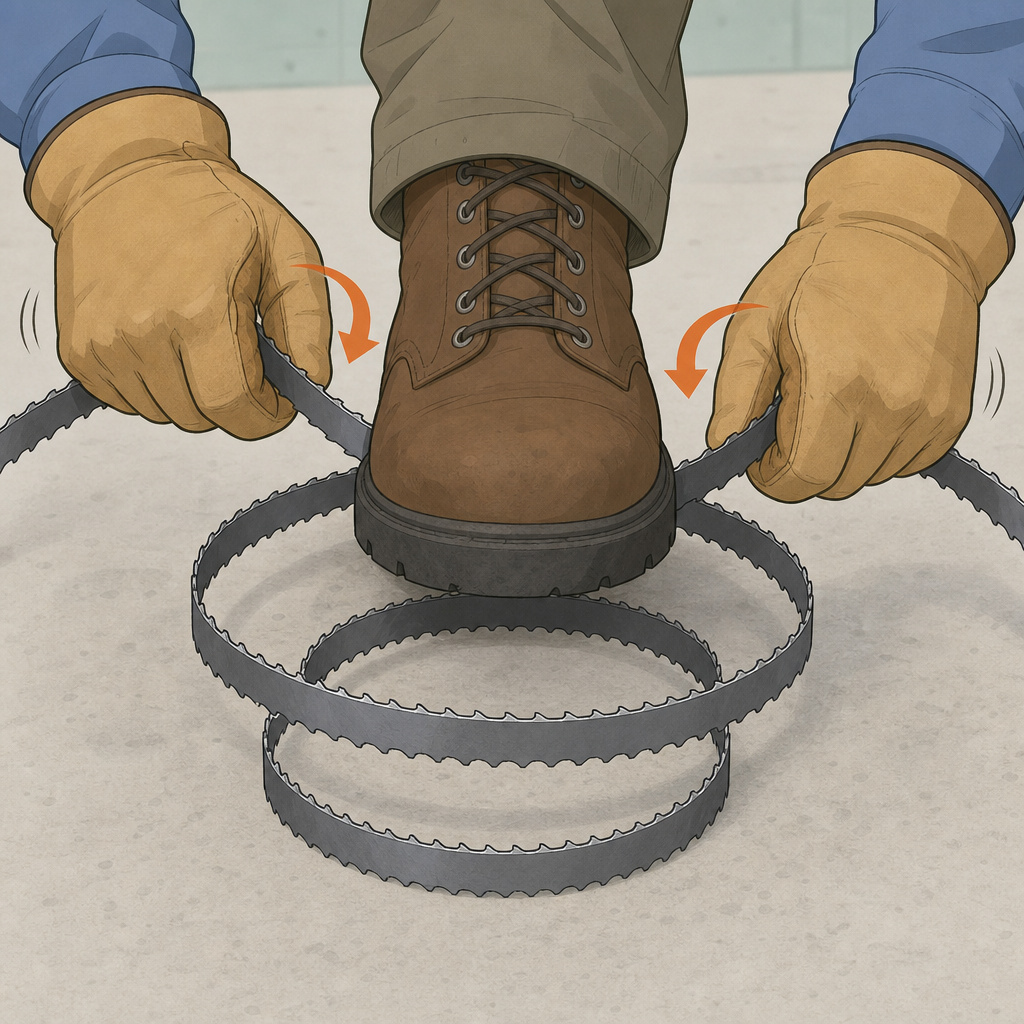
Place the blade flat on your cleared surface. Grip it firmly with both hands, palms up, about three feet apart. The teeth must be facing away from your body and pointing downward toward the floor. This orientation is critical, if the teeth face you, the coiled blade becomes a cage of hooks pointed at your wrists.
Bend your arms to bring your hands together, initiating a large, gentle loop. Don’t try to make a perfect circle. You’re encouraging the blade to find its natural bend radius. As the loop forms, step one foot lightly on the bottom of the loop to stabilize it. Now, with your dominant hand, guide the remaining length of the blade around to form a second loop alongside the first.
Here’s the rhythm that works: bend, guide, let it coil. Do not push or twist. The blade will want to form a third, smaller loop almost by itself. If it resists and tries to spring open, your initial bend was too tight. Relax your grip, let it open up a bit, and start again with a wider first loop.
Common mistakes in the standard coil:
- Starting with hands too close together. This forces an acute bend. Start with a wide stance.
- Fighting the blade’s direction. If it wants to coil clockwise, go with it. Forcing counter-clockwise stresses the weld.
- Lifting the coil off the ground before it’s formed. Keep it on the floor until all three loops are stable.
Once you have three neat loops, immediately secure them with your Velcro strap. Wrap it around the center of the coil and pull it snug. Not crushing tight, just enough to remove all slack. A zip tie works, but I prefer Velcro because you can reuse it and it won’t over-tighten.
The Figure-Eight Coil Method (For Wide or Long Blades)

Blades 1/2 inch and wider, or any blade over 10 feet long, store better and fold easier in a figure-eight. This method distributes the bending stress across two opposing loops instead of three stacked ones.
Start the same way: gloves, glasses, teeth facing away. Create your first loop exactly as you would for the standard coil, about two to three feet in diameter. Hold this loop steady in your non-dominant hand.
Now, here’s the pivot. Instead of making a second loop next to the first, you’re going to feed the remaining blade length through the center of the first loop. Bring the end up and over, then down through the middle. This forms the second loop of the eight.
It feels awkward the first time. The trick is to keep the first loop open like a hoop. Use your knee or foot to brace it if needed. As you feed the blade through, the two loops will naturally want to lie flat against each other in that classic overlapping figure-eight shape.
I use the figure-eight for all my resaw blades (3/4-inch, 2 TPI). The first time I tried to force a standard three-loop coil on one, it fought me every inch. I got it coiled, but the center of the loops had a permanent kink. That blade vibrated like a tuning fork on the saw and produced a wavy cut until I replaced it. The figure-eight keeps the bend radius gentle.
Secure a figure-eight coil by strapping it at the crossover point, where the two loops intersect. One strap is usually enough. This method is also superior for hanging storage, as the shape is inherently stable and won’t spin on a hook.
The Foot-Assisted “Pop” Method (A Quick Alternative)
This is a one-person method that looks like a magic trick when done right. It’s fast and effective for blades of moderate length and flexibility.
Lay the blade flat. Step on the center of it with one foot, pinning it to the floor. Now, grasp the blade with both hands on either side of your foot, about two feet apart, teeth facing away. In one smooth motion, lift your hands, rotating your wrists inward, and then push down slightly.
If you get the motion right, a lift, twist, and press, the blade will “pop” into three coiled loops beneath your hands. The action uses your body weight and the blade’s own spring tension to form the coils instantly.
It requires practice. The first few times, you’ll likely produce a tangled mess. The timing is everything. The lift gets the blade into the air, the twist starts the coil rotation, and the downward press tames the final loop. It’s not a brute force move; it’s a crisp, confident flick.
I use this for my most common 1/4-inch, 6 TPI blades when I’m in a hurry. But I never do it without full gloves and glasses. If your grip slips or your timing is off, the blade can whip violently.
How to Unfold a Band Saw Blade Safely
Unfolding is arguably more dangerous than folding. A coiled blade is energy waiting to be released.
Always assume a new blade from the package is under light tension from its packaging coils. Place the secured coil on your work surface. Put your gloves and glasses on. Slowly release or cut the fastener. Do not let go of the coil.
With one hand holding the coil together, use your other hand to gently guide the outermost loop open. Work deliberately, controlling the expansion. Never throw a coiled blade on the ground to make it uncoil, this can damage the set of the teeth and create wild, unpredictable whipping action.
As the blade unfurls, guide it into a large, single loop on the floor. Inspect it again for any damage that might have occurred in storage. Now it’s ready for installation. Remember to install it on the saw with the teeth pointing in the correct direction (usually downward on the front of the wheel).
Storing and Disposing of Band Saw Blades
Proper storage extends blade life. A coiled blade should be kept in a dry environment to prevent rust. Hanging it on a pegboard hook is ideal, it keeps it off damp floors and prevents it from being crushed. Label the coil with a piece of masking tape: note the width, TPI, and material (e.g., “1/4″ – 6 TPI – Carbon Steel”).
For disposal, the rule is: make it safe for others. Even a completely dull or broken blade has sharp edges. Coil it securely using any of the methods above. Wrap the entire coil in several layers of cardboard or heavy craft paper, and tape it closed.
Write “SHARP METAL – CAUTION” on the outside in marker. This protects sanitation workers. Then, check your local municipal website for scrap metal disposal guidelines. Many recycling centers accept them.
Frequently Asked Questions
Can a band saw blade break while folding it?
Yes, but only if it’s already damaged or you force it past its design limits. A sound blade made of spring or carbon steel is designed to flex. If you hear a sharp ping or see a crack develop, stop immediately. That blade was likely fatigued or had a weak weld. Always inspect before folding.
What’s the best way to fold a very long blade?
For blades over 15 feet, the two-person method is safest. Each person holds an end, teeth facing away. Both walk toward each other, allowing the blade to form a large, natural loop in the middle. Then, one person holds the base of that loop while the other guides the ends into additional loops. Communication is key, agree on the direction of the coil before you start.
Why do my coiled blades sometimes develop a twist or kink?
This is usually caused by forcing the coil in the wrong direction or securing it too tightly. The blade has a natural “set” from being manufactured on a large coil. When you fold it, you should follow that existing curvature. If you fight it, or if you crank a zip tie down so hard it deforms the loops, you’ll create a permanent deformation. Use gentle pressure and snug, not tight, fasteners.
Is it okay to hang a coiled blade on a nail?
Yes, but use a hook, not a nail. A round hook supports the coil’s inner diameter evenly. A nail creates a pressure point that can distort the blade’s shape over time, especially if the blade is heavy. A dedicated blade holder or a sturdy pegboard hook is best.
The Bottom Line
Folding a band saw blade isn’t a test of strength. It’s a test of patience and technique. The right gloves and glasses aren’t optional, they’re your first layer of defense against a tool that can bite in an instant. Remember the core rule: teeth away from you, always. Whether you use the standard coil, the figure-eight, or the quick pop method, let the blade’s natural flex do the work. Secure the coil immediately, store it dry, and dispose of it responsibly. Do that, and your blades will last longer, your workspace will be safer, and you’ll never have to explain a band saw-shaped scar to an urgent care nurse.