How to Measure Band Saw Blades Correctly in 3 Steps
This post contains affiliate links. As an Amazon Associate, we earn from qualifying purchases.
Measuring a band saw blade requires three numbers: length (the distance around the loop), width (from tooth tip to blade back), and teeth per inch (TPI). Get these wrong, and the blade won’t track, will cut poorly, or won’t fit at all.
Most people grab a tape measure and wrap it around the blade while it’s still coiled. That’s the first mistake. A coiled blade is under tension, and the tape will follow the inside curve, shaving inches off the true length. You’ll buy a blade that’s too short, fight to get it on the wheels, and wonder why it keeps slipping off.
This guide walks through the only reliable methods for each measurement, the tools that don’t lie, and what happens when you guess.
Key Takeaways
- Never measure a coiled blade. Always lay it flat and roll it out straight for an accurate length reading. A blade just 1/2 inch too long or short can cause tracking nightmares.
- Measure blade width from the tooth tip to the back edge, not from the gullet. A 1/4-inch blade and a 1/2-inch blade look similar until you try to fit the wider one into a narrow guide block.
- Count teeth per inch (TPI) with a magnifier. A 6 TPI blade cuts fast and rough in softwood; a 14 TPI blade cuts slow and smooth in metal. Using the wrong one burns wood or gums up metal.
- Write down all three numbers, length, width, TPI, and keep them inside the saw’s cabinet. The next time you need a blade, you won’t have to remeasure from scratch.
- If you have no old blade, you can calculate the needed length using the wheel diameters and the distance between them. The formula is (π × Wheel1 Diameter) + (π × Wheel2 Diameter) + (2 × Distance Between Wheel Centers).
The correct blade length is critical for proper tension and tracking. A blade that is too long cannot be tensioned sufficiently, leading to blade flutter and poor cut quality. A blade that is too short over-stresses the saw’s tensioning mechanism and increases the risk of premature fatigue failure at the weld.
Before You Start: Safety and Setup
Before you start: A band saw blade is a continuous loop of spring steel with razor-sharp teeth. The teeth will slice through skin and glove leather with almost no pressure. The back edge of the blade is often ground and can have burrs. Wear thick, cut-resistant work gloves, the kind meant for sheet metal, not gardening. Clear a space on a clean, flat floor, free of sawdust and debris that could kink the blade. Have your tape measure, marker, and calipers ready before you uncoil anything.
I learned the glove lesson the hard way. I was measuring a fresh 1/2-inch 3 TPI blade for a resawing project, handling it casually with bare hands. As I laid it out, my thumb brushed against what looked like a smooth section of the back.
It wasn’t. A microscopic burr from manufacturing opened a clean, shallow cut. It didn’t hurt much, but it bled for twenty minutes and left a permanent reminder across my thumbprint. Now the gloves go on first, every single time.
How to Measure Blade Length (The Roll-Out Method)
This is the only method you should use if you have the old blade. Forget wrapping a tape around a coil. Forget trying to measure it while it’s hanging loose. You’ll be off by at least a couple of inches, guaranteed.
Lay the blade flat on a clean, hard floor. A garage concrete slab or a clean workshop floor works. Uncoil it completely so it forms a large, loose circle. Find a prominent tooth and mark it with a permanent marker or a small piece of masking tape. This is your start point.
Place the end hook of a 25-foot tape measure at that mark. Now, slowly and carefully, roll the blade along the floor, keeping it straight. Imagine rolling a tire.
The marked tooth should travel in a straight line. Keep one foot lightly on the blade to prevent it from sliding or twisting. Roll it until the marked tooth makes one full revolution and touches the floor again.
Read the measurement on the tape measure right at the mark. That’s your blade length. Write it down.
For a standard 14-inch band saw, this is almost always 93.5 inches, but don’t assume. My old Delta 14-inch actually took a 93-inch blade because of a slight manufacturing variance in the wheel hub. I found out after ordering the wrong size twice.
What If You Don’t Have the Old Blade?
Maybe the blade snapped and you tossed it, or you bought a used saw that came without one. You can calculate the length.
You need two measurements from your saw: the diameter of the upper and lower wheels, and the distance between the centers of those wheels.
| Measurement | How to Get It | Example (14″ saw) |
|---|---|---|
| Wheel Diameter (R1 & R2) | Measure across the wheel from outer edge to outer edge. Most 14″ saws have identical wheels. | 14 inches |
| Center Distance (C) | Measure from the center of the upper wheel axle to the center of the lower wheel axle. | ~27.5 inches |
The formula is: (π × Wheel1 Diameter) + (π × Wheel2 Diameter) + (2 × Center Distance).
For our example: (3.1416 × 14) + (3.1416 × 14) + (2 × 27.5) = 43.98 + 43.98 + 55 = 142.96 inches.
That’s the outside circumference. Band saw blades are sized by their inner length, which is the length of the steel band itself. You must subtract the blade thickness (usually 0.025″ to 0.035″) multiplied by 2π (about 6.28). For a 0.032″ thick blade: 142.96 – (0.032 × 6.28) ≈ 142.96 – 0.2 = 142.76 inches.
Most manufacturers round to the nearest half-inch, so you’d order a 143-inch blade. It’s math, but it beats buying three wrong blades.
How to Measure Blade Width and Thickness
Width dictates what your saw can handle. It determines if the blade will fit through the guide blocks and the saw’s throat. Thickness affects how tight a curve the blade can cut.
I won’t recommend using a standard ruler for width. The graduations are too coarse, and parallax error from viewing it at an angle can easily mistake a 1/2-inch blade for a 3/8-inch. A $20 digital caliper from the hardware store is the single best investment for this job.
Put your gloves back on. Find a straight section of the blade. Open the caliper jaws and place them so one jaw rests on the very tip of a tooth.
The other jaw must contact the back edge of the blade. Do not measure from the bottom of the gullet (the space between teeth). That’s a common mistake that gives you the “gullet depth,” not the width.
Squeeze the caliper gently until it clicks, and read the digital display. Common widths are 1/4″, 3/8″, 1/2″, 3/4″, and 1″. Write it down.
Blade thickness is often stamped on the blade itself, near the weld. If it’s not, use the caliper again on the side of the blade, away from the teeth. Most woodworking blades are 0.025″ thick. Thicker blades (0.035″) are for resawing or metal cutting, they resist deflection but can’t turn tight curves.
| Blade Width | Best For | Minimum Curve Radius (approx.) |
|---|---|---|
| 1/4 inch | Tight curves, scroll work, thin stock | 1/4 inch |
| 3/8 inch | General purpose curves, roughing out shapes | 5/8 inch |
| 1/2 inch | Straight cuts, resawing, thicker stock | 2 1/2 inches |
| 3/4 inch & 1 inch | Heavy resawing, milling logs, extreme straight cuts | 8+ inches (nearly straight only) |
Why does thickness matter for curves? A thicker blade is stiffer. When you try to force it around a tight radius, the back of the blade binds against the kerf (the cut itself), creating friction, heat, and a burned, wandering cut. A thin, narrow blade flexes easily. This is a core part of blade maintenance, using the right tool for the job prevents damage.
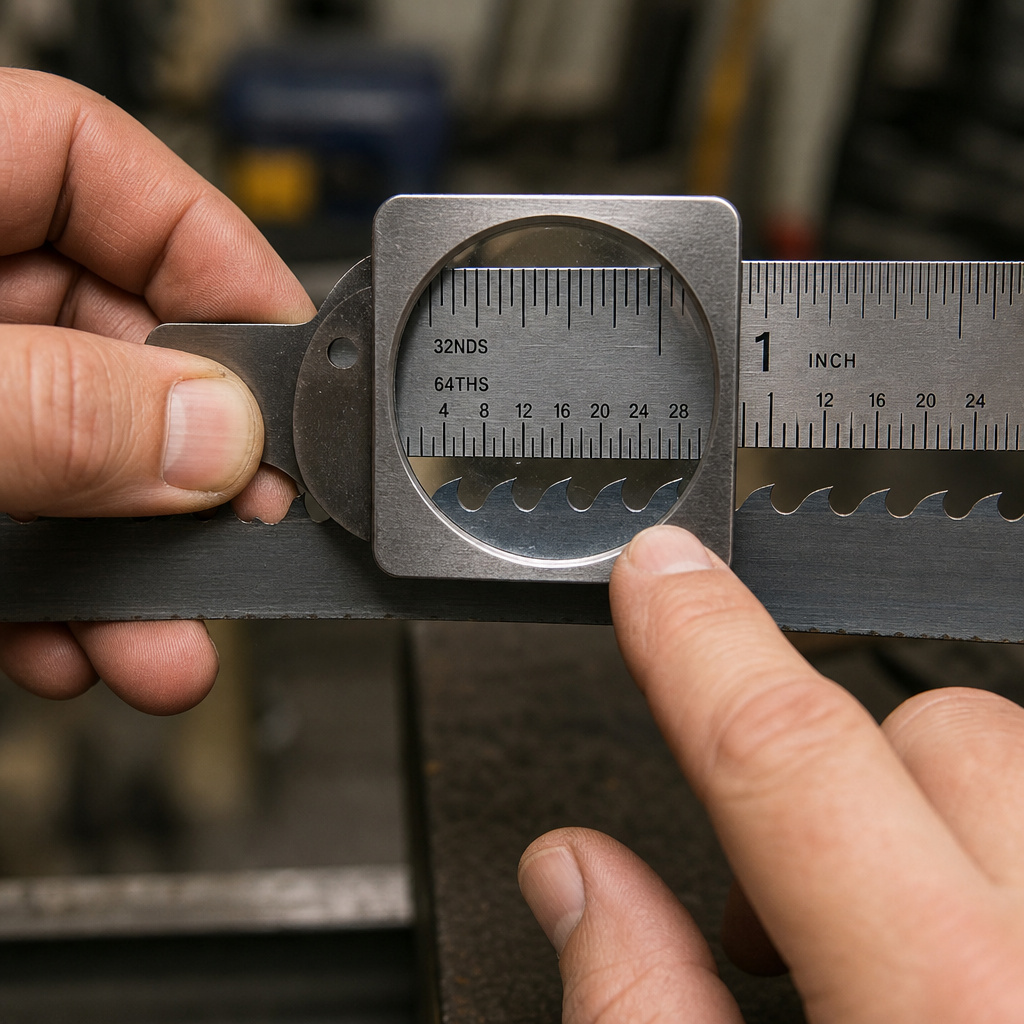
How to Measure Teeth Per Inch (TPI)
Teeth Per Inch determines the cut’s speed and finish. More teeth mean a smoother, slower cut. Fewer teeth mean a faster, rougher cut.
You need good light and a magnifying glass or a ruler with a built-in magnifier. Trying to count tiny teeth with the naked eye leads to mistakes. Place the ruler so the 1-inch mark is exactly at the midpoint between two tooth tips. This is crucial. If you start on a tooth tip, you’ll be off by half a tooth.
Count every tooth point that falls within that inch. If the blade has a variable TPI pattern (like 3-4 TPI, common on wood-cutting blades), measure over three full inches, count all the teeth, and divide by three. This gives you the average.
Never run a high-TPI metal-cutting blade on wood. The small gullets clog with sawdust in seconds, the blade overheats, loses its temper, and the teeth snap off. I ruined a perfectly good 18 TPI bimetal blade on a piece of pine because I was in a hurry and didn’t want to change blades. The teeth were gone in three feet of cutting.
Here’s what happens when you mismatch TPI to material:
| Material | Recommended TPI | What Happens If You Use the Wrong TPI |
|---|---|---|
| Softwood (Pine, Cedar) | 3-4 TPI | A 14 TPI blade gums up, smokes, and leaves burn marks. The cut stalls. |
| Hardwood (Oak, Maple) | 4-6 TPI | A 2 TPI blade tears out chunks and leaves a ragged, splintered edge. |
| Thin Metal (Sheet, Tube) | 14-18 TPI | A 6 TPI blade grabs, vibrates violently, and can shatter teeth or strip them off the band. |
| Plastics, Acrylic | 10-14 TPI (with hook tooth) | A standard-format tooth melts the plastic, causing it to re-weld behind the cut. |
Understanding Tooth Set and Gullet Depth
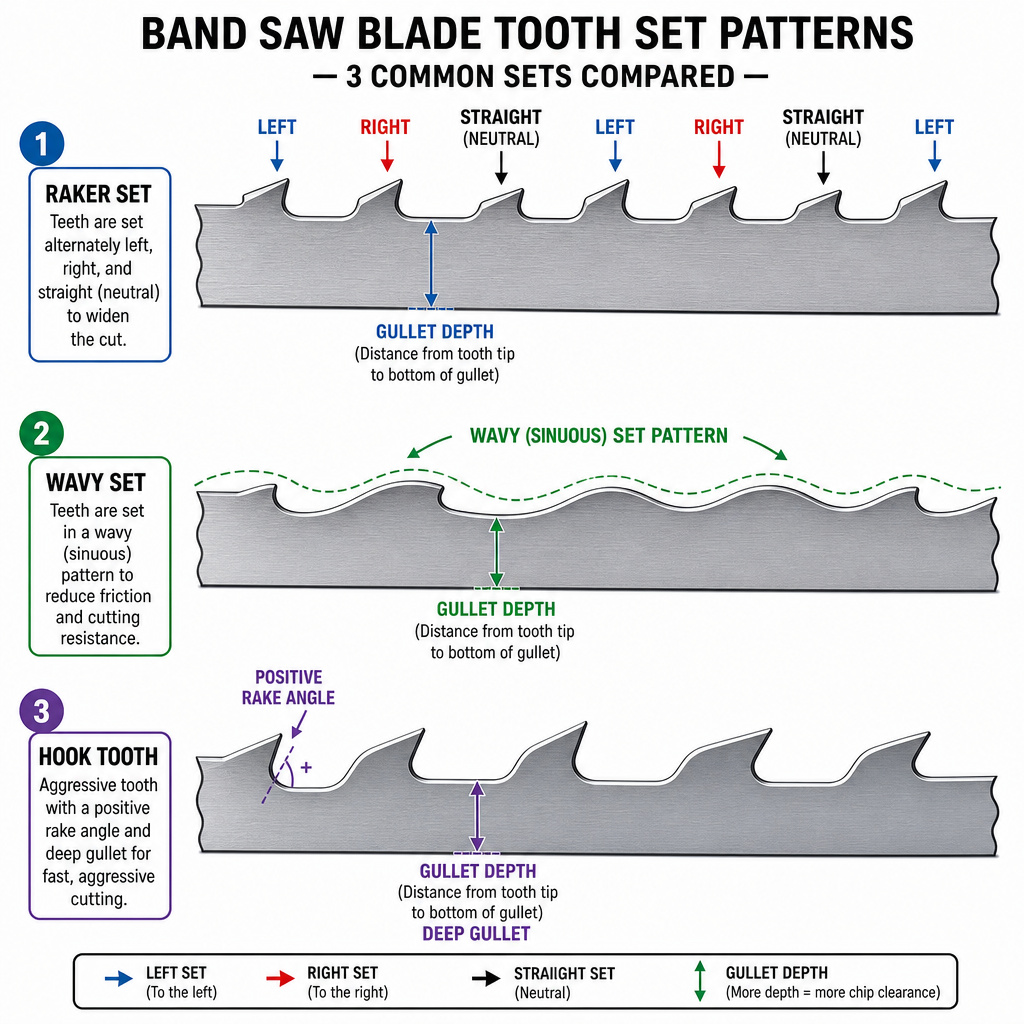
TPI tells you how many teeth, but the tooth set tells you how they’re arranged. This affects chip clearance and blade life. You can see the set with your magnifier.
There are three main types:
1. Raker Set (Alternate): The most common. One tooth is bent left, the next is bent right, the third is straight (the raker). This pattern is excellent for general woodcutting and mixed materials.
2. Wavy Set: Teeth are bent left and right in a gentle wave pattern. This is typical on high-TPI metal-cutting blades. It produces a very smooth cut in thin materials.
3. Hook Tooth: The tooth face has an aggressive, deep gullet and a positive rake angle. This is for fast, aggressive cutting in wood and non-ferrous metals. It’s the go-to for resawing.
Gullet depth is the space between teeth. A deep gullet on a low-TPI blade (like a 3 TPI hook tooth) moves a huge volume of sawdust. A shallow gullet on a high-TPI blade moves tiny chips.
Match the gullet to the material thickness, deep gullets for thick stock, shallow for thin. If the gullet is too small for the chip, it packs full, the blade overheats, and it starts to wander. This is a frequent cause of what looks like a blade troubleshooting issue, the cut drifts because the blade is clogged, not because it’s dull.
The 4-Inch Rule and Why Blade Tracking Matters
There’s an old workshop rule: you should have at least 4 inches of blade between the guide blocks and the wheel. This isn’t just trivia. It’s about stability.
When the blade exits the guide blocks, it’s a free, unsupported steel band heading toward a spinning rubber wheel. If that span is too short, say, 2 inches, the blade can develop a harmonic vibration. You’ll hear a hum or a buzz during the cut, and the cut surface will show slight waves. If the span is too long, the blade can flex sideways under cutting pressure, causing drift.
If your length measurement was perfect but you’re still getting vibration, check this distance. Sometimes, the solution isn’t a new blade, but adjusting the upper guide assembly down closer to the workpiece. This shortens the unsupported span and quiets everything down. Getting the correct blade size is the first step, but proper setup is what makes it work.
Troubleshooting: Problems Caused by Wrong Measurements
You measured, you bought, you installed. The saw still acts up. Here’s how to diagnose a measurement error.
The blade keeps slipping off the wheels.
This is almost always a length problem. A blade that’s even 1/2 inch too long can’t reach proper tension on saws with limited tensioning range. It sits too low on the wheel crowns and walks off. A blade that’s too short is over-tensioned, which can damage the saw’s spring or frame, and still track poorly because the geometry is wrong. Re-measure using the roll-out method. Double-check your saw’s manual for the exact specified length.
The cut is wavy or burns the wood.
This is usually a width or TPI mismatch. A blade that’s too wide for the guide blocks gets pinched, causing friction and heat. A blade with too many teeth for the material (like using a 10 TPI on 4×4 pine) generates heat from clogging. Verify your width measurement with calipers. Confirm the TPI.
The blade breaks at the weld shortly after installation.
This is often a tension issue stemming from a wrong length, but it can also be a bad weld on a new blade. However, if you’re repeatedly breaking blades in the same spot, check your calculated length. An overly short blade is under extreme tensile stress. Every time the weld passes over the wheel, it flexes. After a few hundred cycles, it gives out.
Frequently Asked Questions
Can I measure the blade while it’s still on the saw?
No. The blade is under tension, which stretches it slightly. Any measurement you take will be shorter than the blade’s true relaxed length. You’ll order a blade that’s too short.
My blade has no markings. How do I know what TPI it is?
Use the one-inch counting method with a magnifier. If the teeth are too fine to see clearly, do the three-inch average method. For carbon steel blades, you can also lightly rub the side with fine sandpaper, the different hardness of the teeth sometimes makes the pattern more visible.
What’s the difference between a 93.5″ and a 94″ blade? Can I use the longer one?
Maybe, but it’s a gamble. A half-inch longer might be within your saw’s tensioning range, but it might not. It will sit lower on the wheels, changing the tracking angle. If your saw’s manual specifies 93.5″, get 93.5″. Don’t assume a 94″ will work. The wrong length affects the fundamental replacement process.
How tight should the blade be?
good rule of thumb: with moderate hand pressure, you should not be able to deflect the blade side-to-side more than 1/4 inch at the midpoint between the guides. Too loose, and it wanders. Too tight, and you risk breaking the blade or damaging the saw bearings. A blade tension gauge is the only way to be precise.
Does blade thickness affect the length measurement?
Yes, but marginally. For the roll-out method, thickness doesn’t matter, you’re measuring the actual band. For the calculation method, you subtract (blade thickness × 6.28) from the outside circumference to get the inner length. For a standard 0.025″ blade, that’s about 0.157″, which is why calculated lengths are often within 1/4 inch of the stamped size.
The Bottom Line
Get the three numbers right, length, width, TPI, and write them on a piece of tape inside your saw’s door. Use a tape measure on the floor for length, a digital caliper for width, and a magnifying glass for TPI. Skip any of these steps, and you’re buying a blade that won’t track, won’t cut cleanly, or won’t fit. The right blade, correctly measured, turns a frustrating machine into a precision tool. Your next cut will be the proof.
{
“@context”: “https://schema.org”,
“@type”: “HowTo”,
“name”: “How to Measure a Band Saw Blade for Length, Width, and TPI”,
“totalTime”: “PT10M”,
“tool”: [
{
“@type”: “HowToTool”,
“name”: “Flexible tape measure (25 ft or longer)”
},
{
“@type”: “HowToTool”,
“name”: “Digital caliper or accurate ruler”
},
{
“@type”: “HowToTool”,
“name”: “Magnifying glass or loupe”
},
{
“@type”: “HowToTool”,
“name”: “Permanent marker or masking tape”
},
{
“@type”: “HowToTool”,
“name”: “Thick work gloves”
}
],
“step”: [
{
“@type”: “HowToStep”,
“name”: “Measure Blade Length”,
“text”: “Lay the blade flat on a clean floor. Mark a tooth with a permanent marker. Align the mark with the ‘0’ on a tape measure and slowly roll the blade in a straight line until the mark touches the floor again. Record the distance in inches.”
},
{
“@type”: “HowToStep”,
“name”: “Measure Blade Width”,
“text”: “Put on gloves. Use a digital caliper to measure from the very tip of a tooth to the back edge of the blade. Do not measure from the bottom of the gullet. Record the width, typically 1/4 inch, 3/8 inch, or 1/2 inch.”
},
{
“@type”: “HowToStep”,
“name”: “Measure Teeth Per Inch (TPI)”,
“text”: “Use a magnifying glass. Place the edge of a ruler at the midpoint between two teeth. Count every tooth point within one inch. If the blade has a variable TPI, measure over three inches and divide by three for an average.”
}
]
}
{
“@context”: “https://schema.org”,
“@type”: “FAQPage”,
“mainEntity”: [
{
“@type”: “Question”,
“name”: “Can I measure the blade while it’s still on the saw?”,
“acceptedAnswer”: {
“@type”: “Answer”,
“text”: “No. The blade is under tension, which stretches it slightly. Any measurement you take will be shorter than the blade’s true relaxed length. You’ll order a blade that’s too short.”
}
},
{
“@type”: “Question”,
“name”: “My blade has no markings. How do I know what TPI it is?”,
“acceptedAnswer”: {
“@type”: “Answer”,
“text”: “Use the one-inch counting method with a magnifier. If the teeth are too fine to see clearly, do the three-inch average method. For carbon steel blades, you can also lightly rub the side with fine sandpaper, the different hardness of the teeth sometimes makes the pattern more visible.”
}
},
{
“@type”: “Question”,
“name”: “What’s the difference between a 93.5\” and a 94\” blade? Can I use the longer one?”,
“acceptedAnswer”: {
“@type”: “Answer”,
“text”: “Maybe, but it’s a gamble. A half-inch longer might be within your saw’s tensioning range, but it might not. It will sit lower on the wheels, changing the tracking angle. If your saw’s manual specifies 93.5\”, get 93.5\”. Don’t assume a 94\” will work. The wrong length affects the fundamental replacement process.”
}
},
{
“@type”: “Question”,
“name”: “How tight should the blade be?”,
“acceptedAnswer”: {
“@type”: “Answer”,
“text”: “good rule of thumb: with moderate hand pressure, you should not be able to deflect the blade side-to-side more than 1/4 inch at the midpoint between the guides. Too loose, and it wanders. Too tight, and you risk breaking the blade or damaging the saw bearings. A blade tension gauge is the only way to be precise.”
}
},
{
“@type”: “Question”,
“name”: “Does blade thickness affect the length measurement?”,
“acceptedAnswer”: {
“@type”: “Answer”,
“text”: “Yes, but marginally. For the roll-out method, thickness doesn’t matter, you’re measuring the actual band. For the calculation method, you subtract (blade thickness × 6.28) from the outside circumference to get the inner length. For a standard 0.025\” blade, that’s about 0.157\”, which is why calculated lengths are often within 1/4 inch of the stamped size.”
}
}
]
}