
How to Blow Out Your Sprinkler System Without an Air Compressor
This post contains affiliate links. As an Amazon Associate, we earn from qualifying purchases.
You can blow out a sprinkler system without an air compressor using a gravity drain method. This involves shutting off the water supply, opening manual drain valves at the lowest points of each zone, and allowing water to flow out by gravity. The method only works reliably on systems specifically designed with proper drain valves and a correct installation grade to prevent water from getting trapped in low spots in the pipes.
The gravity drain method relies on a simple principle: water flows downhill. If your system has drain valves installed at the end of each lateral line and at the mainline’s lowest point, and the pipes were laid with a consistent downward slope, this can work. The moment you open those valves, water should drain out until only air remains in the lines.
What follows is a breakdown of the manual drain process, the specific conditions it demands, and the exact steps to follow. We’ll also cover why this method is considered less reliable than the standard air compressor approach, and the one mistake that guarantees frozen pipes come spring.
Key Takeaways
- The gravity drain method is only viable if your irrigation system was originally designed and installed with manual drain valves at all low points.
- You must verify the system’s grade; a single hump in a pipe can trap enough water to crack it during a freeze.
- Systems with sprinklers that have internal check valves require you to physically pull up on each sprinkler to allow drainage.
- This method is explicitly not recommended by extension services like Colorado State University for systems with electric valves, as water can remain on top of the valve diaphragm.
- If you have any doubt about your system’s design, hiring a pro for the full winterization process with air is cheaper than repairing burst pipes.
The Gravity Drain Method: Step-by-Step
This process assumes you have confirmed your system has the necessary manual drain valves. If you’re unsure, check near the backflow preventer and at the end of each zone’s piping run for small brass or plastic valves with a screw or lever.
Before you start: Wear eye protection. Shut off the system’s power at the controller to prevent accidental activation. Relieve all water pressure before opening any valves. Never stand directly over a drain port when opening it.
Step 1: Shut off the main water supply. Locate the main shutoff valve for your irrigation system, typically found in a basement, crawl space, or in a buried box near the street. Turn the valve handle clockwise until it stops.
Step 2: Isolate and drain the backflow preventer. This is the above-ground brass device that prevents contaminated water from siphoning back into your home’s drinking water. Most have test cocks and isolation valves. Close the isolation valves on both sides of the device. Then, open the test cocks to drain any water from the preventer itself. Leave them open.
Step 3: Open the mainline drain valve. Find the main drain valve, which is usually installed on the irrigation mainline just downstream of the backflow preventer at its lowest point. Open this valve completely. You should hear and see water rushing out.
Step 4: Activate each zone to drain lateral lines. Go to your irrigation controller. Manually activate Zone 1. This opens the electric valve for that zone, allowing water in the lateral pipes to flow toward the open drain valve or the sprinkler heads. Let it run for 30 seconds, then turn the zone off. Repeat this for every zone in your system.
Step 5: Open all manual drain valves. After cycling the zones, locate and open every manual drain valve on your system. These are often found at the end of each lateral line. Let the system drain for at least 30 minutes.
Step 6: Address sprinklers with check valves. If your sprinkler heads have built-in check valves (common on slopes to prevent low-head drainage), the water will not drain out on its own. You must physically pull up on each sprinkler body to release the check mechanism and allow the water to drain from the bottom of the sprinkler. Hunter Industries specifically notes this requirement in their guidance.
Step 7: Leave valves open. Once drained, leave all manual drain valves and the backflow test cocks open for the winter. This allows any residual condensation or melting snow to escape.
Where this goes sideways: Skipping the step of activating each zone from the controller. Water sitting in the lateral lines between the electric valve and the sprinklers has nowhere to go unless that valve is open. If you just open drains, you’ve only emptied the mainline.
When a Gravity Drain Will (and Won’t) Work
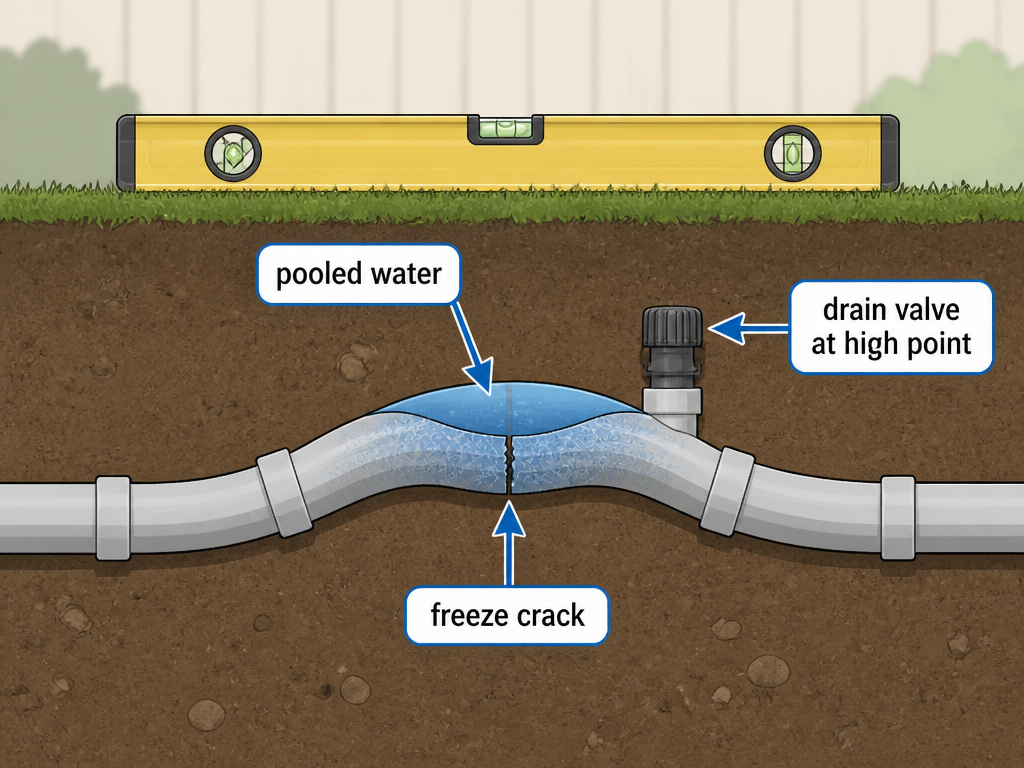
The manual drain method isn’t a universal fix. Its success hinges on two non-negotiable installation specs.
| System Feature | Required for Gravity Drain | What Happens If Missing |
|---|---|---|
| Installation Grade | Pipes must be laid with a continuous, downward slope toward drain points. | Water pools in low spots (“humps”). This trapped water freezes and cracks the pipe. |
| Drain Valve Placement | Valves must be at the absolute lowest point of each zone and the mainline. | Water cannot fully evacuate. Residual water remains in the pipes. |
| Sprinkler Type | Standard spray heads or rotors without internal check valves. | Check valves seal the sprinkler, trapping water in the riser and lateral line directly below it. |
| Valve Type | Any valve type, but electric valves are a complication. | Water can remain on top of the valve diaphragm, freezing and cracking the valve body. |
The CSU Extension winterization guide states the problem plainly: “This method is not recommended since sub-surface pipes have a tendency to shift with time and there is no way to visually inspect lines once draining is complete.” Soil movement, frost heave, or settling can create a low spot in a pipe that wasn’t there when the system was installed.
If your system uses flexible black polyethylene pipe, the risk is even higher. This material is more likely to sag between supports over time. The only way to be certain is with the standard air compressor approach, which forces water out regardless of grade.
Why Professionals and Manuals Caution Against It

The consensus among irrigation manufacturers and agricultural extension services is clear. The gravity drain method is a compromise, not a guarantee.
Hunter Industries warns: “Attempting the manual drain method in systems that were not initially designed/installed this way may lead to negative results and/or damage from residual water.” You are essentially betting that the installer’s work was perfect and that the ground hasn’t moved in the years since.
The part nobody mentions: The water that sits on top of the diaphragm inside an electric valve won’t drain by gravity. That valve body is a sealed unit. When that water freezes, it doesn’t just crack the valve—it can shear the solenoid wires or rupture the diaphragm. Replacing a valve means digging up the manifold, a repair that starts at a couple hundred dollars.
For systems with a Pressure Vacuum Breaker (PVB) or Reduced Pressure (RP) backflow device, the gravity drain is the only safe way to clear the device itself. The Colorado State University guide explicitly says these devices must never be blown out with compressed air because the heat from the air can melt their internal rubber seals. So even if you use an air compressor for the lines, the backflow preventer gets manually drained.
Tools and Precautions for Manual Draining
You don’t need a compressor for sprinklers, but you do need a few basic tools and a lot of caution.
- Adjustable Wrench or Pliers: For opening stubborn drain valve handles.
- Screwdriver: For opening test cocks on the backflow preventer.
- Safety Glasses: Essential. The initial burst of water from a pressurized line can carry sediment.
- Work Gloves: Protect your hands from cold metal and sharp edges in valve boxes.
- Headlamp or Flashlight: Valve boxes are dark.
The procedure is simple on paper. The risk is invisible. After you’ve opened all the drains and water has stopped flowing, you must assume there is still water somewhere. It’s in a dip you can’t see. It’s in a sprinkler with a check valve you missed.
Common mistake: Assuming “no more water is coming out” means “the system is empty.” Gravity draining reaches equilibrium. If the water level in a low spot is below the drain port, it stays there forever. That’s why the air blow-out is the only method that gets a positive displacement.
If you attempt this method, mark your calendar for the first deep freeze. Listen for the sound of cracking ice. It’s not a loud bang. It’s a dull, deep tick from underground. That’s the sound of a pipe splitting. By then, it’s too late.
Frequently Asked Questions
Can I use a shop vacuum to blow out my sprinklers?
No. A shop vacuum or a small pancake compressor lacks the necessary air volume (CFM). These units might reach high pressure (PSI), but they move a tiny amount of air. The air will channel over the top of the water in the pipe instead of pushing the water slug out. You’ll run the compressor dry and still leave water in the lines. You need a unit capable of at least 10-25 CFM, which is why knowing compressor specifications is critical.
My system has automatic drain valves. Do I still need to do anything?
Automatic drain valves activate when water pressure drops below a certain point. You should still shut off the water supply and open the backflow test cocks. However, like manual drains, they rely on proper grade. They are also prone to failure from sediment clogging the mechanism. It’s wise to manually trigger them by shutting off the water and activating a zone to ensure they open.
What if I have a combination system with some manual drains and some zones without?
This is a high-risk scenario. You must treat the zones without drains as if they require an air compressor. Attempting to drain them through the sprinkler heads alone is ineffective. For a mixed system, your safest path is to use a compressor for winterizing for the entire system or hire a professional.
How do I find my drain valves if they’re buried?
Look for round, green plastic valve boxes (sometimes brown or black) near your backflow preventer or at the edges of your lawn. Lift the lid. The drain valves are typically small, quarter-turn brass ball valves with a lever handle. If you can’t find them, consult your original irrigation plan or assume your system wasn’t designed for manual drainage.
Is it okay to just leave the sprinklers on to drain them?
Never. This will not remove water from the pipes. It will only empty the sprinkler bodies themselves. The vast majority of the water—the volume inside the lateral and mainline pipes—remains trapped. This guarantees freeze damage.
The Bottom Line
The gravity drain method for blowing out a sprinkler system without an air compressor is a conditional solution. It demands a perfectly graded system with correctly placed valves, and it offers no way to verify success. For most homeowners, the risk far outweighs the savings.
If your system is new, professionally installed, and you have the as-built plans showing drain locations and pipe slope, you can attempt it. For everyone else, the cost of a professional blow-out service—or renting a proper sprinkler blowout compressor—is insurance. It pays for itself the first time you avoid digging up a frozen, shattered mainline in April.
When in doubt, use air. It’s the only method that doesn’t rely on gravity being perfect.
