What Is a Scroll Saw? The Complete Guide for Woodworkers
This post contains affiliate links. As an Amazon Associate, we earn from qualifying purchases.
A scroll saw is a stationary power saw that uses a thin, reciprocating blade to make intricate curved and straight cuts in wood, plastic, and thin metal. Its defining feature is a blade that can be detached and threaded through a pre-drilled hole in the workpiece, allowing you to cut out interior shapes without an entry cut from the edge. This makes it the only saw in a typical workshop capable of true fretwork and piercing.
Most people get the purpose wrong from the start. They see the fine blade and assume it’s just a delicate jigsaw for tiny projects. That misses its real power. This isn’t a toy for cutting silhouettes of cats. It’s a precision instrument for joinery, inlay, and creating complex, interlocking parts that no other saw can produce without a dozen extra steps.
Let’s break down exactly how a scroll saw works, what separates the good ones from the frustrating ones, and how to match the machine and its blades to the work you actually want to do.
Key Takeaways
- The throat size (distance from blade to rear frame) is the hard limit on workpiece width, not the advertised “cutting capacity.” A 16-inch throat saw can only cut about 8 inches to the left or right of the blade.
- Blade tension is more critical than blade speed. A loose blade will wander, bow, and snap. The correct tension feels like a guitar string just before it’s tuned, tight enough to ring, not tight enough to fear breaking.
- For interior cutouts, you must drill a starter hole. The blade is threaded through this hole and reattached. This is the scroll saw’s unique superpower, enabling projects like wooden puzzles and ornate frames.
- Blade choice dictates everything. A #5 skip-tooth blade chews through 3/4-inch oak. A #2/0 reverse tooth blade leaves a nearly sanded finish on 1/4-inch Baltic birch. Using the wrong one guarantees broken blades or ruined work.
- Vibration is the enemy of detail. A cheap saw shakes the workpiece, blurring your line. A quality saw with a solid cast-iron table and a weighted base lets you follow a pencil line as thin as a hair.
What Is a Scroll Saw Used For?
The scroll saw is the tool for work where the cut line matters more than the speed of the cut. Where a jigsaw or band saw zips through material, the scroll saw creeps. That control is the point.
Its primary job is fretwork, cutting intricate patterns with lots of tight curves and sharp corners. Think wooden name signs, ornate drawer pulls, delicate shelf brackets, and marquetry.
The second major use is making puzzles and interlocking joints. Because you can start a cut from a hole in the middle of the board, you can cut out the center of a piece without breaking the surrounding frame. This is how wooden jigsaw puzzles, decorative boxes with finger joints, and complex inlays are made.
A scroll saw’s blade moves up and down in a straight, reciprocating motion, typically between 400 and 1,800 strokes per minute (SPM). The workpiece rests on a stationary table, and the user feeds the material into the blade. Unlike a band saw, the blade is not a continuous loop; it’s a straight segment held under tension between two chucks, one above the table and one below. This allows the blade to be easily removed and threaded through a pre-drilled hole for interior cuts.
I built a hexagonal keepsake box with splined miter joints a few years back. The splines were tiny, complex walnut pieces that fit into slots in the maple corners. A table saw would have vaporized them.
The band saw blade was too thick. The scroll saw, with a #3 reverse-tooth blade, let me cut twelve identical, fragile pieces without a single blowout. That’s the niche. It’s for the parts other saws can’t touch without a massive setup or a pile of splintered scrap.
How Does a Scroll Saw Actually Work?
The mechanics are simple, but the execution requires a feel for the tool. A motor drives a reciprocating mechanism, either a parallel arm linkage or a C-arm, that moves the blade up and down. You control the feed rate and direction of the workpiece on the table.
The two critical adjustments are speed and tension. Variable speed lets you match the stroke rate to the material. Slower for harder woods and metals to prevent burning; faster for softwoods and plastics for a cleaner cut.
The tension knob, usually on the rear or top of the upper arm, is what most beginners ignore. Crank it until the blade deflects about 1/8 inch when you gently push it sideways. It should sound like a high note, not a dull thud. Get this wrong, and your cuts will never be straight.
Before you start: The blade is under high tension and can snap. Always wear safety glasses, a broken blade fragment travels fast. Fine dust is a constant byproduct; use a dust mask or a shop vacuum connected to the port. That little blower on the saw only clears the cut line; it doesn’t collect anything. Secure loose clothing and hair.
The hold-down foot is your friend. It’s that metal or plastic arm that sits just above the workpiece. Its job isn’t to clamp the wood down; it’s to prevent the upstroke of the blade from lifting the workpiece off the table. Set it so it just kisses the material. Too low, and it binds; too high, and your piece chatters.
Scroll Saw vs. Jigsaw vs. Band Saw: Which One Do You Need?
This is the most common point of confusion. All three cut curves, but they are not interchangeable.
| Tool | Best For | Limitations | Interior Cuts? |
|---|---|---|---|
| Scroll Saw | Intricate curves, fine detail, thin materials (<2″), joinery, puzzles. | Slow. Limited depth of cut. Can’t handle thick stock efficiently. | Yes. Blade can be detached and threaded through a starter hole. |
| Jigsaw | Rough curves in sheet goods, cutting sink holes in countertops, general construction. | Blade deflects, so cuts aren’t perfectly vertical or precise. Limited to edge-starting cuts. | No. Blade is fixed; you must drill an entry hole and cut outward. |
| Band Saw | Resawing thick lumber, cutting rough curves in thick stock, cutting irregular shapes from large pieces. | Minimum curve radius is limited by blade width. Cannot make piercing cuts without an entry slot. | No. The continuous blade loop cannot be inserted into a drilled hole. |
If your project involves letters with internal spaces (like the center of an “O”), intricate lace-like patterns, or tight-radius curves in material under 3/4-inch thick, the scroll saw is your only real option. For everything else, a jig saw or band saw is probably faster and more capable.
The Two Main Types of Scroll Saws
The internal mechanism changes how the saw feels and performs. You’ll encounter two dominant designs.
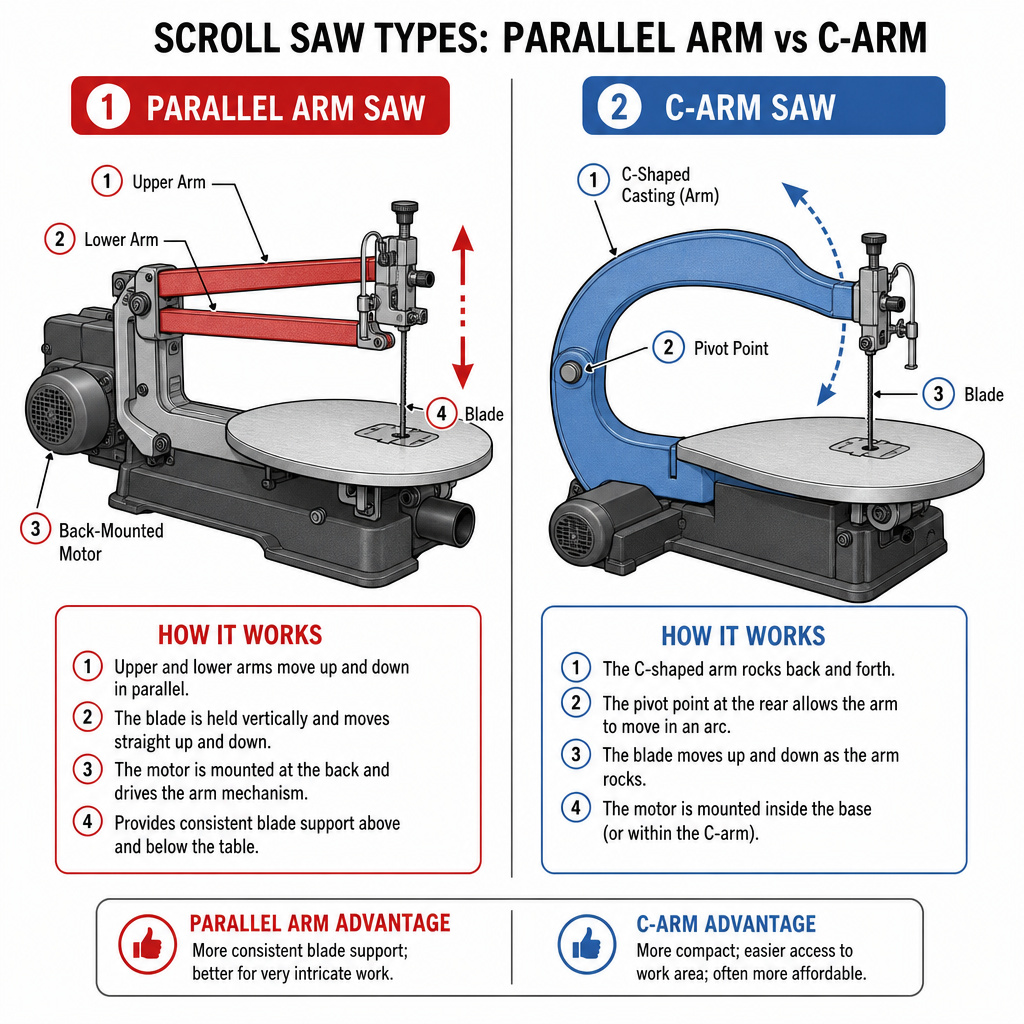
Parallel Arm Saw: This is the most common type, especially in mid-range and entry-level models. The motor is mounted at the back of the saw. Two parallel arms connect to the blade chucks, moving up and down in unison. The advantage is that they are generally simpler and less expensive. The downside is more vibration, as the entire arm assembly moves. On a cheap model, this can make detailed work a chore.
C-Arm Saw: Here, the motor is mounted inside a solid C-shaped casting. The blade is attached between the ends of the “C,” and the entire arm rocks back and forth on a pivot. This design is inherently more stable and produces significantly less vibration. It’s the hallmark of higher-end saws like the DeWalt 20-Inch or the Excalibur series. The trade-off is cost and sometimes a slightly more complex blade-change process.
My first serious scroll saw was a parallel arm Ryobi. It worked, but after an hour of cutting, my hands would feel buzzy. I upgraded to a used DeWalt 20-Inch (a C-arm design) and the difference was night and day.
The workpiece stayed still, the line was clearer, and my frustration level dropped by about 90 percent. For hobbyists doing occasional work, a parallel arm is fine. If you plan on spending weekends at the saw, the vibration reduction of a C-arm is worth every penny.
Choosing the Right Scroll Saw Blade

This is where projects succeed or fail. The blade is the business end, and using the wrong one is the fastest way to a pile of broken blades and scorched wood.
Blades are defined by their length (almost always 5 inches), their teeth per inch (TPI), and their tooth pattern. Forget “universal” blades. You match the blade to the material thickness and the type of cut.
| Blade Type | TPI Range | Best For | What Happens If You Use It Wrong |
|---|---|---|---|
| Skip Tooth (Pegas #5) | 5–15 | General-purpose cutting in wood up to 3/4″. Fast cutting with good chip clearance. | In thick hardwood, it’ll overheat and dull. In thin veneer, it’ll tear out the bottom. |
| Reverse Tooth (Olson #2/0) | 15–30 | Fine detail work and finishing cuts. The bottom few teeth cut upward to minimize splintering on the underside. | Slow cutting speed. Using it on thick material feels like pushing through molasses and builds heat fast. |
| Spiral (Flying Dutchman) | N/A (teeth on all sides) | Cutting in any direction without turning the workpiece. Great for extremely intricate, lace-like patterns. | Leaves a rough, rounded kerf. Terrible for straight lines or projects where edge quality matters. |
| Crown / Two-Way | 10–20 | Cutting laminated materials or plastics. Teeth cut on both the up and down stroke to reduce chipping on both sides. | Less aggressive cut. Not ideal for rapid stock removal in solid wood. |
| Pin-End Blades | Varies | Only for older or specific saws. They have pins on the ends that snap into clamps. Most modern saws use plain-end blades. | They simply won’t fit in a standard chuck. Don’t buy them unless your saw manual specifies them. |
The number (#2, #5, #7) generally indicates the blade’s width and coarseness. A lower number (like #2) is finer for intricate work. A higher number (like #7) is wider and more aggressive for faster cuts in thicker stock.
Here’s the rule of thumb I follow: For 1/4-inch Baltic birch plywood, I use a #2/0 reverse tooth. For 3/4-inch poplar, a #5 skip tooth. For a 2-inch thick stack of pine for a silhouette, I’d jump to a #7 skip tooth and slow the saw speed way down. Start with a small variety pack to learn what works for your material.
How to Make Your First Cut on a Scroll Saw
The theory is simple. The practice requires a light touch.
- Secure the pattern. Spray adhesive works, but blue painter’s tape and a glue stick are cleaner. Stick the pattern to the wood, then put a layer of clear packing tape over the pattern. The tape lubricates the shoe of the saw and keeps the paper from tearing.
- Install and tension the blade. Loosen the top chuck, insert the blade teeth-first and facing forward, and tighten. Do the same on the bottom. Now apply tension. Pluck it. It should ring. If it twangs dull, it’s too loose. If you’re afraid to pluck it, it’s too tight.
- Set the hold-down foot and blower. Adjust the foot so it just touches the workpiece. Turn on the blower, that little tube of air keeps sawdust off your line.
- Start the saw and feed slowly. Don’t push. Let the blade cut. Your job is to steer, not force. Turn the workpiece steadily into the blade. If you smell burning or the blade starts to wander, you’re either feeding too fast, using a dull blade, or have the speed too high for the material.
- For interior cuts, drill a starter hole. Drill a hole inside the waste area of your pattern. Stop the saw, loosen the top blade chuck, thread the blade through the hole, re-tighten the chuck, and continue cutting. When finished, stop the saw and remove the blade to free the piece.
The most common mistake is forcing the cut. The blade should do the work. If you push, the thin blade will deflect, follow the grain instead of your line, and eventually snap. Slow down. Let the tool work.
What to Look for When Buying a Scroll Saw
Beyond the throat size, which dictates your maximum workpiece width, focus on these four features.
- Variable Speed Control: A dial is better than preset switches. Hardwoods and metals need slower speeds (400–800 SPM). Softwoods and plastics can handle faster speeds (1200–1800 SPM).
- Tool-Free Blade Change: This is a game-changer. Look for a saw where you can loosen the blade chucks with a lever or knob, not an Allen wrench. When you’re doing an interior cut and changing blades multiple times, fiddling with a tiny wrench will make you hate the project.
- Solid, Cast-Iron Table: A stamped steel table will flex and vibrate. A heavy cast-iron table stays put. It should also tilt, typically up to 45 degrees left, for bevel cuts.
- Dust Port: The built-in blower is not enough. A saw with a 1-1/4 inch or 2-inch dust port lets you connect a shop vacuum. This keeps your line visible and your lungs clean.
I bought a mid-range saw without a dust port because it was $50 cheaper. After two projects, my shop looked like it had been snowed on with fine maple dust. I spent the $50 I “saved” on a better respirator and an afternoon cleaning. Now I won’t consider a saw without a proper dust collection hookup.
Brands like DeWalt, Delta, and Pegas dominate the serious hobbyist space. For a first saw, the Delta 40-694 is a solid parallel-arm contender. When you’re ready to step up, the DeWalt 20-Inch Variable Speed is the C-arm workhorse. Avoid the cheapest department store models, their vibration will ruin your accuracy and your patience.
Scroll Saw Maintenance and Troubleshooting
A scroll saw is a simple machine, but neglect leads to poor cuts and broken blades.
Weekly (or after every few hours of use):
- Blow out the interior with compressed air. Dust builds up around the plunger mechanism and can cause stiffness.
- Wipe down the table with a dry cloth, then a light coat of paste wax. This reduces friction and prevents rust.
- Check the blade tension spring and plunger for wear. If the tension feels sloppy or won’t hold, these parts may need replacement.
Troubleshooting Common Problems:
- Blade breaks constantly: Almost always incorrect tension. Too tight or too loose. Also, check that you’re not forcing the cut or trying to turn too tight a radius for the blade width.
- Burn marks on wood: Blade is dull, speed is too high, or you’re feeding too slowly. Increase feed pressure slightly or slow the motor speed.
- Excessive vibration: Check that all bolts (especially the ones holding the saw to the stand) are tight. Ensure the stand or bench is solid and level. On parallel-arm saws, some vibration is normal; on C-arm saws, it often means a worn connecting rod or pivot bushing.
- Cut wanders off the line: Dull blade, loose tension, or you’re pushing the workpiece instead of guiding it. Stop, check tension, and if it’s good, put in a fresh blade.
The blade is a consumable. Don’t try to sharpen them. A pack of 50 good-quality blades costs less than a fancy coffee. When the cut starts to feel harder or the blade discolors, change it. A fresh blade is cheaper than the piece of wood you’re about to ruin.
Frequently Asked Questions
Can a scroll saw cut metal?
Yes, but you need the right blade. Use a bi-metal or carbide-grit blade designed for metal, run the saw at its slowest speed, and use cutting fluid on ferrous metals to keep things cool. It’s slow going, best for thin sheet metal or aluminum up to about 1/8-inch thick.
What’s the difference between a scroll saw and a coping saw?
They do the same job, intricate curves, but a coping saw is entirely manual. The scroll saw is the power tool version. The coping saw is cheaper and more portable, but it requires more skill and arm strength for anything beyond the smallest projects.
How thick of wood can a scroll saw cut?
Most scroll saws list a 2-inch capacity, but that’s optimistic. For clean, controlled cuts, 3/4-inch to 1-inch hardwood is the practical limit. You can stack-cut thinner pieces to get thicker finished parts, which is a common technique for making multiple puzzle pieces at once.
Is a scroll saw safe for beginners?
It’s one of the safest power saws. The blade is small, the cutting action is slow, and your hands are away from the blade. The main dangers are eye injury from a broken blade fragment and respiratory issues from fine dust. Safety glasses and a dust mask are non-negotiable.
Why does my scroll saw blade keep coming out of the chuck?
This is almost always a tension issue. The blade isn’t tight enough in the chuck jaws, or the chuck itself is worn. First, make sure you’re inserting the blade fully into the chuck before tightening. If it persists, inspect the chuck jaws for debris or wear. On some models, the entire chuck assembly can be replaced.
Before You Go
A scroll saw fills a specific, irreplaceable role in the workshop. It’s not for breaking down plywood or ripping 2x4s. It’s for the moment when a bandsaw blade is too thick, a jigsaw cut is too rough, and a laser cutter is out of the budget. It rewards patience and a light touch with the ability to make things that look impossible.
Start with a decent saw that has a dust port and variable speed. Buy a blade variety pack. Practice on some scrap pine, making curves and inside cuts. The learning curve isn’t steep, but the ceiling is high. Once you get the feel for blade tension and feed rate, you’ll find yourself looking at wood differently, seeing the intricate shapes hiding inside.