What Size Hole Saw for a Door Handle? Standard Bore Sizes
This post contains affiliate links. As an Amazon Associate, we earn from qualifying purchases.
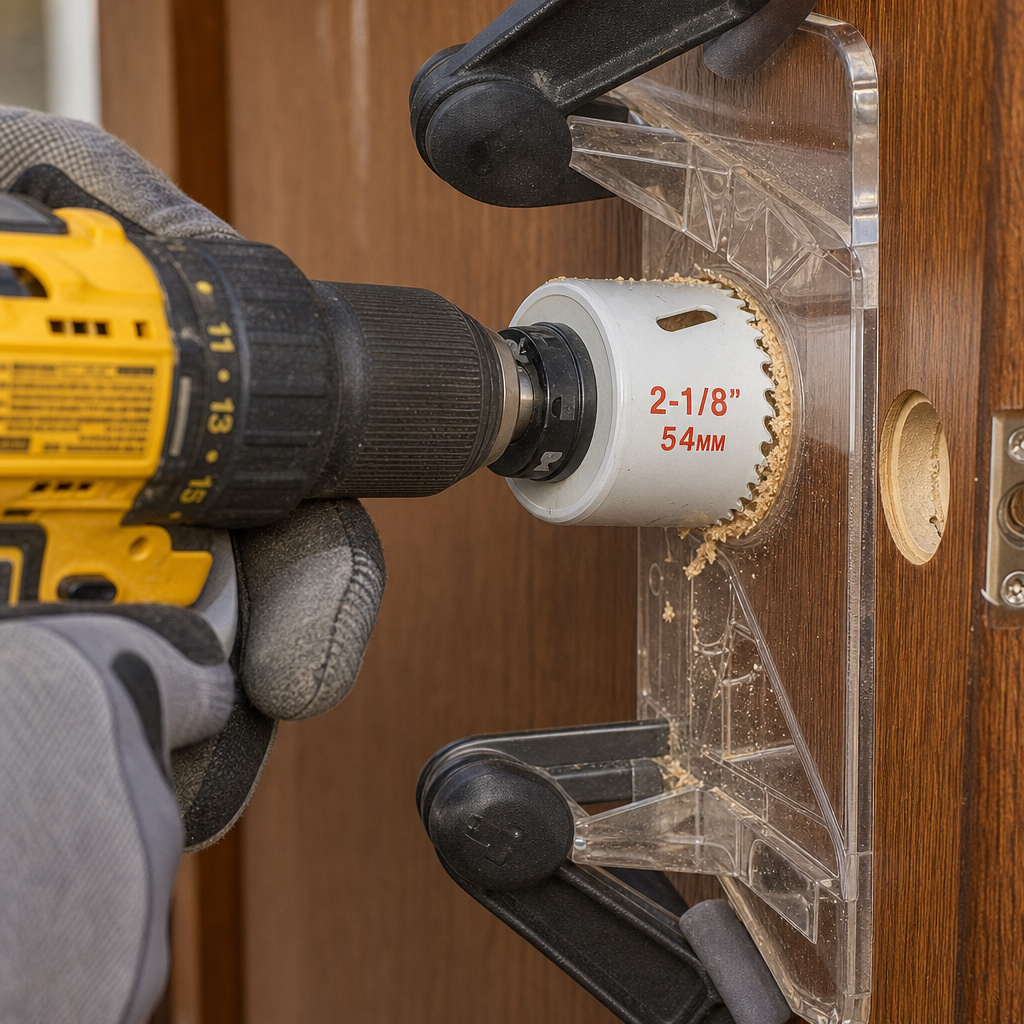
The standard hole saw sizes for a door handle are a 2-1/8 inch (54mm) hole saw for the main bore hole and a 1 inch (25mm) hole saw or spade bit for the latch hole. The backset, the distance from the door edge to the main hole center, is either 2-3/8 inches or 2-3/4 inches.
Most people grab the wrong size hole saw because they assume all doors are the same. They drill the main hole with a 2-inch saw, fight the latch plate into a rough edge bore, and spend an hour sanding and cursing. The latch binds, the knob wobbles, and the project feels broken before it’s finished.
This guide covers the exact sizes, the tools that actually work, and the mistakes you can avoid before you even plug in the drill. We’ll walk through measuring, drilling, and fixing the common errors that turn a 30-minute job into a weekend headache.
Key Takeaways
- The 2-1/8 inch hole saw is the universal standard for the main bore; a 2-inch saw will not fit most modern hardware.
- Drill the main hole from both sides, halfway from one side, then finish from the opposite side, to prevent exit-side splintering.
- Always use the paper template or a dedicated jig like the Dewalt door lock installation kit to mark the backset; eyeballing it leads to misaligned latches.
- For metal or composite doors, use a carbide-tipped hole saw and cutting oil; a standard bi-metal saw will dull in seconds and tear the material.
- Test the latch mechanism fit before screwing anything in. If the latch binds, the hole is misaligned or the mortise is too shallow.
The Three Standard Door Handle Hole Sizes
You need to drill two holes of specific diameters and place them at a precise distance from the door’s edge. Getting one wrong makes the hardware unusable.
The main bore hole, also called the cross bore, is the large hole through the face of the door where the knob or lever sits. Its standard diameter is 2-1/8 inches (54mm). A 2-inch hole saw is too small.
I learned this the hard way replacing knobs in a 1990s house. The old hardware fit a 2-inch hole, but the new Schlage lever set wouldn’t seat. I had to enlarge every hole with a rasp, which took two hours and left ragged edges. Modern residential handles almost universally require 2-1/8 inches.
The cross bore for a door handle is a 2-1/8 inch (54mm) diameter hole drilled perpendicular to the door face. This size accommodates the latch mechanism housing and the knob’s mounting plate. The same 2-1/8 inch diameter is also standard for deadbolt installations, allowing both locks to share a common bore size when installed on the same door.
The latch hole, or edge bore, is the smaller hole drilled into the edge of the door for the latch bolt itself. Its standard diameter is 1 inch (25mm). You can use a 1 inch hole saw, but a 1 inch spade bit often works faster and cleaner on wood doors. The key is drilling straight, if the bit angles, the latch will bind.
The backset is the distance from the door’s edge to the center of the main bore hole. The two standards are 2-3/8 inches (60mm) and 2-3/4 inches (70mm). Most latch mechanisms today are adjustable to fit both, but you must drill the center at the correct distance. If you drill at 3 inches, the latch won’t reach the strike plate in the frame.
Here’s a quick reference table for the core measurements:
| Hole Type | Standard Size | Tool Needed | If You Use the Wrong Size |
|---|---|---|---|
| Main Bore (Cross Bore) | 2-1/8 inches (54mm) | 2-1/8 inch hole saw | Knob won’t seat; latch plate screws misalign |
| Latch Hole (Edge Bore) | 1 inch (25mm) | 1 inch hole saw or spade bit | Latch binds or won’t extend fully |
| Backset Distance | 2-3/8″ or 2-3/4″ | Template or jig | Latch misses strike plate; door won’t latch |
How to Measure Your Door and Hardware
Before you drill, confirm three things: your door’s thickness, your hardware’s specified backset, and whether you’re replacing old holes or starting fresh.
Standard interior doors are 1-3/8 inches thick. Standard exterior doors are 1-3/4 inches thick. Your hardware is designed for this range.
If your door is thicker, like a solid 2-inch oak door, you may need a “thick door kit” with longer latch bolts. I encountered this on a custom barn door. The standard latch wouldn’t reach through. The kit added a week to the project and cost more than the handle itself.
Find the backset specification in your handle’s instruction sheet. It’s usually printed on the paper template. If you lost the template, measure the latch mechanism itself. The distance from the edge of the mounting plate to the center of the knob shaft is the backset. Most modern latches have a sliding adjustment block that lets you choose between 2-3/8 and 2-3/4 inches.
If you’re enlarging an old hole, the process is different. Say the existing hole is 2 inches and you need 2-1/8. You can’t just run the larger hole saw through the center, it will skip and chatter.
Instead, use a hole saw pilot drill to guide from the center, then slowly cut the enlargement. It feels unstable. The saw grabs. Go slow.
For brand-new doors with no existing holes, a dedicated jig is the fastest route to accuracy. The Dewalt door lock installation jig (model DW2694) clamps onto the door and has adjustable settings for backset and door thickness. It costs more than a template, but it eliminates measuring errors. I used it on six apartment doors in one afternoon. Every hole aligned.
I won’t recommend the paper template for a first-time installation on a new door. The paper shifts when you tape it, the center punch mark is vague, and if your drill bit wanders even a millimeter, the latch won’t fit. The Dewalt jig costs about what a single replacement door slab costs, and it saves both.
Which Hole Saw Should You Buy?
Not all hole saws are equal for this job. You need one that cuts cleanly in your door material and lasts beyond a few holes.
For wooden doors, a standard bi-metal hole saw like the Milwaukee 2-1/8 inch Speed Slot works fine. It cuts quickly and the slots help eject chips. The 1 inch size is less common in hole saws; a good quality 1 inch spade bit (like a Dewalt DW1361) is often a better choice for the edge bore. It’s cheaper and less likely to bind in the deep cut.
For metal doors, you need a carbide-tipped hole saw. A standard saw’s teeth will dull on the first revolution, glaze over, and start tearing the sheet metal. The Milwaukee 49-56-4020 carbide grit saw is designed for stainless and aluminum. Use cutting oil too. Without it, the metal heats up, the saw sticks, and you’ll snap the pilot drill.
For composite or fiberglass doors, a sharp bi-metal saw works, but you must drill slowly. The material can melt around the teeth and clog the saw. Clear chips every few seconds.
Here’s a comparison of saw types by door material:
| Door Material | Recommended Hole Saw | Cutting Speed | Critical Tip |
|---|---|---|---|
| Solid Wood | Bi-metal (e.g., Milwaukee Speed Slot) | Medium-Fast | Drill from both sides to prevent tear-out |
| Metal (Steel/Aluminum) | Carbide-tipped (e.g., Milwaukee Carbide Grit) | Slow | Use cutting oil; stop if smoke appears |
| Fiberglass Composite | Sharp Bi-metal | Slow | Clear chips frequently; avoid melting |
| Hollow-Core Wood | Bi-metal | Fast | Support door backside; hollow core can collapse |
Diameter matters more than brand. A 2-1/8 inch saw is 2-1/8 inches. But a cheap saw with thin walls and poor tooth set will vibrate, wander, and produce a ragged hole.
That ragged hole hides under the knob plate. When you tighten the screws, the plate distorts and the knob feels loose forever. Spend on the saw.
Step-by-Step: Drilling the Holes Correctly
Follow this sequence. Skipping a step creates a problem that compounds through the rest of the installation.
Before you start: The hole saw can grab and spin the door if it’s not clamped. The pilot drill can slip off a marked center and gouge the door face. The latch hole must be perfectly perpendicular to the door edge, if it angles, the latch binds and the door won’t close smoothly. Wear safety glasses; wood and metal chips fly back toward your face.
-
Mark the backset and center. Clamp the jig or securely tape the paper template to the door. Use a center punch to make a small dent for the pilot drill. If you skip the punch mark, the drill bit skates across the surface and the hole starts off-center. The latch will be misaligned by the time you reach the edge bore.
-
Drill the main bore hole from both sides. Insert the 2-1/8 inch hole saw into your drill. Start from one side and drill until the pilot bit just emerges from the opposite side. Do not drill all the way through from one side. That causes massive splintering on the exit face. Pull the saw out, move to the other side, insert the pilot into the small hole you just created, and finish the cut. This gives two clean edges.
-
Drill the latch hole straight. Switch to the 1 inch hole saw or spade bit. Align it with the mark on the door edge. Hold the drill level, not angled up or down. Drill straight through. If the bit angles, the latch bolt will follow that angle and bind inside the strike plate. You’ll hear a grinding click every time you turn the knob.
-
Chisel the mortises for the plates. The latch faceplate and the strike plate need shallow recesses so they sit flush. Use a sharp chisel and score the outline deeply before digging in. If you chisel too deep, the plate sits below the surface and the door edge looks gouged. If you skip chiseling, the plate sits proud and the door won’t close flush against the frame.
-
Test fit before final assembly. Insert the latch mechanism into the edge bore. Try the knob on the main bore. Feel for smooth operation. If the latch resists turning, the holes are misaligned. Correct now, before screwing anything tight. Final assembly is just screwing the plates and knobs onto the tested mechanism.
The entire process should take about 30 minutes for a single door. If you rush, you’ll spend an hour fixing errors. Drilling slowly feels tedious, but it’s faster than re-drilling.
What If the Holes Are Misaligned or Wrong Size?
You drilled. Something feels off. Here are the common fixes.
If the main bore hole is off-center, the knob won’t sit straight and the latch mechanism twists. You can’t move the hole. You must enlarge it slightly toward the correct center using the same hole saw, but with careful guidance. This weakens the door around the bore. It’s a last resort.
If the latch hole is misaligned with the main bore (the two holes don’t intersect perfectly), the latch binds. This usually happens if you drilled the edge bore at an angle. You can try to re-drill the edge bore with a larger bit, say a 1-1/8 inch spade bit, to create clearance.
This works if the misalignment is minor. If it’s severe, you may need to plug the hole with a dowel and re-drill. That’s a full afternoon repair.
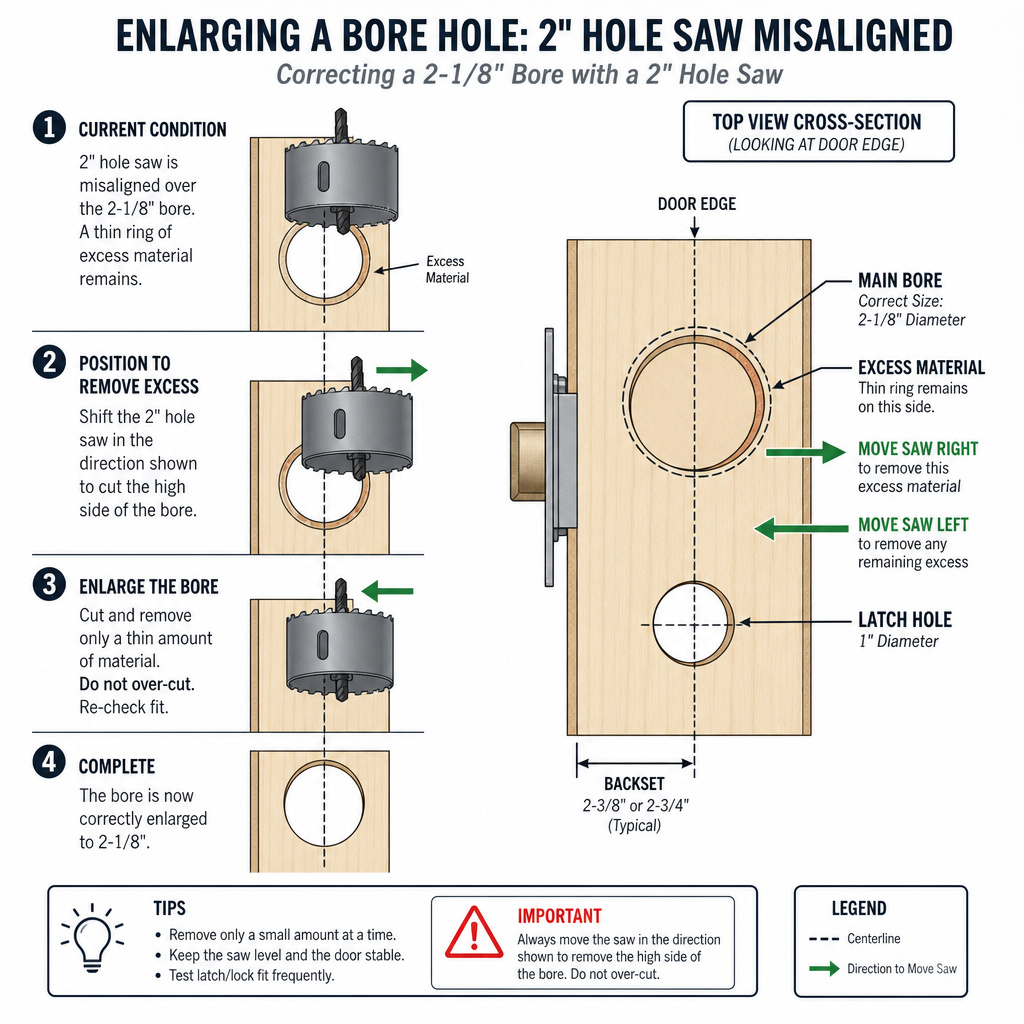
If you used a 2-inch hole saw and the hardware doesn’t fit, you need to enlarge to 2-1/8 inches. Do not try to force the knob plate. It will warp.
Use a 2-1/8 inch hole saw with a steady hand, guiding it to cut only the extra material. Support the door well. The saw will chatter.
If the backset is wrong, you drilled at 3 inches, the latch bolt won’t reach the strike plate. You have two bad options: move the strike plate on the frame (which requires re-drilling the frame and patching the old hole), or plug the main bore hole and re-drill at the correct distance. Both are messy. Measure twice next time.
If your latch grinds when you turn the knob, stop. Do not keep tightening screws hoping it will “wear in.” The misalignment is grinding metal inside the mechanism. Within a week, the latch spring will fail and the door will stay locked or unlocked randomly. Disassemble and find the angle error now.
Door Material Specifics: Wood, Metal, and Composite
The standard sizes are the same, but the cutting feel and tool wear differ drastically.
Wood is forgiving. A sharp hole saw cuts cleanly. The smell of burning wood dust tells you you’re pushing too hard.
Slow down. For hardwood like oak, the saw will labor. Use a higher drill speed but lighter pressure. Let the teeth do the work.
Metal doors require a mental shift. The saw will scream. Use cutting oil (WD-40 or proper cutting fluid) to reduce heat and friction. Drill at slow RPMs.
If you see smoke, stop immediately. The smoke means the metal is overheating and the saw teeth are glazing over. They’ll stop cutting and just rub. Let it cool, add more oil, resume slowly.
Composite and fiberglass doors are abrasive. They wear down hole saw teeth faster than wood. The cut feels gritty.
You’ll see fine powder instead of chips. Clear the saw often. If the saw gets clogged, the material melts around the teeth and you’ll get a rough, fused edge. That edge can prevent the latch plate from seating.
For all materials, the pilot drill is your guide. If the pilot drill breaks, a common failure in metal doors, the hole saw will wander uncontrollably. Use a sturdy pilot bit, not the cheap ones that come with some saw kits. A broken pilot in a half-cut hole is a nightmare to extract.
Frequently Asked Questions
Can I use a 2-inch hole saw for a door handle?
No. Modern door handles are designed for a 2-1/8 inch bore. A 2-inch hole will prevent the knob’s mounting plate from seating properly. The screws will pull the plate against the hole edge, distorting it and causing a permanent wobble. You must enlarge the hole.
What if my door is thicker than 1-3/4 inches?
You need a thick door kit from the hardware manufacturer. These kits include longer latch bolts and sometimes extended mounting hardware. Standard latch bolts are designed for doors up to 1-3/4 inches thick. Beyond that, the bolt won’t protrude enough to engage the strike plate.
How do I drill a door without a template?
Use a door lock installation jig like the Dewalt DW2694. It clamps onto the door and has adjustable guides for backset and door thickness. If you must improvise, measure the backset carefully from the door edge, mark the center, and use a square to transfer that mark to the door edge for the latch hole. This is risky and often leads to misalignment.
Why does my new door handle feel loose even when tightened?
The main bore hole is likely too large or ragged. The mounting plate is sitting on uneven wood, and the screws cannot pull it flush. Alternatively, you may have overtightened the screws, stripping the threads in the door material. Back the screws out, ensure the plate sits flat, and re-tighten gently.
Can I use the same hole saw for a deadbolt?
Yes. The main bore hole for a deadbolt is also 2-1/8 inches in diameter. You drill it typically 5-1/2 inches above the door handle hole. Use the same 2-1/8 inch saw. The latch hole for a deadbolt is usually 1 inch as well, but some models use a slightly different shape; check the deadbolt instructions.
What’s the best way to prevent splintering on the exit side of the hole?
Drill from both sides. Drill halfway through from the first side until the pilot bit just pokes through the back. Then move to the opposite side, insert the pilot into that small starter hole, and complete the cut. This method ensures both faces of the door have a clean, sharp hole edge.
The Bottom Line
Door handle holes require two specific sizes: 2-1/8 inches for the main bore, 1 inch for the latch. The backset must be 2-3/8 or 2-3/4 inches from the door edge. Use a jig or template to mark these distances, eyeballing leads to misaligned latches that grind and fail. Drill the main hole from both sides to prevent splintering. For metal doors, invest in a carbide-tipped hole saw and cutting oil. Test the latch fit before final assembly. If something binds, correct the hole alignment immediately. A correct hole lets the hardware work silently for years; a wrong hole creates a problem you feel every time you open the door.