How to Restring a String Trimmer the Right Way (Step-by-Step)
This post contains affiliate links. As an Amazon Associate, we earn from qualifying purchases.
Restringing a string trimmer requires matching three things: the head type (bump-feed, fixed-line, or automatic-feed), the exact line diameter printed on the head, and a tight, even wind in the direction marked by the arrow on the spool. Get one wrong and the line jams, breaks prematurely, or strains the motor.
Most people grab whatever line is handy and wind it any which way. The trimmer works for five minutes, then the line snaps or won’t feed. They blame the tool. The real problem is a mismatch between the line, the head, and the winding technique. That mismatch burns out electric motors and bogs down gas engines.
This guide walks through each head type. You’ll get the step-by-step for the common bump-feed, the quick-change fixed-line, and the set-it-and-forget-it automatic heads. We’ll cover why soaking nylon line actually works, what that melted blob inside your head means, and how to avoid the three most expensive mistakes.
Key Takeaways
- The line diameter is non-negotiable. Using .095-inch line in a head rated for .080 forces the motor to draw higher amperage, overheating the windings in cordless models within a few uses.
- Wind against the arrow. Every spool has a directional arrow. Winding with it lets the line unravel inside the head under centrifugal force, creating a knotted jam you’ll need pliers to dig out.
- Soak nylon line for 30 minutes before winding. Nylon is hygroscopic, it absorbs water, which swells the polymer chains and increases flexibility. Dry, brittle line snaps on the first pass against a fence post.
- A melted line end inside the spool chamber means your trimmer head is spinning against an object at idle. Adjust the idle speed screw on gas models or check for a dragging brake on electrics.
- Never force a stuck trimmer head. Holding the drive shaft with a 10mm open-end wrench or a dedicated spanner prevents stripping the plastic splines, a $40 repair on most homeowner-grade units.
Before You Start: The Non-Negotiables
Before you start: The trimmer head spins at 7,000 to 10,000 RPM. A loose line tail can whip back and lacerate skin in under a second. Always wear safety glasses, not sunglasses, and sturdy gloves. For gas trimmers, disconnect the spark plug wire and move it at least 6 inches from the plug. A hot exhaust can ignite dry grass clippings; work on a clear, paved surface if possible.
The single most common error is skipping the power disconnect. I’ve seen a neighbor’s Ryobi 40V trimmer start itself from a static discharge when he bumped the head against his boot. The line took a chunk out of his leather work boot. The boot was replaceable. An ankle tendon isn’t.
Gather your line, a tape measure, needle-nose pliers, and a sharp knife. A small flathead screwdriver helps with retention clips. That’s it. You don’t need a specialty tool unless your model requires a spanner to hold the drive shaft (common on Stihl and some Echo models).
What Type of Trimmer Head Do You Have?
You can’t restring it if you don’t know what “it” is. There are three main types, and the restringing process is completely different for each.
Bump-Feed Heads are the most common. You tap the head on the ground while the trimmer is running to advance fresh line. They have a removable spool inside a two-piece housing. Brands like Troy-Bilt, Husqvarna, and most homeowner-grade electrics use these. The spool must be removed, wound, and reinstalled.
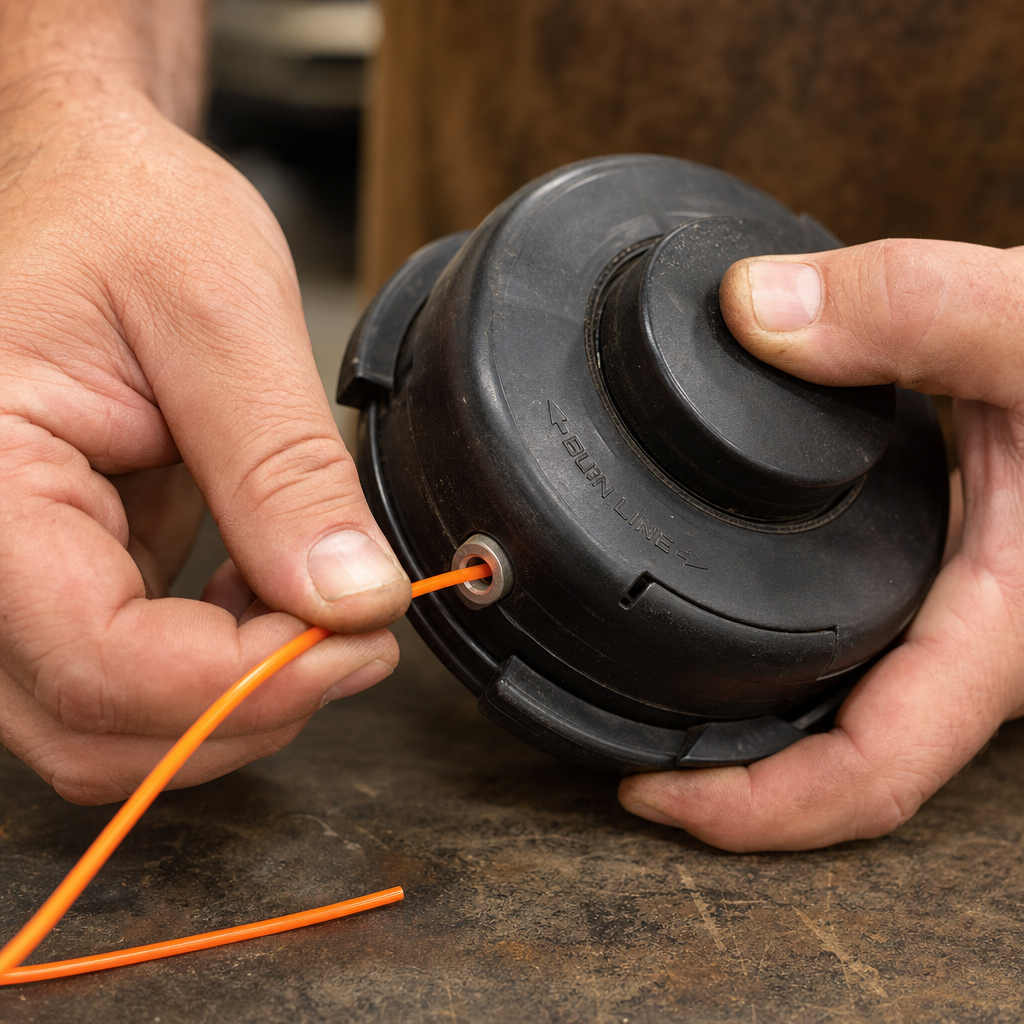
Fixed-Line Heads (also called “manual feed” or “insert heads”) use two short, pre-cut pieces of line. You poke the ends through holes in the head’s side until they click into place. No winding, no spool. Common on light-duty electric trimmers, like many Black+Decker and older Greenworks models. They’re fast to change but wear out quicker.
Automatic-Feed Heads sense when the line is short and release more automatically. The spool is often sealed or proprietary. Examples include the Stihl AutoCut 26-2 or the ECHO Speed-Feed 400. You typically buy a pre-wound replacement spool or cartridge for these. Attempting to rewind them yourself voids the warranty and usually fails.
| Head Type | How to Identify | Restringing Method | Biggest Risk |
|---|---|---|---|
| Bump-Feed | Round head with a removable bottom cap or cover. Often says “Bump & Go” or has an arrow. | Remove spool, wind new line, reassemble. | Winding in the wrong direction causes immediate jam. |
| Fixed-Line | Solid head with two or four small holes on the sides. No removable cover. | Insert pre-cut line lengths until they lock. | Forcing line that’s too thick cracks the head housing. |
| Automatic-Feed | Smooth, often streamlined head with no user-serviceable parts. Brand logos like “AutoCut” or “Speed-Feed”. | Replace with OEM pre-wound spool cartridge. | Trying to open it ruins the clutch mechanism. |
If you’re unsure, your owner’s manual is the final authority. Lacking that, search the model number online followed by “parts diagram”. The head assembly will be listed.
How Do You Restring a Bump-Feed Head?
This is the core skill. Master this, and the other types feel trivial.
Step 1: Remove the Spool.
Depress the plastic tabs on the sides of the head cover and pull the bottom cap off. Sometimes you need to push in and turn. The spool should lift out. If the entire head spins freely, you need to lock the drive shaft. On many gas trimmers, there’s a hole near the head where you can insert a 4mm Allen key or a narrow screwdriver to lock the shaft. For electrics, you might need to hold the metal shaft just above the head with pliers (pad them with a rag to prevent scratches).
Step 2: Clean and Inspect.
Blow out or brush all debris from the spool chamber. Look at the exit holes, are the metal eyelets smooth or burred? A burred eyelet will shred new line. Check the spring under the spool. If it’s rusted or collapsed, the spool won’t retract properly and the line will over-feed. A replacement spring costs about three dollars.
Step 3: Measure and Prep the Line.
Cut about 20 feet of line. This is a starting point; some heads hold more, some less. Find the diameter marking on the old spool or the head itself. It’s crucial.
Using line 0.015 inches over the specified diameter increases drag by roughly 30 percent. On a 10-amp electric trimmer, that pushes it near its thermal cutoff on a hot day. The motor will stutter and shut down.
Now, soak it. This isn’t an old wives’ tale. Nylon monofilament absorbs water, which plasticizes the polymer.
A 30-minute soak reduces internal stress when the line is wound tightly onto the spool. It also reduces friction heat when cutting. Skip this, and your first hard cut against a sidewalk might snap the line because it’s too brittle.
Step 4: Wind the Spool Correctly.
Locate the directional arrow on the spool. Wind against it. This is the step everyone second-guesses.
Find the anchor slot in the center of the spool. Fold your length of line in half and hook the folded center loop into that slot. Now wind each strand onto its respective half of the spool. Keep tension tight and the coils neat and parallel. Overlaps cause knots.
Leave about 6 inches of each strand loose when you’re done. Hook these ends into the retention notches on the spool’s outer rim. This keeps everything in place during reassembly.
Step 5: Reassemble and Thread.
Place the spool back into the head. The lines must feed out through their respective exit holes. This often requires a slight bend to get them started. Once the lines are poking out, seat the spool fully. Make sure it clicks down over the center post and spring.
Snap the cover back on. You should hear a definitive click. If it doesn’t seat flush, the spool is misaligned or a line is trapped. Don’t force it.
Step 6: Test the Feed.
Pull the line ends free from their retention notches. Give them a firm tug to ensure they’re not bound. Before reconnecting power, spin the head by hand. The lines should fly out smoothly. If they don’t, the wind is too tight or in the wrong direction. Take it apart and re-wind.
For more on the nuances of winding trimmer line, especially for tricky dual-line spools, we have a dedicated guide.
What If Your Trimmer Has a Fixed or Automatic Head?
The process is simpler but has its own pitfalls.
Fixed-Line Head Restringing:
- Cut two lengths of line to the manufacturer’s specification, usually 6 to 8 inches.
- Identify the correct holes. There are often two sets: one for shorter line, one for longer. Use the set that matches your cut length.
- Insert one line into a hole until you feel it click or lock into an internal mechanism. Pull gently to confirm it’s held.
- Repeat for the second line in the opposite hole.
- That’s it. No winding, no spool removal.
The risk here is using line that’s too stiff. If the line won’t insert smoothly, don’t hammer it with a screwdriver. You’ll break the internal plastic latch. Instead, try a smaller diameter or a more flexible round line instead of a stiff square line.
Automatic-Feed Head “Restringing”:
You don’t, really. You replace the cartridge.
1. Unlock the head, this often involves lining up arrows and pressing a button.
2. Remove the spent cartridge.
3. Insert the new, pre-wound OEM cartridge. Generic spools rarely work because the release mechanism is precision-timed to the brand’s clutch.
4. Lock the head back in place.
5. Pull the line ends out to the optimal line length (usually 5-7 inches) and you’re done.
I used a universal spool in my Stihl FS 56 RC-E once, trying to save eight dollars. It fed out line in erratic, foot-long bursts for about ten minutes. Then the clutch overheated and seized. The repair bill was ninety dollars. Now I buy the Stihl AutoCut 26-2 spools in a three-pack. They last a full season.
Why Did My New Line Fail Immediately?

A quick diagnosis saves your next attempt.
| Symptom | Likely Cause | The Fix | Timeline |
|---|---|---|---|
| Line snaps instantly when bumped. | Line is old, dry, and brittle. Or, diameter is too large for the exit eyelet, causing a shear point. | Use fresh line. Soak it. Verify diameter. | Breaks on first or second tap. |
| Line won’t feed out at all. | Spool was wound in the wrong direction (with the arrow). Line is bound inside. | Rewind spool against the arrow. | Jam occurs immediately upon starting trimmer. |
| Line feeds out in huge, uncontrolled loops. | Idle speed is set too high (gas), or the brake is dragging (electric). The head is spinning at idle. | Adjust carburetor idle screw (gas) or service electric brake. | Noticeable after a few minutes of operation. |
| Line melts into a blob inside the head. | Head is rubbing against the shield or ground while trimmer is running at full speed. Friction heat melts nylon. | Ensure proper shield clearance. Don’t “scalp” the ground. | Blob forms after 5-10 minutes of continuous use. |
| Motor bogs down or overheats. | Line diameter is too thick, creating excessive load. | Switch to the specified diameter. Let motor cool. | Motor thermal shutdown occurs within 15 minutes. |
If you’re facing persistent feed issues, our guide on replacing trimmer line dives deeper into troubleshooting the entire feed system, from worn bump knobs to weak springs.
What’s the Best Line for My Trimmer?
It’s not just about diameter. Shape and material matter for your specific task.
- Round Line: The standard. Good for general grass and weeds. Most flexible, easiest to wind. It’s what you should use if you’re unsure.
- Square or Star-Shaped Line: Has sharper edges. Cuts more aggressively through thick, fibrous weeds. It’s also noisier and creates more drag on the motor. Don’t use it on a lightweight electric trimmer.
- Twisted Line: A compromise. Slightly more aggressive than round, but more flexible than square. Often has a reinforced core to reduce breakage.
- Bladed Line: Has tiny plastic barbs. Extremely aggressive for heavy brush. Will quickly destroy a plastic trimmer head not rated for it. Check your manual.
For 90% of suburban lawns, a fresh .095-inch round nylon line is perfect. Buy a name-brand spool from Oregon, Husqvarna, or Ryobi. The cheap, no-name line is often inconsistently sized and fractures internally. You’ll use twice as much.
Regarding the practice of soaking trimmer line, the science supports it for nylon. It doesn’t help with co-polymer or reinforced lines. Soak nylon for 30 minutes to an hour. Overnight doesn’t add benefit.
Gas vs. Electric: Any Difference in the Process?
The restringing steps are identical. The safety and maintenance context is different.
For Gas Trimmers:
- Let it cool. The muffler and head can be over 200°F. Wait 15 minutes.
- Disconnect the spark plug wire. Pull the boot off the plug and keep it away. A grounded plug wire can still fire the engine if you pull the starter.
- Check other things while you’re there. Is the air filter clogged? Is the spark plug fouled (gap should be 0.025-0.030 inches)? A quick tune-up now prevents a no-start next time. Torque the spark plug to 18-22 ft-lbs, finger tight plus a quarter turn with a wrench. Over-tightening cracks the ceramic insulator.
For Electric Trimmers (Corded & Cordless):
- Remove the battery or unplug. For cordless, removing the battery is sufficient. For corded, unplug from the wall.
- Mind the brake. Some electrics have an automatic brake that stops the head when the trigger is released. If your line isn’t feeding, this brake might be dragging. Look for a visible brake pad near the head.
- Battery care. If you have a cordless model, this is a good time to check the battery contacts for corrosion. A quick wipe with isopropyl alcohol on a cotton swab keeps the connection solid.
Frequently Asked Questions
How much line should I put on the spool?
For a standard dual-line bump-feed spool, start with 20 feet of line, folded to make two 10-foot strands. Overfilling the spool prevents it from seating in the head and causes drag. Underfilling makes you stop to reload every few minutes. Your manual has the exact capacity.
Can I use any brand of trimmer line?
Yes, as long as the diameter and shape match your trimmer head’s specification. Brand doesn’t matter for performance, but quality does. Cheap line is often brittle and inconsistently thick. Stick with known brands like Oregon, MaxPower, or the OEM line for reliable results.
Why does my line keep breaking even though I just put it on?
You’re either using old, sun-damaged line (check the date on the spool), winding it too tightly which creates internal stress cracks, or you have a burr on the exit eyelet that acts like a knife. Soak new line, wind with firm but not extreme tension, and file down any metal burrs with a small round file.
How often should I restring my trimmer?
Restring when the line wears down to about 3-4 inches remaining. Don’t wait until it’s completely gone, as running the head without line can damage the cutting guard and the spool mechanism. For an average 1/4-acre lawn, you might restring every 4-6 weeks during peak growing season.
What do I do with the old trimmer line?
Don’t throw it in the yard. Coiled nylon line is a hazard for wildlife and can get tangled in mower blades. Wrap it into a small bundle and dispose of it in your household trash. Some recycling centers accept nylon, but check locally first.
The Bottom Line
Restringing a trimmer is a five-minute job with the right line and the right wind. Match the diameter on the head, wind against the arrow, and soak nylon line for half an hour before you start. Those three actions prevent 90 percent of feed problems.
Keep the head clean, replace worn springs and eyelets, and use the process as a chance to check the rest of your tool, air filter on gas, battery contacts on cordless. A trimmer is simple. Treat it right, and it’ll clear your edges for years without complaint. Ignore the specs, and you’ll be buying a new motor or a whole new tool by next season. Your choice.