Learn How to Replace Trimmer Line With This Working Guide
This post contains affiliate links. As an Amazon Associate, we earn from qualifying purchases.
Replacing trimmer line requires matching three things: the head type (bump-feed, fixed-line, or automatic-feed), the line diameter stamped on the head or in your manual, and a tight wind in the direction marked by the arrow on the spool. For most common bump-feed heads, you’ll cut about 20 feet of line, wind it against the arrow’s direction, and leave a 6-8 inch tail on each side before snapping the cover shut.
People get this wrong because they try to force a universal method onto three different head designs. They wind the line the wrong way, cram too much onto the spool, or use the wrong diameter line for their trimmer’s power. That jams the head instantly.
This guide walks you through identifying your head, picking the right line, and loading it correctly so it feeds when you bump it. We’ll cover the specific steps for each head type, the tools you actually need, and what happens when you skip a step.
Key Takeaways
- The correct line diameter is printed on the trimmer head or in the manual, using a thinner line wears out fast, a thicker line strains the motor.
- Wind direction matters. The arrow on the spool shows which way to wind; go the opposite direction so the line releases correctly when tapped.
- Soak new nylon line in water for 30 minutes before loading. It becomes more flexible, reduces breakage, and prevents the strands from heat-welding together inside the spool.
- Clean the head housing every time you change the line. Dirt and old line fragments jam the feed mechanism within two or three uses.
- For bump-feed heads, leave 6-8 inches of line tail after threading it through the exit holes. Less than 4 inches won’t reach the cutting guard, more than 10 inches causes excessive vibration and tangling.
Safety First
Before you start: Disconnect all power. For electric trimmers, unplug the cord or remove the battery. For gas trimmers, turn off the engine and let it cool for at least five minutes. The cutting head can spin unexpectedly if the trigger is bumped, and a hot muffler will burn skin instantly. Wear cut-resistant gloves, freshly cut line ends are sharp enough to slice a finger. Safety goggles are non-negotiable; a snapped line or a piece of debris flies back at eye level.
This isn’t a gentle maintenance task. You’re handling a monofilament line under tension that can whip and a head assembly with small, spring-loaded parts. Rushing leads to pinched fingers and ruined spools.
What Type of Trimmer Head Do You Have?
Look at the business end of your trimmer. The process changes completely based on the head design. There are three main types, and mistaking one for another is the fastest route to frustration.
Bump-feed heads are the most common. They have a round, often black, plastic bump knob on the bottom. You tap this knob on the ground to advance fresh line. Brands like STIHL (AutoCut), Troy-Bilt, and most Ryobi models use this system. The spool sits inside and must be removed, wound with new line, and reinstalled.
Fixed-line heads have two or four small holes around the perimeter. You insert pre-cut lengths of line directly into these holes until they click into place. There’s no spool to wind. Black & Decker and some older electric models use this. It’s simpler to load but you’re constantly stopping to add new line.
Automatic-feed heads sense when the line is short and advance it electronically or via centrifugal force. Many, like the EGO Line IQ, use a sealed, pre-wound spool you swap out as a unit. Others, like some Husqvarna models, have an internal spool you can rewind yourself.
If you’re unsure, your owner’s manual is the final word. Lacking that, search your trimmer’s model number online followed by “head type.” Guessing wrong wastes a spool of line.
Choosing the Right Trimmer Line
The line diameter is not a suggestion. It’s a requirement stamped on the head or listed in your manual. Ignoring it breaks things.
Use a line diameter thinner than specified, and it wears down to a nub in five minutes against tough weeds. It also doesn’t transfer the motor’s power effectively, making the trimmer work harder and overheat. Go thicker than specified, and the extra drag can stall a weaker electric motor or prevent the bump-feed mechanism from releasing line at all.
Most residential electric trimmers use .065-inch or .080-inch line. Mid-range gas trimmers handle .095-inch. Heavy-duty commercial units go up to .130-inch or even .155-inch.
| Line Diameter (inches) | Best For | Common Trimmer Types |
|---|---|---|
| .065 – .080 | Light grass, small electric trimmers | Ryobi 18V, Black & Decker corded |
| .095 | Medium weeds, most gas trimmers | Troy-Bilt TB575, STIHL FS 56 |
| .105 – .130 | Thick weeds, brush, commercial use | STIHL FS 131, Echo SRM-2620 |
| .155+ | Heavy brush, clearing saplings | Dedicated brush cutters |
Material matters too. Standard round nylon line works for grass. For tougher jobs, twisted line or square line lasts longer because its shape cuts like a blade rather than whipping. Avoid “commercial grade” line on a lightweight trimmer, it’s too stiff and won’t feed smoothly.
I bought a bulk spool of .105-inch line for my mid-duty gas trimmer because it was on sale. The trimmer labored, the head got hot to the touch after ten minutes, and the line wouldn’t bump-feed reliably. Switched back to the specified .095-inch and it ran cool and fed perfectly. That extra .010 inch made all the difference.
Gathering Your Tools and Prepping the Line
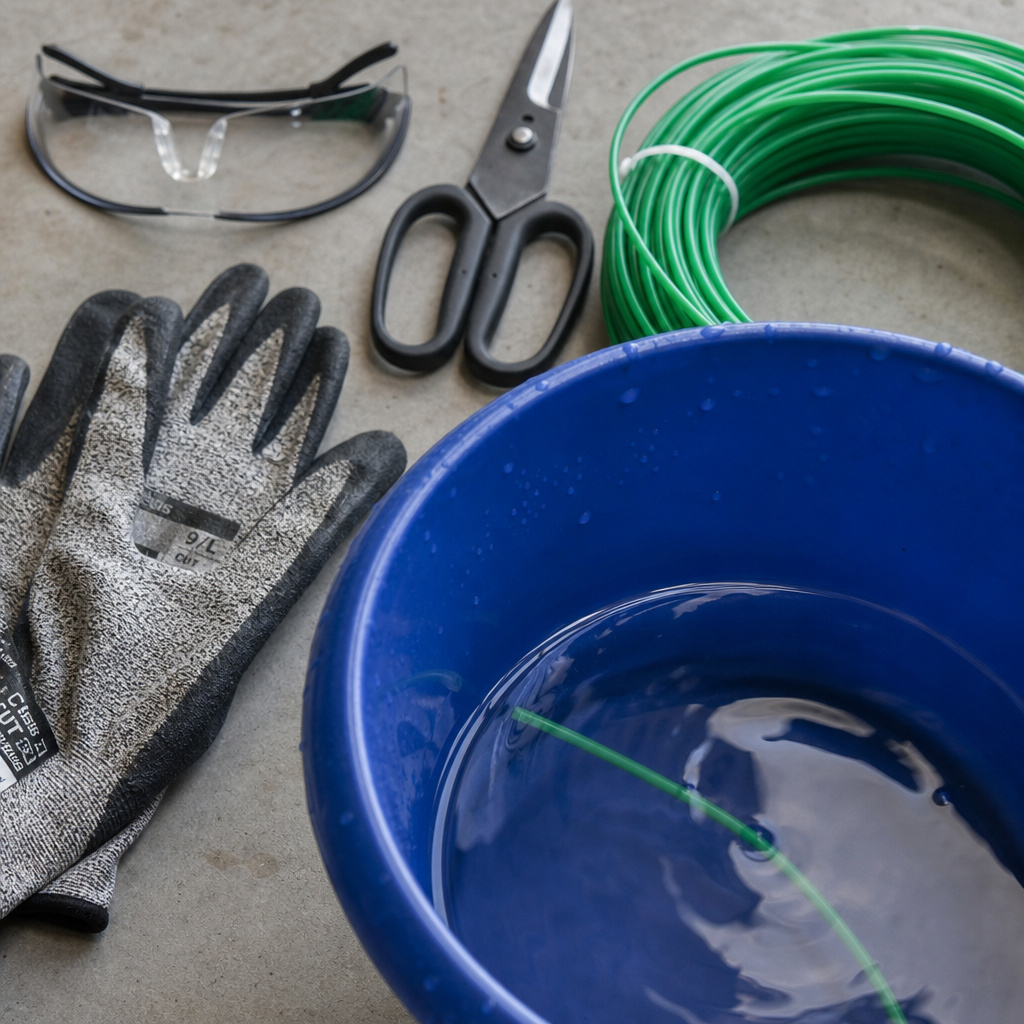
You don’t need much. A pair of scissors or a dedicated line cutter, cut-resistant gloves, safety goggles, and your new line. That’s it.
A flat, clean workspace helps. The garage floor is fine, but keep small parts from rolling into the drain.
Here’s the pro tip most guides skip: soak your new nylon line. Submerge it in a bucket of water for 30 minutes before you cut and wind it. The nylon absorbs water and becomes more flexible. Dry nylon is brittle and snaps easier, especially in cooler weather. Soaked line also resists the heat-fusing that can happen inside a spinning spool, the strands melt together into a solid lump that won’t feed.
Cut your length before soaking. For a standard bump-feed head, 20 feet is a safe bet. Fold it in half to find the midpoint.
That midpoint hooks into the spool’s anchor slot. If your manual says a different length, trust it. Overfilling the spool is a guaranteed jam.
Step-by-Step: Replacing Line on a Bump-Feed Head
This is the process for the majority of trimmers. The specifics vary by brand, but the principles are universal.
- Remove the spool. Press in the two plastic tabs on the side of the head (common on STIHL) or unscrew the bump knob (common on Troy-Bilt, Cub Cadet) by turning it counter-clockwise. The inner reel with the old line will come out. If it’s stuck, a flathead screwdriver gently pried under the edge can help. Forcing it breaks the tabs.
- Clean everything. Brush out all debris from the inside of the head housing and the spool. A toothbrush works. Miss this, and the new line will drag against grit and wear prematurely.
- Remove old line and prepare the new. Unwind any leftover line from the spool. Take your pre-cut 20-foot length, find the middle, and bend it into a tight “V.” Hook that V into the anchor slot on the spool. The two tails should be equal length.
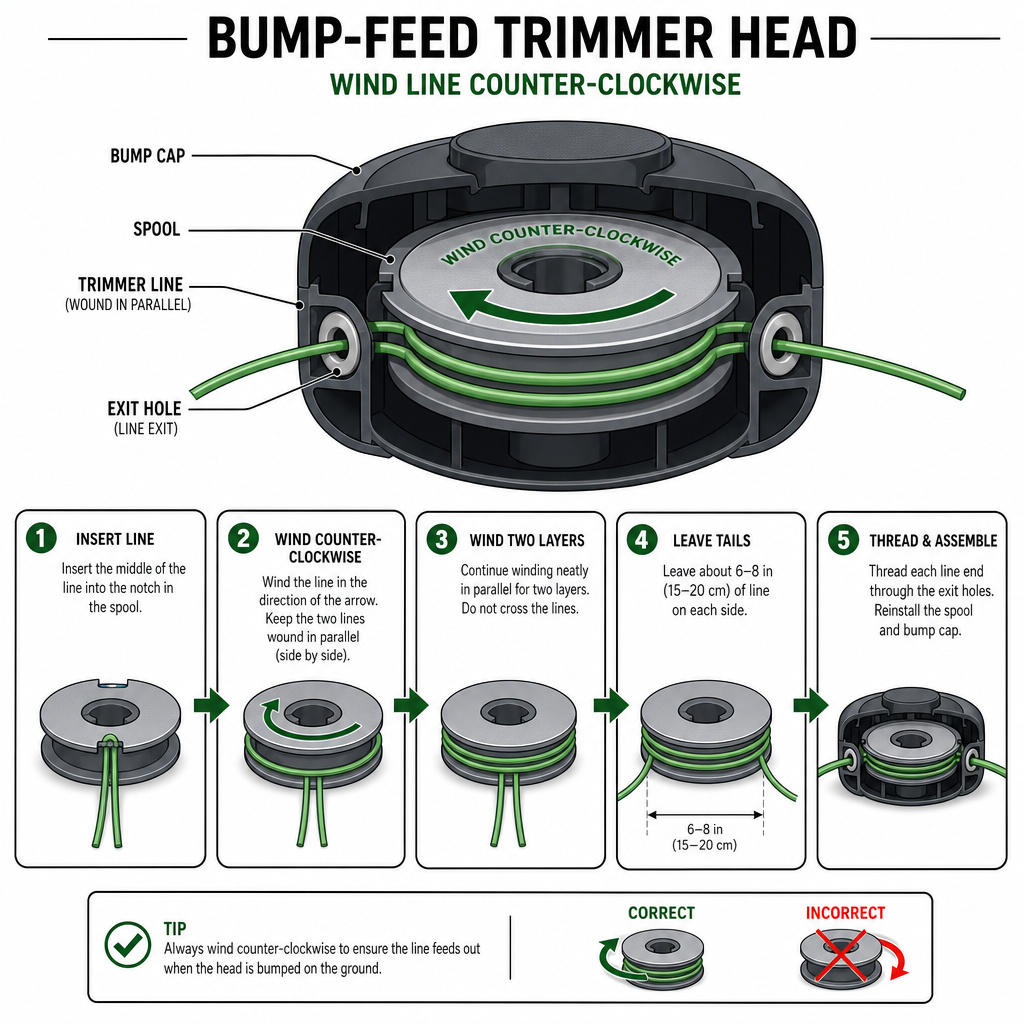
- Wind the line. This is the critical step. Look for the arrow on the spool. Wind the line against that arrow. If the arrow points clockwise, wind counter-clockwise. Keep the strands parallel, tight, and neat. Overlapping or loose winds tangle immediately. Leave about 6-8 inches of each tail unwound.
- Secure the tails. Most spools have notches or slots to hook the ends temporarily. Use them. If not, pinch the tails against the spool with your thumb as you move to the next step.
- Reassemble and thread. Place the spool back into the head, ensuring it clicks or seats fully. Pull the two tails out through their respective exit holes in the head. Now, pull firmly on both tails until you feel them click past a retention mechanism inside. This step is what most people miss, if the line isn’t pulled through until it clicks, it will retract back into the head when you try to use it.
- Replace the cover. Snap the bump knob or cover back on. Give the lines a final tug to ensure they’re secure. Trim the tails to an even length, about 6-8 inches long.
If the line doesn’t feed when you bump the head later, you likely wound it in the wrong direction. The spool needs to unwind when tapped; winding with the arrow makes it tighten.
Loading Fixed-Line and Automatic-Feed Heads
The process is simpler but has its own pitfalls.
For fixed-line heads, you don’t remove a spool. Cut two lengths of line (check manual for length, often 8-10 inches each). Insert one end of a line into a hole on the head and push until you hear or feel a click. Some heads have a locking mechanism you depress with a screwdriver.
Pull gently on the line to confirm it’s locked. Repeat for the second line in the opposite hole. The risk here is not seating the line fully. A half-seated line flies out at full RPM.
Automatic-feed heads like the EGO Line IQ or the Echo SPEED FEED 450 use a different approach. For sealed spool systems, you simply unscrew the old spool cartridge and screw in a new one, no winding. For user-wound automatic heads, you typically feed a single, longer strand through a center hole, even up the ends, and then turn the head itself to wind the line in. The EGO string trimmer has a specific loading ritual that’s dead simple once you know it.
I’ve seen people try to rewind a sealed EGO spool. It’s a mess of melted nylon and frustration. The cartridge is designed as a disposable unit. Paying for the convenience spool is cheaper than the hour you’ll spend trying to hack it.
Winding and Loading: The Right Way
Getting the wind right is what separates a trimmer that works from one that’s jammed after two minutes. The spool has an arrow for a reason.
Wind the line in the direction opposite the arrow on the spool. The arrow indicates the direction the spool needs to turn to release line when the bump mechanism engages. If you wind with the arrow, the bump action tightens the coil instead of releasing it. The head will click but no new line appears.
Keep the winds tight and side-by-side. Loose winds collapse into each other, creating knots inside the spool chamber. Don’t cross the lines over each other. If the two strands start to twist around one another, stop, unwind a bit, and start again.
Most heads hold about 20 feet of .095-inch line total (10 feet per strand). If you’re forcing the last few feet onto the spool, it’s too much. The spool needs a little air space between the wound line and the cover. Cramming it full creates so much friction the line can’t unwind.
For a visual guide on avoiding common mistakes, our article on winding string trimmer line breaks it down with clear pictures.
Why Does My New Line Keep Breaking?
Fresh line snapping off is usually one of three things.
First, you’re hitting something hard. Rocks, concrete edges, fence posts. Even the toughest line will shred against masonry. Angle the head so the line sweeps grass, not scrapes solid objects.
Second, the line is old or poor quality. Nylon degrades in UV light. That bargain bin spool that sat in your shed for three summers is brittle. It’ll snap under normal use. Buy from a known brand and use it within a year or two.
Third, and most subtle, is motor RPM mismatch. A high-RPM trimmer (like many gas models) needs a line that can handle the centrifugal force. A lightweight line meant for a low-RPM electric trimmer will literally fly apart. Match the line’s rated RPM to your tool.
If the line isn’t breaking but just won’t feed, you likely wound it wrong, put in too much, or didn’t clean the head. Back to step one.
Troubleshooting Common Problems
A little diagnostics saves a second trip to the garage.
| Symptom | Likely Cause | Fix |
|---|---|---|
| Line won’t feed when bumped | Line wound in wrong direction; spool not seated. | Rewind opposite the arrow. Ensure spool clicks into head. |
| Line feeds too much, tangles | Too much line on spool; tails too long. | Remove spool, unwind 3-4 feet of line. Trim tails to 6 inches. |
| Head vibrates excessively | Uneven line lengths; damaged spool. | Measure and trim both lines to equal length. Inspect spool for cracks, replace if needed. |
| Line retracts into head | Line not locked in exit holes. | Disassemble, pull lines until they click past internal locks. Reassemble and tug firmly. |
| Head makes clicking noise, no line | Worn bump mechanism; broken spring. | Replace the bump knob or entire head assembly. |
For persistent mechanical issues, like a broken spring or stripped gears, consulting a detailed guide on removing a trimmer head is the next step. Sometimes the problem is inside.
Frequently Asked Questions
Can I use any trimmer line on my machine?
No. Use only the diameter specified on the trimmer head or in your manual. A thicker line can overload the motor; a thinner line wears out instantly and doesn’t cut well.
How often should I replace trimmer line?
Replace it when the cutting ends wear down to about 2-3 inches long. For average suburban use, that might be every 4-6 hours of runtime. Don’t wait until it’s completely gone, running on stubs strains the motor.
Why does my line keep jamming inside the head?
The three usual suspects are winding in the wrong direction, overfilling the spool, or debris left in the head from the last change. Clean the head thoroughly and rewind with less line, going opposite the arrow.
Is it worth buying pre-wound spools?
For automatic-feed heads that use cartridges, yes, it’s often the only option. For standard bump-feed heads, it’s a convenience premium. A bulk spool costs less per foot, but a pre-wound spool gets you back to work in 30 seconds. Your call.
Before You Go
Matching the line to your head type and winding it tight in the correct direction fixes ninety percent of trimmer feed problems. The other ten percent is usually dirt in the mechanism or a worn-out bump spring.
Keep a spare spool of the right line in your garage. Nothing kills a Saturday yard work momentum like a trip to the hardware store for a five-dollar part. And for brand-specific nuances, like the Ryobi 18V cordless trimmer or a STIHL AutoCut system, your model’s manual has the final say, download it if you’ve lost it.
The process feels fiddly the first time. The second time, it takes five minutes. Your forearms will thank you for not fighting a jammed head all afternoon.