How to Wind String Trimmer Line Correctly
This post contains affiliate links. As an Amazon Associate, we earn from qualifying purchases.
Winding string trimmer line correctly requires matching three things: the line diameter printed on your trimmer head, a tight and even wind on the spool following the directional arrow, and leaving the proper tail length (usually 4–6 inches) after threading. The most common mistake is winding the line in the wrong direction or with loose, overlapping coils, which causes immediate jams.
Most people think a jammed trimmer head is a sign of a cheap part. They buy a new spool, wind it the same way, and get the same result a week later. The problem is almost never the hardware. It’s the winding pattern.
This guide walks through the exact sequence for bump-feed, fixed-line, and quick-load heads. We’ll cover why line diameter is non-negotiable, a trick to make nylon more flexible before you start, and how to diagnose the three most common feed failures.
Key Takeaways
- The line diameter stamped on your trimmer head is a hard limit. Go thicker, and the line won’t feed; go thinner, and it snaps on contact with anything harder than grass.
- Wind the line tightly and evenly against the spool’s directional arrow. Loose or crossed winds create friction points that fuse the nylon coils together inside the head after about 10 minutes of run time.
- Soak new nylon line in a bucket of water for 30 minutes before winding. This plasticizes the material, reducing brittleness and preventing the “dry snap” that happens on the first hard edge you hit.
- For bump-feed heads, cut about 20 feet of line, find the center notch on the spool, and wind both ends in the direction of the arrow until you have 4–6 inches of each tail left to thread.
- If your line keeps breaking or jamming, check for three things: incorrect winding direction, a worn or cracked cutting shield deflecting the line, or using old, sun-bleached line that’s lost its tensile strength.
Before you start: Disconnect the spark plug wire on a gas trimmer or remove the battery from a cordless model. The bump-feed mechanism can engage accidentally if the head is rotated, causing the trimmer to start. Wear gloves—freshly cut nylon line has sharp, hot ends that can slice a finger. Work in a well-lit area where you can see the tiny directional arrows molded into the spool.
What tools and line do you need?
Gather everything on a clean work surface before you touch the trimmer. Fumbling for a screwdriver with a half-wound spool in your hand leads to tangled line. You need a pair of gloves, safety glasses, a flathead screwdriver or the unlocking tool that came with your trimmer, and a sharp utility knife or line cutter.
The line itself is the critical component. Its diameter is not a suggestion. A trimmer head designed for 0.095″ line has exit holes and a feed mechanism calibrated for that thickness. Forcing 0.105″ line through it creates enough drag to stall a residential electric motor. Using 0.065″ line in that same head lets it whip around at high speed, but it snaps the moment it touches a fence post or sidewalk edge.
Line comes in different shapes, each with a purpose. Round line is the standard, good for general grass and weeds. Square or twisted line has more aggressive cutting edges for thicker vegetation like brambles or overgrown weeds. Star-shaped line is for the heaviest brush. Stick with round unless you’re consistently battling tough growth—the shaped lines wear down faster and cost more.
| Line Diameter (inches) | Best For | Common Trimmer Power |
|---|---|---|
| 0.065″ | Light-duty grass, electric and battery trimmers (Ryobi 18V, basic models) | 12V–18V Cordless, Curved Shaft |
| 0.080″ | Medium grass and weeds, most homeowner gas trimmers | 25cc–30cc Gas, 40V Cordless |
| 0.095″ | Heavy weeds, light brush, professional-grade residential trimmers | 30cc+ Gas, Commercial Cordless |
| 0.105″–0.130″ | Dense brush, saplings, commercial clearing | 40cc+ Gas, Dedicated Brushcutters |
The correct line diameter is printed on the trimmer head itself, often near the exit holes. If it’s worn off, check the original spool that came with the tool or the owner’s manual. Never guess.
What’s the best way to wind a bump-feed trimmer spool?
This is the most common head type. The process is straightforward if you follow the sequence and respect the direction. First, remove the spool from the head.
Most have a locking button in the center you press while turning the spool counterclockwise. Some require a screwdriver to unlock. If it’s stuck, don’t hammer it. Tap the center button with the handle of a screwdriver to free up any grit.
Clean the spool and the inside of the head with a brush. Old, fragmented line and grass clippings compacted in there are a primary cause of feed resistance. Now, find the directional arrow molded into the spool. This tells you which way to wind. Winding against it means the line will unravel as soon as you start the trimmer.
Step 1: Measure and cut the line. Pull about 20 feet of line from your bulk spool. Cut it. For a two-line head, find the center point. Some spools have a notch or clip to hold the line center. If yours doesn’t, just fold the line in half and pinch the center loop.
Step 2: Anchor the line. Feed the center loop through the center hole of the spool, or hook it onto the center clip. Pull it snug. You’re now holding two strands of equal length.
Step 3: Wind each strand. This is where people mess up. Hold the spool in one hand. With the other, wind the first strand tightly and evenly in the direction of the arrow. Keep tension on the line with your fingers. Don’t let it go slack. Wind until you have about 6 inches of tail left. Repeat with the second strand, winding it in the same direction on the opposite side of the spool. The coils should lie flat and parallel, not crossing over each other.
Why overlapping coils cause jams: When two nylon coils cross inside the spool, the vibration and heat from the trimmer’s rotation (around 7,000 RPM) can soften the plastic at the contact point. The strands fuse together, creating a knot that the bump-feed mechanism cannot pull through the exit hole. You’ll feel a solid “clunk” instead of a line feed.
Step 4: Thread the tails and reassemble. Insert the two tails through the exit holes on the head’s outer casing. Pull them through until you feel resistance from the wound spool. Now, seat the spool back into the head, ensuring the tails aren’t pinched. You should be able to pull the lines freely. If you can’t, the spool isn’t seated correctly. Snap or screw the retaining cap back on. Give the head a gentle tap to release 4–6 inches of line. You’re ready.
For a more detailed look at this entire process, our guide on restringing a trimmer breaks it down with additional visuals.
How do you handle fixed-line and quick-load heads?
Not every head uses a wound spool. Fixed-line heads, common on some Black & Decker and older electric models, use individual lengths of line. The process is simpler but has its own trick.
For a fixed-line head, you’ll need two pre-cut lengths of line, usually between 8 and 12 inches long. Turn off the trimmer. Look for two holes on the side of the head.
Push the line into one hole until about 2 inches protrudes from the opposite side. Repeat for the second hole. The head automatically grabs the line when you start it. The mistake here is using line that’s too short—it won’t grab properly and will retract into the head.
Quick-load heads, like those on many newer EGO or Greenworks models, seem convenient. You don’t wind a spool at all. You feed a single strand of line through an eyelet, and a mechanism inside winds it for you. The catch?
You must follow the exact path shown in the diagram on the head. If you thread it backwards, the mechanism will not engage, and the line will just sit there. I learned this the hard way with an EGO Power+ head. I threaded it, reassembled it, and spent ten minutes bumping it on the ground with zero line feed before realizing I’d missed one guide channel inside the housing.
Why does my line keep jamming or breaking?

If you’ve wound the spool correctly but still have problems, the issue is usually external. Let’s diagnose.
Symptom: Line breaks immediately on hard surfaces.
- Likely Cause: The line is too thin for the job, or it’s old and brittle.
- The Fix: Verify the line diameter. If it’s correct, your line may be degraded. Nylon loses plasticity when exposed to UV light and temperature swings. That bulk spool left in your shed for three summers is probably toast. Swap to fresh line. Consider soaking trimmer line before use to restore flexibility.
Symptom: Line won’t feed, or you hear a grinding sound when bumping.
- Likely Cause: The line is wound in the wrong direction, or the spool is overfilled.
- The Fix: Disassemble and check the arrow. Also, an overfilled spool has no room for the line to unwind. The coils bind against the housing. You should see a small gap between the top of the wound line and the spool’s rim.
Symptom: Line feeds unevenly (one side longer than the other).
- Likely Cause: The tails were not threaded through both exit holes, or one strand is caught under the spool.
- The Fix: Re-open the head. Ensure both tails are pulled evenly and are exiting their respective holes cleanly. Re-seat the spool.
| Symptom | Primary Cause | Secondary Check | Timeline to Failure |
|---|---|---|---|
| Line snaps on first contact | Incorrect diameter or sun-degraded line | Check cutting shield for burrs that cut line | Immediate |
| Grinding noise, no feed | Line wound backwards or spool overfull | Inspect for debris jammed in feed mechanism | Within 30 seconds of operation |
| Line melts/fuses inside head | Overlapping winds creating friction points | Motor may be running too hot, straining line | After 5–10 minutes of continuous use |
| Uneven feed | One line tail pinched or not threaded | Worn bump-feed pawls not engaging spool evenly | Noticeable on first bump |
Can you upgrade your trimmer head?
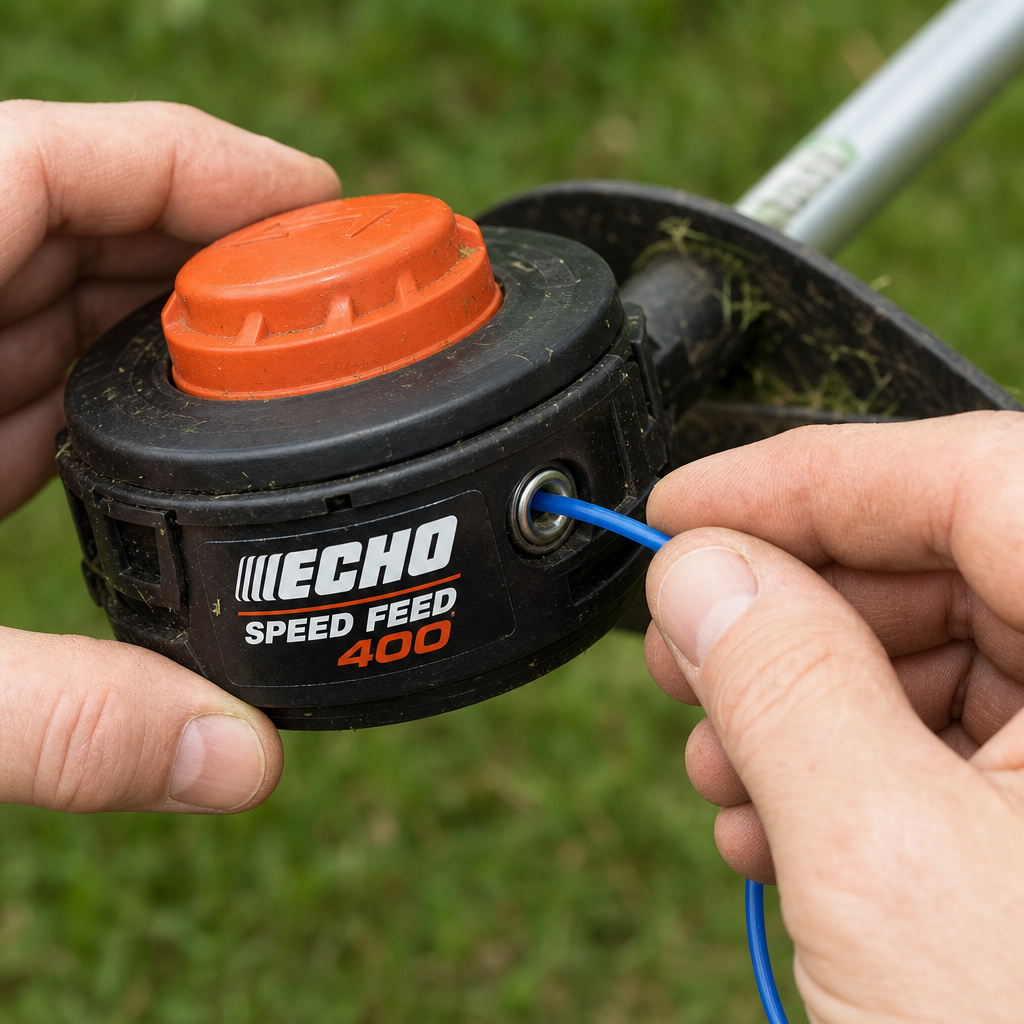
Absolutely. If you’re tired of the winding ritual, a aftermarket head can be a game-changer. The Echo Speed Feed 400 is the benchmark.
You don’t wind it. You feed two 10-foot lengths of line through the head, turn a knob, and it’s done. It’s about a 90-second job. I put one on a Stihl FS 56 four years ago, and I haven’t opened a spool since.
The catch is compatibility. You need to match the thread size and direction on your trimmer’s drive shaft. Most consumer trimmers have a standard M10 left-hand thread.
Some, like certain Ryobi models, use a right-hand thread. Universal kits come with adapters, but you have to install the correct one. Installing it wrong will seem fine until the torque of the motor spins the entire head off the shaft mid-use.
I won’t recommend a universal head for a homeowner who uses their trimmer twice a year. The cost is hard to justify. But if you’re maintaining more than a quarter-acre or doing side jobs, the time savings are real. Just buy the name-brand Echo or Oregon version. The $15 knock-offs have plastic gears that strip the first time you hit a thick root.
Frequently Asked Questions
How much line should be sticking out of the trimmer?
Aim for 4 to 6 inches of line per strand. Less than that reduces your cutting swath and makes you work harder. More than 8 inches creates excessive drag on the motor, reduces tip speed (making cutting less effective), and increases the chance of the line whipping back and tangling. For the precise mechanics, our article on trimmer line length dives deeper.
Is there a trick to making the line last longer?
Yes, beyond soaking it. Avoid “edging” with your trimmer by holding it vertically against concrete. This grinds the line down in seconds. Use the tool for trimming.
If you need to edge, get a dedicated edger or a trimmer with an edging wheel attachment. Also, don’t “bump” the head aggressively on the ground. A firm tap is enough. Slamming it stresses the feed mechanism and wears out the bump knob.
Can I use any brand of line on my trimmer?
Yes, as long as the diameter matches. The material is almost always nylon. Brand loyalty matters less than buying line that isn’t brittle. If a spool feels stiff and snaps easily in your hands, it’s old stock. Buy from a store with high turnover in garden supplies.
Why does my new line seem to disappear so fast?
You’re probably “trimmer walking”—moving the head back and forth over the same patch of tough weeds or along a fence line. The line is wearing down with each pass, not breaking. You’re effectively filing it away on abrasive surfaces. For dense areas, use a slower, deliberate pace instead of rapid strokes.
The Bottom Line
Winding trimmer line isn’t about strength. It’s about precision and following the simple rules printed on the hardware. Match the diameter, follow the arrow, wind tight, and keep it clean. The single biggest improvement you can make isn’t a new tool—it’s taking ten minutes to soak your line before you start. That one habit alone prevents most of the “bad line” complaints.
When the process frustrates you, remember the alternative is hand-cutting that same edge with shears. A properly wound spool gets you back to work in minutes, not hours. Keep a spare spool pre-wound in your garage. When one runs out mid-job, the swap takes less time than finding your gloves.