How to Use a Manual Grass Edger for Perfect Lawn Borders
This post contains affiliate links. As an Amazon Associate, we earn from qualifying purchases.
Using a manual grass edger correctly requires matching the right tool to the job and following a specific sequence of cuts. For a half-moon edger, you step on the blade to drive it 2-4 inches into the soil, rock it to loosen the turf, and repeat in a connected line. For a rotary edger, you roll the spiked wheel back and forth along the hardscape edge. The goal is a consistent trench that acts as a physical barrier for grass roots.
Most people grab the tool and start hacking. The result is a jagged, shallow line that disappears in two weeks. You waste energy, strain your back, and get a result that looks worse than if you’d done nothing.
This guide walks through the two main manual edger types, the exact body mechanics that make the work efficient, and the maintenance rhythm that keeps your edges crisp all season. You’ll learn why mowing first isn’t just a suggestion and how to handle different soil types without breaking your spirit or the tool.
Key Takeaways
- Mow your lawn first. Edging over long grass forces the tool to cut through a tangled mat, which binds the blade and guarantees a ragged, uneven line.
- Match the tool to the task: use a half-moon edger for creating or redefining deep edges and beds; use a rotary edger for quick maintenance along straight pavements.
- The critical depth for a lasting edge is 2 to 4 inches. Anything shallower lets grass roots bridge the gap by the next mowing.
- Let slightly moist soil do the work for you. Bone-dry clay is like concrete and will deflect your blade; saturated mud just gums up the cut.
- Clean the blade after every use. Dried-on soil and grass sap create a rough surface that increases friction and rust, making the next job 30% harder.
Before You Start: Gear and Ground Rules
Before you start: A manual edger is a lever with a sharp edge. Your body is the motor. The two most common injuries are a blade glancing off a rock into your shin, and a strained lower back from using your arms instead of your legs. Wear steel-toe boots or heavy work shoes, long pants, and gloves with a solid grip. Clear your intended path of any visible stones, sticks, or sprinkler heads.
This isn’t a power tool, so the safety risks are different. The hazard is repetitive strain and a sudden slip. Your stance matters more than your strength.
You also need to prep the lawn itself. Mow it. I know everyone says it, but almost no one explains why.
When you try to edge through uncut grass, the long blades wrap around the edger’s shaft and blade. This binding force pulls the tool off its intended vertical path. You end up fighting the grass instead of cutting the soil, and your line wanders. Do the mowing first, and the blade contacts only the thatch and soil, clean and direct.
The Two Main Manual Edger Types
Your first job is to pick the right weapon. Using a half-moon edger on a long concrete driveway is masochism. Using a rotary edger to carve out a new flower bed is futile. They are designed for different missions.
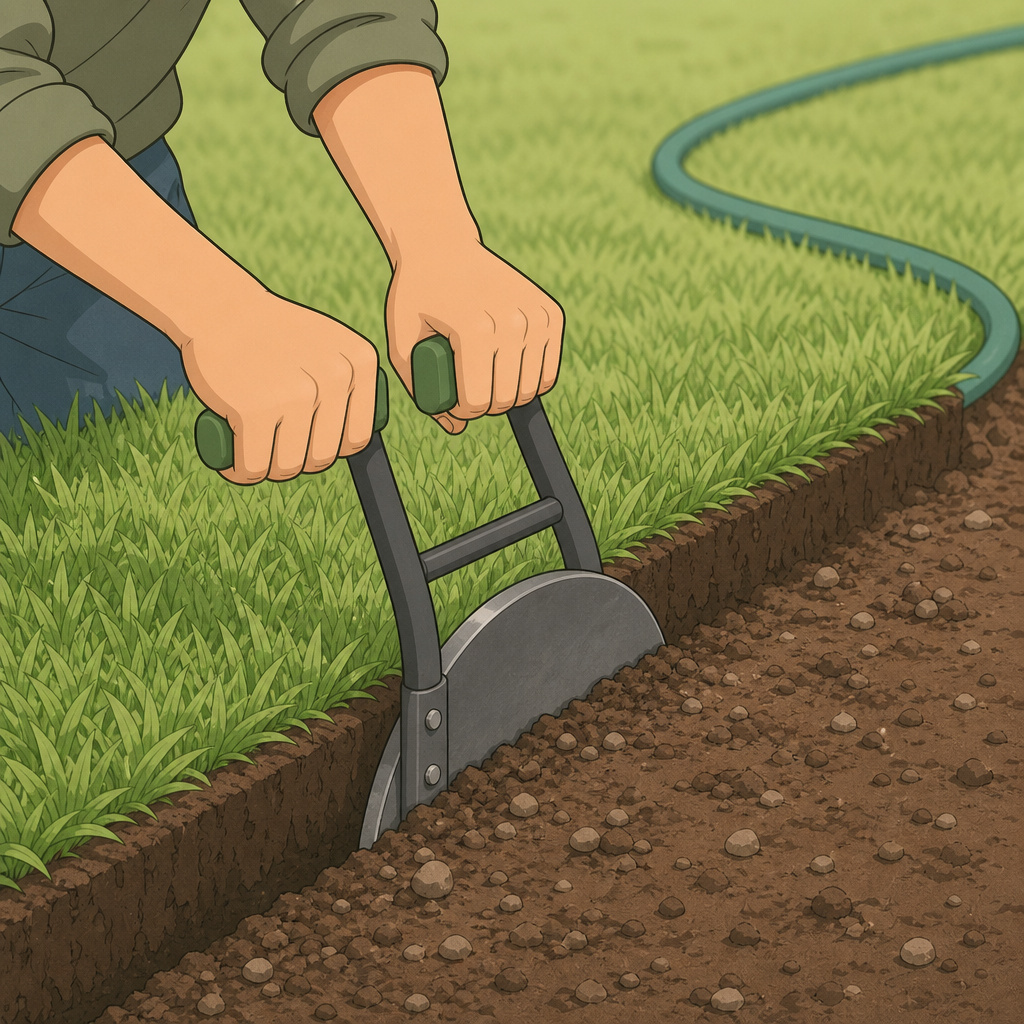
The half-moon edger, characterized by its curved steel blade fixed to a long handle, uses a chopping and levering action to slice through turf and soil. It is the tool for defining new boundaries or re-cutting overgrown ones, capable of creating a trench up to 6 inches deep. The rotary or roller edger employs a spiked cutting wheel that rotates as it is pushed; its action is a slicing and tearing motion best suited for maintaining existing edges along uninterrupted hard surfaces like sidewalks and driveways.
Here’s the breakdown to decide which one you actually need.
| Edger Type | Best For | Physical Demand | Resulting Edge |
|---|---|---|---|
| Half-Moon Edger | Creating new beds, redefining blown-out edges, working in curves. | High. Requires leg drive and core engagement. | Deep, vertical trench (2-6 in). A definitive barrier. |
| Rotary/Roller Edger | Weekly upkeep along straight pavements, light-duty touch-ups. | Low to Moderate. Primarily arm and shoulder motion. | Shallow, clean cut (1-2 in). A cosmetic refresh. |
| Edging Shears | Precise snipping around stepping stones, tight corners, or after using a larger edger. | Very Low. Hand and wrist action only. | A clipped grass line, not a soil trench. |
I keep a True Temper half-moon edger and an Ace Dual Wheel Rotary Edger in my shed. The half-moon is for the spring reset of all my bed lines. The rotary edger comes out every other mow to shave the grass back from the driveway. Trying to use only one for everything leads to frustration and a half-finished job.
How to Use a Half-Moon Edger (The Right Way)
This is where most people get it wrong. They hold it like a shovel and try to muscle it into the ground with their arms and back. That’s a one-way ticket to a sore tomorrow and a wavy edge line.
The half-moon edger is a foot-activated tool. Your arms are just for guidance and leverage.
- Position the Blade. Stand with the bed or pavement on your left (if right-handed). Place the curved blade exactly where you want the new edge, with the flat side against the grass you’re keeping and the curved side over the area you’re cutting away.
- Tilt and Step. Tilt the handle back toward you about 15 degrees. Place your dominant foot firmly on the top ledge of the blade, the reinforced metal step. This is non-negotiable. Use your body weight, not your arm strength.
- Drive and Rock. Push straight down with your leg until the blade is 2 to 4 inches deep. Don’t just stab. Once it’s in, rock the handle forward and back slightly. This motion uses the blade’s curve to pry and loosen a wedge of turf. Pull the tool straight up and out.
- Move and Connect. Shift your feet down the line about 6 inches. Place the blade so its curve slightly overlaps the previous cut. Repeat the step-rock-lift sequence. The goal is a connected series of cuts, not isolated plugs.
If you skip the rocking motion, you’re just making a series of vertical slits. The grass between them remains connected underneath, and the whole strip won’t lift cleanly. You’ll be left tearing at it with your hands.
The first time I used one, I didn’t rock the blade. I just stabbed down every few inches along a 20-foot bed. After an hour, I had a line of slits but no clean trench.
I had to go back, re-cut every section with the rock, and then spend another 30 minutes pulling up the stubborn, still-attached turf. The job took twice as long. Now I rock without thinking.
How to Use a Rotary or Roller Edger
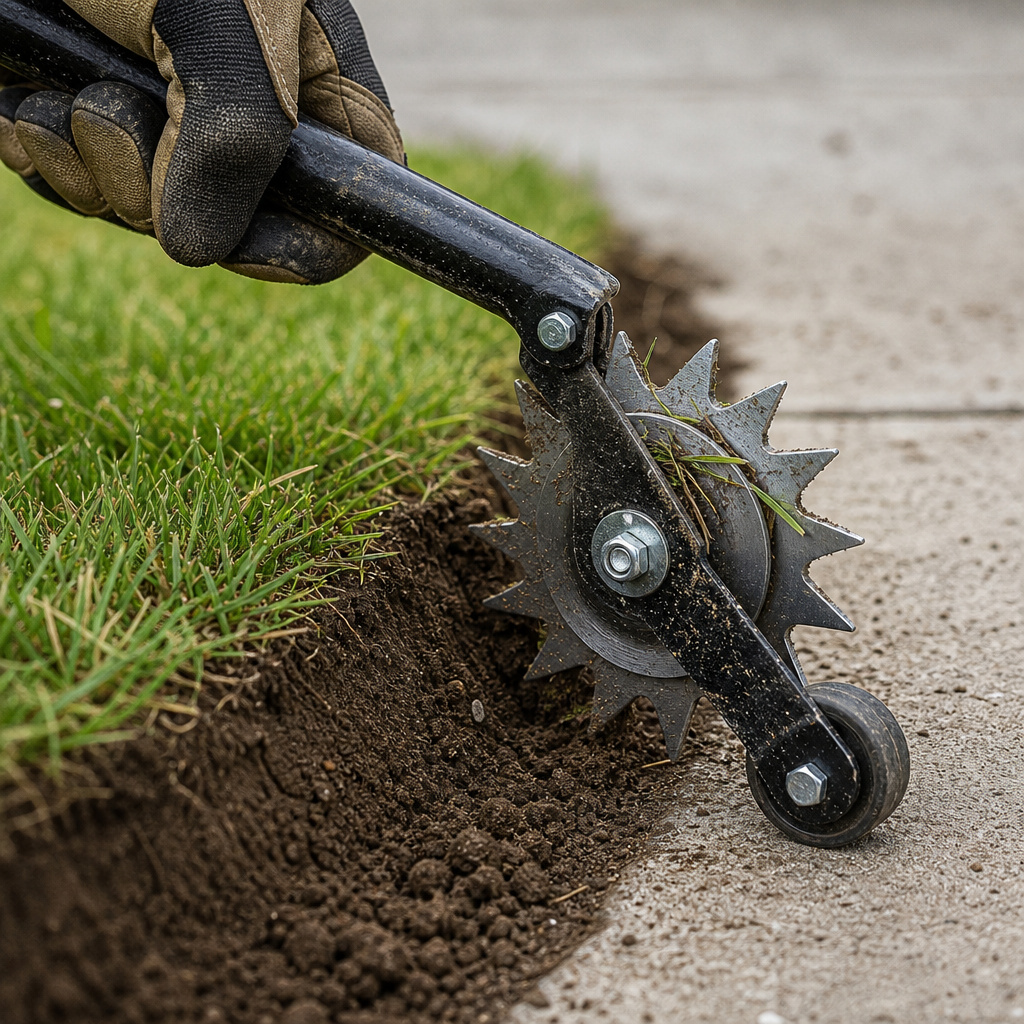
The rotary edger is simpler but has its own nuance. The common mistake is pushing it like a lawnmower in one direction. That just rolls the wheel; it doesn’t guarantee a cut.
Your cutting action comes from the back-and-forth roll. The spikes on the wheel need to engage, slice, disengage, and re-engage.
- Line Up the Wheel. Position the cutting wheel so it sits in the gap between the grass and the hard surface (driveway, sidewalk). The guide roller should be on the pavement, keeping the wheel at a consistent distance.
- Engage and Roll. Push down on the handle to drive the spikes into the soil, then immediately roll the tool forward about a foot. Without lifting the pressure, pull it back toward you over the same section. This forward-back motion is one cutting cycle.
- Advance and Repeat. Ease up, move forward another foot, press down, and repeat the back-and-forth roll. Your path should be a series of these overlapping one-foot cycles.
If you only push forward, the wheel can skip over tough patches of grass or compacted soil. The return stroke catches what you missed and cleans up the cut. Let the tool’s weight and the wheel’s teeth do the cutting. You’re just providing the directional force.
Why Edge Depth Matters More Than You Think
A shallow edge is a temporary edge. Grass roots, especially aggressive runners like Bermuda or Kentucky bluegrass, can spread laterally just under the surface. If your trench is only an inch deep, those roots will cross it in a week or two, and you’ll see green shoots appearing on your sidewalk.
A 2 to 4 inch trench creates a true “no-go zone.” It exposes a vertical soil face that roots can’t easily cross. It also improves water runoff from your hardscape and gives a crisp shadow line that makes your lawn look professionally maintained. This depth is the difference between edging every week and edging every month.
Pro Techniques and Troubleshooting
You have the basic cuts down. Now let’s fix the common problems and add the finesse that separates a clean edge from a great one.
Fixing a Wobbly Edge Line
Your line looks like a seismograph reading. This happens when you focus on each individual cut instead of the overall path.
Pick a sighting point at the far end of your edge, a tree, a fence post, the corner of your house. Before each cut, look up at that point, then down at your blade placement. Your hands will naturally align the tool to that distant target. This is the same trick carpenters use to snap a straight chalk line. It prevents the incremental drift that creates a wave.
If you’re re-cutting an existing but overgrown edge, use a garden hose to lay out the new line first. A hose is flexible enough for curves but provides a clear visual guide. Don’t use spray paint. The wind catches it, the nozzle clogs, and you end up with a dotted line that’s more confusing than helpful.
Working With Different Soil Types
The ideal edging soil is like a well-wrung sponge: moist but not wet. You need to adjust your technique for the extremes.
- Hard, Dry Clay: This will blunt your blade and shock your joints. The day after a good rain is perfect. If you must edge in dry conditions, use a garden hose to lightly dampen the cutting line 30 minutes before you start. You’re not soaking it, just breaking the surface tension.
- Sandy Soil: It cuts easily but collapses. Your trench walls will crumble. For a defined edge in sand, make your final pass with the half-moon edger held at a slight angle to compact the soil wall as you cut.
- Rocky Soil: Go slow. Expect to hit stones. When you do, don’t pry against them. Pull the blade out, clear the rock by hand, and re-cut. Forcing it can chip the blade’s edge or bend the shaft.
The Maintenance Rhythm (When to Edge)
Edging isn’t a one-and-done task. It’s a cycle. Initial creation is the hard work; maintenance is the easy part that preserves it.
Here is a realistic seasonal schedule that accounts for grass growth speed:
| Season/Timing | Task | Why This Timing |
|---|---|---|
| Early Spring | Major re-cut with half-moon edger. | Reset edges blurred by winter. Grass is actively growing but not yet at peak speed. |
| Late Spring / Summer | Bi-weekly touch-up with rotary edger. | Peak growing season. A quick pass every other mow prevents overgrowth. |
| Early Fall | Final deep edge with half-moon. | Clean up summer growth before winter dormancy sets in. |
| Winter | Rest. | Grass isn’t growing. Edging frozen or soggy soil damages the lawn and the tool. |
Trying to do a major re-cut in the height of summer is brutal work, and the grass will blur your new line within days. Do the heavy lifting in the cool, damp seasons.
Manual Edger Care and Sharpening
A dull edger makes every job feel like you’re fighting the earth itself. The difference is visceral.
After each use, take two minutes to hose off the blade and knock off any clumped soil. Dry it with an old rag. This prevents rust and keeps the cutting edge clean for next time.
I keep a 5-gallon bucket with an inch of sand and some old motor oil in the bottom of my shed. After cleaning and drying, I stab the blade into the sand-oil mix a few times. It leaves a thin, protective coating.
A sharp half-moon edger blade should cleanly slice through a piece of paper held at its edge. If it tears or crumples the paper, it’s time to sharpen. Use a flat mill bastard file, holding it at the existing bevel angle (usually around 30-45 degrees). File in one direction only, from the handle end of the blade toward the cutting tip, using consistent, even strokes. Check for burrs on the back side and remove them with a few light passes.
You don’t need a razor edge, but you do need a defined one. Sharpening twice a year, once in spring and once in fall, is sufficient for most homeowners. If you hit a lot of rocks, check it more often.
For a rotary edger, the hardened steel spikes are rarely user-sharpenable. If they become rounded and stop gripping, you typically replace the entire wheel assembly. Consult your edger blade replacement guide when that time comes.
Frequently Asked Questions
Can I edge my lawn with a shovel instead?
You can, but you shouldn’t. A flat shovel blade is designed for digging and lifting, not for making a vertical slice. It will create a wider, ragged, and uneven trench. The half-moon edger’s curved blade is specifically engineered to cut and lift a neat wedge of turf in one motion. It’s far more efficient and gives a better result.
How do I edge around tree roots?
You don’t. Severing major surface roots can seriously harm or kill a tree. If grass is growing right up to a tree trunk, use edging shears to trim the grass short, or create a mulch ring that extends at least 3 feet from the trunk. Maintain the mulch ring instead of trying to cut an edge.
My manual edger keeps getting stuck in the ground. What am I doing wrong?
You’re likely driving it in at a 90-degree angle (straight up and down). The blade enters cleanly but has no path to exit because the soil closes around it. Always tilt the handle back slightly before you step down. This creates a leading angle that allows the blade to be rocked and withdrawn smoothly.
Is a manual edger better than a string trimmer for edging?
For creating a defined, long-lasting soil trench, yes, absolutely. A string trimmer is for trimming grass, it cuts vegetation but doesn’t move soil. It can simulate an edge by cutting grass vertically, but that line disappears as soon as the grass grows back. A manual edger physically removes a strip of turf and soil, creating a barrier. For the full comparison, see our guide on string trimmer edging techniques.
How long does a manual edger last?
With basic care, decades. The wood or fiberglass handle is usually the first point of failure, often from being left in the rain or stored under heavy items. The steel blade, if kept clean and occasionally sharpened, will outlast most homeowners. I have a Fiskars half-moon edger that’s over 15 years old and still cuts perfectly.
The Bottom Line
A manual grass edger is a simple tool that rewards good technique. The work is physical, but it’s not about brute force. It’s about leverage, rhythm, and timing.
Mow first. Match the half-moon edger for creation and the rotary for maintenance. Drive the blade to a true 2-4 inch depth with your leg, not your back. Clean the tool when you’re done.
That’s the entire process. Do it right in the cool seasons, maintain it in the warm ones, and you’ll have crisp, defined edges that make your entire lawn look deliberate and sharp. The tool does the cutting. You just need to point it in the right direction and let physics do the rest.