Ryobi 18V Trimmer Line Size: The Right Line for Your Model
This post contains affiliate links. As an Amazon Associate, we earn from qualifying purchases.
The correct trimmer line size for most Ryobi 18V models is 0.080-inch (2.0mm) diameter. However, some base models, like the 18V One+ 10″ String Trimmer, require a 0.065-inch line. Using a thicker 0.095-inch line is possible for heavy weeds on higher-end 18V models, but it will drain the battery faster and strain the motor.
People get this wrong because they assume all Ryobi 18V trimmers use the same line. They don’t. The company has released a dozen different 18V trimmer models over the years, and the factory line spec changes. Picking the wrong diameter feels like a minor choice, but it directly impacts how long your battery lasts, how clean your cuts are, and how soon you’ll need a new motor.
This guide walks you through finding your model’s exact spec, explains why the size matters more than you think, and shows you what happens when you guess wrong.
Key Takeaways
- Check the manual first. The user guide lists the exact line diameter. If you’ve lost it, look for a printed label on the trimmer head or spool cover.
- Most Ryobi 18V trimmers use 0.080″ (2.0mm) line. This is the standard for mid-range and brushless models.
- Base models often need 0.065″ line. Using thicker line here jams the head and overheats the motor.
- Line shape changes cutting aggression. Round line is fine for grass. Square or twisted line cuts through thicker weeds better but wears down the battery quicker on an 18V system.
- Wrong size line has immediate symptoms. A trimmer that sounds labored, feeds line unevenly, or dies prematurely is often suffering from an oversized line.
How Do I Find the Correct Line Size for My Specific Model?
Open the user manual. It’s on page one or two under “Specifications” or “Replacement Line.” If the manual is long gone, your next best bet is the tool itself.
Look for a small, embossed or printed label on the trimmer head, usually near the spool cover. It often says “USE .080 IN LINE” or something similar. No label? Check the underside of the spool cover or the original spool that came with the tool. Manufacturers stamp the size there because they know you’ll lose the manual.
For Ryobi 18V trimmers, the most common specification is 0.080-inch (2.0mm) diameter green line. This size balances cutting power with the torque and RPM limits of the 18V brushless motor. Using a larger diameter increases rotational mass, which the motor must overcome, reducing effective runtime and increasing heat buildup in the windings.
If those physical checks come up empty, you can identify by model number. The number is on a sticker on the main shaft or motor housing. Here’s a quick reference for some common Ryobi 18V models:
| Ryobi 18V Model Number | Recommended Line Diameter | Notes |
|---|---|---|
| R18HLTR14, R18HLTR38 | 0.080″ (2.0mm) | Standard for brushless models. |
| R18LTR24 | 0.080″ (2.0mm) | Common mid-range trimmer. |
| R18XLTR30, R18XLTR35 | 0.080″ (2.0mm) | Extended runtime models. |
| 18V One+ 10″ String Trimmer (older base model) | 0.065″ (1.65mm) | Lower-power motor requires thinner line. |
| Various “Expand-It” attachment heads | Varies by powerhead | Check the powerhead manual, not the attachment. |
Once you know the size, the next step is a proper Ryobi 18V trimmer line replacement. Winding it wrong is just as bad as picking the wrong diameter.
What Size String Does a Ryobi Battery Weed Eater Take?
The 0.080-inch line is the workhorse for the Ryobi 18V system. It’s thick enough to handle general lawn grass, weeds, and light brush without snapping constantly, but it’s not so heavy that it bogs down the motor on a single 4.0Ah battery.
Thinner 0.065-inch line is for the most basic, low-cost 18V trimmers. Their motors don’t have the torque to swing the heavier 0.080 line efficiently. If you put 0.080 in a 0.065 trimmer, you’ll hear the motor strain within the first minute. It sounds like a low hum changing pitch as it struggles, and the head won’t reach full speed.
Can you use 0.095-inch line? On paper, some of the more powerful 18V brushless models can spin it. In practice, I don’t recommend it unless you’re dealing with exceptionally thick, woody weeds and you’re willing to trade runtime for cutting power. You’ll get about 60-70% of the run time you would with 0.080 line. The motor also runs hotter, which shortens its overall lifespan.
Here’s the breakdown of what each size is good for:
- 0.065″ (1.65mm): Tender grass, fine edging. Use only if your trimmer manual specifies it.
- 0.080″ (2.0mm): All-purpose weed whacking. This is your default for Ryobi 18V.
- 0.095″ (2.4mm): Heavy weeds, light brush. Acceptable for high-torque 18V models if used sparingly.
The shape of the line matters almost as much as the diameter. Round line is the standard. It’s predictable and works fine for 90% of residential yards. Square line has sharper edges that slice through thick, fibrous weeds like blackberry vines more aggressively. Twisted line is a compromise, offering a bit more bite than round without being as harsh on the spool mechanism.
On an 18V system, square and twisted lines create more drag. They’re worth it for a tough job, but don’t run them all season. Switch back to round for general maintenance.
What Happens If You Use the Wrong Size Line?
The problems start small and get expensive.
An oversized line—like putting 0.095 in a trimmer built for 0.080—adds rotational mass. The motor has to work harder to get it spinning and keep it at speed. You’ll feel it as vibration in the shaft. The first symptom is reduced battery life.
What used to last 30 minutes now dies in 20. The second symptom is uneven line feed. The extra drag on the spool means the bump-feed mechanism can’t advance the line smoothly. You’ll get one long tail and one short one, or it won’t feed at all.
Putting a 0.095-inch line in a trimmer designed for 0.080-inch cuts your battery life by a third and makes the motor housing too hot to touch after 15 minutes of continuous use. That heat is cooking the internal components.
An undersized line—like using 0.065 in a 0.080 trimmer—snaps constantly. You’ll be stopping every few feet to manually pull more line out. It’s frustrating and makes a simple job take twice as long. More importantly, the line isn’t heavy enough to transfer the motor’s power effectively into a cutting impact. You end up whipping weeds instead of cutting them, which just bruises them and they grow back thicker.
The worst mistake is forcing a line that’s too thick for the exit holes on the trimmer head. It either won’t feed at all, or it feeds in fits and starts, causing the line to wear unevenly and snap inside the spool. Now you have to take the whole head apart to clear a jam.
How Does Line Material and Shape Affect 18V Performance?
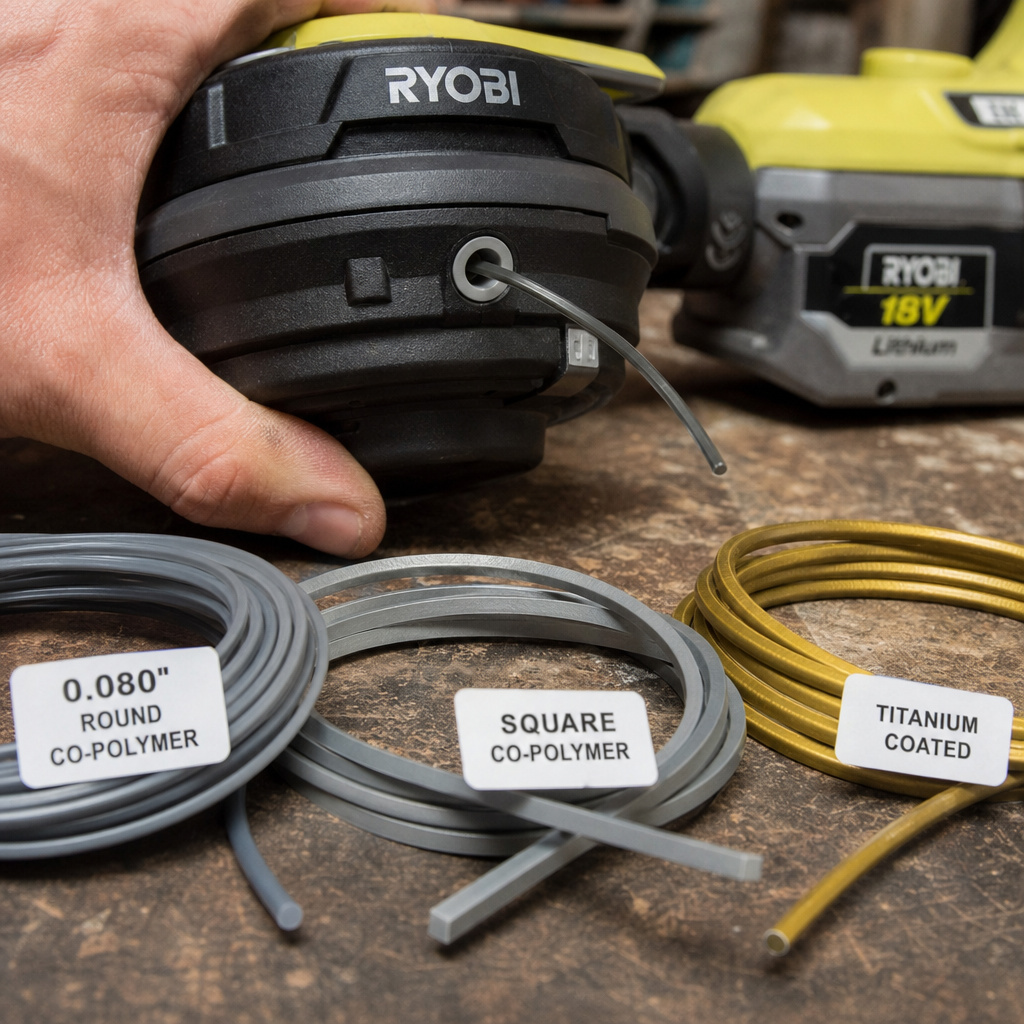
Nylon is the default. It’s cheap and works okay. Co-polymer blends are more common now. They last longer because they’re more resistant to abrasion from rocks and concrete. Titanium-coated line takes that a step further; it’s noticeably more durable but also stiffer, which can be harder on the 18V motor’s plastic drive gears during a hard jam.
Round line is the baseline. It’s what the motor and head are engineered around. Square line cuts better but wears faster because those sharp edges get ground down.
It also creates more wind resistance. On a gas trimmer, you’d never notice. On an 18V battery model, that extra drag translates directly into fewer minutes of runtime.
My preference for general use on Ryobi 18V is a co-polymer round line in 0.080-inch. It’s the best balance of durability, cutting performance, and battery efficiency. I save the square or twisted line for specific, tough patches and swap back when I’m done.
A quick list of what to consider:
– For grass and soft weeds: Round co-polymer line, 0.080″.
– For overgrown areas with thick stems: Square or twisted line, 0.080″. Accept the shorter runtime.
– For edging along sidewalks: Round line, any material. Precision matters more than aggression here.
– Avoid: So-called “commercial grade” lines marketed for 40V and gas trimmers. They’re too stiff and heavy.
Step-by-Step: Choosing and Installing the Right Line
Picking the line is only half the battle. Installing it wrong ruins everything.
- Disconnect the battery. This seems obvious, but a trimmer head can spin with a slight bump. A spinning head with your fingers near it removes skin. Do this first.
- Identify your head type. Ryobi uses mostly bump-feed heads. Some have a quick-load system where you poke pre-cut lengths into holes. Most require you to wind a spool. Your step-by-step guide for replacing trimmer line will walk you through the specifics for each type.
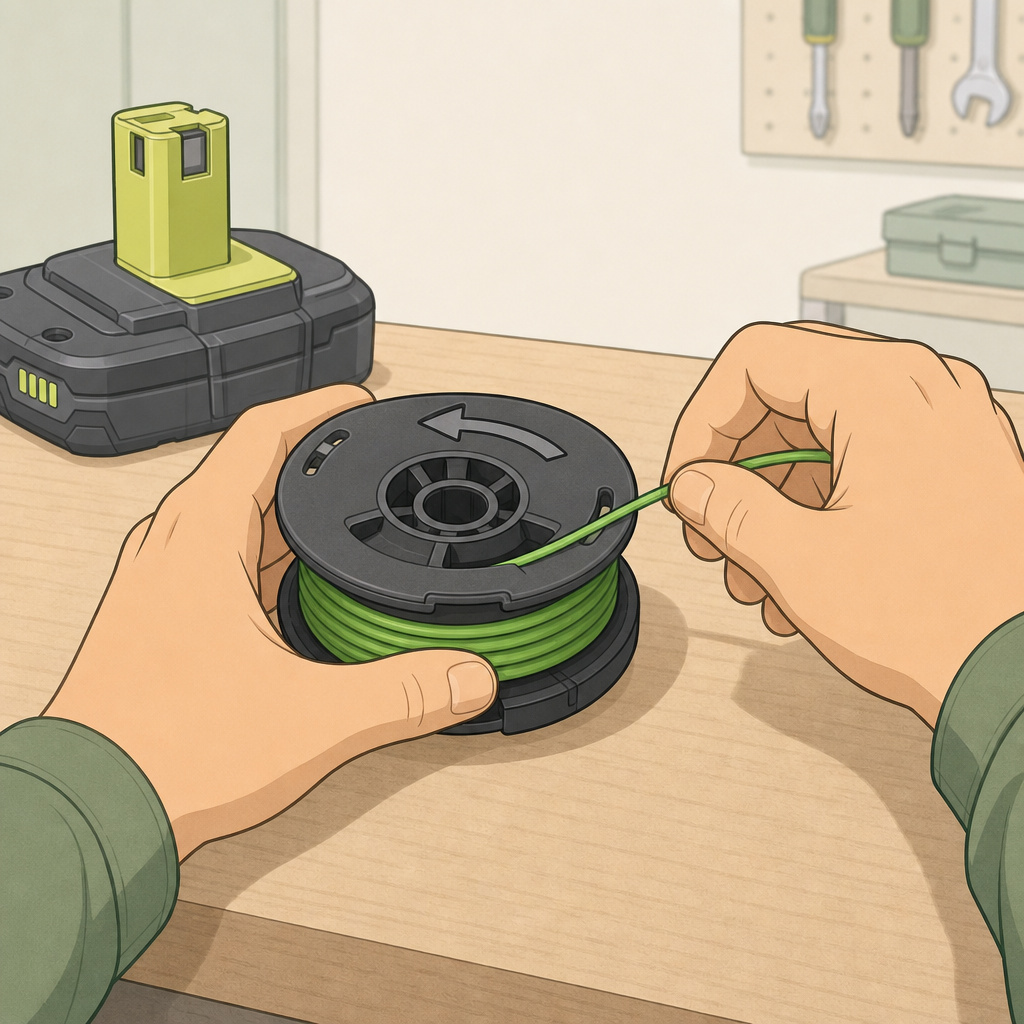
- Wind the spool in the correct direction. Look for an arrow on the spool. Wind the new line against that arrow. If you wind with the arrow, the line will tangle inside the head the first time you try to feed it. I learned this the hard way on an R18LTR24. I wound 25 feet of line perfectly, snapped the cover shut, bumped the head, and watched the whole mess knot itself into a solid ball inside the spool. Now I always double-check the arrow.
- Don’t overfill the spool. Leave about 1/8-inch of space between the wound line and the spool’s outer rim. Overfilling creates tension that prevents the bump-feed mechanism from working. The line won’t advance.
- Thread the ends through the exit holes before snapping the cover shut. It sounds simple, but every season I watch someone wind a spool, put the cover on, and then try to poke the line ends out through the holes with a screwdriver. It never works cleanly. Thread first, then close.
If your trimmer uses the Speed-Load head system, the process is different. You’ll need pre-cut lengths of line. The trick here is to make sure the lines are exactly the same length. A difference of even half an inch will cause one side to wear down faster than the other, giving you lopsided cutting.
Troubleshooting Common 18V Line Problems
Your trimmer acts up. Here’s how to know if it’s the line or something else.
| Symptom | Likely Cause | Fix |
|---|---|---|
| Line won’t feed / advances unevenly | Oversized line jammed in head, or spool wound in wrong direction. | Remove spool, check line diameter matches spec, rewind against arrow direction. |
| Motor sounds strained, slows under load | Line is too thick for the model, or line is wet/waterlogged. | Replace with correct diameter line. Let wet line dry completely before use. |
| Line snaps immediately on contact | Line is too thin, brittle from age/UV exposure, or hitting hard objects. | Use correct diameter. Store line indoors. Avoid rocks and concrete. |
| Trimmer head doesn’t spin, battery dies fast | Severe internal jam from wrong line size or improper winding. | Disassemble head, remove all line, rewind with correct size following proper threading a weed trimmer line technique. |
| Vibration in the shaft | One line tail is significantly longer than the other, or line is unbalanced/mismatched. | Stop, retract both lines evenly to 6-8 inches, resume trimming. |
Line that’s been sitting in a damp garage for two years becomes brittle. It’ll snap no matter what diameter you use. Fresh line is cheap insurance against a morning of frustration.
A worn-out spool can also cause feed issues. The springs that control the bump-feed wear out. If you’re using the correct line and following the right winding techniques for trimmer line, but the line still won’t advance, consider replacing the entire spool assembly. They’re inexpensive and often come with new line pre-wound.
Frequently Asked Questions
Can I use a thicker line for more power?
No. The motor provides a fixed amount of power. A thicker line doesn’t create more power; it absorbs more of the motor’s power just to spin. You get less cutting efficiency, more battery drain, and extra heat. Use the thickness your trimmer was designed for.
My manual is gone and there’s no label on the trimmer. What now?
Find the model number on the trimmer’s motor housing or shaft. Search for “Ryobi [model number] manual” online. The official PDF from Ryobi will list the line size.
If that fails, start with 0.080-inch. It’s the most common size. If the motor labors badly, switch to 0.065-inch.
Is there a difference between green, black, and orange trimmer line?
Color is mostly about visibility and branding. The performance difference between a green 0.080 nylon line and a black 0.080 nylon line from the same brand is negligible. Focus on diameter and material (nylon vs. co-polymer) first.
How often should I replace the trimmer line?
Replace it when it’s gone. There’s no schedule. A spool lasts through several reloads of the ends. When you’re down to the last few wraps on the spool, reload the whole thing. Don’t try to splice short pieces together—it never feeds right and causes jams.
Can I use any brand of line in my Ryobi trimmer?
Yes, as long as the diameter matches your tool’s requirement. Ryobi’s own line is fine, but so are third-party brands like DeWalt, Oregon, or Maxpower. The critical spec is the diameter printed on the package.
The Bottom Line
Ignore the one-size-fits-all advice. Your Ryobi 18V trimmer has a specific line diameter it’s engineered to use, and deviating from it costs you battery life, cut quality, and eventually the motor. Check the manual or the tool itself for the 0.065″, 0.080″, or 0.095″ specification.
Wind it onto the spool against the arrow, don’t overfill it, and thread the ends before closing the head. Use round line for general work and save the aggressive square line for the tough spots. Do that, and your trimmer will run longer, cut cleaner, and won’t leave you halfway through the yard with a dead battery and a handful of chewed-up weeds.