
How to Drill Into Siding | The 1/8″ Gap That Stops a Crack
This post contains affiliate links. As an Amazon Associate, we earn from qualifying purchases.
Drill into siding by first identifying the material, vinyl, engineered wood like LP SmartSide, fiber cement, or wood, then using a sharp carbide-tipped bit sized for your fastener, drilling straight and slow, and leaving the mandated expansion gap. For vinyl, that gap is 1/32 inch; for engineered wood, it’s 1/8 inch at panel seams. Hit the stud or sheathing behind with at least 1.5 inches of penetration.
The 1/8-inch expansion gap isn’t a suggestion. It’s the line between a secure mount and a cracked panel when the siding heats up. Get that wrong, and the manufacturer’s 50-year warranty doesn’t apply. The rest is about matching the drill bit to the fastener, the fastener to the substrate, and your speed to the material’s brittleness.
What follows: a breakdown of the four main siding types and their drilling rules, the seven-step process for a clean hole, and the three mistakes that turn a weekend project into a repair bill.
Key Takeaways
- Identify your siding first. Vinyl, engineered wood (LP SmartSide), fiber cement (Hardie board), and real wood each have unique drill bit, fastener, and technique requirements.
- Leave the expansion gap. Vinyl needs a 1/32-inch space between the fastener head and siding; engineered wood needs a 1/8-inch gap at panel seams. Ignoring this causes buckling and cracks.
- Pre-drill for everything except vinyl. A sharp carbide-tipped bit prevents splintering on wood and engineered wood, and is mandatory for fiber cement.
- Penetration depth is non-negotiable. Fasteners must sink at least 1.5 inches into the stud or sheathing behind the siding for a secure hold.
- Seal every hole. Use a high-quality, paintable exterior sealant meeting ASTM C920, Class 25, on all cuts and penetrations to prevent water intrusion.
What Type of Siding Do You Have?
You can’t drill it right if you don’t know what it is. The wrong bit on fiber cement shatters it. The wrong technique on vinyl warps it. Start by looking at the panel’s profile, texture, and backside.
Vinyl Siding
It’s thin, flexible, and usually hollow on the back. Tapping it produces a plastic sound. The panels interlock with a lip-and-channel system. The critical rule here is thermal expansion. According to the ASTM D7793 standard for rigid PVC siding, a 12-foot length can expand and contract by up to 1/2 inch with temperature swings. Your fastener must not restrict that movement.
Engineered Wood (LP SmartSide, Accoya)
This feels solid. LP SmartSide has a distinct wood-grain or brushed texture. Turn a piece over, the back is flat OSB (oriented strand board). Accoya is a solid, modified wood that’s heavier and denser than pine. Both require pre-drilling and specific fasteners. LP’s installation manual states you must seal all exposed cuts, including drill holes, with a sealant meeting ASTM C920.
Fiber Cement (Hardie Board)
It’s heavy, brittle, and sounds like concrete when tapped. The back is flat and often gray. Drilling this requires a masonry-rated carbide bit and steady pressure. There’s no flexibility, so there’s zero margin for a wandering drill.
Real Wood (Cedar, Pine)
You can see the grain. It’s solid throughout, though softer than engineered products. The risk here is splitting, not cracking. A sharp brad-point bit and a pilot hole are mandatory.
Common mistake: Using a standard twist bit on fiber cement. The silica abrasives in the material will dull a HSS bit in seconds, causing the drill to skate and chip the face. You need carbide.
The 7-Step Process for a Clean, Secure Hole
This isn’t just about making a hole. It’s about making a hole that doesn’t compromise the siding’s weather resistance or structural integrity. Follow this sequence every time.
- Locate the Stud or Sheathing. Use a stud finder. For engineered wood siding installed per code, there will be a water-resistant barrier (WRB) and possibly plywood or OSB sheathing behind it. Your fastener must penetrate this sheathing and sink into the stud by at least 1.5 inches. Mark your spot with a pencil.
- Select the Correct Drill Bit. Match the bit to the siding and fastener.
- Vinyl: A standard high-speed steel (HSS) twist bit is fine. Size it for the screw’s shank, not the threads.
- Engineered/Wood: A sharp carbide-tipped bit or brad-point bit. The Accoya guidelines recommend pre-drilling to 1/32 inch less than the nail diameter.
- Fiber Cement: A carbide-tipped masonry bit. No exceptions.
- Set Your Drill Correctly. Use the drill’s clutch if it has one. For screw driving, set it to a low torque setting to avoid over-driving. For drilling pilot holes, use a high speed with low pressure.
- Drill the Pilot Hole. Hold the drill perfectly perpendicular to the siding. Start slow to create a dimple, then apply firm, steady pressure. Let the bit do the work, don’t force it.
- Mind the Gap. This is the step every DIY guide glosses over. As you drive the fastener, you must maintain the expansion clearance.
- For vinyl, the fastener should be “loosely” attached, with about a 1/32-inch space between the fastener head and the siding surface.
- For engineered wood panels at a seam, LP specifies a 1/8-inch expansion gap on the back side of the panel seam.
- Drive the Fastener. Use the correct fastener. For engineered wood, LP specifies ring shank nails or exterior screws. For Accoya, stainless steel 304 or 316 fasteners are strongly recommended. Drive it until the head is flush with the siding surface, or just above it for vinyl, respecting the gap.
- Seal the Penetration. Immediately after driving the fastener, run a bead of high-quality exterior sealant around the fastener head and over any exposed cut edges. This is not optional for wood-based sidings.
| Siding Type | Drill Bit Type | Critical Gap | Must-Penetrate Depth | Fastener Type |
|---|---|---|---|---|
| Vinyl | HSS Twist Bit | 1/32″ at fastener head | Into sheathing/stud | Vinyl siding nails or screws |
| Engineered Wood (LP) | Carbide-tipped or Brad-point | 1/8″ at panel seams | 1.5″ min. Into stud | Ring shank nail, exterior screw |
| Fiber Cement | Carbide-tipped Masonry Bit | N/A (rigid) | 1″ into sheathing/stud | Corrosion-resistant screw |
| Real Wood | Brad-point or Sharp Twist Bit | N/A | 1.5″ into stud | Galvanized or stainless steel screw |
What Happens When You Drill Siding Wrong?
The consequences aren’t always immediate. That’s why people keep making the same mistakes.
Buckling and Warping
This is the classic vinyl failure. When you drive a screw tight against the panel, it has nowhere to go when it expands on a hot day. The material bows outward between fasteners, or the fastener pulls through the slot. Once it buckles, it never lies flat again. You have to replace the entire panel.
Face Cracks and Splits
Engineered wood and fiber cement have no give. If you drill too close to the edge of a panel, within about an inch, or use excessive force, you’ll see a hairline crack spider out from the hole. In fiber cement, it can be a full chip-out. On LP SmartSide, a crack is a direct path for water into the OSB core, which swells and fails.
Warranty Voidance
This is the silent cost. Every manufacturer’s installation instructions are part of the warranty. LP’s 50-year limited warranty explicitly states that failure to follow published instructions makes the warranty “inapplicable.” If you didn’t pre-drill, didn’t leave the gap, or didn’t seal the hole, and the panel fails in 5 years, you own the replacement.
Where this goes sideways: Skipping the sealant on a cut or drilled hole in engineered wood. Water wicks into the exposed OSB edge, the panel swells within a season, and the paint bubbles and peels around the hole. The fix is pulling the panel, which means disturbing the entire course.
The Tools You Actually Need (Not the Marketing List)
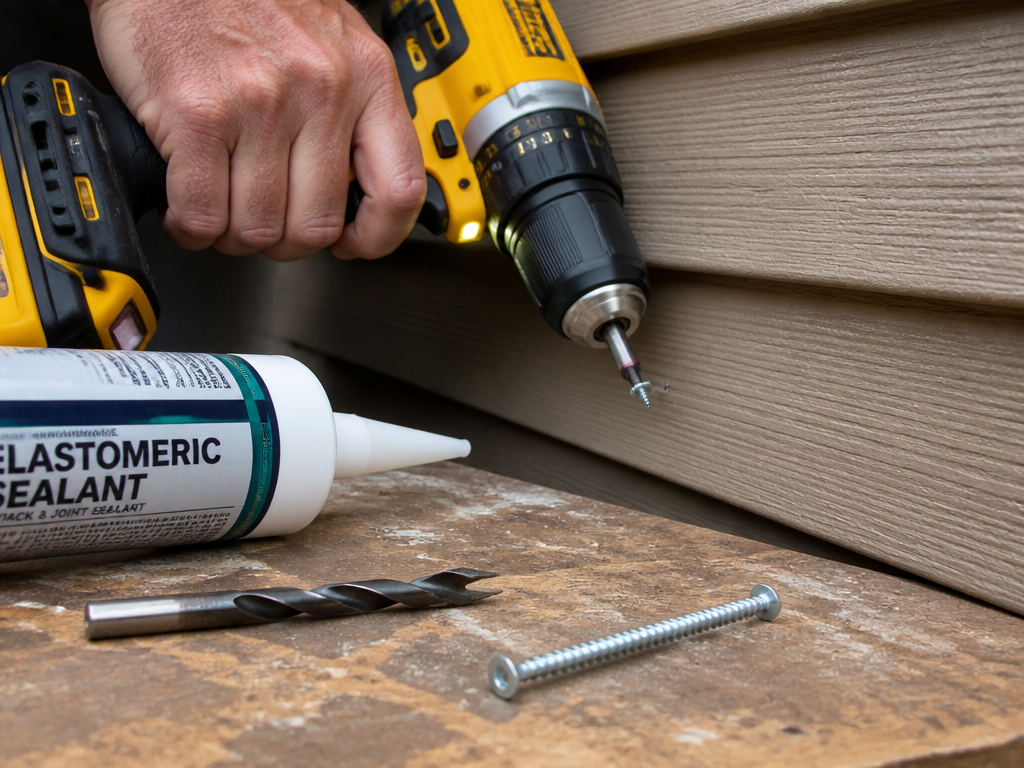
You need three things: the right bit, the right driver, and the right sealant. Everything else is extra.
The Drill
A cordless drill/driver is fine. An impact driver gives you more torque but less control, easy to over-drive and crack the siding. If you’re drilling fiber cement or doing more than a few holes, a hammer drill (set to drill-only mode) with a carbide bit is the professional’s choice for speed and clean holes.
The Bits
- Carbide-tipped masonry bit: For fiber cement. The Bosch HCB series or a similar grade.
- Brad-point or carbide-tipped wood bit: For LP SmartSide, Accoya, and real wood. A brad-point prevents walking and gives a cleaner entry hole.
- Standard HSS twist bit: Only for vinyl.
The Fasteners
This is where people cheap out. For any wood-based siding, you need corrosion resistance. * Hot-dipped galvanized or stainless steel screws: For engineered wood and real wood. Stainless is best for coastal or high-humidity areas. * Ring shank nails: For LP SmartSide lap siding installations. They hold better than smooth shanks. * Vinyl siding nails: The large, flat head is designed not to pull through the vinyl slot.
The Sealant
Don’t use cheap caulk. You need a high-quality, elastomeric, paintable exterior sealant that meets ASTM C920, Class 25. This means it can stretch and recover with the siding’s movement. DAP Alex Flex or OSI Quad are common contractor choices. Apply it with a caulking gun, then smooth it with a wet finger.
Drilling Specific Siding Types: The Details Everyone Misses
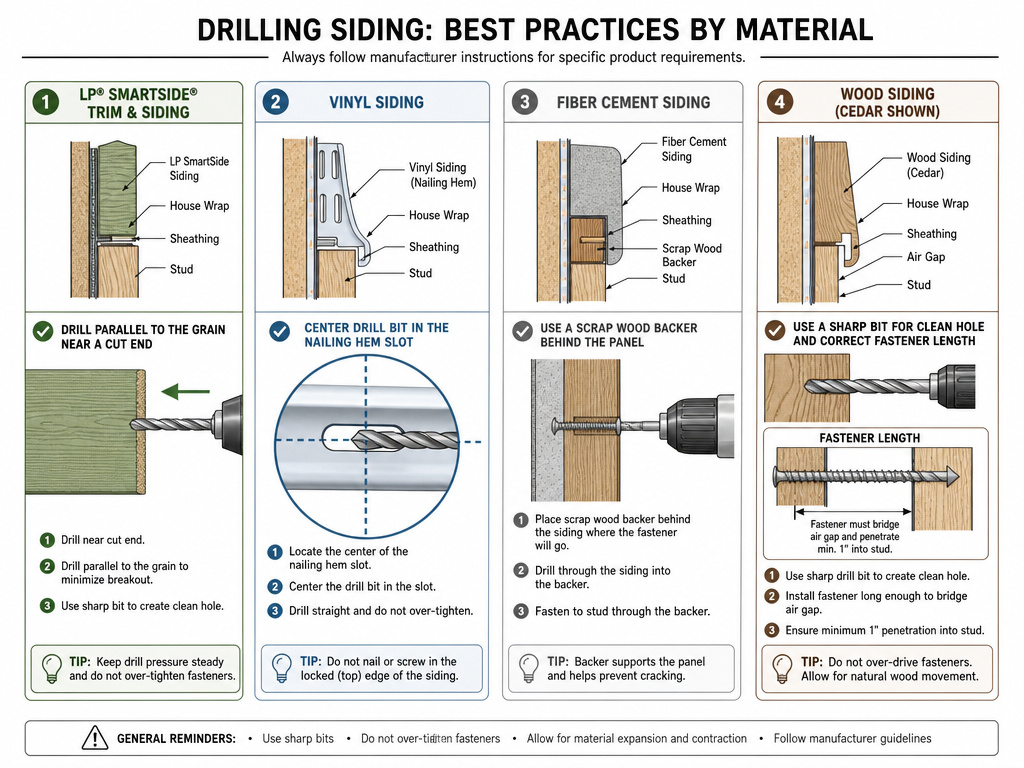
The general rules get you 80% of the way. The last 20% is in the material-specific quirks.
Drilling into LP SmartSide & Engineered Wood
The texture has a direction. LP’s manual notes that Cedar Texture and Brushed Smooth panels have a grain or brushstroke that runs parallel to the long edge. If you have to drill near a cut end, orient your drill so any potential splintering follows the grain, not across it. Always pre-drill. The strand material can cause screws to wander if you try to drive them directly.
Drilling into Vinyl Siding
Find the nailing hem, the thick strip at the top of each panel with pre-punched slots. You must drill through the center of this slot. Drilling above or below it misses the structural part of the panel. The fastener should sit in the middle of the elongated slot, not tight against either end, to allow for lateral movement.
Drilling into Fiber Cement (Hardie Board)
Wear a respirator. The dust contains crystalline silica, which is a respiratory hazard. Drill on a slow speed with firm, constant pressure. Let the carbide grit do the grinding; pushing too hard can blow out the back side. If you’re drilling near an edge, put a scrap piece of wood behind it as a backer to prevent blowout.
Drilling into Wood Siding (Cedar, Pine)
The softer the wood, the sharper the bit needs to be. A dull bit will tear the fibers instead of cutting them, leaving a ragged hole that seals poorly. For cedar, which is often installed with a gap between boards, ensure your fastener is long enough to bridge that air gap and still get 1.5 inches into the stud.
The part nobody mentions: That 1/8-inch expansion gap for engineered wood isn’t just at the seam. Anywhere two rigid materials meet, like where siding butts against brick or a window flange, you need a 3/8-inch gap with backer rod and caulk, per LP’s spec. That’s a full 3/8 of an inch. Most people caulk it tight, which guarantees a crack.
Fastener Penetration: How Deep Is Deep Enough?
A screw that only bites into the siding itself is useless. It will pull out under wind load or thermal stress. The holding power comes from the structure behind.
The rule is 1.5 inches of penetration into solid wood. For LP SmartSide, the fastener must penetrate the stud or a combination of water-resistant sheathing and stud by at least that amount. If you have 1/2-inch thick siding and 1/2-inch sheathing, your fastener needs to be at least 2.5 inches long (1/2″ + 1/2″ + 1.5″).
For ring shank nails in Accoya, the guideline is even more precise: penetration into the substructure should be at least 6 times the nail’s diameter for ring shank nails, or 12 times the diameter for smooth shank nails. For a standard #8 nail (0.12″ diameter), that’s a minimum of 0.72 inches for ring shank, or 1.44 inches for smooth. Always choose ring shank.
| Substrate Behind Siding | Minimum Fastener Penetration | Example Fastener Length |
|---|---|---|
| Stud only (no sheathing) | 1.5 inches | 2-inch screw (for 1/2″ siding) |
| Sheathing + Stud | 1.5 inches into stud | 2.5-inch to 3-inch screw |
| Steel Studs | Through steel + into backing | Use a self-drilling tek screw |
| Concrete/Masonry | 1 inch into masonry | Masonry anchor sleeve |
How to Drill Near Edges and Seams Without Cracking
Edges are stress concentrators. A hole too close will split the material.
- Stay Back from the Edge: Keep drill holes at least 1 inch from any cut edge or the end of a panel. For fiber cement, make it 1.5 inches.
- Stagger Holes: If you’re installing something with multiple fasteners, like a light fixture bracket, stagger the holes vertically rather than drilling them in a straight line along the same grain path.
- Support the Backside: When drilling near the very bottom or top edge of a panel, have a helper press a scrap block of wood firmly against the backside. This supports the material and prevents blowout.
If you do crack it, the repair depends on the material. For a small crack in engineered wood, you can inject a bit of exterior wood glue, clamp it, and then seal over it. For vinyl, you need to replace the panel. For fiber cement, you need to patch with a cementitious filler, which rarely matches the texture.
Frequently Asked Questions
Can you use an impact driver on siding?
You can, but you shouldn’t on anything but vinyl. An impact driver delivers sudden, high torque that’s excellent for driving long screws into dense wood. On brittle siding like fiber cement or even engineered wood, that hammering action easily over-drives the fastener, cracks the face, or strips the head. Use a standard drill/driver with a clutch for control.
Do you need to pre-drill vinyl siding?
No. Vinyl is soft and designed for direct fastening. The critical step is using the correct nail or screw with the wide, flat head and placing it in the center of the nailing slot, leaving the 1/32-inch gap for expansion.
What is the best screw for LP SmartSide siding?
LP specifies ring shank nails or exterior screws. For screws, choose a corrosion-resistant exterior screw like a coated deck screw or, better yet, a stainless steel screw. The thread should be coarse for good bite in the OSB substrate. A #8 or #10 screw with a length that achieves at least 1.5 inches of penetration into the stud is the standard.
How do you fill old screw holes in siding?
For a clean, permanent fix, you must fill the hole with a material that bonds and moves with the siding. For wood and engineered wood, use an exterior-rated, paintable wood filler or epoxy. Press it in, let it cure, sand it flush, and paint. For vinyl, they sell color-matched vinyl repair patches that heat-weld into place. For fiber cement, use a cementitious patching compound. In all cases, prime and paint the patch to match.
Can you drill into siding to hang Christmas lights?
Yes, but plan the attachment points carefully. Use screw-in plastic hooks or light-clip systems designed for siding. Drill only into the nailing hem of vinyl or the thickest part of a wood panel. Never screw directly into the thin, flexible face of a vinyl panel. When you remove the hooks after the season, leave the screw in the hole, snip off the head, and seal over it. This prevents water intrusion better than trying to patch a tiny hole.
The Bottom Line
Drilling into siding is a test of patience, not force. Identify your material, match your bit and fastener, and respect the expansion gaps, 1/32 inch for vinyl, 1/8 inch for engineered wood seams. Pre-drill everything except vinyl, and seal every hole you make with an ASTM C920 sealant. The goal isn’t just to hang something today; it’s to ensure that hole doesn’t become a leak, a crack, or a warranty void five years from now. If you remember one thing, make it the gap. Everything else follows from that.
