
Guide on How to Use a Gutter Side Drill Safely & Effectively
This post contains affiliate links. As an Amazon Associate, we earn from qualifying purchases.
Using a gutter side drill requires matching three specific things: a battery-powered drill with a 3/8″ or larger chuck, a speed range of 1800–2500 RPM, and a momentary contact switch without a lock. Corded drills, hammer drills, and impact drivers are explicitly banned by manufacturers like RIDGID for their drain cleaning attachments due to shock and cable damage risks.
That 2500 RPM ceiling isn’t a suggestion. It’s the point where the flexible drive cable inside the gutter attachment starts to whip if it meets resistance, and the plastic sheath can melt from friction within minutes. Exceed it, and you’re not cleaning a gutter, you’re creating a dangerous, snapping hazard.
What follows is the spec sheet the tool rental place won’t hand you, the two critical safety steps every manual buries on page 11, and the drill models that actually fit the bill. By the end, you’ll know how to read your own drill’s label in ten seconds and spot the one feature that makes it safe for this job.
Key Takeaways
- Corded drills are prohibited. Using one with a drain cleaning attachment violates the OEM safety warning and creates a severe risk of electrical shock.
- The drill must have a momentary contact switch (no lock-on feature) and an adjustable torque clutch. A locked drill switch can overstress and snap the cable.
- Speed is critical: operate between 1800–2500 RPM. Running slower than 1800 RPM lacks cleaning power; exceeding 2500 RPM risks melting the drive sheath or causing cable “whip.”
- Personal protective equipment (PPE) is non-negotiable. Wear safety glasses, sturdy gloves, long sleeves, and consider a face shield. Gutter debris is often contaminated.
- Always use a chain knocker bushing and ensure exposed cable does not exceed 1/4 inch. More exposure dramatically increases the risk of the cable kinking or flipping over.
The 3 Non-Negotiable Drill Specs for Gutter Work
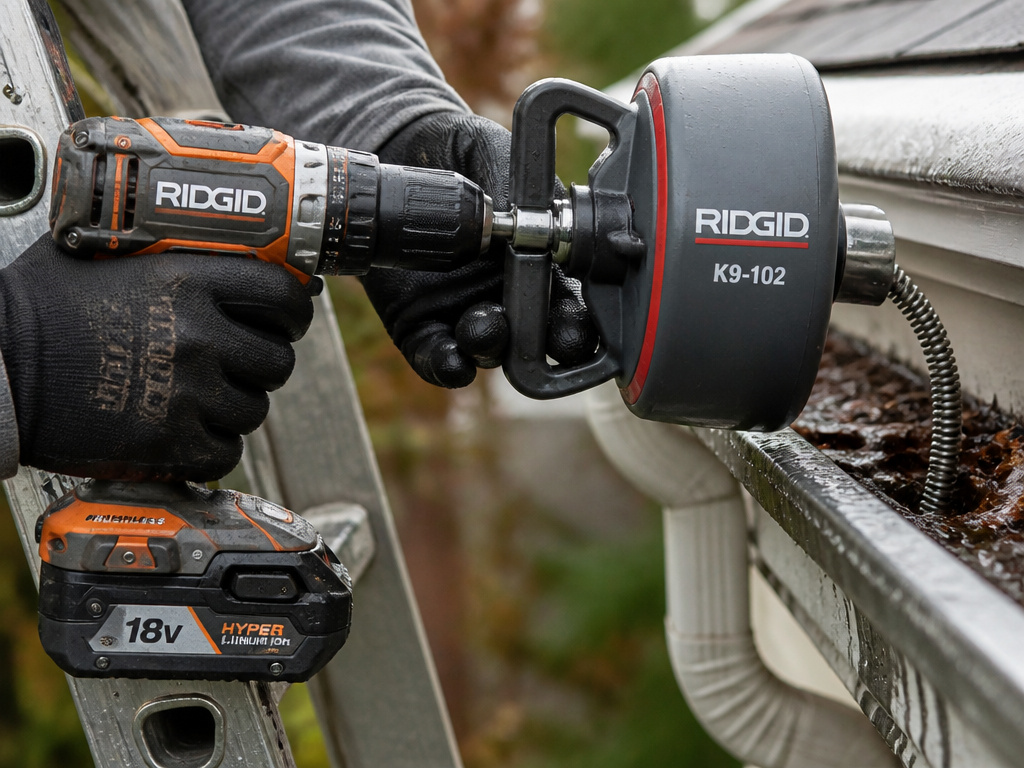
Forget horsepower or brand prestige. For gutter side drills, which are almost always attachments for flexible drain cleaning machines, the manufacturer’s manual dictates three exact specifications. Miss one, and you risk voiding warranties, breaking equipment, or causing injury.
The RIDGID FlexShaft drain cleaner manual is the authority here. Its “Acceptable Battery Powered Drills” section lists requirements that are absolute, not advisory.
Rotational Speed: 1800 to 2500 RPM (Maximum 2500 RPM). Chuck Size: 3/8″ or greater. Clutch: With adjustable torque. Switch Type: Momentary Contact Switch. Switch Lock: Not equipped. Must carry appropriate certification mark (CE mark, c(UL)us mark, etc.). – RIDGID FlexShaft™ Drain Cleaning Machines Operator’s Manual.
1. Battery-Powered Only (No Corded Drills)
This is the most violated rule. The manual states plainly: “Do not use with a corded drill. Operating with a corded drill increases the risk of electrical shock.”
A gutter cleaning job is wet. You are standing on a ladder, handling a metal machine, and guiding a cable into a water-filled pipe. Introducing a 120-volt corded tool into that environment is asking for trouble. A battery-powered drill isolates you from the mains electricity. This isn’t about convenience; it’s a designed safety barrier.
2. Speed Range: 1800–2500 RPM
Speed isn’t about going faster for better cleaning. It’s about matching the drive system’s engineering limits.
- Below 1800 RPM: The attached chain knocker or cutter won’t spin with enough force to effectively break up packed debris. You’ll stall, bog down the drill, and generate excessive heat in the drill motor.
- Above 2500 RPM: Centrifugal force causes the long, flexible drive cable to oscillate violently, a phenomenon called “whip.” This can damage the cable’s internal wiring, melt its plastic sheath, and, in extreme cases, cause the cable to snap. The manual explicitly warns not to exceed 2500 RPM.
Most modern 18V or 20V MAX cordless drills have a high-speed setting that reaches 2000-2200 RPM, which is ideal.
3. The Right Switch & Chuck
The momentary contact switch is a safety feature you can feel. You must hold the trigger down for the drill to run; release it, and it stops instantly. Drills with a lock-on button are unacceptable because if the cable jams and the drill locks on, the torque can twist the entire machine or kink the cable before you can react.
The adjustable torque clutch lets you set a maximum rotational force. You dial it to a medium setting so if the cable hits an immovable obstruction, the drill chuck disengages (it “clutches out” and clicks) instead of transmitting all that torque into a cable twist.
Finally, the chuck must be 3/8″ or larger to securely grip the 5/16″ hex drive shaft that comes from drain cleaning machines like the RIDGID K9-102. A 1/4″ chuck simply won’t fit.
| Drill Specification | Why It’s Required | What Happens If You Ignore It |
|---|---|---|
| Battery-Powered | Eliminates risk of electrical shock in wet environments. | Severe shock hazard, potential electrocution. |
| 1800–2500 RPM | Matches engineered limits of flexible drive cable. | Below 1800: ineffective cleaning. Above 2500: cable whip, sheath melt, snap risk. |
| Momentary Switch (No Lock) | Allows immediate stoppage if cable binds. | Locked drill can over-torque and kink or break cable before user reacts. |
| 3/8″ Chuck or Larger | Securely grips the machine’s 5/16″ hex drive shaft. | Insecure connection causes slippage, damaging the drive shaft and chuck. |
| Adjustable Torque Clutch | Prevents excessive force transfer to cable during a jam. | Direct drive transfers full motor torque to cable, leading to immediate twists or breaks. |
Gutter Side Drill Safety: More Than Glasses and Gloves
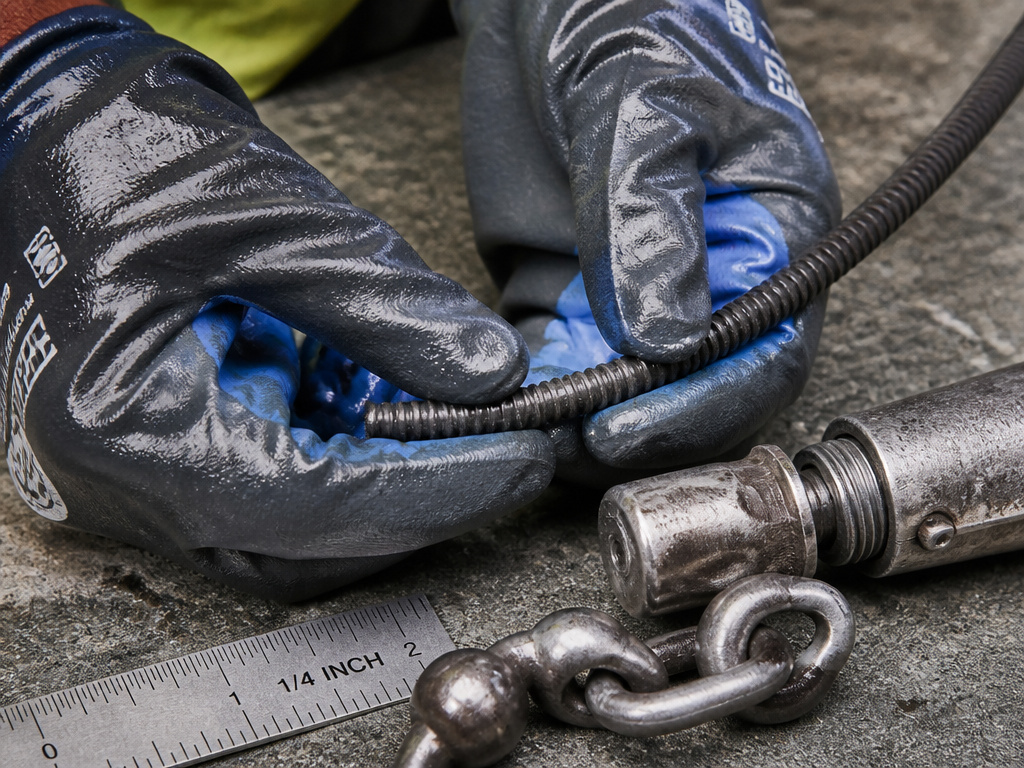
Before you start: Assume gutter muck is contaminated. Wear latex or rubber gloves under your work gloves and a disposable face shield over your safety glasses. The manual explicitly warns of bacteria and toxic substances. After the job, wash your hands and arms thoroughly before eating, drinking, or smoking.
Safety here is a two-layer system: machine setup and personal protection. Most guides cover the basics. The gaps are in the specifics.
Machine Setup Safety:
- Cable Inspection: Before connecting the drill, feed out the entire flexible cable. Look for kinks, cracks in the plastic sheath, or any “fishhooking” at the end. A damaged cable under rotation can snap and recoil with enough force to cause serious injury.
- Chain Knocker Setup: When installing the chain knocker (the cleaning head), you must use a knocker bushing cut from the sheath. The exposed cable tip must not exceed 1/4 inch (6 mm). More exposure lets the cable flex too much at the base of the knocker, leading to metal fatigue and failure. Tighten the set screws securely, a loose knocker can be lost down the drain.
- Drill Securement: Use the provided strap or bracket to secure the drill to the main machine body. A dangling, heavy drill will pull on the drive connection and strain your wrists.
Personal Protective Equipment (PPE):
Safety glasses and gloves are the bare minimum. For gutter work, upgrade.
* Eyes & Face: Goggles that seal or a full face shield. Debris and contaminated water will splash back toward you.
* Hands: Heavy-duty, waterproof gloves (like nitrile-coated) over a pair of disposable latex gloves.
* Body: Long sleeves, sturdy pants, and waterproof boots. You are not just keeping dirt off; you are creating a barrier against unknown contaminants in stagnant gutter water.
* Hearing: The combination of drill whine and the machine’s motor can exceed 85 dB. Use ear plugs or muffs.
Step-by-Step: Connecting and Operating Your Gutter Side Drill
This is where theory meets practice. Rushing the setup is how cables get ruined and jobs go sideways.
Tools & Prep Checklist
- Acceptable battery-powered drill (checked against specs above)
- Fully charged battery (plus a spare)
- RIDGID FlexShaft or equivalent gutter cleaning machine
- Correct chain knocker or cutter head for your gutter size
- Hex wrench (usually supplied with machine)
- Knocker bushing (cut from old sheath if needed)
- Safety PPE: glasses/face shield, gloves, etc.
- Ladder stabilizer (for safe, hands-free operation)
The Connection Sequence
- Inspect and Assemble the Cleaning Head. Select the correct chain knocker for your gutter downspout (typically 2″ for standard residential). Slide the knocker bushing onto the cable, then the chain knocker. Ensure chains are straight, not twisted. The cable end must be flush with the end of the collar. Hand-tighten the set screws.
- Secure the Drill. Place your drill into the mounting bracket on the drain machine. Use the strap to snug it down so it cannot wobble or fall out. A loose drill damages the drive connection.
- Connect the Drive Shaft. Extend the machine’s 5/16″ hex drive shaft. Open your drill’s chuck fully, insert the hex shaft, and tighten the chuck securely. This is the most common point of failure, a loose grip will round off the hex shaft.
- Final Tightening. Use the supplied hex wrench to final-tighten the chain knocker set screws. Place the screw tip against the cable and give it an additional 1/8 to 1/4 turn (45–90 degrees). A loose knocker will slip and spin uselessly.
Operating Procedure
- Feed the Cable. Manually feed the cable with the cleaning head into the downspout opening until you feel slight resistance. Do not turn on the drill yet.
- Start the Drill. Depress the drill’s momentary trigger. The chain knocker should begin spinning freely.
- Advance and Clear. Apply light, steady pressure to feed the cable into the gutter line. Let the spinning chains do the work. Do not force it. Every few feet, pull back slightly to allow dislodged debris to flush out.
- If You Jam: Immediately release the drill trigger. Do not reverse the drill unless your machine and drill are specifically designed for it (like a Snap-on SDR10P rapid reversing model). For most setups, manually work the cable back and forth to free the head before resuming.
- Retraction. Once through the obstruction, keep the drill running and slowly retract the entire cable. This helps clear remaining debris from the pipe.
Where this goes sideways: Forcing the cable when the drill bogs down. This binds the cable inside the sheath, creating a helical twist that can permanently kink it. The kink weakens the cable, and it will snap on the next tough job. If the drill struggles, pull back, let it clear, and try again with less pressure.
Choosing the Right Drill for the Attachment
You have a drill. The question is whether it’s the right drill. Here’s how the common types stack up for gutter side work.
Cordless Drill/Driver (The Best Choice)
This is the category designed for this job. Models like the DeWalt DCD791 or Milwaukee 2804-20 offer the necessary speed (0-2000 RPM), a 1/2″ chuck, an adjustable clutch, and a momentary switch. Their brushless motors handle the sustained load of cleaning a 30-foot gutter run without overheating. This is the default pick for most homeowners and pros.
Hammer Drill (Unacceptable)
A hammer drill incorporates a pounding action for masonry. This pulsating force is catastrophic for a flexible drive cable, causing rapid fatigue and failure. Furthermore, most hammer drills have a switch lock for continuous operation, which violates the safety rule. Do not use one.
Impact Driver (Unacceptable)
Impact drivers deliver sudden, high-torque rotational impacts. These shocks will destroy the internal wiring of a flexible cable and can shear the small set screws holding the chain knocker. They are the worst possible choice.
Right-Angle Drill (Possible, but Check Specs)
A right-angle drill can be useful in tight spaces near the gutter outlet. However, you must verify its speed range and switch type. Many are variable speed with a momentary trigger and can work, but ensure its RPM doesn’t exceed 2500 at full trigger.
The bottom line? A standard cordless drill/driver is almost always the correct tool. Its design aligns perfectly with the gutter attachment’s needs. If you’re in the market, look for one labeled “0-2000 RPM” with a 1/2″ chuck. The DeWalt DCD791 is a reliable workhorse that won’t bog down.
Common Problems & How to Fix Them
Gutter cleaning is straightforward until it isn’t. Here are the failures you’ll likely face and how to handle them.
| Problem | Likely Cause | Immediate Fix |
|---|---|---|
| Drill runs, but cable doesn’t spin. | Chuck is loose on hex shaft. | Stop. Unplug battery. Tighten chuck securely on the clean hex drive. |
| Chain knocker spins freely in pipe. | Worn chains or wrong knocker size. | Retract and inspect chains. Replace if worn. For large pipes, use a knocker with more chains/links. |
| Cable is difficult to feed or retract. | Cable is kinked or damaged internally. | Stop drilling. Visually inspect entire cable length for a permanent bend or sheath crack. A kinked cable must be replaced. |
| Drill clutch disengages (clicks) constantly. | Torque clutch set too low or obstruction is severe. | Increase clutch setting slightly. If it still clicks, the obstruction may require a different cutter head or manual clearing. |
| Loud whining noise from machine. | Lack of lubrication on drive cable. | Retract cable. Apply a manufacturer-recommended cable lubricant (not WD-40) before continuing. |
The Cable Kink: A Point of No Return
A kink isn’t just a bend. It’s a permanent deformation of the cable’s internal steel core. Once kinked, that spot becomes a focal point for stress. Under the rotation and push-pull forces of cleaning, it will eventually snap. There is no repair. If you see a kink, replace the entire cable assembly. This is why the “no forcing” rule is non-negotiable.
Frequently Asked Questions
Can I use my regular corded drill for gutter cleaning?
No. The operator’s manuals for drain cleaning machines like the RIDGID FlexShaft explicitly prohibit corded drills due to the heightened risk of electrical shock in wet conditions. This is a safety mandate, not a suggestion.
What does “momentary contact switch” mean?
It means the drill only operates while you are physically holding down the trigger. The trigger spring returns to the “off” position when released. This is a critical safety feature that allows instant stopping if the cable jams. Many older or cheaper drills have a lock-on button next to the trigger, avoid those for this application.
How do I know my drill’s RPM?
Check the tool’s specification label, usually located on the motor housing or in the user manual. It will list a “No-load RPM” (e.g., 0-2000 RPM). For gutter work, you want to run the drill at or near its maximum speed, provided that maximum is at or below 2500 RPM.
My drill has a 1/2″ chuck but only goes to 1500 RPM. Is that okay?
It’s not ideal. While the chuck size is correct, 1500 RPM is below the recommended 1800 RPM minimum. The cleaning head may not spin with enough force to effectively break up packed debris, leading to stalls and frustration. You can try it, but be prepared for less effective cleaning.
What should I do if my chain knocker gets stuck in the downspout?
First, release the drill trigger immediately. Do not reverse the drill unless it’s a model specifically designed for rapid reversing. Try gently rocking the entire machine back and forth to work the knocker loose. If that fails, you may need to disassemble the downspout from the bottom to access and remove the stuck head.
Is a gutter side drill the same as a “drain snake”?
They are related but different. A traditional hand-crank drain snake is for indoor drains. A gutter side drill refers to a powered drain cleaning machine (like the RIDGID FlexShaft) that uses a cordless drill to spin a long, flexible cable. It’s designed for longer, larger-diameter runs like gutter downspouts and outdoor drain lines.
The Bottom Line
Using a gutter side drill isn’t about brute force. It’s about precision matching. Match the drill to the machine’s specs, battery-powered, 1800-2500 RPM, momentary switch. Match your setup to the task, correct knocker, secure connections, and a bushing to limit cable exposure. Most importantly, match your safety gear to the real hazard: contaminated muck and a high-torque spinning cable.
The right drill is a standard cordless drill/driver. Leave the hammer drills and impact drivers in the box. Follow the sequence: inspect, assemble, secure, then run. When in doubt, pull back. Force is the enemy of the flexible cable. Keep your RPMs in the green zone, wear the gloves and glasses, and that clogged gutter will be clear in twenty minutes, not two hours.
