The Complete Guide to Cutting Angles on a Table Saw Safely
This post contains affiliate links. As an Amazon Associate, we earn from qualifying purchases.
Cutting angles on a table saw requires matching three things: the type of cut (miter, bevel, or compound), the correct accessory (miter gauge, sled, or taper jig), and a blade height set to about 1/4 inch above the workpiece for clean engagement. The blade must tilt away from the fence for bevel cuts to prevent kickback, and every angle setting must be verified with a test cut on scrap wood before touching project material.
Most guides tell you to trust the scales on your saw. They’re wrong. The stamped numbers on a bevel gauge or miter gauge are almost always off by a degree or two after a year of use. That tiny error turns a perfect 45-degree picture frame joint into a gap you can see from across the room. You need to calibrate with a separate tool, then test, then cut.
This guide walks through the exact setup for miter, bevel, and compound cuts. It covers the tools that actually work, the safety rules you can’t skip, and the troubleshooting steps when a joint doesn’t close. You’ll learn how to adjust feed rate for different materials and why a zero clearance insert matters more on plywood than on oak.
Key Takeaways
- Never trust the saw’s built-in angle scales. Calibrate with a digital angle gauge or drafting triangle and verify with a test cut on scrap.
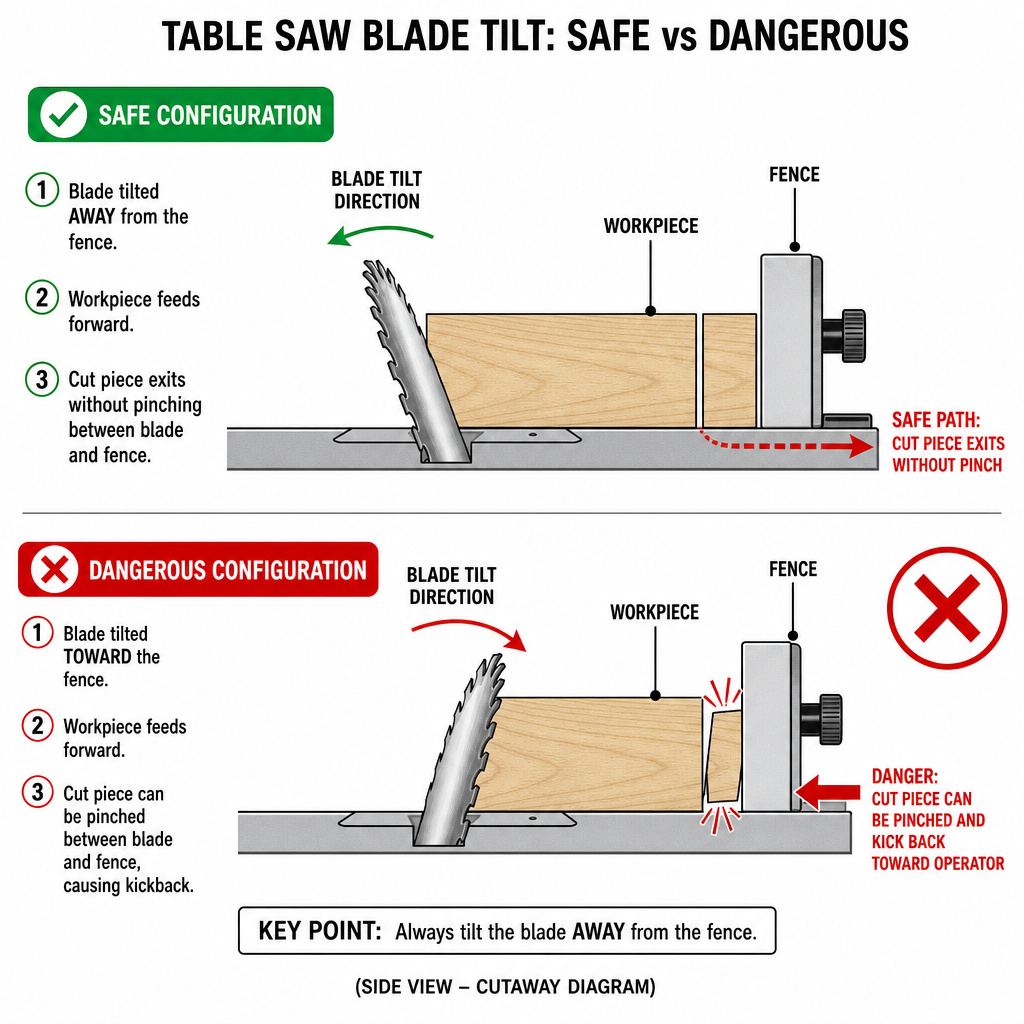
- For bevel cuts, the blade must tilt away from the fence. Tilting toward the fence traps the workpiece and guarantees kickback.
- Set blade height to 1/4 inch above the wood. Higher blades increase tear-out and risk; lower blades cause more vibration and burn marks.
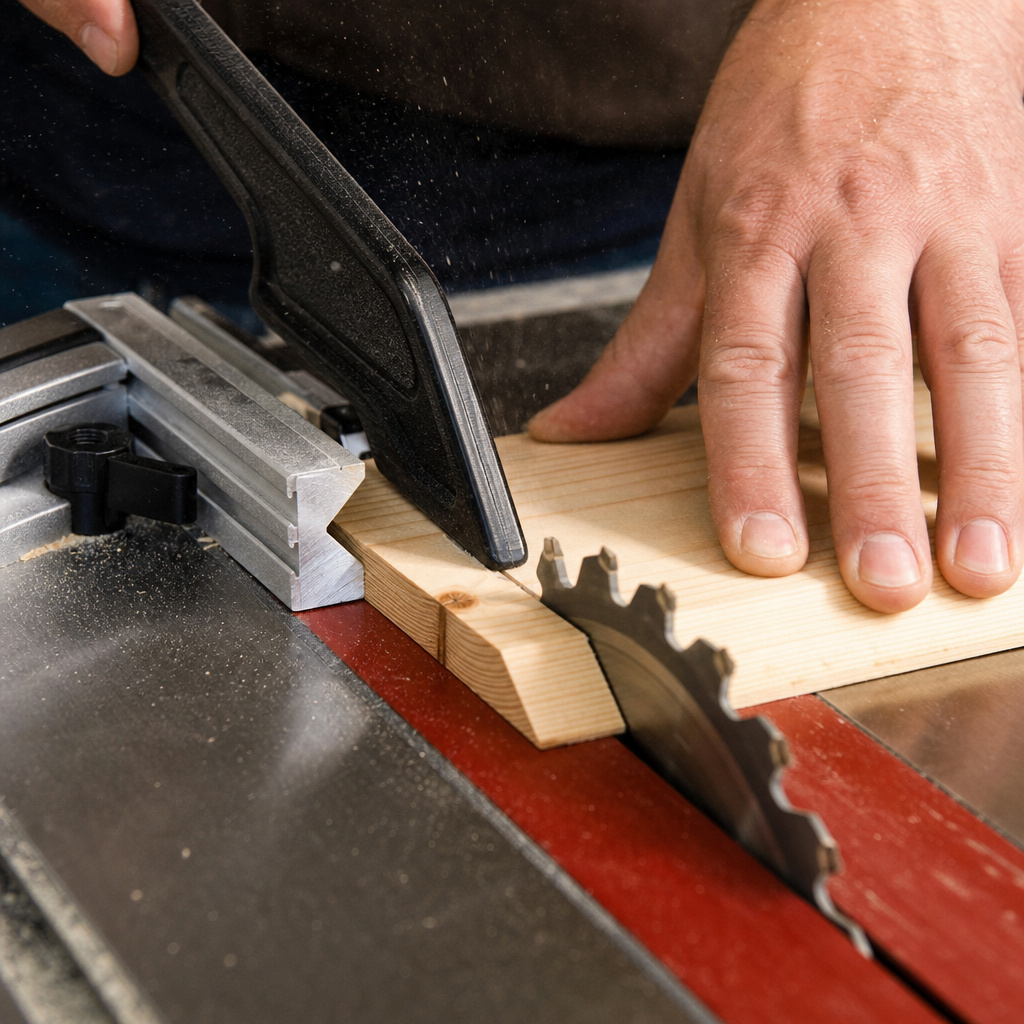
- Use a push stick for the final 6 inches of every cut. Your fingers stay outside the blade path, and you maintain consistent pressure.
- If a miter joint doesn’t close, the error is usually in the miter gauge setting, not the blade. Re-calibrate the gauge, not the saw tilt.
Safety First: Your Checklist Before Any Angle Cut
Before you start: The blade stays spinning for a full second after you release the power switch. Never reach over it during that time. A tilted blade changes the kickback vector, a trapped piece can fly toward your chest, not just back. Wear safety glasses, hearing protection, and secure loose clothing.
Unplug the saw. That’s the first step, not the last. You’re adjusting gauges, tilting blades, and fitting jigs. A plugged-in saw with a loose adjustment knob can start from vibration.
Check that the riving knife is aligned and about 3mm behind the blade. It prevents the kerf from closing and pinching the blade, which is the main cause of kickback on straight cuts and a hidden risk on angled ones.
Your stance matters. Stand to the side of the blade path, not directly behind the workpiece. If kickback happens, the wood launches along the blade plane, standing behind it puts you in the line of fire.
The Three Types of Angle Cuts: Miter, Bevel, and Compound
The first step is knowing what you’re trying to make. A miter cut angles across the width of the board. A bevel cut angles across the thickness. A compound cut does both at once.
| Cut Type | What It Changes | Primary Tool | Common Use |
|---|---|---|---|
| Miter | Angle of the board’s end | Miter gauge or crosscut sled | Picture frames, box joints |
| Bevel | Angle of the board’s face | Tilted blade (with fence or taper jig) | Chamfers, decorative edges |
| Compound | Both end and face angles | Miter gauge + tilted blade | Crown molding, complex joinery |
A miter gauge set to 30 degrees does not produce a 30-degree cut if the gauge’s bar is bent or the slot is worn. The error compounds over the length of the cut, resulting in a joint that is tight at the front but opens up at the back.
Miter cuts use the miter gauge or a sled. The workpiece is held against the gauge and pushed through the blade. The cut happens across the board’s width. For accuracy longer than about 12 inches, you need a crosscut sled with an angled fence. The sled’s base supports the entire workpiece, eliminating wobble.
Bevel cuts tilt the blade itself. The workpiece is guided by the fence or a taper jig. The blade must tilt away from the fence. If it tilts toward the fence, the cut piece gets trapped between the blade and the fence, that’s a classic kickback trigger. For long bevels on narrow stock, use a taper jig. It’s a sled-like guide that holds the piece at a constant angle while keeping your hands well back.
Compound cuts are why crown molding is frustrating. You set both the miter gauge angle (for the horizontal tilt) and the blade tilt (for the vertical tilt). Most saws have a compound scale, but it’s rarely accurate. You’ll need a dedicated crown molding sled or a digital gauge to set both independently, then test on scrap twice.
Essential Tools and Accessories for Precision
You can’t cut accurate angles with just the saw. You need specific accessories, and some are more critical than others.
- Digital Angle Gauge (Wixey WR300 or similar). This is non-negotiable for bevel cuts. Place it on the blade, zero it on a known flat surface, then tilt the blade to your target angle. It reads to 0.1-degree accuracy. The saw’s stamped scale might be off by 2 degrees.
- Crosscut Sled. Build one if you don’t have it. A simple plywood sled with a hardwood front fence improves accuracy for any crosscut, including miters. For angled miters, you can attach a secondary fence at your target angle to the sled’s main fence.
- Taper Jig. For long bevel cuts on narrow stock, this jig is safer than using the fence alone. It’s a guided platform that holds the workpiece at the correct angle while your hands stay inches from the blade.
- Zero Clearance Insert. This insert has a slot cut exactly for your blade. It supports the workpiece right up to the cutting edge, preventing tear-out on the bottom face of the cut. Critical for plywood and veneered materials.
- Sharp, High Tooth Count Blade. A Freud 80T thin kerf combination blade leaves a cleaner cut on angles than a 24T rip blade. More teeth engage the wood at the angled surface, reducing splintering.
I used the fence as a guide for a bevel cut on a DeWalt DW745 for three years without a taper jig. One afternoon, cutting a 15-degree bevel on a 6-foot oak board, the back end of the board shifted slightly. It touched the fence behind the blade. The piece kicked back so fast it dented the garage wall behind me. I built a taper jig the next weekend.
Why the zero clearance insert matters on angles? On a straight cut, tear-out usually happens on the top face. On an angled cut, because the wood enters the blade at a skew, the bottom face can splinter where it exits the insert’s wide factory slot. A zero clearance insert supports that bottom edge all the way through.
How to Set Up and Cut a Perfect Miter
Miter cuts are the most common angled task. The process is straightforward if you follow a tight sequence.
Step 1: Calibrate the miter gauge. Use a drafting triangle or digital gauge against the gauge’s face. Set it to your desired angle (say, 45 degrees). Lock it. Now, place the gauge in the saw’s slot and push it fully forward. Check the angle again. The gauge can deflect when seated. Adjust until it’s perfect in the working position.
Step 2: Set blade height. Raise the blade so about 1/4 inch of tooth protrudes above the workpiece. For a 3/4-inch thick board, that means the blade height is around 1 inch total.
Step 3: Perform a test cut. Use scrap wood of the same thickness and species. Make the cut. Then, use the drafting triangle to check the resulting angle. If it’s off, adjust the miter gauge calibration, not the blade.
Step 4: Cut the project piece. Hold the workpiece firmly against the miter gauge. Use a push stick for the final feed. Keep the feed rate steady. If you rush, the cut will burn; if you hesitate, the blade can deflect and create a slight curve.
Step 5: Check the joint. Fit the two mitered pieces together. If there’s a gap, don’t force them. The error is likely in the gauge setting, not your technique. Go back to step 1.
If your miter joint is tight at the front but open at the back, the miter gauge is twisting in the slot during the cut. That’s usually a worn slot or a gauge with a loose bar. Solution: use a crosscut sled instead. The sled’s base rides on the table, not in a slot, eliminating twist.
How to Set Up and Cut a Safe, Accurate Bevel
Bevel cuts involve blade tilt. The safety rule here is absolute.
The blade must tilt away from the fence. Visualize the cut: the blade is angled, and the fence is straight. If the blade tilts toward the fence, the wedge-shaped cut piece gets narrower as it passes through. At the back of the blade, it can be pinched between the blade and the fence. That pinch launches the piece backward.
- Unplug and tilt the blade. Use your digital angle gauge to set the exact bevel angle. Lock the tilt mechanism.
- Position the fence. Set the fence parallel to the tilted blade. Use a measuring tape to check the distance from the blade to the fence at the front and rear of the blade. They should be equal, or the rear can be slightly wider (toed-out).
- Set blade height. Again, 1/4 inch above the workpiece.
- Use a taper jig for long or narrow pieces. Clamp the workpiece to the jig. The jig rides against the fence, keeping your hands inches away from the blade.
- Feed slowly and consistently. Bevel cuts have more blade surface contacting the wood. They require slower feed rates to avoid burning. Listen to the sound, a high-pitched whine means you’re feeding too fast.
Never make a bevel cut with the blade tilted toward the fence on a piece longer than 12 inches. The trapped wedge will kick back within 2 seconds of the blade engaging the rear of the workpiece. I’ve seen it happen with pine, which is soft, hardwood is even more violent.
Why feed slower on bevels? The angled blade presents more cutting edge to the wood per inch of travel. Each tooth is removing a larger, skewed chip. If you feed at the same speed as a straight cut, the teeth overload, heat builds, and the wood burns. Slow down by about 30 percent.
Troubleshooting Common Angle-Cutting Problems
Your cut didn’t come out right. Here’s what to check, in order.
| Problem | Likely Cause | Immediate Fix | Long-Term Solution |
|---|---|---|---|
| Miter joint doesn’t close | Miter gauge calibration error | Re-calibrate gauge with digital tool, test on scrap | Build or use a crosscut sled for all miter cuts |
| Bevel cut has burn marks | Feed rate too fast or blade dull | Slow feed, check blade sharpness | Install a sharp Freud 80T blade and practice consistent feed speed |
| Tear-out on bottom of cut | Wide insert slot lacking support | Install a zero clearance insert | Make custom inserts for common blade heights and tilt angles |
| Cut piece kicks back | Blade tilted toward fence on bevel | Stop, re-tilt blade away from fence | Always use a taper jig for bevels longer than 24 inches |
| Angle is inconsistent across length | Miter gauge twisting in slot | Use a sled instead of the gauge | Replace worn miter slots or upgrade to a premium gauge with anti-twist design |
Burning happens for two reasons. Dull blades burn because they rub instead of cut. Fast feed rates burn because the teeth can’t clear chips fast enough. For bevels, it’s usually feed rate. For miters, it’s often a dull blade combined with a slightly twisted gauge that creates friction.
Tear-out on plywood is predictable. Plywood’s layered veneers splinter where the blade exits. A zero clearance insert is the first fix. The second is using a blade with more teeth (80T or higher). The third is applying painter’s tape over the cut line on the bottom face. The tape holds the fragile fibers together as the blade exits.
If your compound cut for crown molding is wrong, the error is usually in the blade tilt setting, not the miter gauge. Crown molding sits at a weird angle on the saw. You’re cutting the “spring angle” into the back. That’s a bevel cut. Calibrate the blade tilt with a digital gauge first, then set the miter gauge for the corner angle.
Frequently Asked Questions
What’s the best blade for cutting angles on a table saw?
high tooth count combination blade, like a Freud 80T thin kerf. It crosscuts cleanly and handles the angled engagement better than a rip blade. For hardwoods, a dedicated crosscut blade with 90+ teeth is even better, but it’s slower on rip cuts.
Can I cut angles without a miter gauge?
Yes, but you need a substitute. A crosscut sled with an angled fence is more accurate. For bevels, a taper jig replaces the fence. Never cut angles freehand, the blade will grab the wood and deflect, ruining the cut and causing kickback.
Why does my 45-degree miter cut produce a 44-degree angle?
The saw’s scale is off. Or the miter gauge deflects when locked. Or the miter slot in the table is worn, allowing the gauge to twist. Calibrate with an external tool (digital gauge or triangle) and verify with a test cut. The scale is a rough guide, not a precision instrument.
How do I prevent kickback on bevel cuts?
Two rules: tilt the blade away from the fence, and use a taper jig for any piece where your hands would get within 6 inches of the blade. The jig keeps the workpiece aligned and your hands out of the danger zone. Also, ensure the riving knife is properly aligned behind the tilted blade.
Is a digital angle gauge really necessary?
For bevel cuts, yes. The stamped scale on the saw can be off by 1-3 degrees after regular use. That error makes joinery impossible. For miter cuts, a high-quality drafting triangle can suffice, but the digital gauge is faster and more repeatable.
The Bottom Line
Cutting angles on a table saw is about calibration, not guesswork. Trust a digital angle gauge over the saw’s built-in scales every time. Match the cut type to the correct accessory: miter gauge for miters, tilted blade and taper jig for bevels.
Safety dictates that the blade tilts away from the fence for bevel cuts. Use a push stick for the final feed on every cut. Set the blade height to 1/4 inch above the wood for clean engagement without excessive risk.
When a joint doesn’t close, the fault is usually in the tool setting, not your technique. Re-calibrate, test on scrap, then cut again. A sharp, high tooth count blade and a zero clearance insert solve most tear-out and burning issues.
Start with simple miter cuts to build confidence. Move to bevels only after you’ve mastered the safety setup. Leave compound cuts for crown molding until you’ve built a dedicated sled or jig. The process is methodical, not magical. Follow the steps, and the angles will be right.