The Right Way to Sharpen a Chainsaw Blade for Perfect Cuts
This post contains affiliate links. As an Amazon Associate, we earn from qualifying purchases.
Sharpen a chainsaw blade by matching three specifications: the round file diameter to your chain’s pitch, the factory filing angle (typically 30°), and the depth gauge height relative to the cutter. Correct gullet shape, top plate angle, and raker clearance create a fast, straight, and safe cut.
A sharp chainsaw blade requires matching three things: the correct round file diameter for your chain’s pitch, the factory-specified filing angle (usually 30 degrees), and the depth gauge height relative to the newly sharpened cutters. Get any one wrong and the saw will cut slow, pull sideways, or bite too aggressively and kick back.
Most people sharpen until the edge looks shiny. They ignore the depth gauges, use a file that’s the wrong size, and wonder why the saw still cuts like it’s dragging through mud. The shine is irrelevant. What matters is the gullet shape, the top plate angle, and the raker clearance.
This guide walks through both the hand-file method and the bench grinder approach. You’ll learn how to spot a dull chain before it starts smoking, correct a chain that’s been sharpened unevenly, and set the depth gauges so the saw cuts fast without trying to climb out of the log.
Key Takeaways
- Match the file size to your chain’s pitch, not the brand. A .325″ pitch chain needs a 4.8mm file, not a generic “chainsaw file.”
- File the depth gauges (rakers) every third sharpening. If you don’t, the newly sharpened cutters won’t take a full bite and the saw will vibrate and cut slow.
- Count your file strokes on the first tooth and repeat that number exactly for every other tooth. Uneven tooth length causes the saw to cut in a circle.
- A bench grinder is faster, but it removes more metal per pass. It’s easy to overheat and blue a tooth, which softens the steel permanently.
- The chain is sharp enough when it pulls itself into a dry log with the weight of the saw alone. If you have to push, something’s off.
Signs Your Chainsaw Blade Needs Sharpening
Listen to the saw. A sharp chain makes a consistent, crisp buzzing sound in the wood. A dull one chatters, screams, and produces fine powder instead of coarse chips.
You’ll also feel it. The saw stops self-feeding, forcing you to lean into the cut. Smoke curling from the kerf is a late-stage warning, the chain is so dull it’s burning wood rather than slicing it.
Visually, a sharp cutter has a defined hook on the top plate and a clean, angled gullet behind it. A dull one looks rounded over, often with a shiny, reflective edge where the bevel has worn flat. Check for damaged teeth, too. Hitting dirt, a rock, or an embedded nail will take a visible chunk out of the cutter. That tooth will now be shorter than its partners, causing the saw to pull to one side.
A dull chain produces fine, dusty shavings. A sharp one throws out coarse, square chips about the size of a pencil lead. If your sawdust looks like sand, stop cutting and sharpen.
The Tools You Actually Need (And One You Don’t)
You can sharpen a chain with just a file and a steady hand. But three tools turn a chore into a repeatable, accurate job. First, a filing guide.
It clamps to the bar and holds the round file at the preset angle and height. The Husqvarna file guide is a common pick among pros for its solid clamps and clear markings. Without a guide, your filing angle will drift a degree or two with each stroke, and the teeth will end up uneven.
Second, a flat file with a handle and a depth gauge tool. The depth gauge tool is a stamped metal plate with a slot and a step. You’ll use it later.
Third, a sturdy way to hold the saw still. A bench vise is ideal. A Quick-Grip style bar clamp across a workbench works. Trying to file a chain while holding the saw between your knees is a fast track to a bad sharpening job and a cut hand.
Skip the all-in-one pull-through sharpeners from the big-box store. They promise a quick edge but often sharpen at the wrong angle and ignore the depth gauges completely. They’re fine for one emergency touch-up in the field if you’re stuck, but they’ll ruin a chain over repeated use.
Manual Sharpening Process
Clean the chain first. Sap and grit act like sandpaper on your file. Brush out the bar groove and wipe each tooth.
Then set the chain tension. It should be snug against the bar but still pull freely by hand. Overtightening locks the chain and makes filing difficult.
Find the shortest cutter tooth. This is your starting point. Mark it with a dab of paint, chalk, or even a sharpie.
Sharpen this one to the desired shape, counting your strokes. Then use that exact stroke count for every other tooth on that side. This is the single best trick for keeping teeth even.
I sharpened a friend’s Oregon chain that was pulling hard to the left. The right-side cutters were a full millimeter shorter than the left. It took marking the short side and filing the long side down with two extra strokes per tooth over three passes to even them out. The saw cut straight again, but I removed months of chain life in twenty minutes.
Step 1: Setting Up the File and Guide
Clamp the filing guide onto the bar. The guide’s arrows should point in the chain’s cutting direction. Insert the correct round file. The file should sit just below the top of the cutter tooth, with about a fifth of its diameter above the top plate. If the file sits too high, you’ll blunt the top plate angle. Too low, and you won’t touch the cutting edge.
Step 2: Filing the Cutters
Hold the file level. Push forward with light, even pressure, following the guide’s angle. Lift the file on the return stroke. Do not drag it back, that dulls the file. Rotate the file a quarter turn every few strokes to wear it evenly.
Work your way around the chain, doing all teeth facing one direction. Then flip the saw in the vise and repeat for the opposite-facing teeth. Consistency matters more than pressure. Ten light strokes are better than five heavy ones that gouge the file and change the gullet shape.
Step 3: Checking Your Work
Look at the bright filed edge on each tooth. They should all be uniform. The gullet behind the edge should be a smooth curve, not a V-notch. Run your fingernail lightly across the top plate, it should catch, not slide. If it slides, the edge is still rounded. Give it two more strokes.
Depth Gauge Adjustment: The Step Everyone Forgets
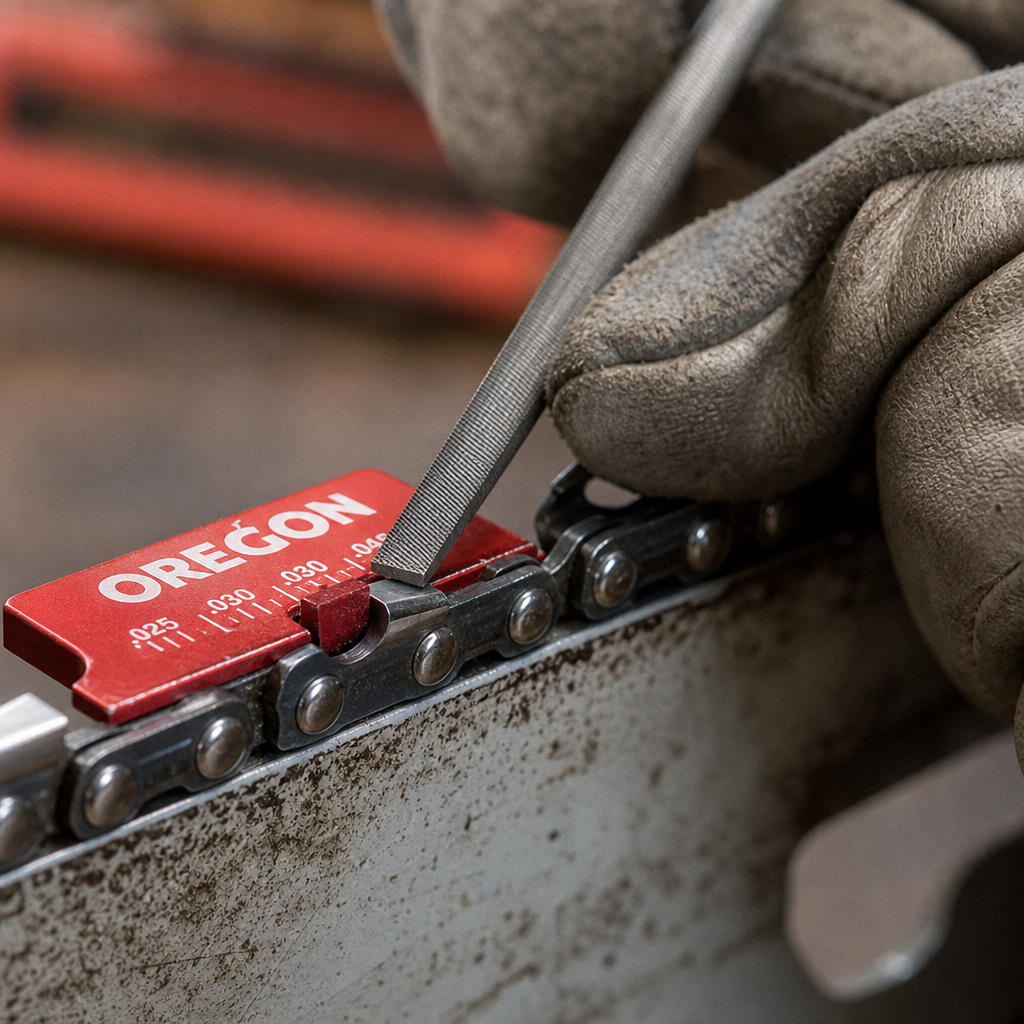
The depth gauge, or raker, is the little hump in front of each cutter. It controls how deep the cutter bites. Every time you file the cutter, you make it shorter, which brings the cutting edge closer to the depth gauge. If the raker is too high, the cutter can’t reach the wood. Too low, and the cutter bites too deep, making the saw grab, jump, and kick back violently.
After every three to five sharpenings, check the rakers. Use a depth gauge tool. Lay it across the chain. If a raker sticks up above the tool’s slot, file it down with a flat file until it’s flush. File all rakers to the same height.
| Chain Pitch | Recommended Depth Gauge Setting | Consequence if Too High | Consequence if Too Low |
|---|---|---|---|
| 0.325″ / 3/8″ Low-Profile | 0.025″ (0.635mm) | Slow, dusty cuts; saw overheats | Aggressive grab; high kickback risk |
| 3/8″ Standard | 0.030″ (0.762mm) | Requires excessive pushing force | Saw tries to climb out of the cut |
| 0.404″ | 0.035″ (0.889mm) | Chain glazes over, no self-feed | Dangerous, uncontrollable cutting |
The STIHL 2-in-1 filing guide combines a round file and a flat file in one tool to do both jobs simultaneously. It’s clever, but it has a learning curve. Set it up wrong once and you’ll file every raker too low on that pass. I keep one in my field kit for quick touch-ups, but for a full sharpen at the bench, I use separate files and a dedicated gauge.
Electric/Bench Grinder Method
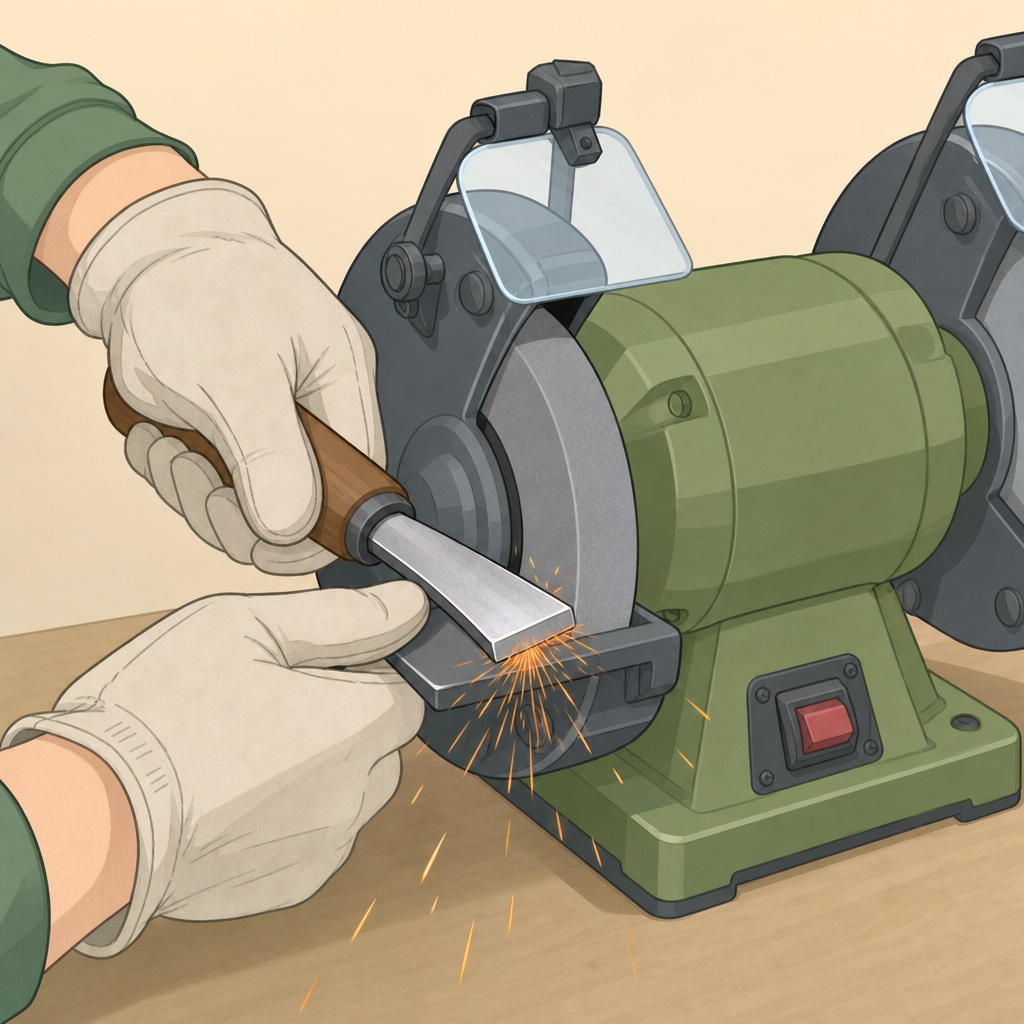
A bench grinder like the Husqvarna Sharp Force or Oregon electric sharpener is for someone who goes through a lot of chain or needs to repair badly damaged teeth. It’s fast and consistent. It’s also unforgiving.
The wheel removes metal quickly. Hold a tooth against the grinding wheel for a half-second too long and you overheat it, drawing the temper. The steel turns blue and softens, and that tooth will dull after a single cut.
Before you start: Always wear safety glasses. The grinder throws sparks and tiny metal fragments. Secure the chain in the vise clamp. Set the sharpening angle using the tool’s guide, usually a pin or a notch. Set the stop so the grinding wheel just kisses the tooth. Power on, touch the tooth to the wheel for one second, release, index to the next tooth. Let the wheel do the work; don’t force it.
The grinder excels at fixing uneven chains. You can set the stop to take a tiny bit off the longer teeth until they match the shorter ones. But it’s a removal process, not a refinement. You’ll shorten the overall life of the chain compared to careful hand filing.
Common Sharpening Mistakes and How to Fix Them
The most frequent error is using the wrong file size. A 4mm file on a .404 pitch chain barely touches the sides of the cutter. You’ll get a shiny edge on the very top, but the hook in the gullet stays rounded. The chain still won’t cut. Match the file to the pitch stamped on the drive links or listed in your saw’s manual.
Filing at the wrong angle is next. Most chains are 30 degrees. Some, like the STIHL Rapid Hexa, are 25 degrees and require a hexagonal file. Filing a Hexa chain at 30 degrees with a round file ruins it. Check your chain’s specification.
Ignoring the depth gauges makes a freshly sharpened chain cut like a dull one. The symptom is a saw that requires a lot of downforce and produces fine dust. The fix is simple: get out the flat file and the depth gauge tool.
Uneven tooth length makes the saw cut in an arc. To fix it, find the shortest tooth. Sharpen all other teeth on that side until they match its length. This takes patience and a stroke counter. It’s why marking a starting tooth is non-negotiable.
Chainsaw Chain Maintenance Beyond Sharpening
Sharpening is one part. The chain and bar need care to make that edge last. Clean the bar groove weekly.
Gunk builds up and pinches the chain, causing extra friction and heat. Flip the bar over every few tanks of gas to wear both sides evenly. Look for burrs on the bar edges, file them flat with a flat file.
Lubricate with proper bar and chain oil, not motor oil. Bar oil is stickier and clings to the chain under centrifugal force. After each use, check the tension. A hot chain expands, then contracts as it cools. A loose chain can derail and whip; a tight one burns out the bar and sprocket.
Store the saw with the chain off the bar if it’s going into long-term storage. Wipe the bar down with an oily rag to prevent rust. A little care here means the next time you pull the cord, the chain is ready to work, not seize up.
Frequently Asked Questions
How often should I sharpen my chainsaw chain?
Sharpen little and often. Give the chain a few file strokes after every hour of cutting in clean wood, or after every 15 minutes if you hit dirt or sand. Letting it get fully dull requires removing a lot more metal to restore the edge, shortening the chain’s life.
Can I sharpen a chainsaw chain without a vise?
You can, but you shouldn’t. Holding the saw between your knees or trying to brace it on a stump introduces wobble. Your file angle drifts, and you risk cutting yourself. Even a simple clamp securing the bar to a picnic table is better than nothing.
What’s the difference between chain pitch and file size?
Pitch is the average distance between three rivets, divided by two. It determines the size of the drive links and the sprocket. File size is the diameter of the round file needed to match the curvature of the cutter’s gullet. They’re related but not the same, you match the file to the pitch.
Why does my chain still not cut well after sharpening?
You probably missed the depth gauges. A sharp cutter held back by a too-high raker can’t bite. Or, your teeth are uneven in length, causing the saw to cut in a curve instead of straight. Check both.
Is it worth buying an electric chainsaw sharpener?
If you maintain multiple saws, cut firewood regularly, or process lumber, yes. The speed and consistency pay off. For the homeowner who uses a saw a few times a year to clean up storm debris, a quality file and guide are more economical and harder to mess up.
Before You Go
A sharp chainsaw is a safe, efficient saw. The process boils down to matching the file to the pitch, filing every tooth evenly, and never forgetting the depth gauges. Hand filing with a guide teaches you to read the chain and feel the edge.
A bench grinder gets the job done fast but demands a lighter touch. Whichever method you pick, start with a clean, tight chain and a marked tooth. Count your strokes. And when you’re done, the proof is in the cut, the saw should pull itself through the wood, throwing chips, not dust.
