How Does an Edger Work? The Real Mechanics Explained
This post contains affiliate links. As an Amazon Associate, we earn from qualifying purchases.
A lawn edger works by spinning a rigid blade or a heavy-duty string in a vertical plane, perpendicular to the ground. This cutting action slices a narrow, clean trench between the grass and an adjacent hard surface like a sidewalk or driveway. The blade is powered by a gas engine or an electric motor, and a depth guide wheel controls how deep the trench is cut, creating a sharp, defined border that a mower or string trimmer cannot achieve.
Most people grab their string trimmer, tilt it, and try to edge. It works for a week. Then the line wears down against the concrete, the cut gets ragged, and you’re left with a fuzzy, uneven border that looks worse than if you’d done nothing. The tool isn’t built for that job.
A dedicated edger is built for one thing: a perfect, repeatable edge. This guide breaks down the mechanics, the different types, and the real-world techniques that separate a pro finish from a DIY hack job.
Key Takeaways
- The vertical blade is non-negotiable for a clean edge. A string trimmer cuts horizontally; an edger’s blade spins vertically to shear grass at a 90-degree angle against a hard surface.
- Blade material dictates lifespan. A basic steel blade lasts a season on sandy soil. A carbide-tipped blade costs three times more but will still be sharp after two years of hitting occasional gravel.
- Depth adjustment bolts strip easily. They thread into soft aluminum housings. Hand-tighten only; cranking them with a wrench ruins the threads and the housing is often not sold separately.
- Let the tool do the work. Pushing an edger forward too fast forces the blade and bends the drive shaft. The right pace feels slow, and you’ll hear the engine load slightly without bogging down.
- Clean the underside after every use. Caked-on mud and grass hold moisture against the steel blade shaft. That spot rusts through in 18 months, seizing the blade.
How an Edger’s Cutting Mechanism Actually Works
Forget the marketing. The core action is simple but specific. A motor, either a 2-cycle gas engine buzzing at about 7,000 RPM or a high-torque electric motor, spins a driveshaft. This shaft connects to a cutting head mounted at a fixed 90-degree angle to the ground.
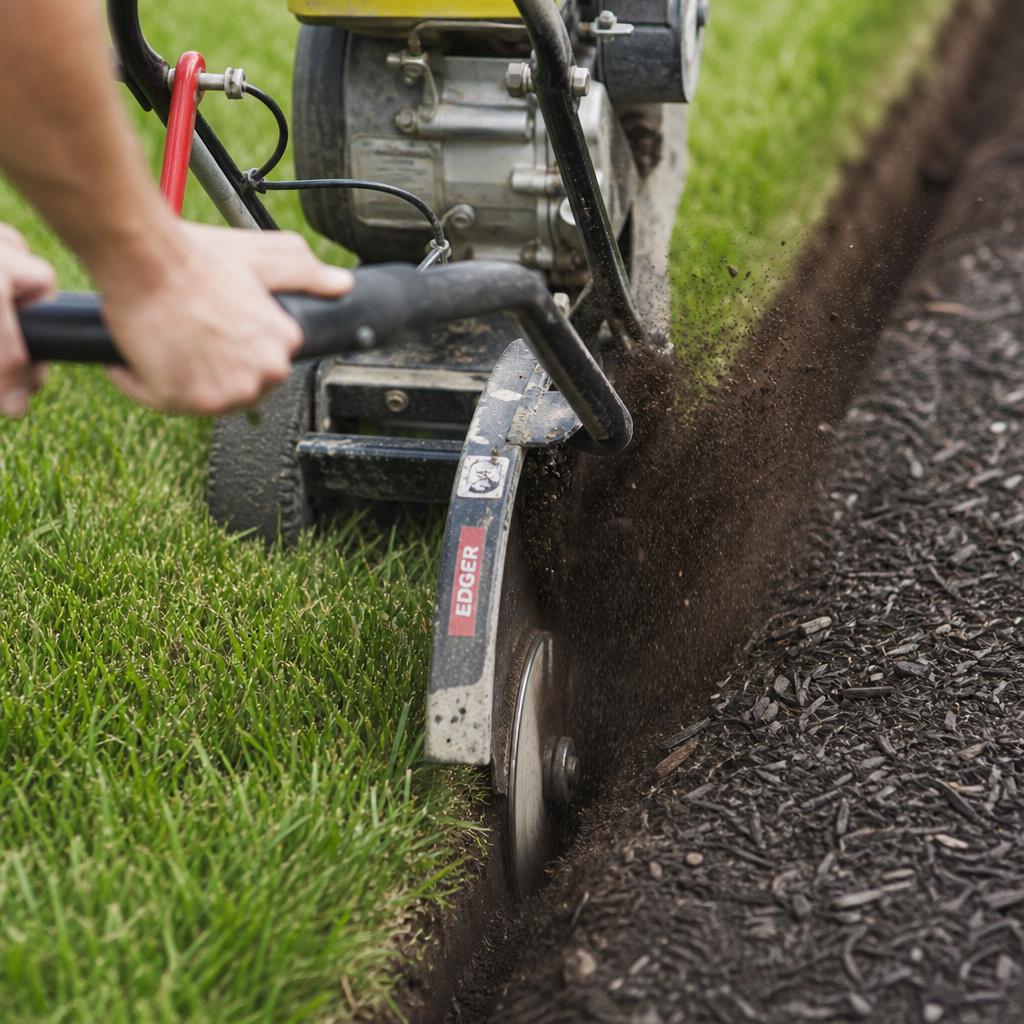
The cutting head on a dedicated lawn edger holds a rigid blade or reinforced line that rotates in a vertical plane, perpendicular to the ground surface. This orientation allows it to slice cleanly through grass roots and soil directly against a hard vertical face, creating a distinct trench. A depth-guide wheel, adjustable typically from 0 to 3 inches, controls the trench depth and stabilizes the tool during operation.
The magic is in that vertical plane. A mower blade spins parallel to the ground, shearing the top off the grass. A string trimmer head also spins parallel, whipping through growth. An edger’s blade spins like a circular saw held on its side, allowing it to cut a precise vertical wall.
The guide wheel is the unsung hero. It rolls along the sidewalk, keeping the blade at a consistent distance and preventing it from digging into the concrete itself. Without it, you’d gouge your pavement and create a wavy, uneven edge.
Key Components of a Lawn Edger
You need to know the parts to understand the machine. It’s not complicated, but each piece has a job.
The Power Source: This is the heart. A 2-cycle engine (like on many Stihl and Echo models) is light and powerful but requires a gas-oil mix. A 4-cycle engine is heavier, quieter, and uses straight gas, but you must check the oil. Battery-powered edgers, like the Ryobi 40V or DeWalt 60V, are shockingly capable now. They offer instant start, zero fumes, and enough runtime for a typical suburban yard. The trade-off is power. A gas engine will power through tough, dry soil and established roots that will stall a mid-tier battery model.
The Cutting Assembly: This is the business end. The blade is key. You have options:
* Steel Blades: The standard. They’re cheap and effective but dull quickly, especially in abrasive soil. You’ll be sharpening or replacing them annually.
* Carbide-Tipped Blades: These have small, brutal carbide chips welded to the steel teeth. They stay sharp 5-10 times longer than steel. They’re brittle, though. Hit a solid rock wrong and a tip can snap off.
* Heavy-Duty Trimmer Line: Some edgers, particularly lower-cost electric models, use a thick, reinforced nylon line instead of a blade. It’s safer and won’t damage pavement, but it frays quickly against concrete and can’t handle deep edging or tough roots.
The blade attaches to a spindle and bearing assembly. This is a common failure point if it’s not kept clean.
Handles, Guards, and Controls: The handle houses the throttle and a safety switch. The debris shield is not optional, it stops a spray of dirt and rocks from hitting your shins. The depth adjustment is usually a knob or lever that raises or lowers the guide wheel. Remember: hand-tight.
| Component | Primary Function | What Happens If It Fails |
|---|---|---|
| Drive Shaft | Transfers power from motor to blade. | A bent shaft causes violent vibration, destroying bearings within minutes of use. |
| Guide Wheel Bearing | Allows wheel to roll freely, stabilizing cut depth. | A seized wheel drags, creating a wavy, uneven edge and straining the motor. |
| Throttle Cable | Controls engine speed from the handle. | A frayed cable sticks at full throttle or fails to return to idle, creating a safety hazard. |
| Debris Shield | Deflects rocks and debris away from the operator. | Without it, you will be hit by small stones traveling at high speed. It hurts. |
What’s the Difference Between an Edger and a String Trimmer?
This confusion wastes more time and money than any other lawn tool mistake. They are cousins, not twins.
A string trimmer is a brush cutter. Its head spins parallel to the ground, and you use it to cut down weeds, trim grass along fences, and mow areas your mower can’t reach. You can tilt it to edge. It’s also the wrong tool.
The YouTube proof is brutal. One landscaper put it bluntly: “See how stupid I look right now? That’s ’cause this is not an edger. This is an edger.
A weed whacker uses a string, and when you try to use a string against concrete, it eats through and trashes the string.” He’s right. Nylon line is designed to flex and break when it hits something hard to protect the tool. Concrete is the ultimate hard thing. It grinds the line down in seconds, leaving a weak, frayed end that makes a terrible cut.
A dedicated edger uses a rigid metal blade. It doesn’t wear down against the pavement; it uses it as a guide. The result is a crisp, square trench that looks manufactured. The string trimmer method leaves a rounded, fuzzy trough.
There’s also the attachment question. Brands like Stihl and Echo make separate edger attachments for their power heads. Others, like some DeWalt trimmers, have a specific attachment-capable model (like the 972).
The universal rule: if the motor is in the head, it’s a string trimmer. If the motor is in the shaft and drives attachments via a spinning coupler, it can run an edger attachment. Trying to force the wrong tool to do the job ends with you buying the right tool anyway.
Types of Lawn Edgers: Which One Actually Fits Your Yard?
Your soil type, yard size, and patience level decide this. Here’s the real breakdown.
Walk-Behind Edgers: These look like miniature tillers. They have a set of wheels and you guide them from behind. They’re incredibly stable and powerful, perfect for creating new edges or redefining overgrown ones on large properties. The downside is storage. They take up the space of a small lawn mower.
Handheld Edgers: The most common type. You hold them like a string trimmer. They’re maneuverable, easy to store, and great for maintaining existing edges. They struggle with deep, initial cuts in hard soil. Your arms will feel it after 100 feet.
Stick Edgers: A subset of handhelds, these are lightweight, often electric, and designed for quick touch-ups. They’re not for heavy work. Think of them as the detail brush to the walk-behind’s roller.
Choosing comes down to power source and your property’s needs.
| Edger Type | Best For | Biggest Limitation | Maintenance Tip |
|---|---|---|---|
| Gas-Powered (2-Cycle) | Large yards, tough soil, professional use. | Requires fuel mix, regular engine upkeep, noisy. | Use ethanol-free fuel or a stabilizer. The carburetor gums up after 60 days of stale gas. |
| Battery-Powered (Cordless) | Medium yards, suburban maintenance, noise-sensitive areas. | Limited runtime (30-45 mins on a 4Ah battery), lower torque for hard soil. | Store batteries at room temperature. Heat kills lithium cells faster than cold. |
| Electric-Powered (Corded) | Small yards, consistent power, low maintenance. | The cord. It’s a tripping hazard and limits range to 100 ft from an outlet. | Use a heavy-gauge outdoor extension cord. A light cord overheats and saps power. |
| Manual Edger | Tiny beds, precise curves, no maintenance desire. | Your back and shoulders. It’s slow, hard labor. | Keep the blade sharp. A dull manual edger is utterly miserable to use. |
I bought a cheap corded electric edger for my first house. It worked fine for a season in the soft Georgia clay. The next summer, I moved to a place with rocky New England soil. That same edger would bog down, overheat, and trip the thermal reset every ten feet. I learned the hard way that “power source” isn’t just about cords or gas cans, it’s about matching torque to terrain. I upgraded to a Stihl gas model and haven’t looked back.
Step-by-Step: How to Edge a Lawn
Theory is fine. Let’s get dirty. This is the sequence that prevents callbacks and injuries.
Before you start: Put on safety glasses, a rock will fly. Wear hearing protection with gas models; that high-pitched whine damages hearing over time. Use gloves to protect your hands from vibration and debris. Clear your work area of kids, pets, and loose objects.
- Mow First. Always. Edging after mowing clears the trimmings and lets you see the exact line you need to cut. Trying to edge through long grass wraps it around the blade shaft and stalls the tool.
- Mark Your Line (For New Edges). Use a can of landscape marking paint or a hose. A curved edge looks intentional when it’s smooth. A wobbly edge looks like a mistake.
- Set the Depth. For maintenance, the blade should just barely cut into the soil to redefine the existing trench, about half an inch. For a new edge, start shallow (1 inch) and make a second pass to go deeper. This is easier on the tool and gives you a chance to correct course.
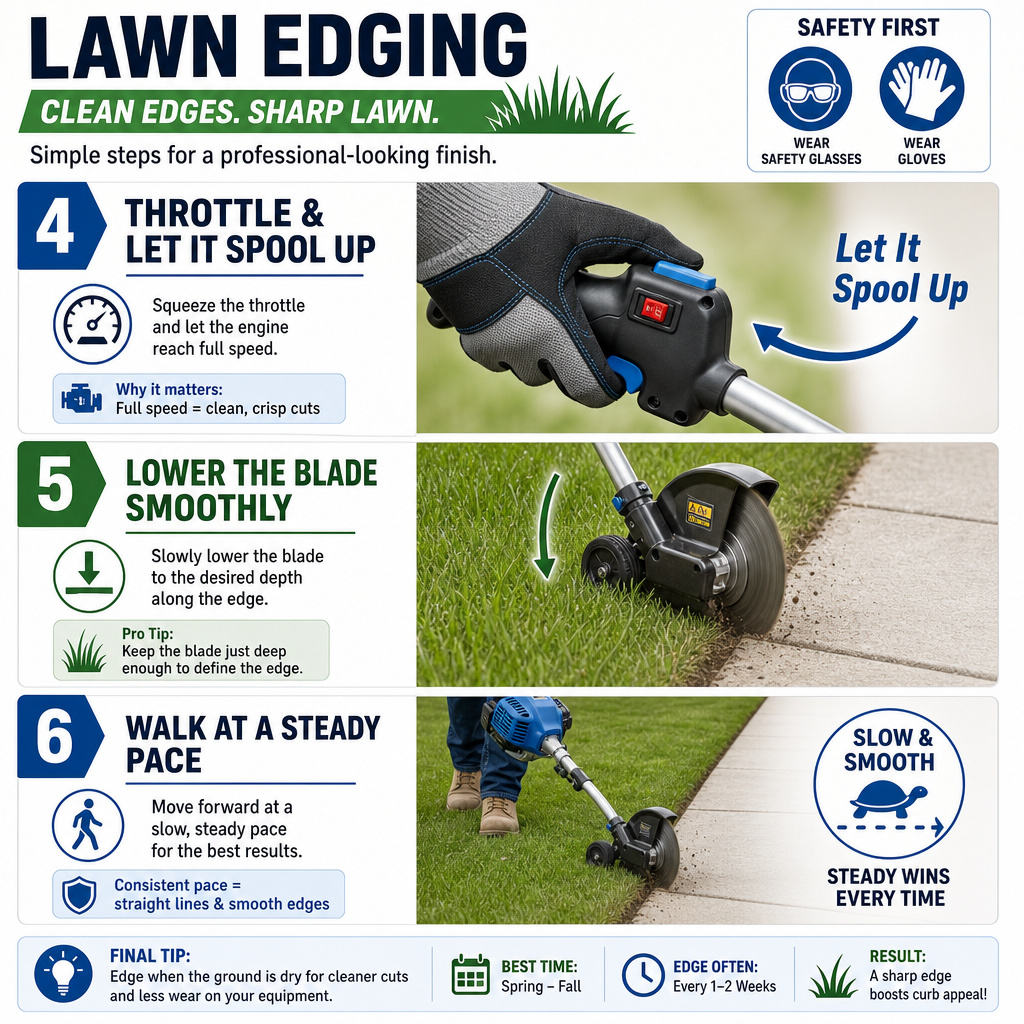
- Start the Tool and Let It Spool Up. Engage the throttle fully. Wait for the engine or motor to reach its operating RPM. You hear the pitch stabilize. Cutting at low speed tears grass instead of slicing it.
- Begin the Cut. Position the guide wheel firmly on the sidewalk. Lower the spinning blade into the soil at the start point. Don’t jab it. Ease it down.
- Walk Smoothly. Maintain a steady, slow walking pace. Let the blade do the cutting. If the engine bogs down, you’re going too fast or the soil is too hard. Make a shallower pass. The handle should vibrate evenly, not jerk.
- Clean As You Go. Every 20-30 feet, stop, pull the edger back, and sweep the excavated soil and grass clippings off the sidewalk and back onto the lawn. If you wait until the end, it cakes on and is harder to remove.
What about corners? For a 90-degree corner, cut past the corner on one side, then come back and cut the other side, letting the trenches meet. Don’t try to pivot the spinning blade, it will dig in and jerk the tool.
Common Edger Problems and How to Fix Them
Things go wrong. Here’s what you’re likely to see and what to do about it.
- Vibration Suddenly Increases. This is urgent. Stop immediately. Likely a bent blade or, worse, a bent drive shaft. Unplug or shut off the engine. Remove the blade and inspect it on a flat surface. If the shaft is bent, the repair often costs more than a new tool.
- Blade Won’t Spin. The drive belt may be broken (on walk-behind models) or the driveshaft coupling may have failed. For handhelds, check if the attachment is fully seated and locked. I’ve seen a dozen Ryobi trimmer head attachments not fully clicked in, causing the drive to slip.
- Uneven, Wavy Cut. Your guide wheel isn’t touching the ground evenly. Check the wheel bearing for freedom of movement. Ensure the depth adjustment is locked securely on both sides. A wavy cut means the tool is rocking as you walk.
- Engine Runs But Lacks Power (Gas Models). This is almost always old fuel or a dirty air filter. Drain the old gas, replace with fresh mix, and clean or replace the filter. A clogged spark arrestor screen on the muffler can also cause this.
- Battery Tool Dies Quickly. The battery is likely cold or old. Lithium batteries lose capacity in the cold. Store them inside. If it’s an old battery, it may simply be at the end of its life, usually 3-5 years of regular use.
Never store a gas edger with fuel in the carburetor over the winter. The ethanol in modern gas attracts moisture, which separates and sits in the carburetor bowl. By spring, the internal jets are varnished shut. You’ll spend an hour cleaning a carburetor for every minute you saved by not draining it.
Essential Safety Tips You Can’t Ignore
This isn’t a drill. People get hurt.
- Eye Protection is Not Optional. The blade throws small stones and chunks of dirt like bullets. Safety glasses cost $5. An ER visit costs thousands.
- Watch the Cord (Corded Models). Be hyper-aware. Cut your own cord and the tool could explode. Use a cord hook or keep it over your shoulder.
- Never Lift a Running Edger. The spinning blade is exposed. If you need to move it over a sidewalk section, release the throttle, let the blade stop completely, then carry it.
- Beware of Buried Hazards. Sprinkler heads, landscape lighting wires, and dog tie-out stakes are blade destroyers and can cause dangerous kickbacks. Know what’s buried along your edge.
- Keep Bystanders Back. A 30-foot perimeter is a good rule. This is especially critical with kids who might run into the area without warning.
Maintenance: Keeping Your Edger Running for Years
A clean tool is a long-lived tool. This takes 5 minutes after each use.
- Clean the Underside. Use a putty knife or stiff brush to scrape off caked mud and grass from the blade guard and shaft area. This prevents rust and corrosion.
- Inspect the Blade. Look for nicks, bends, or dullness. A sharp blade cuts cleanly; a dull one tears and strains the motor. Sharpen it with a file, maintaining the original angle.
- Check Fasteners. Vibration loosens nuts and bolts. Ensure the blade is securely fastened and all handles and guards are tight.
- Air Filter (Gas Models). Tap out loose debris. Replace a clogged filter. A dirty filter makes the engine run rich, fouling the spark plug.
- Proper Storage. For gas models, either run the carburetor dry or add fuel stabilizer for off-season storage. For all models, store in a dry place. Hang it up if possible.
Think of it like properly cleaning your trimmer, a little routine care prevents most major repairs.
Frequently Asked Questions
Can I use my string trimmer as an edger?
You can, but you shouldn’t for a serious edge. Tilting a trimmer wears out the line rapidly against concrete and produces a rounded, less defined trench. It’s a passable shortcut for a quick touch-up, but for a crisp, professional border, a dedicated edger is the right tool.
How deep should I edge my lawn?
For maintaining an existing edge, cut just deep enough to redefine the trench, about half an inch. When creating a new edge, aim for a trench 1.5 to 2 inches deep. This depth is enough to create a clear visual border and slow grass rhizomes from crossing back over.
How often should I edge?
Edge every other time you mow during the peak growing season (spring and early summer). This maintains the definition with minimal effort. Letting it go too long allows the grass to grow over the trench, forcing you to re-cut the edge from scratch.
What size/brand of edger do I need for a half-acre yard?
For a half-acre, a mid-power gas handheld edger (like a 25cc-30cc model from Stihl or ECHO) or a high-torque 40V-60V battery model is sufficient. Focus on runtime. With a battery tool, have a second charged battery ready. With gas, a one-gallon fuel can will handle the job easily.
Is a manual edger worth it?
Only for very small, intricate areas like flower beds with delicate curves, or if you absolutely despise maintaining any kind of engine. For any linear footage along a driveway or sidewalk, the physical labor of a manual edger becomes punishing quickly. Your time and effort are worth more than the cost of a basic electric model.
What’s the best way to dispose of the soil and grass from edging?
Sweep it back onto your lawn. This material is nutrient-rich topsoil and organic matter. Letting it wash into the street storm drain is a waste and can contribute to local waterway siltation. If you have too much, add it to a compost pile or use it to fill low spots in your yard.
Before You Go
An edger isn’t a magic wand, but it’s the only tool that creates that sharp, manicured line that makes a lawn look finished. The mechanism is straightforward: a vertical blade, a guide wheel, and enough power to spin them. Success hinges on matching the tool’s power to your soil, using a sharp blade, and having the patience to let the machine cut at its own pace. Skip the gimmicks and the string trimmer hacks. Do the job once with the right tool, maintain the edge regularly, and you’ll save yourself hours of rework every season. Now go make a straight line.