Guide on How to Replace the Head on a Ryobi String Trimmer
This post contains affiliate links. As an Amazon Associate, we earn from qualifying purchases.
Replacing a Ryobi string trimmer head requires matching three things: your trimmer’s specific shaft-locking method, the correct thread direction (right-hand standard or left-hand reverse), and a compatible replacement head, bump-feed, fixed-line, or universal. The process takes about 15 minutes with basic hand tools if you follow the right sequence.
Most people assume the head just screws off. They grab it and twist, stripping the plastic splines or rounding the metal shaft. The real work happens before you touch the head, figuring out how to lock the spinning shaft inside.
This guide walks through the exact removal methods for common Ryobi models, how to identify thread direction without the manual, and how to install a new head so it runs true without vibration. We’ll also cover what to do when the head is stuck and why the first five minutes of use are critical.
Key Takeaways
- Lock the shaft first. Never try to unscrew a free-spinning head. Use the shaft lock button (common on 40V models), insert a pin into the gear housing, or align the flange slot, depending on your Ryobi.
- Thread direction is everything. Most Ryobi trimmers use standard right-hand threads (turn counter-clockwise to loosen). A small number, often older gas models, use reverse left-hand threads (turn clockwise to loosen). Forcing the wrong way strips the shaft.
- Hand-tighten, then snug. Thread the new head on by hand until it seats. Use a wrench only for a final quarter-turn to secure it. Overtightening cracks the housing or deforms the shaft threads, causing immediate vibration.
- Test for wobble immediately. After installation, run the trimmer at low speed for 30 seconds. Any shaking or rhythmic knocking means the head isn’t seated square, stop and re-thread it before cutting.
Most Ryobi string trimmers manufactured after 2015 use a standard right-hand thread (counter-clockwise to loosen, clockwise to tighten) on a 10mm x 1.25mm shaft. Exceptions are some older 2-cycle gas models and curved-shaft trimmers, which may use a left-hand reverse thread. Always verify direction visually before applying force.
Tools and Parts You’ll Need
Gather these before you start. Rushing to find a tool mid-job with a half-disassembled trimmer is how small parts get lost.
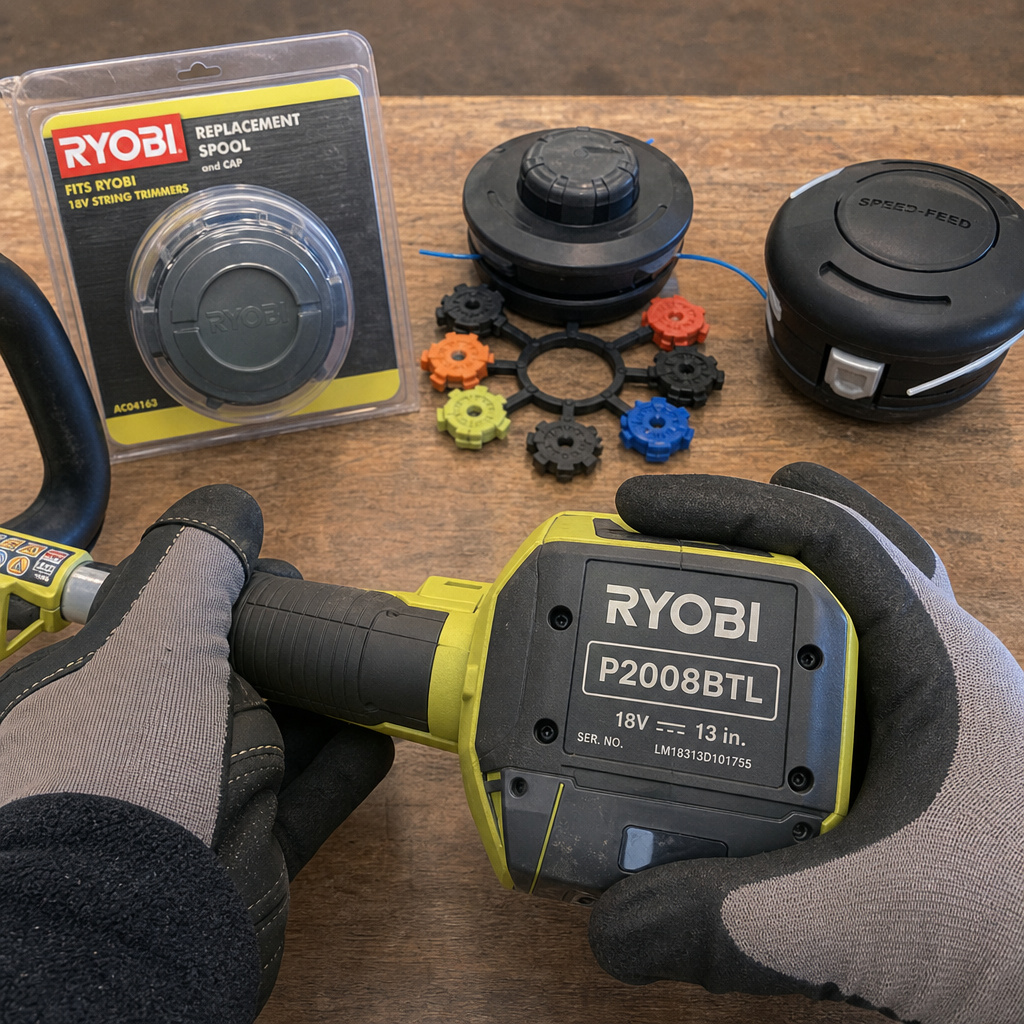
You need a replacement head that fits your Ryobi. OEM heads are model-specific. Universal heads come with a set of plastic adapters, you must select the one that matches your shaft diameter and spline pattern. Using the wrong adapter creates slop, and the head will vibrate loose within ten minutes.
For tools, a Phillips head screwdriver handles any cover screws. A flathead screwdriver or a 4mm Allen key often works as the shaft lock pin. An adjustable wrench or pliers can provide leverage on a stubborn head, but wrap the jaws in electrical tape first to prevent crushing the plastic. Have a rag and some penetrating oil (like WD-40) on hand for a head that hasn’t been off in years.
- Replacement Trimmer Head: Ryobi OEM part or a compatible universal head with the correct adapter kit.
- Phillips Head Scredriver: For removing any debris shield or cover.
- Flathead Scredriver / Pin Tool: To engage the shaft lock in the gear housing.
- Adjustable Wrench or Pliers (Optional): For stubborn heads. Wrap the jaws.
- Work Gloves: Protects your hands from sharp edges and dirt.
- Penetrating Oil: Helps free a corroded or stuck head.
- Clean Rag: For wiping down the shaft threads.
Before you start: The trimmer head spins at over 7,000 RPM. If the tool is powered while you’re working, the head can engage unexpectedly, wrapping the line around the shaft or your hand. Always remove the battery or disconnect the spark plug. Also, the cutting line can be sharp enough to slice skin, handle the head by its housing, not the line exit ports.
How to Remove the Old Head
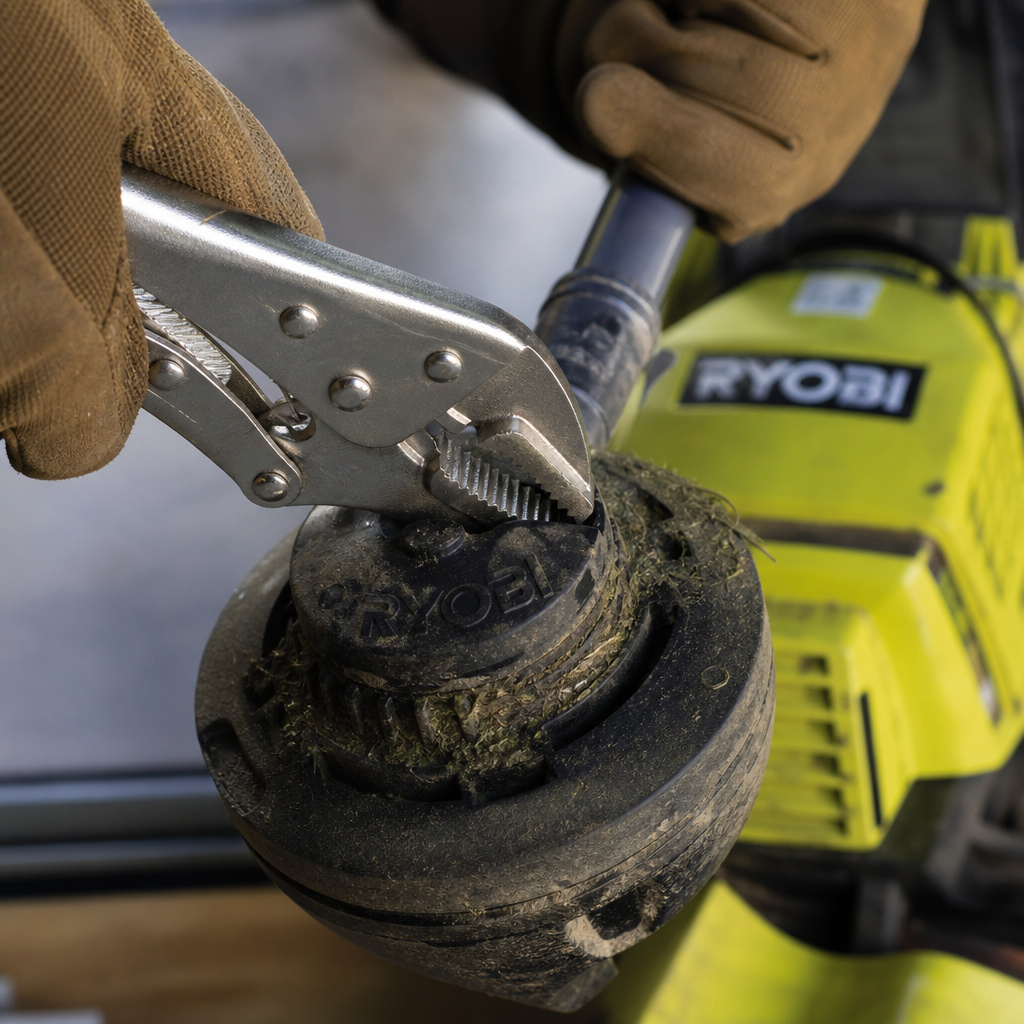
This is the phase where patience pays. The goal is to immobilize the driveshaft so you can break the head loose without damaging the trimmer’s gearbox.
First, identify your Ryobi’s locking method. Newer 40V and 18V brushless models typically have a rubber or plastic button on the side of the gear housing. Press and hold this button, you’ll feel the shaft click and lock.
For models with a small hole near the base of the head, you need to insert a pin. The official Ryobi tool is a small metal rod, but a 4mm Allen key or a sturdy flathead screwdriver tip works. Insert it until it stops the shaft from turning.
Some older models use a flange system. You’ll see a notched washer just below the head. Align the notch with a slot in the gear case and insert a flathead screwdriver to lock it.
If your trimmer has none of these features, you’ll have to create friction. Carefully wedge a wooden block between the head and the gear housing, or rest the head against a scrap piece of lumber on the ground to keep it from spinning. This method is less precise and risks cracking the housing if you’re not careful.
Now, determine thread direction. Most Ryobi trimmers use standard right-hand threads. This means you turn the head counter-clockwise (lefty-loosey) to remove it. However, a subset of models, particularly some curved-shaft gas trimmers, use left-hand reverse threads. If you’re unsure and the head isn’t stuck, try gentle pressure counter-clockwise first.
If it doesn’t budge, try clockwise. Look for an arrow molded into the head housing, it often points in the direction of rotation when the trimmer is running, which is the opposite of the removal direction. Once you know the direction, apply steady pressure. Don’t jerk it.
I fought a head on a Ryobi gas trimmer for twenty minutes, convinced it was standard thread. I was leaning on it with a wrench, rounding the plastic. Finally checked an old forum post, that specific model year used reverse thread. A quarter-turn clockwise and it spun right off. Now I always do a visual check first: standard threads slope down to the right, reverse threads slope down to the left. Ten seconds of looking saves a lot of swearing.
If the head is corroded or has thread-locker from the factory, it will resist. Apply penetrating oil around the base where the head meets the shaft. Let it soak for five minutes.
Then, tap the side of the head housing with a rubber mallet or the handle of your screwdriver to break the corrosion seal. Re-engage your shaft lock and try again with steady, increasing pressure. If you’ve followed the head removal process correctly and it still won’t move, the threads may be chemically bonded. At that point, consider that the shaft itself might be damaged, which is a more involved general trimmer repair.
Installing the New Trimmer Head
With the old head off, you have a clean slate. This is the moment to avoid the two most common installation errors: cross-threading and over-tightening.
Start by cleaning the exposed shaft threads with your rag. Remove any packed grass, dirt, or old debris. This ensures the new head starts straight. If you’re using a universal head with an adapter kit, now is the time to select the right one.
Test-fit the adapters on the shaft. The correct one will slide on with minimal play but won’t be forced. It should engage the splines smoothly. Once selected, you can often leave it on the shaft or press it into the new head’s receptacle.
Thread the new head on by hand. Do not use a tool yet. If it’s a standard thread (most likely), turn it clockwise. It should spin on easily for the first few turns.
If you meet immediate resistance, stop. You are likely cross-threading. Unscrew it completely, re-align, and start again. The head must start straight. Once it’s hand-tight, you should feel it seat against the gear housing or a washer.
| Tightening Method | Tool | Goal | Risk If Overdone |
|---|---|---|---|
| Hand-tighten | Fingers only | Seat head squarely, feel for cross-threading | None. This is the safe step. |
| Snug | Adjustable wrench | Take up final thread slack, secure head | Cracks head housing, strips plastic threads |
| Final Set | Wrench + quarter-turn | Lock head against vibration | Deforms metal shaft, causes permanent wobble |
Now for the final securement. Place your wrench on the head, again, protect the plastic with tape. Turn the head an additional quarter-turn to a half-turn past hand-tight. That’s it.
The goal is to secure it against vibration, not to weld it on. Overtightening is the primary cause of a wobbly new head. The plastic housing distorts under extreme torque, meaning it no longer spins on a true axis. You’ll feel the vibration the instant you pull the trigger.
Troubleshooting a Stuck or Problematic Head
Sometimes the job doesn’t go smoothly. Here are the fixes for the usual hang-ups.
The head spins freely but won’t unthread. This means the shaft is spinning with it, your locking mechanism isn’t fully engaged. Double-check that your lock button is pressed all the way in, or that your pin is inserted deep enough into the gear housing hole. On some models, you need to rotate the head slightly until you feel the internal lock notch align. Don’t force the lock pin; you’re feeling for a positive stop, not trying to punch through metal.
You stripped the plastic splines inside the head. If the head turns but makes a grinding sound without unthreading, the internal drive splines are gone. Your only option now is destructive removal. Use a pair of locking pliers to grip the head’s outer housing as tightly as possible. Lock the shaft, and turn the pliers in the removal direction. The head will be ruined, but the metal shaft should survive. This is why using the correct locking method from the start is crucial.
The new head wobbles violently when you test it. Stop immediately. This is not a “break-in” issue. Power down and unthread the head. The cause is usually one of three things: debris trapped between the head and the gear housing, a mismatched or damaged adapter, or a cross-threaded start that forced the head on crooked. Clean the mating surfaces again, verify the adapter, and re-install by hand, ensuring it starts perfectly straight. A minor wobble can also mean the pre-wound spool inside the new head is unbalanced, try replacing trimmer line with a fresh, evenly wound spool.
Choosing the Right Replacement Head
You have three main paths: OEM, universal, or an upgrade to a fixed-line head. Your choice depends on your budget and how much you hate winding spools.
OEM Ryobi Heads are the sure bet. They are designed for your specific model, come with the correct thread and adapter pre-installed, and usually install in under a minute. The downside is cost and availability, you might pay a premium, and the exact model might be discontinued. Always have your trimmer’s model number (found on the battery housing or motor label) when searching.
Universal Heads are cheaper and widely available. The kit includes a head and a ring of plastic adapters. The challenge is picking the right adapter. It must match both the shaft diameter (common sizes are 8mm, 9mm, and 10mm) and the spline pattern (the number and shape of the grooves). An adapter that’s too loose will cause fatal wobble; one that’s too tight can crack when forced. Test-fit before final assembly.
Fixed-Line or “Speed-Feed” Heads are an upgrade. They use pre-cut lengths of line that you insert without opening a spool chamber, you just pull to advance. They eliminate the chore of winding and can save time. However, they consume line faster and the pre-cut segments can be more expensive than bulk spools. They also require a specific Ryobi 40V line or Ryobi 18V trimmer line diameter to feed properly.
I switched my primary trimmer to a fixed-line head three seasons ago. The convenience is real, no more spool tangles mid-job. But I learned the hard way that not all “universal” fixed-line heads feed reliably on Ryobi’s lower RPM cordless models. The one that finally worked had a stronger spring in the advance mechanism. Read reviews from other Ryobi users before buying.
Post-Installation Check and Maintenance
The job isn’t done when the head is on. The first use is a live test.
Reconnect the battery or spark plug wire. Hold the trimmer safely away from yourself and any objects. Start it and let it run at idle speed for 30 seconds.
Listen and feel. It should run smoothly with a steady hum. Any shaking, knocking, or irregular noise means something is off. Stop and re-check your work.
If it runs true, make a few light practice cuts in a clear area. Don’t attack thick brush immediately. You’re checking that the line feeds correctly when you bump the head or activate the auto-feed.
After about five minutes of runtime, stop and let the head cool. Then, with the power off, check the tightness by hand. It’s not uncommon for a new head to settle a fraction with initial vibration. Give it a slight snug turn if needed.
To make this replacement last, integrate a quick check into your routine cleaning your trimmer. After each major use, wipe grass sap and dirt from around the head housing. This prevents grime from hardening in the threads, which is what causes heads to seize. A little preventative care means the next time you need to perform a trimmer head replacement, it will be another straightforward 15-minute task, not a battle.
Frequently Asked Questions
Which way do you loosen a Ryobi trimmer head?
Most Ryobi string trimmers use standard right-hand threads. You turn the head counter-clockwise (to the left) to loosen and remove it. A small number of models, often older gas-powered ones, use left-hand reverse threads, which require turning clockwise to loosen. When in doubt, try gentle pressure counter-clockwise first, if it doesn’t move, try clockwise before forcing it.
Why won’t my new Ryobi trimmer head spin?
If the head doesn’t spin when you pull the trigger, the issue is likely not the head itself. First, ensure the driveshaft is engaging. On some models, you must push the head inward toward the gearbox until you hear a click to engage the drive splines. If it’s engaged but not spinning, the problem could be a sheared pin inside the gear housing or a failed motor, issues beyond a simple head swap.
Can I use any universal trimmer head on my Ryobi?
You can, but you must use the correct adapter from the kit that matches your Ryobi’s shaft diameter and spline pattern. An ill-fitting adapter will cause severe vibration, damage the shaft, and likely shake the head loose during use. Always test-fit the adapter on the shaft before installing the head to ensure a snug, non-forced fit.
How do I know if my trimmer head needs replacing?
Replace the head if you see visible cracks in the housing, if the line refuses to feed despite new line, or if the head wobbles excessively even when tightened correctly. Also replace it if the internal drive splines are worn smooth, causing the head to slip on the shaft instead of turning. A head that’s merely dirty or has old line can usually be cleaned and restrung.
Is it worth upgrading to a fixed-line head?
It depends on your usage. Fixed-line heads are fantastic for convenience, no winding spools, just insert pre-cut lines. They excel for regular lawn edging and light trimming. However, they use more line over time, and the segments can be costlier than bulk spool line. They may also not feed as reliably in very thick, heavy weeds compared to a traditional bump-feed head.
Before You Go
Replacing a Ryobi trimmer head is a straightforward repair that hinges on three details: locking the shaft securely, turning the head in the correct direction, and avoiding the temptation to overtighten the new one. The right tools, mainly a screwdriver for the lock and a protected wrench for leverage, make it a 15-minute job.
Remember to test for vibration immediately after installation. A wobbly head isn’t just annoying; it strains the trimmer’s motor and gearbox. If you hit a snag with a stuck head, penetrating oil and patience work better than brute force. For the next replacement, keeping the shaft threads clean will make the process even easier.
Choose a replacement head that fits your needs. OEM for guaranteed compatibility, universal for value (with careful adapter selection), or a fixed-line head for ultimate convenience. With the head swapped, you’re ready to get back to a clean trim.