How to Trim Hedges with an Electric Trimmer: A Pro’s Step-by-Step Guide
This post contains affiliate links. As an Amazon Associate, we earn from qualifying purchases.
Trimming a hedge with an electric trimmer requires matching three things: the right tool for the hedge type, a systematic cutting sequence (sides first, top last), and a guide line for straight edges. The goal is a tapered shape, wider at the base than the top, to let sunlight reach lower branches and prevent bare patches. Never cut into old, brown wood on most conifers, and always check for active bird nests before you start.
Most people grab their trimmer and start hacking at the top of the hedge. They end up with a wavy, uneven line and a pile of clippings that hides their progress on the sides. The top gets cut too wide, the base gets shaded out, and by next season the bottom third of the hedge is a dead, twiggy mess.
This guide walks through the pro sequence, from choosing the right electric trimmer and setting up a foolproof string guide to the specific sweeps that leave a crisp, straight edge. We’ll cover timing, safety, and the one maintenance step you absolutely cannot skip if you want the blades to last more than one season.
Key Takeaways
- Check for nests first. It is illegal to damage or destroy an active bird’s nest in many regions. A quick visual inspection before you plug in can save you a fine and protect wildlife.
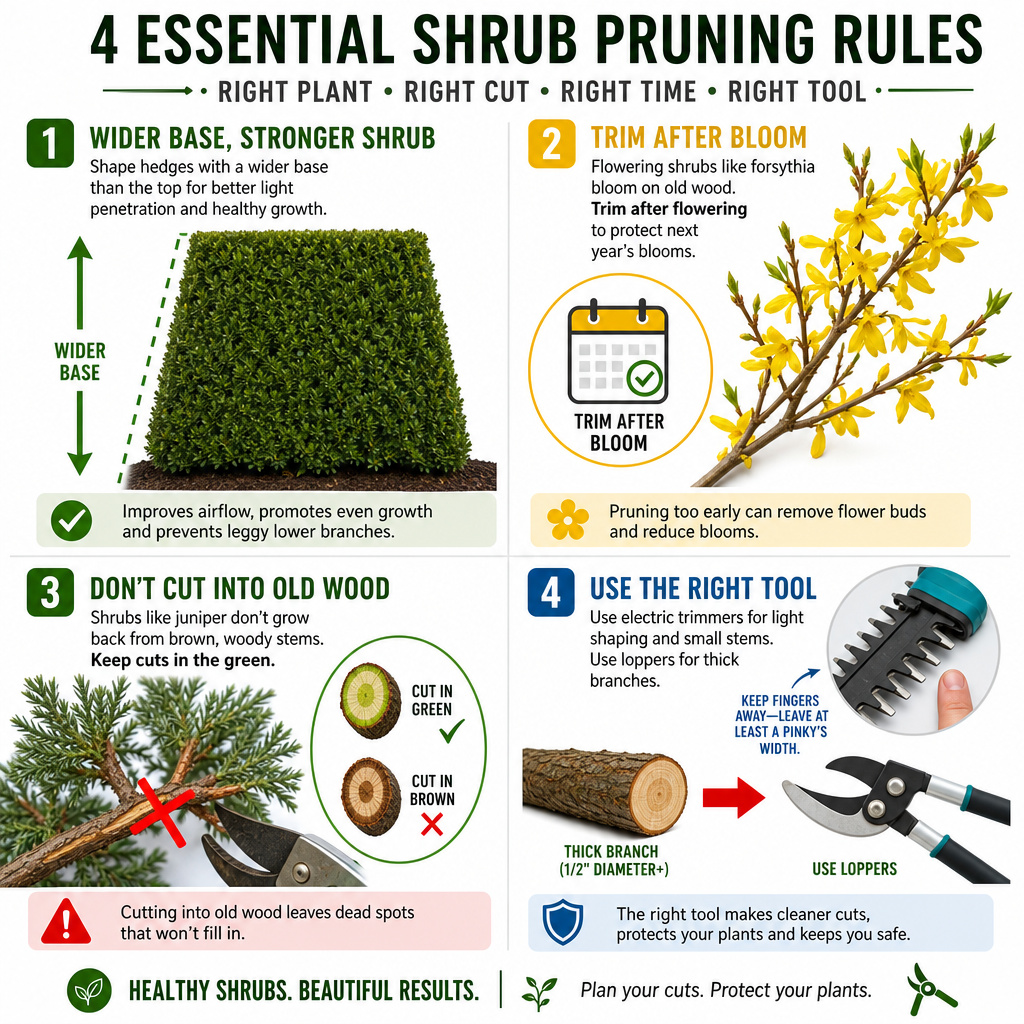
- Shape for sunlight, not for symmetry. A hedge should be 2–3 inches wider at the base than the top. This slight taper (a “batter”) prevents the upper growth from shading out the lower branches, which is the primary cause of bare bottoms.
- Sharp blades are non-negotiable. Dull electric trimmer blades tear and bruise stems instead of slicing them. The damaged tissue invites fungal disease, and the ragged cuts turn brown within days, ruining the clean look.
- Trim sides first, top last. This lets clippings from the sides fall away cleanly. If you do the top first, all those clippings land on the uncut sides, obscuring your line and forcing a second pass.
- Never cut conifers into old wood. Plants like boxwood, yew, and privet cannot regenerate from leafless, brown stems. If you cut past the green growth, that spot will remain a bare, dead hole in your hedge permanently.
Before You Start: Gear and Safety
Electric hedge trimmers are lighter and quieter than gas models, but they’re not toys. The blades move at over 3,000 strokes per minute. Before you touch the trigger, get your kit right.
Before you start: Wear safety goggles that wrap around the sides, flying wood chips can come from any angle. Use thick, close-fitting gloves (not loose leather) to improve grip and protect your hands. If using a corded trimmer, plug it into a GFCI outlet or use a portable Residual Current Device (RCD). The RCD will trip in milliseconds if you cut the cord, which can prevent a fatal shock.
Your basic gear is safety glasses, gloves, and sturdy boots. For a corded tool, that RCD is as essential as the trimmer itself. I learned this the hard way helping a neighbor years ago. His old extension cord had a barely visible nick in the sheath.
His corded Black & Decker trimmer sliced right through it mid-hedge. The RCD on his outdoor outlet popped instantly. Without it, that could have been a very different story. Now I won’t plug in a corded tool without one.
Beyond safety, you need the right trimmer. For a small, formal boxwood hedge, a 16-inch cordless model like a Ryobi 18V is nimble and plenty powerful. For a long, tall privet screen, you want a 24-inch or longer blade to reduce the number of passes. More length means more weight, so consider a shoulder strap if you have a lot to do.
The Right Time to Trim
Timing is about plant health and the law. Get it wrong and you’ll stunt the hedge or break wildlife protection rules.
The best time for a major trim is late spring, after the first flush of new growth has hardened off a bit. This gives the hedge the summer to regrow and fill in. A second, lighter trim in early fall keeps it neat heading into winter. Avoid heavy pruning in late fall; the new, tender growth won’t have time to harden before frost.
Then there’s the legal part. In many places, including the UK and parts of the US, it is illegal to intentionally damage or destroy the active nest of any native wild bird. The peak nesting season is generally early March through August.
| Hedge Type | Best First Trim | Second Trim (Optional) | Critical “Don’t” |
|---|---|---|---|
| Formal (Boxwood, Privet) | Late May / Early June | Early September | Never cut into leafless brown wood. |
| Flowering (Forsythia, Lilac) | Right after flowering ends. | Very light tidy-up in fall if needed. | Trimming in spring before flowering cuts off all the buds. |
| Conifer (Yew, Arborvitae) | Late spring. | Early fall if needed. | Do not cut back to brown wood (except Yew, which can). |
| Overgrown Renovation | October onward, over 2–3 seasons. | Not applicable. | Never cut back more than one-third of the total growth in a single year. |
You must check the interior of the hedge for nests before you make a single cut. Look for a tightly woven cup of twigs and grass, often sheltered deep in the branches. If you find one with eggs or chicks, stop. Mark that section with a bit of flagging tape and work around it. The family will usually fledge in 2-3 weeks.
How do I trim a hedge straight?
The secret to a razor-straight top isn’t a steady hand, it’s a physical guide. Your eyes will lie to you, especially on a long run. You need a string line.
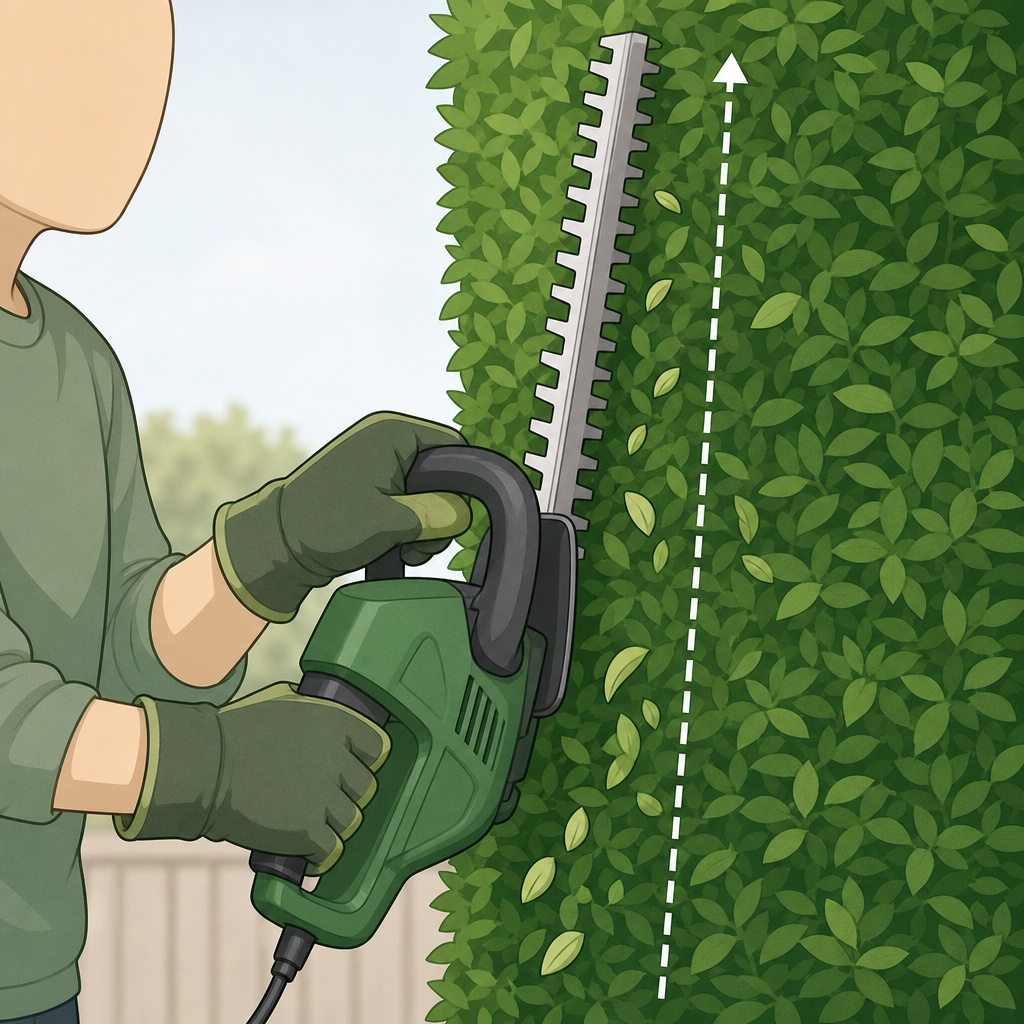
For a perfectly straight hedge top, drive two wooden stakes into the ground at each end of the hedge, just outside the desired width. Tie a taut string between them at the exact height you want the hedge top, then trim just above the string using long, smooth passes, keeping the trimmer base plate level with the string.
Start by driving a sturdy wooden stake into the ground at each end of your hedge, positioned just outside its width. Tie a bright orange or white mason’s line to one stake at the height you want the finished top.
Pull it tight to the other stake and tie it off. For a hedge longer than 15 feet, add a third stake in the middle to prevent sagging. Set the string about half an inch above your target cut line, this gives you a clear sight line and keeps the trimmer from snagging the string.
Now, stand squarely facing the hedge. Hold the trimmer with both hands, arms slightly bent. Start the cut with the blade tip just beyond the hedge, then bring it into the foliage using your whole body, not just your arms. Make a long, smooth pass from one end to the other, keeping the base plate of the trimmer visually aligned with the string. Don’t watch the blades, watch where the body of the tool meets your guide line.
Your first pass should just skim the top. Step back and look. See a high spot?
Lower the string a quarter-inch and take another light pass. It’s far easier to take off two small increments than to try and fix a deep gouge. The string doesn’t lie. Your eyes will.
The Professional Cutting Sequence
This order exists for a reason. It minimizes cleanup, reduces strain, and gives you the cleanest final shape.
- Clear the bottom. Use a rake or your hands to pull away any vines, leaves, or debris tangled at the base of the hedge. Cutting over hidden rocks or a garden hose will instantly chip or dull your blades. I once shredded a soaker hose buried in ivy. The plastic wrapped around the blade shaft in a second, stalling the motor and requiring a full teardown to clean out.
- Trim the sides from bottom to top. Start at one end, at the very bottom of the hedge. Hold the trimmer so the blades are vertical. Make an upward sweeping motion, following the natural slight taper. Work your way along the hedge. Cutting bottom-to-top lets the clippings fall cleanly away. If you go top-to-bottom, the clippings pile up on the uncut lower sections and you lose your visual line.
- Cut the top using your guide line. With the sides done, move to the top. Follow the string guide technique. Use the full length of the blade in long, overlapping passes.
- Step back and inspect. Walk to the far end of the hedge and squint at it. Look for dips, bulges, or stray branches. Make minor corrective cuts. This is when you refine the shape from a rough block to a sharp, finished form.
The reason for the tapered shape is simple physics. A vertical wall of foliage shades its own base. The lower leaves starve for sunlight, drop off, and the plant redirects energy upward.
A slight inward angle, just 5 to 10 degrees, lets light hit the lower branches all day. This keeps the hedge full from the ground up. It’s not just aesthetics; it’s plant physiology.
Tackling Different Hedge Types
Not all hedges are created equal. The technique needs to adapt to the plant’s growth habit.
Formal Hedges (Boxwood, Privet): These are the precision work. Use a shorter blade for control. They can handle being cut back to the same line repeatedly. Always keep the taper.
Flowering Hedges (Forsythia, Lilac): Timing is everything. These set their flower buds on the previous year’s growth. If you shear them in spring, you’re cutting off all the flowers. The rule is to trim them within a month after they finish blooming. This gives them the rest of the season to grow new wood that will bloom next year.
Coniferous Hedges (Arborvitae, Juniper): Here’s the big warning. Most conifers cannot sprout new growth from old, brown wood. If you cut a juniper branch back past the green needles, that’s it. The branch dies back to the next junction, leaving a permanent dead zone. The exception is yew, it can regenerate from old wood, which is why it’s been used for topiary for centuries.
| Problem | Likely Cause | Immediate Fix | Long-Term Solution |
|---|---|---|---|
| Bare bottom / leggy base | Hedge is too vertical or top-heavy, shading the base. | Gradually reshape over 2-3 trims to introduce a taper. Can’t fix instantly. | Maintain a “batter” (wider base) from the start. Ensure the base gets at least 4-6 hours of sun. |
| Brown, ragged edges after trimming | Dull trimmer blades are tearing, not cutting, the stems. | Stop. Sharpen blades before continuing. | Sharpen trimmer blades after every 4-5 hours of use. |
| Hedge looks thin, not dense | Over-trimming each time, not allowing some interior growth. | Let it grow out 6-8 inches before next trim. | Trim less aggressively. Aim to remove only 2-4 inches of new growth each session. |
| Sticky sap gumming up blades | Cutting pine, spruce, or other resinous species. | Wipe blades frequently with a rag dipped in mineral spirits. | Clean blades thoroughly with mineral spirits immediately after finishing the job. |
For thick branches, anything over your pinky finger in diameter, the electric trimmer is the wrong tool. You’ll strain the motor, risk kickback, and make a mangled cut. Switch to bypass loppers or a pruning saw. This is a core part of operating a hedge trimmer safely and effectively.
Aftercare and Maintenance
The job isn’t done when the last clipping falls. What you do next determines your trimmer’s lifespan and your hedge’s health.
First, the hedge. Rake or blow all clippings off the top. A mat of decaying leaves sitting on the new cuts promotes mold and disease. A light feed with a balanced, slow-release fertilizer in early spring supports the growth you just encouraged.
Now, the tool. This is non-negotiable.
- Unplug or remove the battery.
- Clean the blades. Use a stiff brush (an old paintbrush works) to remove all plant residue and sap. For sticky sap, use a rag with a bit of WD-40 or mineral spirits. Sap left on the blades hardens into an abrasive glue that accelerates wear.
- Lubricate. Spray a light machine oil along the blade track and on the cutting teeth. Wipe off the excess. This prevents rust and keeps the cutting action smooth.
- Inspect for damage. Look for nicks in the blades, loose screws, or cracks in the housing.
I keep a kit in my shed: brush, rag, spray lubricant, and a hex key set. The five minutes it takes to clean and lubricate your trimmer after each use adds years to its life. A neighbor burned out his trimmer motor because packed grass and mud around the cooling vents caused it to overheat. A simple brush-down would have saved it.
Store the trimmer hanging up, or at least off a concrete floor which can draw moisture. For cordless models, store the battery in a cool, dry place, not on the charger.
Frequently Asked Questions
Can I trim a wet hedge with an electric trimmer?
No. Water conducts electricity, creating a severe shock hazard with corded tools. Even with cordless, wet foliage clumps together, clogs the blades, and results in ragged, torn cuts. The clippings stick to the hedge in a soggy mat. Always wait for the hedge to dry completely.
What’s the difference between a hedge trimmer and a string trimmer?
hedge trimmer has rigid, reciprocating metal blades designed for slicing through woody stems and shaping shrubs. A string trimmer (weed whacker) uses a fast-spinning nylon line to cut soft grass and weeds. Using a string trimmer on a hedge will do nothing but fray the line and annoy you.
How short can I cut my hedge?
For most established hedges, never remove more than one-third of the total green growth in a single trimming session. Cutting back too far shocks the plant, and on many species, it cannot regrow from the old wood. If a hedge is severely overgrown, plan a renovation over two or three years, cutting back one side one year and the other the next.
My electric trimmer blades are hitting each other or binding. What’s wrong?
This usually means a bent blade tooth or debris jammed in the gear mechanism. First, ensure the tool is unplugged/battery removed. Manually work the blades back and forth to dislodge any stuck wood chips. Inspect the teeth for any that are visibly out of alignment. A single bent tooth can throw off the entire cutting action and often requires professional repair.
Is a corded or cordless electric trimmer better?
Corded trimmers offer unlimited runtime and consistent power but are limited by cord length and require careful management to avoid cutting the cord. Cordless trimmers (18V, 40V, 56V) offer complete freedom of movement and are lighter, but you are limited by battery life. For a small city lot, cordless is often preferable. For a long country hedge, a corded model with multiple heavy-duty extension cords might be more reliable.
The Bottom Line
Trimming a hedge cleanly with an electric trimmer comes down to preparation and patience. Set a string guide, wear your safety gear, and follow the sequence: clear, sides, top, inspect. Remember the taper, it’s what keeps a hedge healthy for decades, not just neat for a week.
The biggest mistake isn’t a wobbly line you can fix next season. It’s cutting into the dead wood of a conifer or disturbing a nest of chicks. Those errors are permanent. Take the extra five minutes to look and plan. The hedge, the wildlife, and your future self will thank you for it.