How to Change a Ryobi Trimmer Head (The 5-Step Pro Method)
This post contains affiliate links. As an Amazon Associate, we earn from qualifying purchases.
Changing a Ryobi trimmer head requires matching three things: your trimmer’s model (18V HP, 40V or gas), the thread direction (almost always right-hand), and the head type (bump-feed, fixed-line or universal). You need a flathead screwdriver or punch pin, the new head, and about five minutes of patience. The hardest part isn’t the swap itself—it’s figuring out which direction to turn the old head when it’s stuck, এবং cleaning the mating surfaces before the new one goes on.
Changing a Ryobi trimmer head requires matching three things: your trimmer’s model (18V HP, 40V, gas), the thread direction (almost always right-hand), and the head type (bump-feed, Load-and-Go, or universal). You need a flathead screwdriver or punch pin, the new head, and about five minutes of patience. The hardest part isn’t the swap itself. It’s figuring out which direction to turn the old head when it’s stuck, and cleaning the mating surfaces before the new one goes on.
Most people jam the screwdriver into the wrong hole or try to twist the head without locking the shaft. That leads to stripped threads, broken plastic, and a half-hour of frustration. You end up buying a new trimmer instead of a $15 head. This guide walks you through the specific steps for your Ryobi model, shows you what tools to avoid, and tells you how to test the new head before you start cutting.
Key Takeaways
- Right-hand threads are standard on Ryobi trimmers. Turn the old head clockwise to tighten, counter-clockwise to loosen. A left-hand thread is rare.
- The shaft lock button or hole is critical. Use a flathead screwdriver or punch pin to immobilize the shaft before you twist the head.
- Clean the shaft threads and gear case mating surface with a rag and brush before installing the new head. Dirt and grass grit act like a cement.
- Universal heads require an adapter kit. Match the shaft diameter (usually 8mm or 10mm) and thread direction.
- Hand-tighten the new head first, then use a wrench for a final snug turn. Overtightening causes vibration, which loosens the head faster than a loose fit.
Before you start: Disconnect the battery or spark plug. The head can spin unexpectedly if the motor engages, and the cutting line is sharp enough to slice skin. Wear gloves and safety glasses. If you’re using penetrating oil on a stuck head, keep it away from electrical contacts on battery models.
What tools do you need?
You don’t need a full workshop. A flathead screwdriver is the primary tool. A small punch pin or Allen key can work if your model has a dedicated lock hole. Avoid adjustable wrench jaws on plastic heads, they crush the housing. A pair of needle-nose pliers is useful for pulling out old, tangled line remnants.
The screwdriver should be medium-sized, not a tiny electronics one. You need enough leverage to hold the shaft steady while you twist the head. If the head is corroded or gummed up with grass, a can of penetrating oil like WD-40 helps. Have a rag and a stiff brush for cleaning. That’s it.
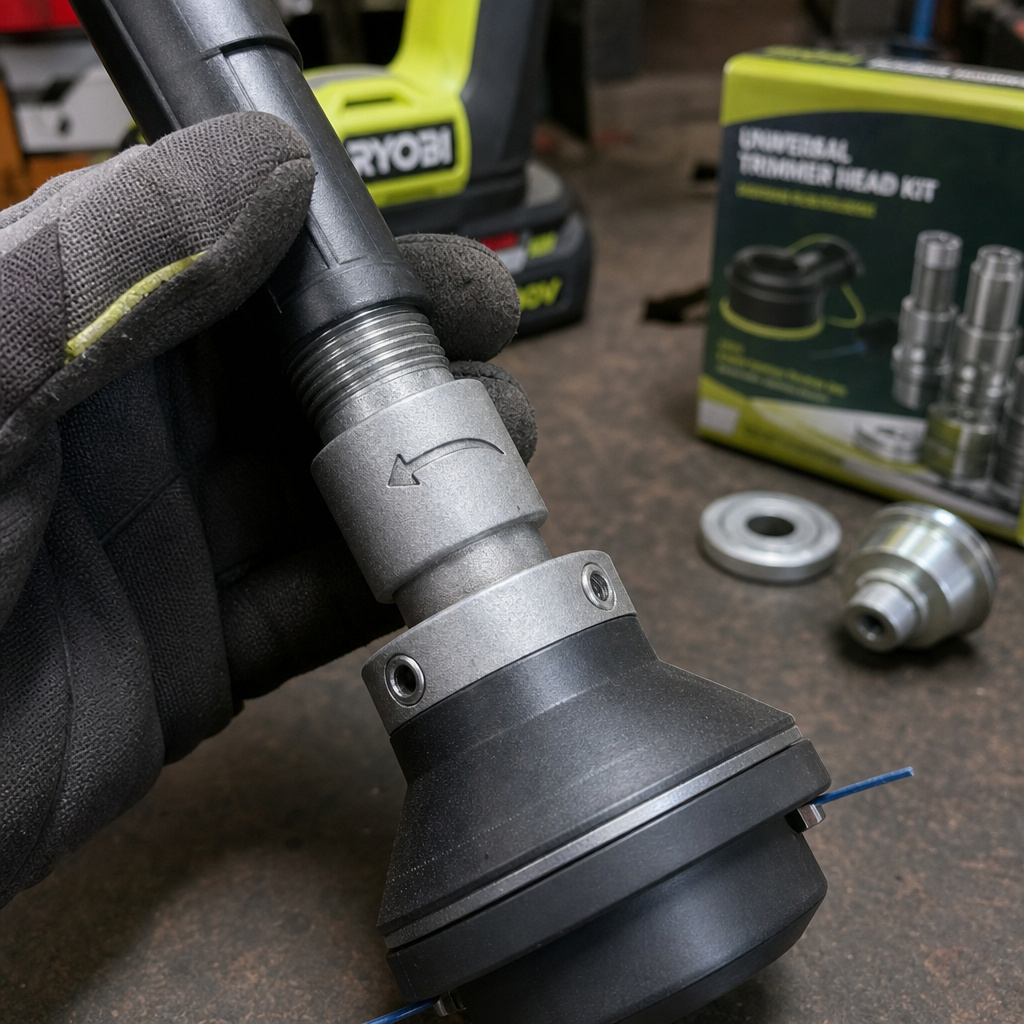
A Ryobi 40V trimmer head uses a right-hand thread (counter-clockwise to loosen) and a shaft lock hole located directly behind the head flange. Inserting a screwdriver into this hole immobilizes the drive shaft, allowing you to apply torque to the head without spinning the entire gear case.
How to identify your Ryobi trimmer head type
Ryobi uses two main head systems: bump-feed and Load-and-Go. Bump-feed heads have a spool inside that advances line when you tap the head on the ground. Load-and-Go heads require you to manually pull out fresh line lengths. There’s also a third category, universal aftermarket heads that fit multiple brands with adapter inserts.
Look at the head itself. A bump-feed head will have a visible bump knob on the bottom and often says “Tap & Advance” on the packaging. A Load-and-Go head is smoother, with a manual line release mechanism. The model number on your trimmer shaft (like RY40210 for a 40V model) tells you the original head type, but aftermarket universal heads are common replacements for both.
| Head Type | Visual Identifier | Line Advance Method | Common Ryobi Models |
|---|---|---|---|
| Bump-Feed | Bottom bump knob, spool inside | Tap head on ground | Ryobi 40V Expand-It, most gas models |
| Load-and-Go | Smooth bottom, manual release tab | Pull line manually | Ryobi 18V HP Brushless, some 40V models |
| Universal | Comes with adapter kit, no brand logo | Depends on adapter (usually bump) | Fits most Ryobi 18V/40V with correct adapter |
If you’re buying a replacement, match the head type to your usage. Bump-feed is faster for large areas. Load-and-Go is more precise for edging. Universal heads are cheaper but require you to pick the right adapter from the kit.
Step-by-step removal process
The removal is the same for all head types, but the locking mechanism varies slightly between 18V and 40V models.
- Disconnect power. Remove the battery from cordless models. For gas trimmers, disconnect the spark plug wire. This isn’t just a safety check. An accidental bump of the start button with the battery seated can spin the shaft at high speed, whipping the screwdriver out of your hand.
- Locate the shaft lock. On most Ryobi trimmers, there’s a small hole in the gear case directly behind the head. Align the hole with a corresponding slot in the flange washer on the head. On some 18V models, there’s a physical button you press and hold. If there’s no hole or button, the shaft may lock automatically when you rotate the head to a specific position, check your manual.
- Insert your locking tool. Use a flathead screwdriver that fits snugly into the hole. If it’s loose, the shaft will still spin and you’ll strip the threads. For button-type locks, just press and hold it.
- Turn the head counter-clockwise. This is the standard right-hand thread direction. Turn it like you’re unscrewing a bottle cap. If it doesn’t budge, don’t force it. Apply a small amount of penetrating oil to the thread interface and wait two minutes. Then try again with steady pressure. Forcing it cracks the plastic housing.
- Remove the old head. Once loose, slide it off the shaft. Inspect the shaft threads and the gear case surface. Grass, dirt, and dried line fragments often stick here. Clean them off with a brush and rag.
If the head is stuck solid after oil and steady pressure, the threads might be corroded or cross-threaded. In that case, you may need to cut the old head off with a rotary tool, but that’s rare. Usually, the oil and correct direction work.
Thread direction: right-hand or left-hand?
Almost every Ryobi trimmer uses a right-hand thread. That means you turn the head counter-clockwise to loosen it, clockwise to tighten it. It follows the standard “righty-tighty, lefty-loosey” rule. I’ve never seen a Ryobi with a left-hand thread on the head attachment.
But other brands do use left-hand threads. Stihl gas trimmers often have them. If you’re installing a universal head that came from a Stihl kit, check the adapter. The universal head itself might be marked with an arrow indicating rotation direction. Always verify before you turn.
I installed a universal head on a Ryobi 40V three years ago without checking the adapter. It had a left-hand thread marking. I forced it clockwise, thinking it was standard. The head seized after two uses, and the plastic drive tang inside the adapter snapped clean off. Now I look for the arrow every time.
The consequence of guessing is a stripped shaft or a broken head. If you’re unsure, look for an arrow stamped on the head or adapter. If there’s no arrow, assume right-hand for Ryobi.
Installing a new Ryobi or universal head
Clean the shaft threads first. A dirty shaft prevents the new head from seating fully, which creates wobble and uneven line wear. Use your brush and rag to remove any debris.
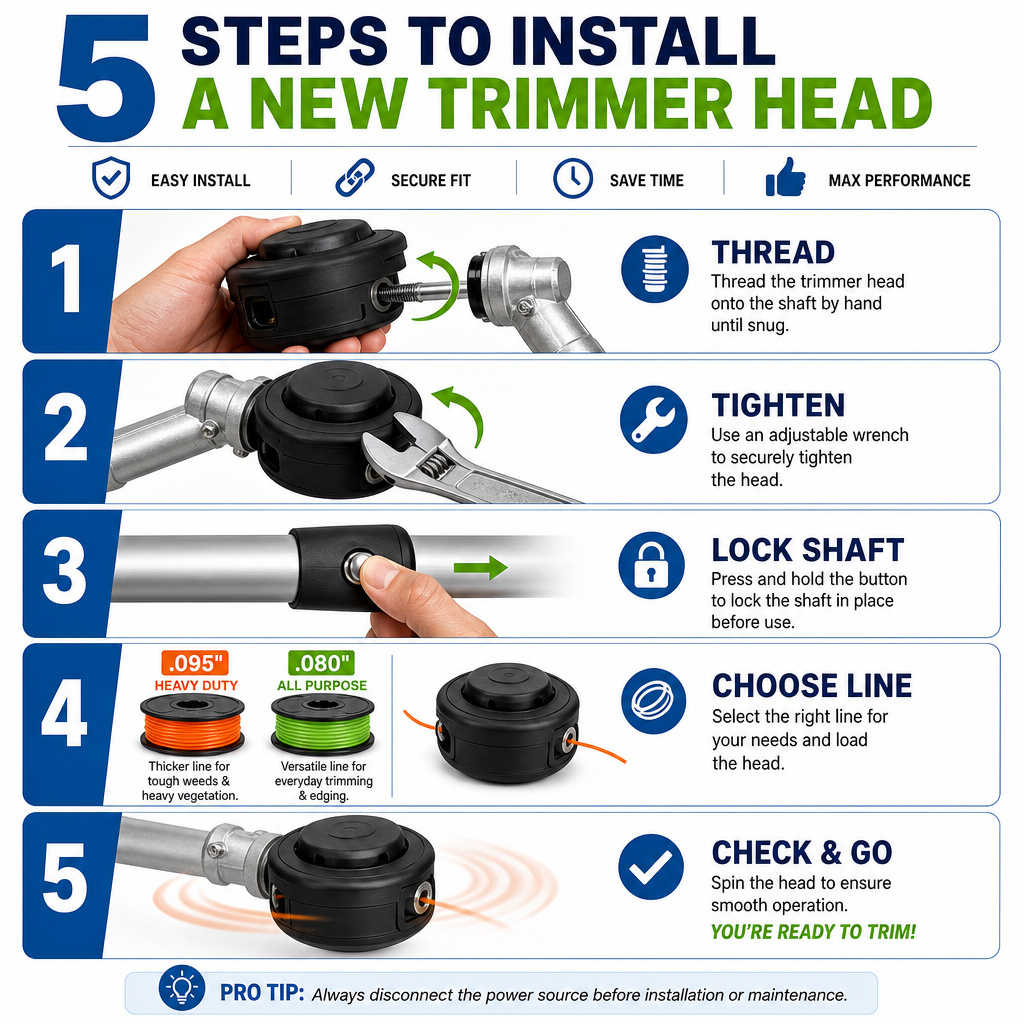
- Hand-thread the new head. Start threading it onto the shaft by hand. Do not use a wrench yet. If it doesn’t start smoothly, stop. Check for debris again or verify the thread direction. Hand-threading ensures you’re not cross-threading.
- Tighten with a wrench. Once the head is hand-tight, use an adjustable wrench or a dedicated spanner (if provided) to give it one final snug turn. Do not crank it down. Overtightening plastic threads causes them to stretch. Under tension from vibration, stretched threads loosen faster than properly tightened ones.
- Lock the shaft and secure. For some models, you need to lock the shaft again and turn the head clockwise a final click to engage the locking mechanism. Refer to your trimmer’s manual for this step, it’s common on bump-feed heads with automatic locks.
- Load the line. If you’re installing a bump-feed or Load-and-Go head, follow the specific threading a trimmer procedure for your model. For universal heads, use the line diameter recommended on the head packaging, usually .095″ for Ryobi 40V and .080″ for 18V.
- Test before use. Reconnect the battery or spark plug. Start the trimmer in a safe, clear area and let it run for ten seconds. Listen for wobble or irregular vibration. If the head spins smoothly, you’re done. If it vibrates, remove it, clean again, and re-tighten.
Which replacement head should you buy?
OEM Ryobi heads are reliable but cost more. Universal heads are cheaper and often come with adapter kits for multiple brands. Your choice depends on how often you use the trimmer and whether you want the exact original performance.
OEM heads match your trimmer’s balance and line feed mechanism perfectly. They’re a safe bet. Universal heads can be hit or miss.
Some have poor bump-feed mechanisms that jam after a few taps. Others have excellent durability. Read reviews focused on Ryobi compatibility.
I prefer OEM for 40V models because the balance is critical for reducing arm fatigue. For 18V trimmers, a good universal head like the Oregon Universal Speed-Feed works fine and saves money. Just ensure you select the correct adapter from the kit, usually the 8mm or 10mm one with right-hand threads.
| Head Type | Pros | Cons | Best For |
|---|---|---|---|
| Ryobi OEM | Perfect fit, known line feed, warranty support | Higher cost, limited to one model | Users who want guaranteed performance |
| Universal (with adapter) | Fits multiple tools, often cheaper, variety of designs | Adapter must be correct, feed quality varies | DIYers with multiple trimmers or budget focus |
| Fixed-line head | No spool winding, always fresh line, simple | Line must be cut and inserted manually, not for dense weeds | Small, precise edging work |
If you’re upgrading, a fixed-line head eliminates spool winding headaches. You just cut a length of line and insert it. It’s slower for big areas but fantastic for neat edging.
Troubleshooting common installation problems
A new head that wobbles, doesn’t feed line, or feels loose has a clear cause. Here’s how to diagnose it.
Wobble or vibration: The head isn’t seated flush. Remove it and clean the shaft and gear case face again. Look for a small plastic shard or grass stem stuck in the threads. Hand-thread it again and tighten only until snug. Over-tightening warps the plastic, creating an uneven mount.
Line doesn’t advance (bump-feed): The spool inside isn’t wound correctly or the spring is missing. Open the head (usually by unscrewing the cover) and check the spool orientation. The line must be wound in the direction opposite the arrow on the spool, that’s a common mistake. Also verify the spring is present and seated.
Head seems loose after use: This is often due to overtightening earlier. The plastic threads stretched, then vibration worked them loose. Remove the head, inspect the threads for cracking. If they’re intact, reinstall with less torque. If cracked, replace the head.
Universal head doesn’t fit: You used the wrong adapter. Universal kits include multiple plastic adapters for different shaft sizes and thread directions. Match the shaft diameter (measure it with a caliper or compare to the old head) and thread direction. Forcing the wrong adapter can break the drive tang.
After solving any issue, run the trimmer for a minute to confirm the fix. Then give the head a final visual check for alignment.
Post-installation care and maintenance
Once the new head is running smoothly, a couple of habits extend its life considerably.
First, clean the head after each use. Grass sap and dirt build up around the exit holes and inside the bump mechanism. A quick brush-off prevents gumming.
Second, store the trimmer properly, hang it or place it in a dry area. Leaving it on a damp garage floor invites corrosion on the shaft threads. Our guide on proper trimmer storage covers the specifics.
Use the correct line diameter. Too thick line (.105″ on an 18V trimmer) strains the motor and jams the head. Too thin line (.065″ on a 40V) snaps constantly. Match the line to the head’s specification, which is usually printed on it.
Finally, don’t let the head run on bare concrete or rock. That wears down the line instantly and can damage the head’s plastic housing. Trim grass, not pavement.
If your trimmer head starts making a grinding noise after a few weeks, stop immediately. The noise usually means grass debris has packed into the gear case behind the head, grinding against the drive shaft. Remove the head, clean the area thoroughly, and reinstall. Letting it grind ruins the shaft bearings.
Frequently Asked Questions
Why won’t my Ryobi trimmer head unlock?
The shaft isn’t locked. Find the lock hole on the gear case, align it with the slot on the head’s flange washer, and insert a screwdriver firmly. If the head still won’t turn, it might be cross-threaded or gummed up with debris. Apply penetrating oil to the threads, wait, then try again with steady pressure.
Can I use a universal trimmer head on any Ryobi?
Yes, if the universal head kit includes an adapter that matches your Ryobi’s shaft diameter and thread direction. Most Ryobi shafts are 8mm or 10mm with right-hand threads. Pick the correct adapter from the kit, don’t guess.
How often should I change the trimmer head?
Change it when the line advance mechanism fails, the housing cracks, or the threads wear out. For casual users, a head lasts 2-3 years. For heavy weekly use, inspect it annually and replace when performance drops. Don’t wait until it’s completely broken.
Do I need to replace the spring when changing the head?
Yes. The spring is part of the bump-feed mechanism. New Ryobi OEM heads include a new spring. Universal heads usually include one. If you’re reusing an old head, inspect the spring for fatigue or rust. A weak spring causes poor line advance.
What’s the difference between a bump-feed and a fixed-line head?
bump-feed head contains a spool of line that advances when you tap the head on the ground. A fixed-line head has no spool; you insert pre-cut lengths of line directly. Fixed-line heads are simpler and don’t require winding, but you must stop to replace line more often.
The Bottom Line
Changing a Ryobi trimmer head is a five-minute job if you know the thread direction, use the shaft lock, and clean the mating surfaces. The most common mistake is forcing the head without locking the shaft, which strips threads or cracks plastic. Match the replacement head to your model. OEM for guaranteed fit, universal with the correct adapter for budget flexibility. After installation, test for wobble and use the correct line size. A clean, properly seated head lasts years. Keep the shaft threads clean and store the tool upright, and you’ll swap heads only when the mechanism wears out, not because you broke it.