How to Replace String on Ryobi 18V Trimmer (5-Minute Fix)
This post contains affiliate links. As an Amazon Associate, we earn from qualifying purchases.
Replacing the string on a Ryobi 18V cordless trimmer requires matching three things: the correct line diameter (usually .080-inch), the right winding direction (follow the arrow on the spool), and maintaining even finger tension to prevent overlapping coils. Skip any of these and the line will tangle, jam, or break within the first minute of use.
Most people grab the first spool of line they see, wind it loosely, and then spend twenty minutes cursing at a jammed head. They blame the tool. The tool is fine. The process was wrong from the first coil.
This guide walks through the exact eight-step sequence that works every time, explains why each detail matters, and shows you how to avoid the three most common failures that turn a five-minute job into a frustrating afternoon.
Key Takeaways
- The battery must come out first. Every time. A trimmer head can spin up to 7,000 RPM, enough to break skin and throw debris before you even register the sound.
- Use .080-inch diameter round nylon line for standard Ryobi 18V trimmers. Thinner .065-inch line snaps on tougher weeds, and thicker .095-inch line overloads the motor and burns out the head’s clutch springs.
- Wind the line tightly with consistent finger pressure. Loose winds create slack that overlaps under centrifugal force, binding the spool instantly. You’ll smell the plastic friction burn before you see the smoke.
- After winding, lock the line ends in the spool’s top grooves before threading them through the head’s eyelets. This keeps tension during reassembly and is the single step most YouTube tutorials skip.
- Store leftover line in a sealed bag away from sunlight. UV radiation degrades nylon polymers, making the line brittle. A spool left on a garage shelf for a season will snap twice as fast as fresh line.
Before You Start: The Non-Negotiables
Before you start: The trimmer head spins fast enough to throw stone fragments at bullet-like speeds. Wear safety glasses, not sunglasses. The battery is a live electrical source until removed; a accidental bump against the trigger can start the motor. Work on a clear, flat surface so dropped parts don’t roll away into gravel or grass.
You need two things: the right string and about five minutes of focused attention. The “right string” is printed on the trimmer head itself or in the manual, for most Ryobi 18V models, it’s .080-inch diameter. I keep a 100-foot spool of Oregon Gatorline .080 in my shed. It’s not the cheapest, but it wears evenly and doesn’t fray into sharp barbs.
The optional tool that saves genuine frustration is a 6-inch piece of 1/2-inch wooden dowel. Use it to maintain tension while winding. Your fingers will thank you.
The 8-Step Process (With Pictures in Your Head)
Step 1: Power Down Completely
Remove the 18V battery. Set it aside where you won’t accidentally kick it. This isn’t just a safety rule. It’s a cognitive reset. You can’t rush the next steps if the tool is inert.
Step 2: Open the Trimmer Head
Find the two grey plastic tabs on the sides of the black bump-feed head. They have small arrows molded into them. Press both tabs inward simultaneously with your thumbs. You’ll feel a faint click.
Pull the black cap straight off. If it’s stuck, don’t pry with a screwdriver. Twist it slightly left and right while pulling. The cap is held by two plastic tangs that can snap if forced.
Step 3: Remove the Old Spool and Clean
Lift the spool out. Notice the direction the remaining line is wound. There’s an arrow embossed on the spool’s side, that’s your winding direction for the new line. Discard the old line.
Now look inside the head. You’ll see grass clippings, dirt, and maybe a spider web. Blow it out or brush it clean. Grit in there grinds down the spool’s post and creates wobble. A wobbly spool never feeds right.
This is also the perfect time for some quick trimmer maintenance, wiping down the guard and shaft.
Step 4: Measure and Cut New Line
Unspool about 15 feet of line. Cut it. Why 15 feet? The Ryobi spool holds roughly 25 feet of .080 line when full. Putting on 15 feet gives you a fresh start with plenty of cutting length, but leaves room on the spool so the coils don’t bind against the cap. Too much line creates internal pressure.
If you’re using pre-cut lengths, you’ll need two pieces, each about 7-8 feet long.
Step 5: The Critical Wind
This is where people fail. The goal is tight, even, non-overlapping coils.
Find the anchor hole on the spool’s inner rim. Feed about two inches of line into it.
Bend that fed-in section into a hook so it catches inside the spool. This hook is your only mechanical anchor. If it slips, the whole winding unravels.
Now wind in the direction of the arrow. Clockwise for 99% of Ryobi spools. Use your thumb to keep tension on the line coming from the spool. Your other hand guides the winding, making sure each new coil sits neatly against the previous one, not on top of it.
Wind the line with enough tension that it slightly depresses the flesh of your thumb. If you can slide a fingernail between coils, it’s too loose. Loose winding lets the line cross over itself under centrifugal force when the head spins, creating an immediate knot that locks the spool solid. You’ll hear a high-pitched whine from the motor straining, then the clutch will slip with a burnt-rubber smell.
Work from the inside of the spool out to the outer rim, one even layer. Then wind a second layer back inward if your 15-foot length requires it. Leave about six inches of each line end free.
Step 6: Lock and Load
Before you even think about the trimmer head, secure the line on the spool. Look at the top of the spool. You’ll see two small grooves opposite each other.
Pull the two free ends of the line up and seat one in each groove. This locks the line in place, preventing it from unwinding while you handle it. It’s a simple trick that makes the next step possible without a third hand.
Now, holding the spool with the line locked, thread each free end out through its corresponding eyelet on the trimmer head itself. The eyelets are the holes in the black plastic head that the line feeds through during use.
Step 7: Reassemble
Place the spool back into the head. It should drop in and click into place on the central post. If it doesn’t seat fully, don’t force it. Pull it out and check that the line isn’t trapped underneath the spool.
Once the spool is seated, pull the line ends up and out of their locking grooves. You should now have two lines coming out of the head’s eyelets.
Snap the black cap back on. The tabs must align with the slots. You’ll hear and feel a definitive click.
Step 8: Final Test and Trim
Reinsert the battery. Hold the trimmer safely away from your body, feet, and any objects. Press the trigger to start the motor.
Tap the head’s bump knob on a hard, flat surface (like a driveway) to feed out line. The centrifugal force will pull the line out to its cutting length.
Stop the motor. Using scissors, trim the two lines so they are even, extending about 6-7 inches from the head. Any longer and they’ll whip excessively, losing cutting power. Any shorter and you’ll be bump-feeding constantly.
Which String Should You Actually Buy?
Not all trimmer line is the same. The shape changes how it cuts and how long it lasts.
| Line Shape | Best For | Wear Pattern & Risk |
|---|---|---|
| Round (.080-inch) | General grass, light weeds. The standard for a reason. | Wears evenly but can glaze over and become less effective on dry, woody stems. |
| Square / “Gatorline” | Tougher weeds, brambles. The edges slice rather than whip. | Edges wear down to round after 20-30 minutes of heavy use, but the initial cut is aggressive. |
| Twisted | Dense, fibrous growth. The helical shape is slightly more durable. | Can create more vibration at high RPM. Prone to fraying if it hits rocks or fencing. |
The Ryobi 18V motor is designed for the balance and drag of round .080-inch line. Stepping up to square .095-inch line increases drag by about 40 percent. The motor can handle it in short bursts, but continuous use will heat up the gearbox and shorten its life. Stick with the correct line size unless you’re facing a specific, tough job.
Why Does My New Line Keep Jamming?
You followed the steps, but the line won’t feed, or it snaps instantly. One of these three things happened.
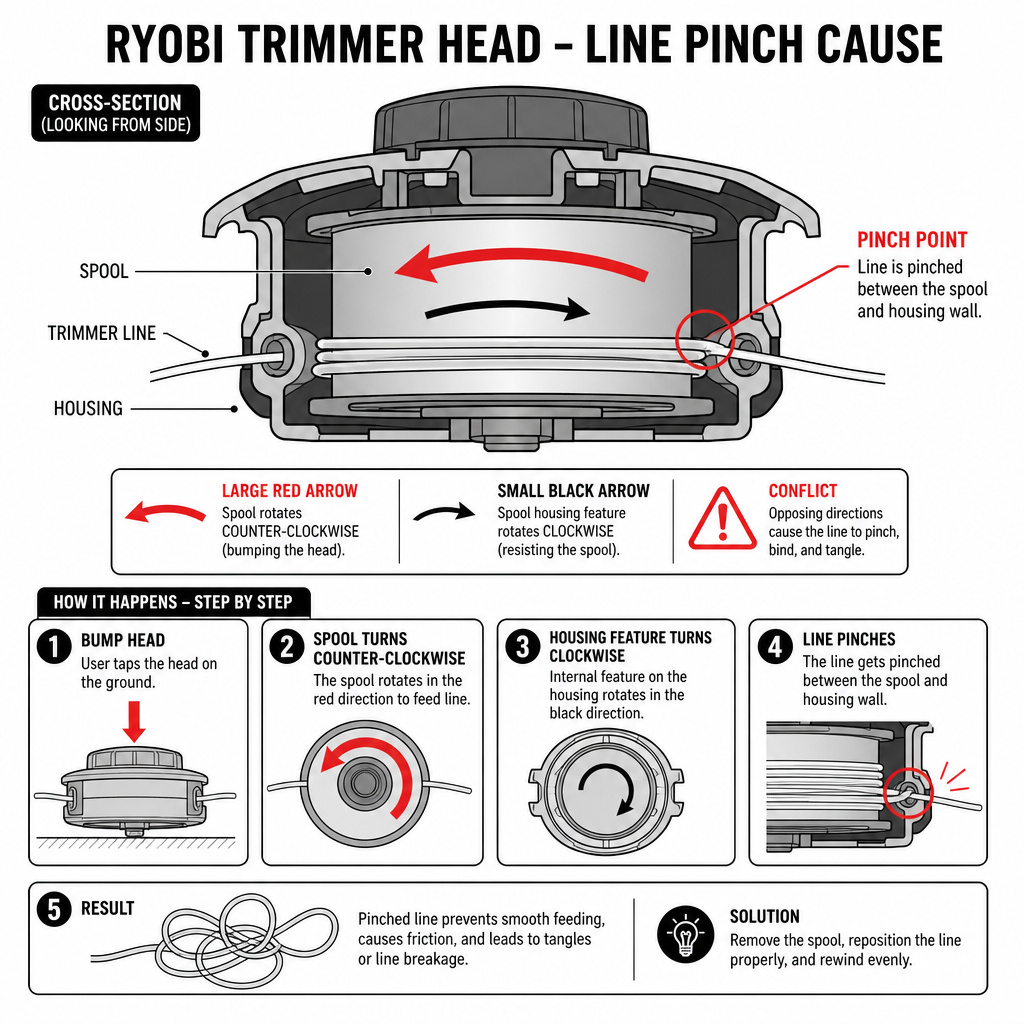
- The winding direction was wrong. You wound counter-clockwise against the arrow. When the head spins, it tries to unwind the spool, but the mechanism is designed to release line when bumped. The forces fight, the line binds, and the spool locks. Fix: Take it apart and re-wind in the correct direction.
- The line overlapped during winding. You lost tension for half a second. That one loose coil crossed over another. At high speed, that crossover becomes a knot. The knot jams between the spool and the cap. Fix: Slow down. Wind with consistent pressure. Use the dowel trick.
- You used the wrong diameter. .065-inch line is too thin for the head’s eyelets and feed mechanism. It doubles back on itself inside the spool chamber and knots. .095-inch line is too thick; it can’t feed smoothly through the exit channels and creates friction heat. Fix: Use .080-inch.
I bought a generic “universal” .095-inch line once because it was on sale. The spool felt tight going into the head. I ran the trimmer for maybe three minutes edging a sidewalk. The smell hit me first, hot plastic. I stopped. The line had melted and fused to the inside of the spool chamber. I had to chisel it out with a pick. The replacement head cost more than a year’s supply of correct line.
When to Replace More Than Just the String
- The spool wobbles on the central post. The brass bushing inside the spool is worn. A new spool costs a few dollars.
- The spring under the spool is rusted, broken, or missing. This spring provides the tension for the bump-feed mechanism. Without it, tapping does nothing.
- The head’s eyelets are worn into oval shapes or have sharp burrs. These will cut your line as it feeds out. You can sometimes smooth them with a round file, but a new head is a more reliable fix.
If the head itself is cracked or the release tabs are broken, it’s time for a changing the trimmer head. The Ryobi head is a modular unit. Swapping it is often easier than trying to repair brittle plastic.
Frequently Asked Questions
Can I use any .080 line, or does it have to be Ryobi brand?
Any quality .080-inch nylon trimmer line will work. Brand doesn’t matter; specification does. Avoid the absolute cheapest no-name line, it’s often inconsistently sized and more brittle. Oregon, Maxpower, and DeWalt make reliable aftermarket line.
How often should I replace the string?
Replace it when about 4-5 inches of length remains on each side, or when it starts breaking frequently. Don’t run it down to the nub. That puts extra strain on the feed mechanism and increases the chance of the line end retracting into the head, which is a pain to retrieve.
The line won’t feed when I bump the head. What now?
First, make sure you’ve tapped it firmly on a hard surface while the head is spinning. A soft lawn won’t work. If it still won’t feed, the issue is almost always inside. Take it apart again. Check for a broken or missing spring under the spool. Ensure the line isn’t tangled underneath the spool or pinched by the cap.
Is the nylon line recyclable?
Typically, no. Most municipal curbside recycling programs do not accept nylon trimmer line. It tangles in sorting machinery. The best practice is to put spent line in the trash. Some hardware stores may have dedicated recycling bins for plastic gardening materials, call ahead to check.
The Bottom Line
Restringing a Ryobi 18V trimmer is simple when you control three variables: diameter, direction, and tension. Match the printed specs, follow the arrow, and keep the coils tight. The job takes five focused minutes.
Skipping the prep, using the wrong line, winding loose, forgetting to lock the ends, turns it into a thirty-minute fight with a plastic spool. Keep a dedicated spool of .080 line in your shed, and you’ll never dread this task again. After you’re done, a quick wipe-down and cordless trimmer storage in a dry place will have it ready to go next time.