
Learn How to Drill a Hole in a Quartz Countertop Safely
This post contains affiliate links. As an Amazon Associate, we earn from qualifying purchases.
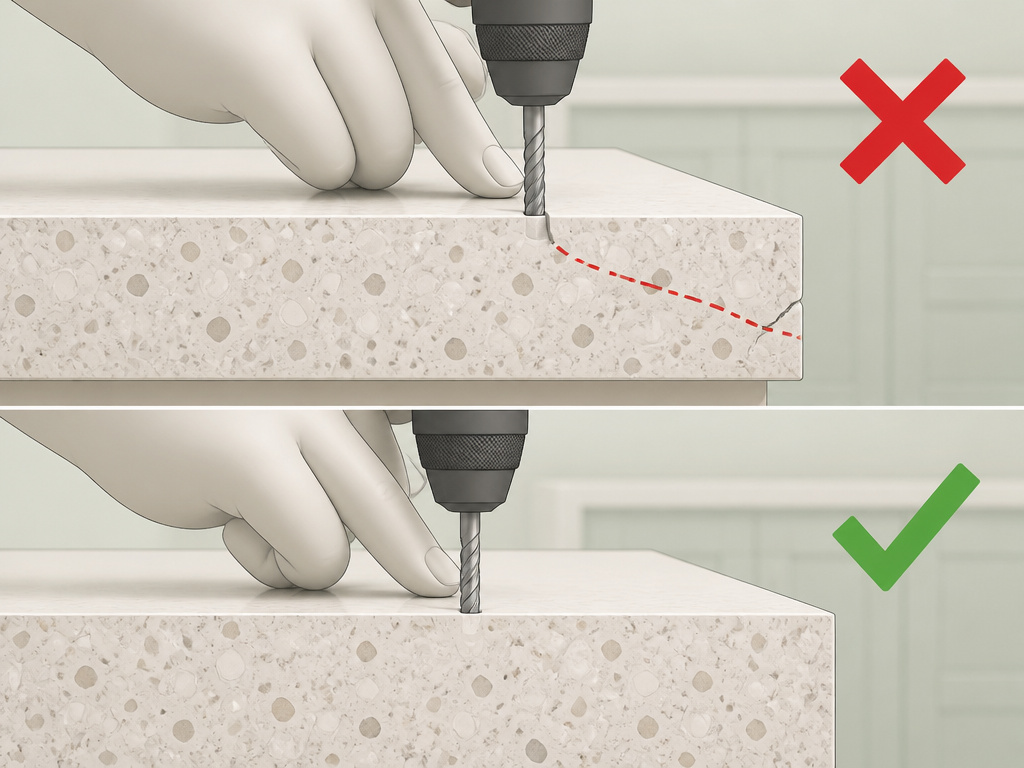
To drill a hole in a quartz countertop, you need a diamond core drill bit, a constant water feed for cooling, and a slow-speed corded drill. Quartz’s hardness and resin binder will crack under the heat from standard metal bits. A 1mm error in bit size creates an installation headache, and drilling closer than 70mm to the slab’s edge risks a fracture that can’t be hidden.
The resin binder is the weak point. Heat it past its tolerance with a dull bit or no water, and the slab doesn’t just chip, it spiderwebs. That’s why every manufacturer guideline, like the VICOSTONE fabrication manual, mandates wet drilling. The process isn’t about force. It’s about managing heat and vibration with three things: the right abrasive, constant coolant, and controlled breakthrough.
What follows: the exact bit type and size for standard fixtures, the seven steps to a clean hole with a water dam, the two manufacturer rules everyone ignores until they crack a slab, and what to do when you’re an inch off the mark.
Key Takeaways
- Use only a diamond-tipped core drill bit, standard masonry or twist bits will overheat and crack the quartz.
- Maintain a continuous water flow over the cut. A simple dam made from modeling clay around the hole works.
- Drill at a slow speed (300–500 RPM) with light pressure. Let the diamond grit do the grinding.
- Always support the underside of the countertop, especially near edges, to prevent blow-out when the bit breaks through.
- Measure twice, drill once. A hole drilled in the wrong spot or too close to the edge is often a permanent, costly mistake.
Why Quartz Demands a Different Approach
Quartz is an engineered composite of about 90% crushed quartz crystals held together by polyester resin, rather than a natural stone. The crystals give it incredible scratch resistance, but the resin is the vulnerability.It softens with heat. A standard metal drill bit spinning fast creates friction heat that the resin can’t dissipate. The result is a thermal shock that cracks the slab from the inside out, often in a star pattern radiating from your drill point.
Technical Spec: Per the VICOSTONE quartz fabrication guideline, all drilling and cutting must use water-spraying tools. Dry cutting generates heat that “can weaken the physical properties of the product, and make it susceptible to cracking, chipping, discoloration, and other damage.”
That’s the non-negotiable rule. Your goal is to keep the cutting zone cool enough that the resin stays stable. That requires the right abrasive and a constant coolant. A diamond core bit grinds rather than cuts, generating less concentrated heat. The hollow core design also removes less material, reducing stress. But without water flushing away the ground-up quartz and cooling the diamonds, you’re back to square one with a ruined bit and a cracked countertop.
The Right Tools for the Job (And What to Skip)
You can’t make this work with tools from your general-purpose drill kit. The wrong choice here doesn’t just slow you down, it guarantees a bad outcome.
The Drill: Use a corded drill, not cordless. You need consistent, high torque at low speeds (200-500 RPM). A cordless drill can bog down under the constant pressure, its battery sagging at the worst moment and causing the bit to stick and chatter. A variable-speed corded drill gives you the control.
The Bit: This is the most critical piece. You need a diamond core drill bit. A hole saw with diamond grit on its rim is acceptable for thinner material, but for the standard 2cm or 3cm quartz slab, a true core bit is better. It’s a hollow cylinder with diamond segments bonded to the end. As it grinds, a solid plug of material, the core, is left inside the bit. This design is more stable and produces a cleaner hole wall than a hole saw’s aggressive teeth.
Sizing is everything. Standard faucet and soap dispenser holes are 1-3/8 inches (35mm) in diameter. Air gap or water filter dispenser holes are often 1-1/2 inches. Buy the exact size you need. A core bit that is even 1mm too small creates a problem you can’t easily fix. The fixture won’t fit, and enlarging a hole in quartz is a specialist’s task.
Cooling System: You must deliver water directly to the cutting edge. The best on-site method is a modeling clay dam. A ring of non-hardening clay built around the drilling area holds a pool of water right over the bit. Other accessories include a water feed cup that attaches to the drill, or a helper with a squirt bottle. Have a wet/dry vacuum ready to manage the runoff.
Support & Safety: Wear safety glasses and a dust mask, quartz slurry is fine and contains crystalline silica. Place a scrap wood block under the drilling area to support the slab during breakthrough and catch the core plug.
| Tool | Specific Recommendation | Why It’s Non-Negotiable |
|---|---|---|
| Drill | Corded, variable-speed drill | Delivers constant torque at low RPM without battery fade. |
| Drill Bit | Diamond core drill bit (e.g., 35mm for faucets) | Grinds without creating the friction heat that cracks resin. |
| Cooling | Modeling clay dam & water | Prevents thermal shock, flushes abrasive slurry, extends bit life. |
| Support | Scrap wood block, wet/dry vacuum | Prevents underside blow-out and manages water/slurry mess. |
| Safety | Safety glasses, dust mask | Protects from flying debris and inhaling crystalline silica dust. |
The 7-Step Core Drilling Process
This isn’t a race. Rushing any of these steps transfers vibration into the slab. That vibration finds the weakest point in the resin matrix and turns it into a crack you might not see until the faucet is tightened down.
1. Mark and Protect.
Double-check your measurements against the sink template and cabinet layout. Once you’re certain, apply painter’s tape over the mark. The tape gives the bit’s diamond edge a tiny bit of grip for the initial touch, preventing it from “walking” across the slick quartz surface.
2. Create the Water Dam.
Roll a snake of modeling clay and form a circle around the taped mark, about an inch away from the center. Press it down to create a watertight seal. Fill the reservoir halfway with water.
3. Start at an Angle.
With the drill at its slowest speed, position the core bit at roughly a 45-degree angle to the surface, touching the edge of your marked circle. Start the drill and let the diamonds grind a shallow notch. This creates a pilot groove.
4. Go Vertical and Begin the Cut.
Pivot the drill to vertical, settling the bit into the notch. Apply light, steady pressure. Let the tool do the work. You’ll feel and hear the consistent grind of the diamonds. Keep the water level topped up in the dam.
5. Manage the Breakthrough.
As you near the bottom of the slab, reduce pressure significantly. The last 3-4mm are critical. An uncontrolled snap of the core plug can chip the underside of the hole. Some pros place a piece of masking tape on the underside of the countertop at the drill point. The tape supports the stone during final breakthrough, minimizing chip-out.
6. Remove the Core and Clean Up.
Once the bit fully penetrates, the core plug will be loose inside the bit. Retract the drill and tap the plug out onto your scrap wood block. Use the wet/dry vacuum to suck all water and slurry from the hole and the surface. Clean the area immediately with a damp cloth; dried slurry bonds like a weak cement.
7. Deburr and Inspect.
The hole interior will have a rough, ground finish. For a faucet, this is fine, the base plate covers it. For a visible grommet, smooth the edge with a diamond hand pad. Inspect the underside for chips. Minor hidden chips are no concern. Any visible damage should be filled with a color-matched epoxy.
Where this goes sideways: Skipping the water dam to avoid a mess. The bit heats up within 30 seconds. By 45 seconds, the resin at the cutting edge is softening. The crack forms from the inside of the hole outward, and you often won’t see it until you wipe away the dry, powdery residue to find a hairline fracture reaching for the edge of the slab.
Common Mistakes That Crack Quartz
Using the Wrong Bit
A standard twist bit or even a carbide-tipped masonry bit is useless. The metal heats up almost instantly, losing its hardness and glazing over. It then rubs rather than cuts, pumping heat directly into the quartz. The first sign is often a burnt plastic smell from the overheated resin. By then, the damage is done.
Drilling Too Fast
High RPMs create centrifugal force that can cause the core bit to wobble, especially if it’s not perfectly seated in the chuck. This vibration is a crack catalyst. It also flings water out of your dam, defeating the cooling. Slow is smooth, and smooth is crack-free.
Ignoring Manufacturer Layout Rules
This is where DIY guides often fall short. The VICOSTONE guideline specifies two hard limits: 1. Minimum Edge Distance: The cutting line must never be less than 70mm from the slab’s edge. Closer than that, and the narrow bridge of stone is prone to cracking from the drilling stress or future load. 2. Minimum Inside Radius: Any interior corner cut should have a radius of at least 5mm (3/16″). A sharp 90-degree corner is a stress concentrator. A drill starting a hole near such a corner can initiate a crack along that weak line.
| Mistake | What Happens | Timeline to Failure |
|---|---|---|
| Dry Drilling | Thermal shock cracks the resin binder. | Crack appears during drilling or within hours as slab cools. |
| Excessive Pressure | Bit deflects, creating uneven stress and hidden fractures. | Crack may propagate days later under fixture load. |
| Hole Too Close to Edge (<70mm) | Creates a fragile stone bridge vulnerable to snap-off. | Can crack during drilling, installation, or first use. |
| No Underside Support | Core plug blows out, chipping a large, ugly crater. | Immediate, visible damage upon breakthrough. |
Diamond Core Bit vs. Hole Saw: Which One Wins?
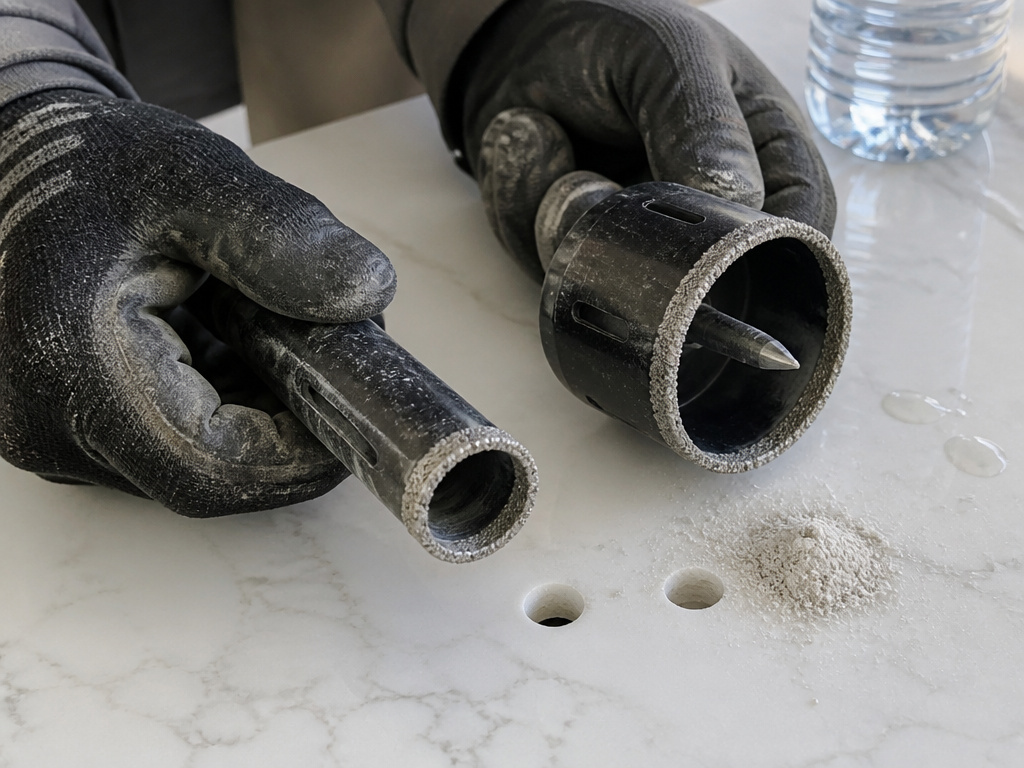
Both have diamond grit, but they work differently. Your choice depends on the hole size, slab thickness, and how many holes you need to drill.
A diamond hole saw looks like a standard hole saw with a diamond-coated rim. It’s often cheaper and good for single, small-diameter holes. However, it cuts more aggressively, can wander more on slick quartz, and its solid center pin can be a point of extra friction and heat.
A diamond core drill bit is the professional choice. Its hollow design reduces friction and material removal, runs cooler, and produces a cleaner wall. It’s also more stable in the cut. The trade-off is cost and the need for a specific-sized arbor.
For a one-time faucet installation, a quality hole saw can work if you’re meticulous. For any job involving multiple holes, larger diameters, or thicker slabs, the core bit is the only tool that minimizes risk.
The bottom line: If you’re buying a tool for this job, get a core bit. If you’re borrowing or already own a diamond hole saw, use it, but double down on your cooling and go even slower.
Before You Start: The Safety Checklist
Before you start: Quartz drilling produces a slurry containing crystalline silica, a respiratory hazard when dry. The core plug can snap out with force. The drill and bit get hot. – Wear sealed safety glasses and an N95 dust mask. – Secure long hair and loose clothing. – Ensure your work area is stable and well-lit. – Have a first-aid kit and phone accessible.
Frequently Asked Questions
Can I use a regular drill bit on quartz?
No. Standard high-speed steel (HSS), carbide, or masonry bits are designed for softer or more porous materials. They will overheat almost immediately against quartz, losing their edge and transferring destructive heat into the slab, almost guaranteeing a crack.
How do I keep the drill bit from slipping on the shiny surface?
Apply painter’s tape over your marked spot. The slightly textured surface of the tape gives the diamond grit some initial purchase. Also, start drilling at a 45-degree angle to create a small starter groove before going vertical.
What if I don’t have a way to use water?
Don’t drill. Dry drilling quartz is a near-certain path to a cracked countertop. If water is absolutely impossible (e.g., in a finished kitchen with no way to contain runoff), your only semi-viable option is to use a specialized dry-cutting diamond core bit designed for minimal water use, and you must drill in very short bursts (3-5 seconds) with long cooling breaks. The risk remains extremely high.
The hole is slightly too small for my fixture. Can I enlarge it?
Enlarging a hole in quartz is difficult and risky. You cannot simply use a larger bit; the original hole will cause it to wander and chip. The professional method involves using a router with a diamond bit and a specialized guide jig. For a DIYer, it’s often safer to slightly enlarge the fixture’s stem with sandpaper or to use an escutcheon plate that covers the imperfect hole.
How can I fix a small chip around the hole?
For a minor, superficial chip on the top edge, use a color-matched epoxy resin repair kit. Clean the area with acetone, mix the epoxy, press it into the chip, and let it cure fully before sanding it flush with a fine-grit diamond pad. For any chip on the visible surface or a deep one, call a stone fabricator.
The Bottom Line
Drilling quartz is about heat management, not muscle. The resin binder is your enemy, and water is your best friend. Get a diamond core bit in the exact size, build a clay dam, and let a slow corded drill do the grinding. Respect the manufacturer’s rules on distance from edges, and always support the underside.
The one tool that makes or breaks this job is the bit, not the drill. A genuine diamond core bit turns a high-stakes operation into a controlled, five-minute process.A cheap workaround turns it into a $2000 slab replacement. Choose once.
