
How to Attach a Socket to a Drill: Adapters & Safety Tips
This post contains affiliate links. As an Amazon Associate, we earn from qualifying purchases.
To attach a socket to a standard drill, you need a socket adapter, a small metal bit with a hex shank on one end for the drill’s chuck and a square drive (1/4″, 3/8″, or 1/2″) on the other for the socket. Insert the adapter’s hex shank about 3/4″ into the drill’s keyless chuck and tighten clockwise until it clicks 8-12 times. Then, press the socket onto the adapter’s square drive until it clicks or locks. Never use this setup on plastic pipe taps or with worn, incompatible drives.
The adapter is the only thing standing between a successful bolt run and a stripped fastener or a flying socket. Its shank type and drive size are not interchangeable suggestions.
What follows: the two non-negotiable compatibility checks, the four-step click-count method for your chuck, the one setup that voids tool warranties, and the pro-grade system that uses a hand ratchet instead of a drill.
Key Takeaways
- The socket adapter’s hex shank must match your drill’s chuck type (round or 1/4″ hex), and its square drive must match your socket set.
- Tighten a keyless chuck by rotating the sleeve clockwise until you hear 8-12 distinct clicks, this is the manufacturer’s specified secure point.
- Impact sockets are the only safe choice for drill use; standard chrome sockets can shatter under the sudden torque.
- For specialized tasks like tapping into water mains with a Reed Feed Tap, a drill is used only to turn the boring bar; the actual socket connection requires a hand ratchet per the manual.
- Using attachments not recommended by the tool maker, like a socket adapter on a drill not rated for it, voids your warranty and risks injury.
The Two Compatibility Checks You Can’t Skip
You have the drill. You have the socket. The missing link is the adapter, and picking the wrong one makes the whole project dead before it starts.
Does Your Drill Have a Chuck or a Hex Collet?
This decides which adapter shank you need. Look at the business end of your drill.
A keyless chuck has three jaws that tighten around a round shank. It accepts adapters with a smooth, round hex shank. A 1/4″ hex quick-release collet is a sleeve that grips a hex-shaped bit; it’s common on impact drivers and some compact drills. It requires adapters with a 1/4″ hex shank designed to lock in.
Common mistake: Forcing a round-shank adapter into a hex collet. The collet can’t grip the smooth sides, so the adapter spins uselessly or ejects under load.
The round shank for a chuck needs to go in deep. The DEWALT DCD800 manual specifies inserting an accessory about 3/4″ (19 mm) before tightening. That’s further than most people push it. A shallow seat leaves the adapter wobbly, and the resulting runout will round off bolt heads.
Square Drive Size: It’s Printed on the Socket
The square drive is the male end on the adapter that the socket fits onto. Sizes are 1/4″, 3/8″, and 1/2″. You must match the drive size to your socket set.
| Drive Size | Best For | Common Socket Set Range |
|---|---|---|
| 1/4″ | Small fasteners, electronics, light DIY | 4mm – 14mm |
| 3/8″ | General automotive, furniture assembly | 8mm – 19mm |
| 1/2″ | Lug nuts, heavy-duty mechanical work | 10mm – 24mm+ |
A 3/8″ drive adapter will not fit a 1/2″ socket. Forcing it won’t work. Some adapters are double-ended, offering two drive sizes on one tool, which is a smart buy for a versatile socket tool set.
The 4-Step Process for a Keyless Chuck Drill
Assuming you have the right adapter, round shank, correct drive size, the physical attachment is a five-minute job. The clock starts after you find the adapter in your toolbox.
Step 1: Open the chuck wider than the shank.
Pull the chuck sleeve back (counter-clockwise) until the jaws open wider than the adapter’s hex shank. Don’t just open it a little. Give yourself room.
Step 2: Insert the adapter fully.
Push the adapter’s round hex shank into the chuck as far as it will go. Aim for that 3/4-inch depth. You should feel the back of the shank seat against the chuck’s internal stop. If it’s sticking out an inch, you’re not in deep enough.
Step 3: Tighten by hand, then finish with the drill.
Rotate the chuck sleeve clockwise with your hand until it’s snug. Then, while holding the adapter steady, gently pull the drill’s trigger in short bursts in the forward direction. The chuck jaws will self-tighten. Listen for the clicks.
Where this goes sideways: Using the drill to tighten the chuck without hand-tightening first. The jaws can catch unevenly, leaving the adapter off-center. Your drill will wobble violently the first time you hit a stubborn bolt.
Step 4: Verify with the click test.
A secure tightening on drills like the DEWALT DCD800 series is indicated by 8-12 audible clicks after hand-tightening. If you don’t hear clicks, your chuck might be a different model, but the principle is the same: tighten until you meet firm, consistent resistance. Tug on the adapter. It shouldn’t move.
Now, press your socket onto the adapter’s square drive. Most have a spring-loaded ball bearing that will click when the socket is fully seated. For a ratchet socket wrench setup, you’d use the same adapter in your cordless drill instead of a manual handle.
When Your Drill Has a Hex Collet (Impact Drivers & Compact Drills)
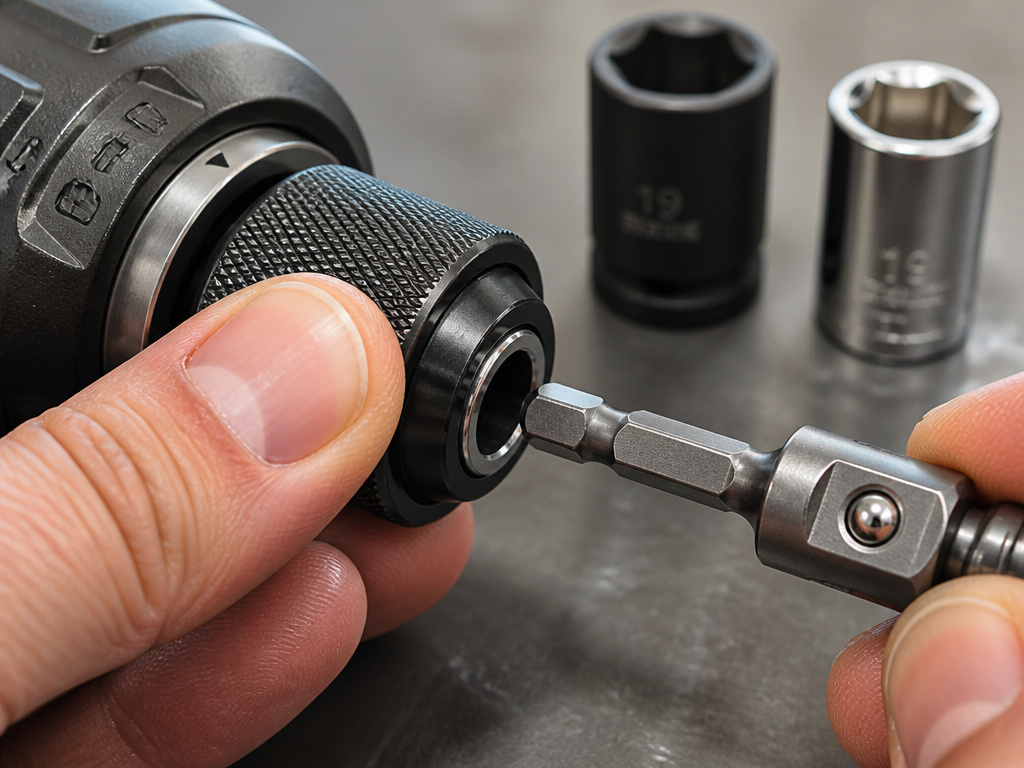 The process is simpler but has a critical torque warning. A 1/4″ hex collet doesn’t have jaws; it’s a locking sleeve.
Push the locking sleeve forward, insert the adapter’s 1/4″ hex shank all the way, and release the sleeve. You’ll hear a definitive click. It’s the same mechanism used for driver bits.
The warning is about force. Impact drivers deliver sudden, rotational blows. This is why you must use impact sockets, which are made from softer, tougher steel that flexes slightly under shock load. A standard chrome socket from a hand-tool set is hardened and brittle; under impact driver torque, it can crack or shatter.
The part nobody mentions: An impact driver’s high torque can overwhelm a cheap adapter. The square drive can twist right out of the socket, rounding both the drive and the socket’s interior. Spend the extra dollar on a forged, heat-treated adapter.
The One Setup That Voids Your Warranty and How to Spot It
 Tool manufacturers are specific about what you can and cannot attach. This isn’t legalese. It’s a liability line drawn from stress tests.
The RYOBI 18V Drill-Driver manual states it clearly: “Do not use any attachments or accessories not recommended by the manufacturer of this product. The use of attachments or accessories not recommended can result in serious personal injury.”
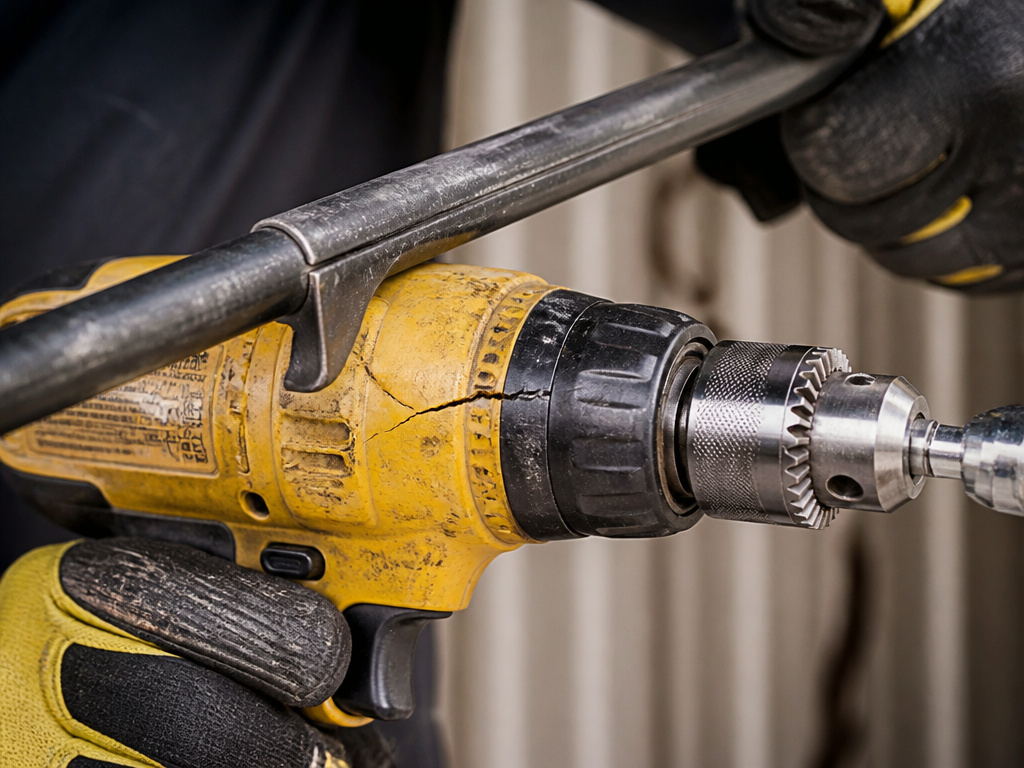
For a drill, “not recommended” often means attachments that create excessive lateral load. A socket adapter, when used correctly on a bolt, is a pure torsional load, the force spins in line with the drill’s axis. That’s fine. The problem is when you use it as a makeshift hand tool for leverage.
Never put a cheater bar (a pipe) over the drill handle to get more torque. Never use the drill with a socket to try and free a seized, rusted bolt meant for a breaker bar. That side pressure can crack the drill’s gear housing. Once that housing is cracked, your warranty is void. The repair costs more than a new mid-range drill.
The Pro Exception: The Reed Feed Tap and Its Hand-Ratchet Rule
In some professional contexts, you’ll see a socket attached to what looks like a drill. The procedure is completely different.
The Reed Feed Tap system for tapping water mains uses a 7/16” socket (part #48208) and a 1/2” drive socket adapter (part #48207). The manual is explicit: you connect the socket adapter to a drill only to turn the boring bar. When it comes to the actual tapping torque on plastic pipe, the manual states: “Absolutely no power tools are to be used.”
For that, you use a hand ratchet. The drill provides rotation, but the final seating force, where over-torque could crack the pipe, comes from a calibrated human arm. This highlights that even with a perfect drill socket connection, knowing the tool’s limit is the real skill.
Socket-on-Drill Uses: What It’s Actually Good For
A drill with a socket won’t replace your ratchet wrench. It’s a speed tool for specific jobs.
Assembly line work: Driving multiple bolts of the same size to a consistent torque (using the drill’s clutch). Think furniture kits, deck building, or mounting several identical fixtures.
Disassembly: Quickly zipping out dozens of bolts, like when removing a lawnmower deck or an old fence.
Limited-space driving: In a deep cavity where a compact socket wrench won’t fit, a slender socket on a long adapter can reach the fastener. The drill does the turning where your wrist can’t swing.
It fails for final tightening. A drill lacks the feel of a hand. You’ll strip threads or shear bolts. Always switch to a hand tool for the last few turns.
Choosing Your Gear: The Short List
You need two things: a good adapter and the right sockets.
For the adapter, get a 3/8-inch drive, round hex shank adapter if you have a standard chuck drill. The Neiko 10077A is a solid, forged option. For hex collet drills, the DeWalt DWARO1 Impact-Rated Adapter is built for the shock.
Your sockets must be impact-rated. A set like the TEKTON 3/8-inch Drive Impact Socket Set covers the most common sizes. Don’t use your grandfather’s chrome-vanadium hand-tool sockets.
If you’re buying a whole new socket wrench set for drill use, look for the words “impact” on the label. That’s the only thing that matters.
Frequently Asked Questions
Can I use any socket with my drill?
No. You must use impact sockets. Standard chrome sockets are hardened and can shatter under a drill’s torque, especially from an impact driver. Impact sockets are made from more ductile steel to absorb shock.
Why won’t my socket stay on the adapter?
The spring-loaded retainer ball inside the adapter’s square drive is likely worn or missing. It’s a cheap part that fails. You can sometimes replace the ball and spring, but it’s often easier to buy a new adapter. Also, ensure you’re using matching drive sizes (e.g., 3/8″ adapter with 3/8″ sockets).
Is it safe to use a socket adapter on an impact driver?
Yes, but with two strict conditions. First, use only impact-rated sockets. Second, use an adapter specifically rated for impact use, it will be labeled as such. The sudden torque of an impact driver will destroy a standard adapter not built for shock loads.
How do I attach a socket to a drill without an adapter?
You can’t, safely. The square drive of a socket has no way to grip the round jaws of a chuck. Any makeshift solution, like jamming a bolt into the socket and gripping the bolt with the chuck, is unstable and dangerous. The socket can spin off at high speed. Always use the proper adapter.
Can I use my drill as a power wrench for lug nuts?
You can use it to remove lug nuts quickly, but never to tighten them. Use the drill in reverse to zip them off. For tightening, you must use a torque wrench to achieve the precise, vehicle-specific foot-pounds required. Overtightening with a drill can warp brake rotors or shear the studs.
The Bottom Line
Attaching a socket to a drill boils down to a $5 metal adapter and a 30-second compatibility check. Get that right, and you turn your drill into a bolt-running speed demon for assembly and disassembly.
Get it wrong, by mixing drives, using chrome sockets, or ignoring the click-count, and you’ll spend the afternoon picking shattered metal out of your workshop floor and shopping for a new drill under a voided warranty.
The rule is simple: match the shank, match the drive, click until it’s tight, and let the impact-rated steel take the heat. Your knuckles and your fasteners will thank you.
