How to Use a Band Saw Safely (The Real Way Pros Do It)
This post contains affiliate links. As an Amazon Associate, we earn from qualifying purchases.
Safe, professional band saw use requires matching three elements: the correct blade type for your material, proper machine setup for that blade, and a controlled feed speed. This precise alignment prevents blade drift, burning, and damage to both the workpiece and the saw’s cutting teeth, ensuring clean, accurate cuts every time.
Most people get this wrong by treating the band saw like a faster jigsaw. They slap on any blade, skip the setup, and force the cut. The result is a wandering blade, a burned edge, and a piece of wood that looks like a beaver got to it. That burned smell isn’t just friction; it’s the steel teeth overheating and losing their hardness, permanently.
This guide walks through the real steps, from picking the right blade off the rack to cutting perfect tenons and veneers. It covers the setup most tutorials skip, the safety rules you actually need, and the advanced techniques that separate clean work from kindling.
Key Takeaways
- Blade selection is non-negotiable. A 1/4-inch, 6 TPI blade for curves, a 1/2-inch, 3 TPI for resawing, and a bi-metal blade for anything tougher than softwood.
- Correct guide adjustment is the difference between a straight cut and a ruined project. The side guides should be a business card’s width from the blade, and the thrust bearing sits just behind the gullets.
- Never force a cut. Let the saw do the work. If you’re pushing, the blade is either dull, the wrong type, or the feed rate is too fast. All three ruin the blade and the workpiece.
- Release the blade tension every time you finish for the day. Leaving a blade under tension for weeks flattens the rubber tires and fatigues the steel, leading to premature breakage.
- Use a featherboard for resawing. It holds the stock against the fence with consistent pressure, which is the only way to get a uniform veneer thickness across a wide board.
Proper blade tension is critical for cut accuracy and blade life. For a typical 1/2-inch blade on a 14-inch saw, apply tension until the blade deflects approximately 1/8-inch when pressed with moderate finger force midway between the upper and lower guides. Insufficient tension allows the blade to wander under load, while excessive tension accelerates fatigue and can damage the saw’s bearings and tires.
What’s the Right Band Saw Blade for Your Project?
The blade is the saw. Get this wrong and nothing else matters. You wouldn’t put a racing slick on a dump truck. Blade choice comes down to width, teeth per inch (TPI), and material.
Width controls maneuverability. A narrow blade, like a 1/4-inch, can turn a tight radius because less of its body is trying to follow a curve inside the cut. A wide blade, like a 3/4-inch, resists twisting and stays straight, which is why it’s the go-to for resawing thick stock into thinner boards. The rule of thumb is simple: the blade width should be less than the tightest radius you need to cut.
Teeth per inch determine cut speed and finish. Fewer TPI (3-4) means bigger gullets that clear sawdust fast from deep cuts, perfect for resawing or cutting thick, soft wood. More TPI (10-14) gives a smoother finish on thin materials like plywood or plastic but clogs instantly in deep green wood. For general shop work, a 1/2-inch, 3 or 4 TPI blade is the equivalent of a reliable shop truck.
Blade material is the third variable. Carbon steel blades are cheap and work fine for intermittent softwood cutting. Bi-metal blades, with a flexible back and hardened tooth tips, last three to five times longer and handle hardwoods and the occasional nail.
Skip the carbon steel if you’re cutting anything harder than pine more than once a month. I burned through a carbon steel blade on a single 8-foot cut of ash once. The teeth were rounded over by the end, and the cut looked like it was made with a spoon.
| Material / Cut Type | Recommended Blade | Why It Works |
|---|---|---|
| Curves & Scrollwork | 1/4-inch, 6 TPI Carbon Steel | Narrow width navigates tight radii; moderate TPI balances speed and finish. |
| Resawing (6-inch thick stock) | 3/4-inch, 3 TPI Bi-metal | Wide blade resists drift; low TPI clears large volumes of sawdust efficiently. |
| General Woodshop Use (Hardwood) | 1/2-inch, 3-4 TPI Bi-metal | Balanced width for mild curves and straight cuts; hardened teeth withstand abrasion. |
| Cutting Thin Plywood or Plastic | 1/4-inch, 10-14 TPI Skip-tooth | High TPI produces a clean edge without splintering the veneer layers. |
| Occasional Softwood Projects | 1/2-inch, 4 TPI Carbon Steel | Economical for light-duty work where blade life isn’t a primary concern. |
How to Set Up Your Band Saw Correctly
A band saw out of the box is just a noisy motor with a wobbly blade. The setup is what makes it a precision tool. This takes ten minutes and saves hours of frustration.
First, install and tension the blade. Power off and unplug the saw. Open the wheel covers and thread the blade through the table slot, making sure the teeth face forward, toward the table and you. Engage the tension lever or turn the tension knob.
The goal isn’t “tight.” It’s “correctly tensioned.” For a 1/2-inch blade on a 14-inch saw, you want about 1/8-inch of deflection when you push sideways on it with one finger, midway between the guides. A guitar string plucks. A correctly tensioned band saw blade should have a similar, low-pitched twang. Too loose, and it wobbles. Too tight, and you’ll hear a high-pitched ping that stresses the wheels and leads to a snapped blade.
Next, adjust the guides. This is where most people fail. The upper and lower guide assemblies each have side bearings and a thrust bearing. The side bearings should be a business card’s thickness away from the blade, close enough to prevent lateral movement but not touching.
The thrust bearing sits just behind the blade’s gullets, not touching the teeth. When you push material into the cut, the blade moves back a fraction and contacts this bearing. If it’s set too far forward, it rubs the teeth and dulls them. If it’s too far back, the blade can deflect rearward under pressure.
Finally, square the table. Use a reliable combination square against the blade. The table should be 90 degrees to the blade across its full height. If it’s off, loosen the table tilt lock, adjust, and re-tighten. A half-degree error over a 6-inch tall cut means your tenon won’t fit its mortise.
I ran a blade with the thrust bearing riding the teeth for a weekend of cutting walnut. By Monday, the blade was pulling to one side on every cut. The constant friction had heated and softened the teeth’s leading edges, ruining a $40 bi-metal blade in three hours of work. Now I check that gap every time I change blades.
Before You Start: Non-Negotiable Safety Rules
A band saw’s blade is a continuous, sharpened steel ribbon moving at high speed. Respect it.
- Wear ANSI Z87.1-rated safety glasses. Sawdust in the eye is one thing. A broken tooth fragment is another. Hearing protection is also mandatory; a band saw runs around 85 dB, enough to cause hearing damage over time.
- Keep fingers at least 3 inches from the blade. Use push sticks, featherboards, or a dedicated push block for anything narrower than your hand. Your hand follows the wood into the blade if it slips.
- Never reach across a moving blade to retrieve a cut-off piece. Turn the saw off and wait for the blade to stop completely.
- Secure long, flexible stock. A long, thin piece can whip back into the blade or your body. Use a roller stand or an outfeed support.
- Maintain a clean, well-lit workspace. Sawdust on the table is a slipping hazard. Good lighting helps you see your cut line and keep your fingers clear.
Step-by-Step Guide to Making Your First Cut
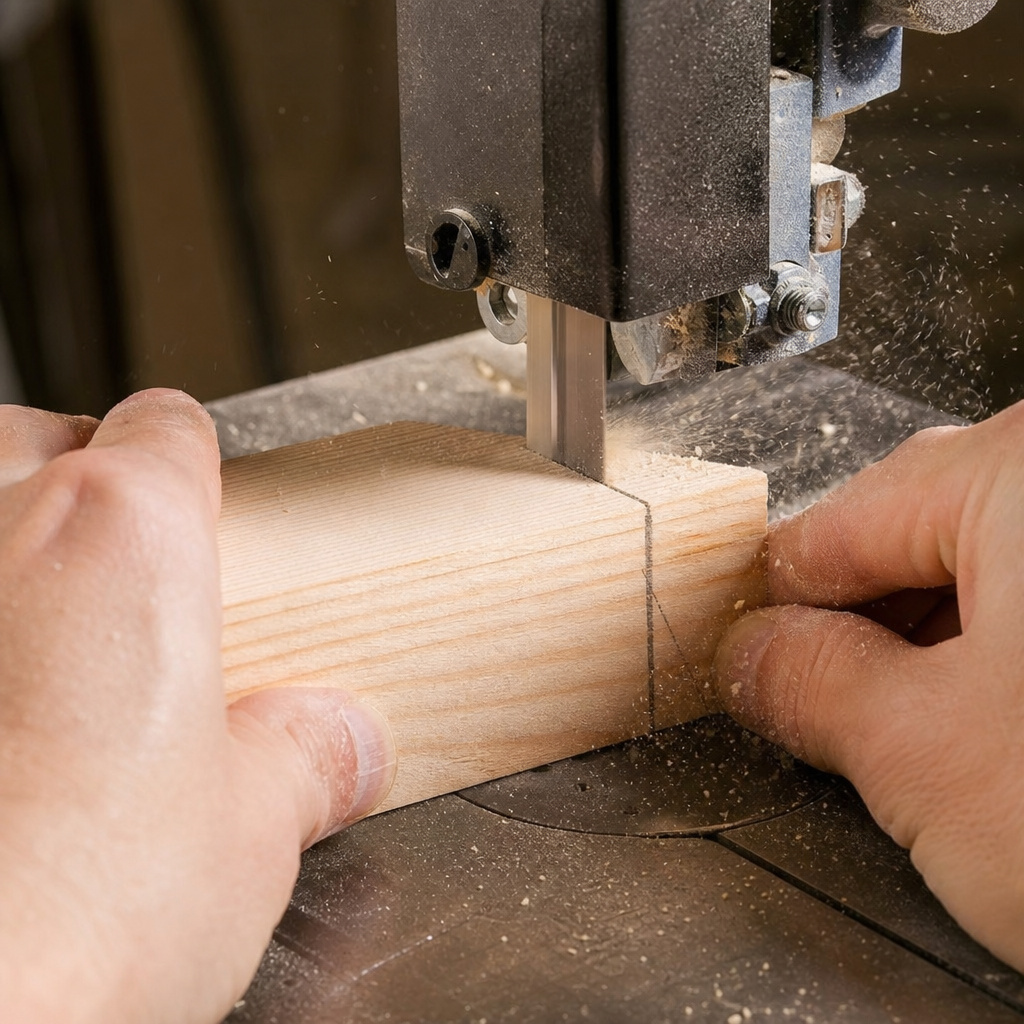
With the saw set up and safety gear on, you’re ready to make chips.
- Mark your cut line clearly. Use a sharp pencil or a knife line. A vague pencil mark disappears under sawdust halfway through the cut. For a straight cut, set the fence. For a curve, draw the line on the wood.
- Position the upper blade guard. Adjust the guard so it sits about 1/4-inch above the thickness of your material. This minimizes the exposed blade while keeping the guard out of your way.
- Power on and let the saw reach full speed. Don’t start feeding the wood the moment you hit the switch. Let the motor and blade come up to speed, it takes two seconds. Feeding too early can stall the blade or cause it to snatch the wood.
- Feed the material steadily. Place the wood flat on the table and guide it into the blade along your line or against the fence. Use light, consistent pressure. Let the blade do the cutting. If you hear the motor bog down, you’re feeding too fast. Back off slightly.
- Follow through without forcing. As you near the end of the cut, keep the material supported. For longer pieces, have a roller stand ready to catch the offcut so it doesn’t fall and bind the blade. When the cut is complete, let the blade come to a complete stop before removing any scraps from the table.
If the blade wanders from your line, don’t twist the wood to correct it mid-cut. That binds the blade. Back the wood out slowly, turn the saw off, and check your setup, blade tension and guide alignment are the usual culprits.
Advanced Techniques: Beyond Straight Cuts
Once you’re comfortable with straight lines, the band saw shows its real value.
Cutting tight curves requires a narrow blade (1/4-inch or 3/8-inch) and a series of relief cuts. For an inside corner, cut straight into the waste area up to the corner before following the curve. This gives the blade room to turn without binding. Pivot the wood, not the saw. Keep your hands on the sides of the workpiece, feeding and turning in one smooth motion.
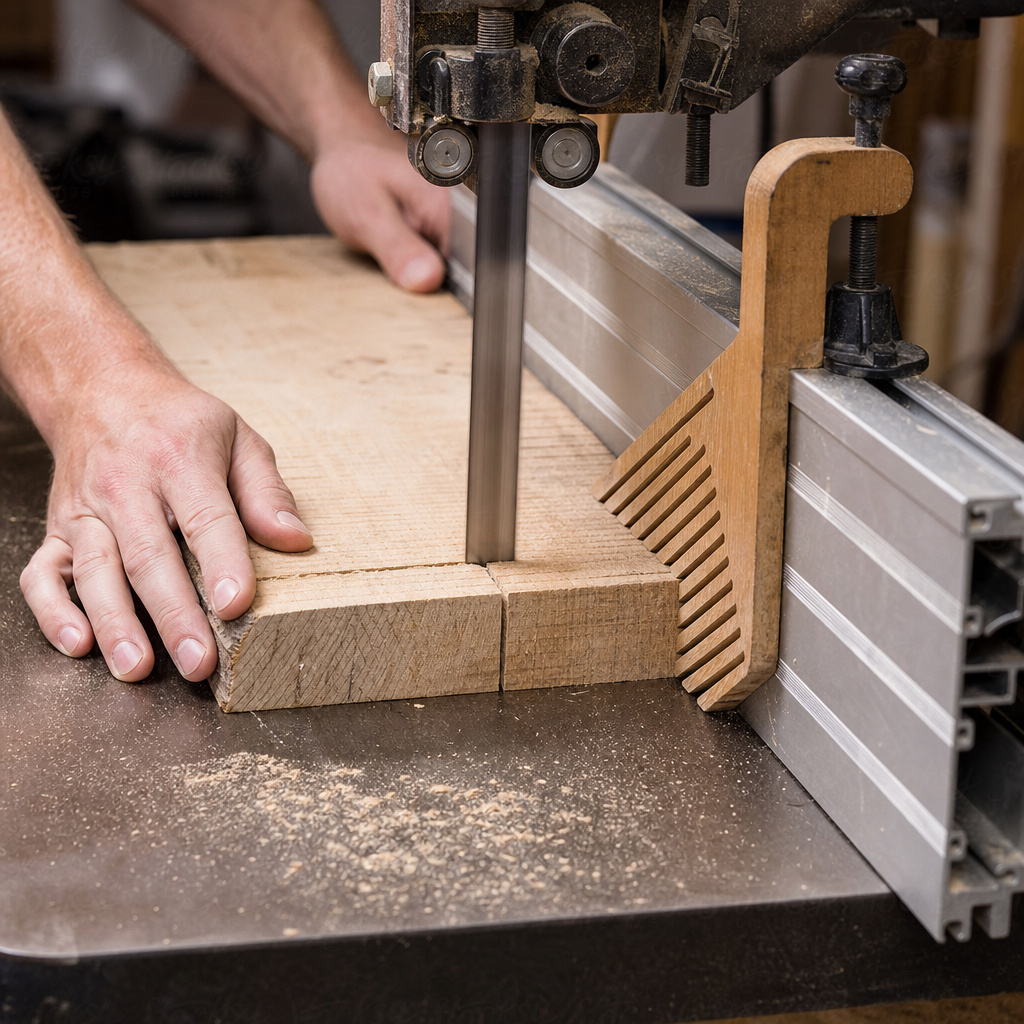
Resawing is cutting a thick board into thinner slabs. It’s how you make your own veneer or bookmatched panels. Use the widest blade your saw can take (3/4-inch on a 14-inch saw), a tall fence, and a featherboard clamped to the table. The featherboard applies even pressure against the fence, preventing the board from twisting during the long cut. Feed slow, about one inch every three seconds. If the blade starts to drift, it’s often because the board’s face isn’t perfectly jointed against the fence. Stop, reassess, and shim if necessary.
For resawing, a featherboard is not optional. Your hand pressure varies; a featherboard’s doesn’t. Clamp it to the table so the fingers press the stock firmly against the fence, about an inch ahead of the blade. This single tool eliminates 90% of resawing drift and kickback.
Cutting circles is easier with a simple jig. Drill a hole in a scrap of plywood, insert a nail through the hole into the center of your workpiece, and pivot the wood through the blade. It’s more accurate than trying to freehand a perfect circle.
Making joinery is where a band saw earns its keep. Roughing out tenons is fast and leaves little cleanup for a shoulder plane. Cutting dovetails by hand is easier if you remove most of the waste on the band saw first, right up to your knife line. For lap joints, the band saw’s straight, vertical cut is ideal.
Common Band Saw Problems and How to Fix Them
Even with perfect setup, things go wrong. Here’s how to diagnose the usual suspects.
| Symptom | Likely Cause | Immediate Fix |
|---|---|---|
| Blade wanders, won’t cut straight | Dull blade, incorrect blade tension, misaligned guides, or forcing the cut. | Stop the cut. Check blade sharpness by running a fingernail across a tooth—it should catch. Re-check tension and guide alignment. |
| Burn marks on wood | Dull blade, too-slow feed rate, or blade tooth set is worn. | Increase feed rate slightly. If burning persists, the blade is dull and needs replacement. |
| Excessive vibration or noise | Loose blade, worn tires, or debris stuck in the guides/wheels. | Power off. Check blade tension and tracking. Inspect wheels for sawdust buildup and clean them. |
| Blade breaks suddenly | Over-tensioning, a fatigued blade (from leaving it tensioned), or forcing a cut on a pinched blade. | Always release tension when done for the day. Never back a blade out of a cut that has pinched—turn off the saw first. |
| Motor stalls under light load | Incorrect blade (too many TPI for the material), or drive belt is slipping. | Verify blade selection. Check and tighten the drive belt according to your saw’s manual. |
Burn marks have a specific smell, sweet and acrid, like overheated sugar. That’s the lignin in the wood burning. If you smell that, your blade is either dull or you’re feeding too slow.
The friction heat is cooking the wood instead of cutting it. Speed up your feed slightly. If the burning continues, the blade is done.
Frequently Asked Questions
How often should I replace my band saw blade?
There’s no fixed schedule. Replace it when cuts require more force, start burning the wood, or the blade consistently drifts even after a proper setup check. A bi-metal blade cutting hardwoods might last for 8-10 hours of actual cutting time. A carbon steel blade on the same material might last 90 minutes.
Can I cut metal on my wood band saw?
Yes, but you must make changes. You need a metal-cutting blade (a finer-toothed, bi-metal or carbide-tipped blade) and you must slow the blade speed way down, often to under 300 feet per minute. Most wood band saws run too fast. Forcing metal through at wood-cutting speeds will instantly dull the teeth and can shatter them. Some saws have a gearbox or pulley system to reduce speed; if yours doesn’t, don’t attempt it.
My band saw blade keeps coming off the wheels. What’s wrong?
This is almost always a tracking issue. The blade isn’t centered on the crowned part of the rubber tires. With the saw off and unplugged, manually rotate the top wheel while adjusting the tracking knob. The blade should ride centered on the tire, with an equal amount of blade visible on either side of the wheel flange. If the tires are worn or glazed with pitch, clean them with rubbing alcohol or replace them.
What’s the best way to store extra band saw blades?
Hang them, don’t coil them. The proper way is to make a simple rack with pegs and hang the blades by their center hole. If you must coil them, make large, gentle loops, at least 24 inches in diameter. Tight coils stress the metal and can create a permanent kink that ruins the blade’s tracking.
Why does my band saw cut curves but not straight lines?
You’re likely using a blade that’s too narrow for straight cuts. A 1/4-inch blade is designed to flex. Switch to a 1/2-inch or 3/4-inch blade with 3-4 TPI for resawing or long rip cuts. Also, verify your fence is parallel to the blade and your guides are adjusted correctly. A fence that’s out of parallel will steer the wood away from the blade.
The Bottom Line
A band saw is the most versatile saw in the shop, but only if you match the blade to the job, dial in the guides and tension every time, and let the tool work at its own pace. The biggest mistake is rushing, rushing the setup, rushing the blade choice, rushing the cut. That rush costs you in ruined wood, broken blades, and frustration. Slow down. Set it up right. Listen to the sound of the cut. A happy band saw hums. A struggling one screams. Your first perfect resawn veneer, or a tight curve cut cleanly, is worth the ten minutes of setup. Keep the tires clean, the tension off when it’s idle, and a few different blade widths on hand, and it’ll handle 80 percent of your cutting tasks better than any other saw you own.
{
“@context”: “https://schema.org”,
“@type”: “HowTo”,
“name”: “How to Use a Band Saw Safely and Accurately”,
“totalTime”: “PT45M”,
“tool”: [
{
“@type”: “HowToTool”,
“name”: “Band saw (14-inch or larger)”
},
{
“@type”: “HowToTool”,
“name”: “Safety glasses and hearing protection”
},
{
“@type”: “HowToTool”,
“name”: “Featherboard”
},
{
“@type”: “HowToTool”,
“name”: “Push sticks”
}
],
“step”: [
{
“@type”: “HowToStep”,
“name”: “Set Blade Tension”,
“text”: “Thread the blade through the table slot and onto the wheels, teeth facing forward. Tension the blade until it deflects about 1/8-inch when you press it with a single finger midway between the guides.”
},
{
“@type”: “HowToStep”,
“name”: “Adjust Blade Guides”,
“text”: “Set the side guides a business card’s thickness away from the blade. Position the thrust bearing just behind the blade’s gullets, not touching the teeth.”
},
{
“@type”: “HowToStep”,
“name”: “Align the Table”,
“text”: “Use a combination square to check that the table is perfectly perpendicular to the blade. Adjust the table tilt lock if necessary.”
},
{
“@type”: “HowToStep”,
“name”: “Make a Test Cut”,
“text”: “Use a scrap piece of your project material. Power on the saw, let it reach full speed, and make a straight cut. Listen for smooth operation and check the cut quality.”
},
{
“@type”: “HowToStep”,
“name”: “Cut Your Workpiece”,
“text”: “Hold the material firmly against the fence or your marked line. Feed steadily without forcing. For tight curves, pivot the material, not the saw. For resawing, use a featherboard and push sticks.”
}
]
}
{
“@context”: “https://schema.org”,
“@type”: “FAQPage”,
“mainEntity”: [
{
“@type”: “Question”,
“name”: “How often should I replace my band saw blade?”,
“acceptedAnswer”: {
“@type”: “Answer”,
“text”: “There’s no fixed schedule. Replace it when cuts require more force, start burning the wood, or the blade consistently drifts even after a proper setup check. A bi-metal blade cutting hardwoods might last for 8-10 hours of actual cutting time. A carbon steel blade on the same material might last 90 minutes.”
}
},
{
“@type”: “Question”,
“name”: “Can I cut metal on my wood band saw?”,
“acceptedAnswer”: {
“@type”: “Answer”,
“text”: “Yes, but you must make changes. You need a metal-cutting blade (a finer-toothed, bi-metal or carbide-tipped blade) and you must slow the blade speed way down, often to under 300 feet per minute. Most wood band saws run too fast. Forcing metal through at wood-cutting speeds will instantly dull the teeth and can shatter them. Some saws have a gearbox or pulley system to reduce speed; if yours doesn’t, don’t attempt it.”
}
},
{
“@type”: “Question”,
“name”: “My band saw blade keeps coming off the wheels. What’s wrong?”,
“acceptedAnswer”: {
“@type”: “Answer”,
“text”: “This is almost always a tracking issue. The blade isn’t centered on the crowned part of the rubber tires. With the saw off and unplugged, manually rotate the top wheel while adjusting the tracking knob. The blade should ride centered on the tire, with an equal amount of blade visible on either side of the wheel flange. If the tires are worn or glazed with pitch, clean them with rubbing alcohol or replace them.”
}
},
{
“@type”: “Question”,
“name”: “What’s the best way to store extra band saw blades?”,
“acceptedAnswer”: {
“@type”: “Answer”,
“text”: “Hang them, don’t coil them. The proper way is to make a simple rack with pegs and hang the blades by their center hole. If you must coil them, make large, gentle loops, at least 24 inches in diameter. Tight coils stress the metal and can create a permanent kink that ruins the blade’s tracking.”
}
},
{
“@type”: “Question”,
“name”: “Why does my band saw cut curves but not straight lines?”,
“acceptedAnswer”: {
“@type”: “Answer”,
“text”: “You’re likely using a blade that’s too narrow for straight cuts. A 1/4-inch blade is designed to flex. Switch to a 1/2-inch or 3/4-inch blade with 3-4 TPI for resawing or long rip cuts. Also, verify your fence is parallel to the blade and your guides are adjusted correctly. A fence that’s out of parallel will steer the wood away from the blade.”
}
}
]
}