How to Feed an EGO String Trimmer: POWERLOAD & Manual Tips
This post contains affiliate links. As an Amazon Associate, we earn from qualifying purchases.
To feed an EGO string trimmer, match the method to your specific trimmer head. For POWERLOAD heads, press and hold the trigger to auto-feed line. For manual heads, bump the head on the ground while the trimmer is running. Always use the correct line diameter specified for your model.
Feeding your EGO string trimmer isn’t about strength or secret tricks. The jamming, the frustration, the wasted time usually come from one thing: not matching the method to your specific trimmer head. Get that wrong, you’ll fight it every time. Get it right, the process takes under a minute.
The two systems on EGO trimmers work completely differently. This guide will show you exactly how to identify yours and run through the correct feeding process step-by-step. You’ll learn the simple alignment trick for POWERLOAD™ heads এবং the precise winding pattern for manual heads that prevents tangles for good.
Key Takeaways
- EGO has two head types: The automatic POWERLOAD™ system (has a green button) and the manual Rapid-Reload bump-feed head. The feeding process is different for each.
- The core fix is usually alignment, not force: For POWERLOAD™, the arrows on the head must click into place before pressing the button. For manual heads, the line must be wound in the correct direction with even tension.
- Using the wrong line diameter is a top cause of jams. Most EGO trimmers use either 0.095-inch or 0.080-inch line. Check your manual or the old spool.
- Always start with safety: Turn off the trimmer এবং remove the battery before handling the cutting head.
- If your line still won’t feed, the issue is likely a poorly wound spool (manual) বা a misaligned head (POWERLOAD™). Rarely, worn drive gear teeth can be the culprit.
The Two Types of EGO Trimmer Heads: Know Which One You Have
Before you touch any line, you need to know which system you’re working with. Feeding the wrong way guarantees a jam.
| Head Type | How to Identify It | How It Feeds Line |
|---|---|---|
| POWERLOAD™ (Automatic) | A green button on the head’s side. Often has “POWERLOAD” printed near it. | Pressing hold the green button while the trimmer motor is running. An internal mechanism auto-winds new line. |
| Rapid-Reload (Manual Bump-Feed) | No green button. The head has a removable spool cover, often with arrows. | You must manually wind new line onto the spool. Bumping the head on the ground releases it. |
My first time with a universal trimmer head, I ignored the arrows. I wound the line my own way, thinking tension was all that mattered. Twenty minutes of furious bumping and one overheated motor later, I learned that alignment beats force every time. The arrows are there for a mechanical reason, the line path through the eyelets.
What You’ll Need
- Correct Replacement Line: Check your manual for the diameter. 0.095-inch is most common, but 0.080-inch is used on some models.
- Safety Goggles: Always. Flying line debris is unpredictable.
- Work Gloves: Optional, but they protect your hands from sharp line ends.
- Scissors or Utility Knife: To cut the line cleanly.
- A Clean Workspace: A table or flat bench beats doing this on the grass.
Safety First: Non-Negotiable Steps
This is the part most people skip until it’s too late. Trimmer line is under high tension এবং can release suddenly.
1. Turn the Trimmer Completely Off. Press the power button to off. Don’t just trigger the lock.
2. Remove the Battery Pack. This is your ultimate safety guarantee. It eliminates any chance of the motor engaging.
3. Wear Eye Protection. Monocord line can snap and fly back.
4. Handle the Line Carefully. The cut ends are sharp and can easily slice skin.
” line feeds from a chamber that spins at several thousand RPM. Respect the tool.
How to Feed an EGO POWERLOAD™ String Trimmer (Automatic System)
If your trimmer has the green button, follow these steps. No winding is required.
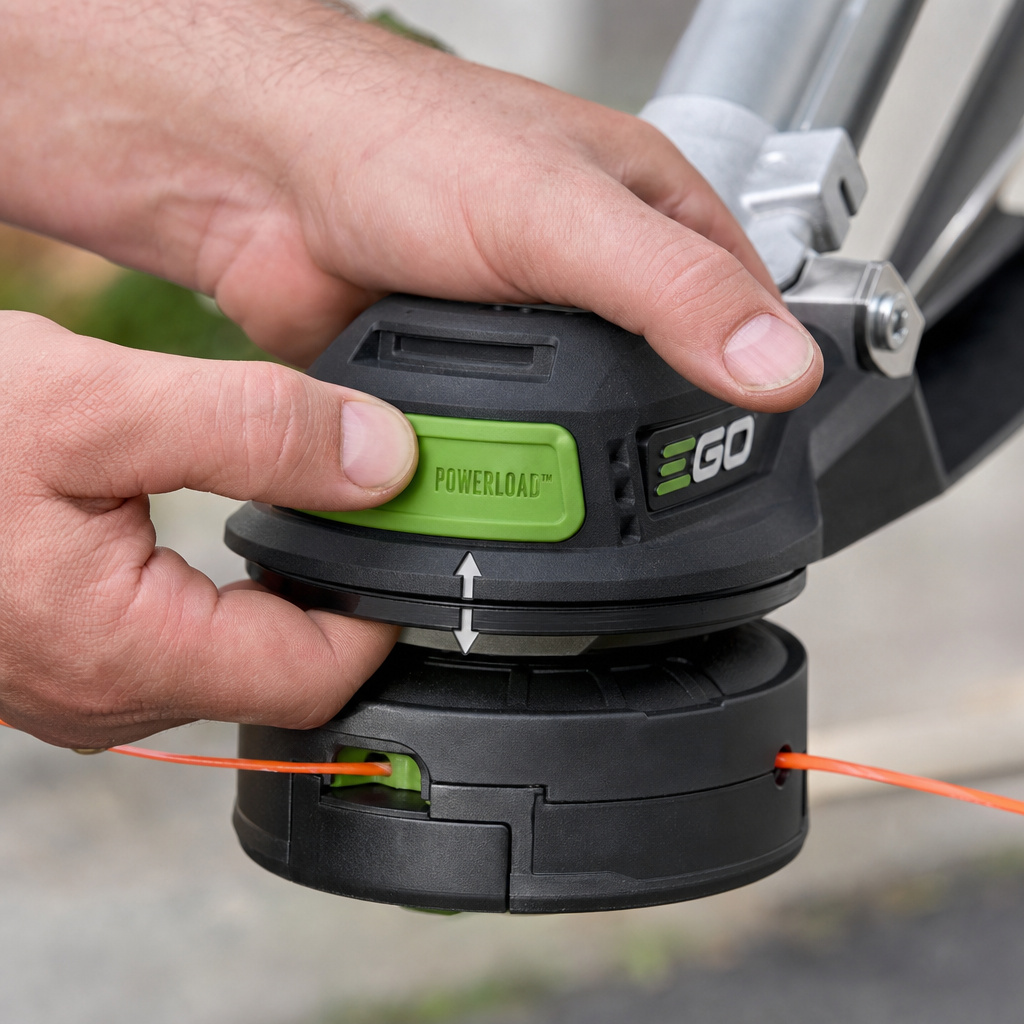
The Atomic Answer: Align the two arrows on the trimmer head until they click together, then press and release the green POWERLOAD™ button while holding the trimmer off the ground. The system will automatically wind about 3 feet of line.
Why this works: The alignment click positions the internal gears and line channels. Pressing the button activates a small motor that winds the spool. If the arrows aren’t aligned, the gears can’t engage.
Step-by-Step Process:
- Prepare: Turn off the trimmer এবং remove the battery as outlined in the safety section.
- Clean the Head (Optional but Recommended): Use a brush বা compressed air to remove grass clippings and dirt from around the head and line exit eyes. Debris here blocks the line.
- Align the Arrows: Rotate the head’s outer casing by hand until you feel a distinct click. The two arrow markings, one on the stationary housing and one on the rotating head, will line up perfectly.
“You’ll feel the click in your fingertips when the gears seat. Don’t just line them up visually, rotate until it snaps into place.” – That’s the tactile feedback the mechanism needs.
- Activate POWERLOAD™: With the trimmer head held safely away from the ground and anything else, press এবং release the green button. You’ll hear a brief whirring sound (about 2–3 seconds) as the system winds the line. Do not hold the button down.
- Test It: Reinstall the battery, start the trimmer in a safe, clear area. Hold it so the head is clear. The line should now extend automatically. If it doesn’t, repeat the alignment step more carefully.
How to Feed a Manual Bump-Feed EGO String Trimmer
For trimmers without the green button, you’ll be winding the spool yourself. Precision here prevents tangles.
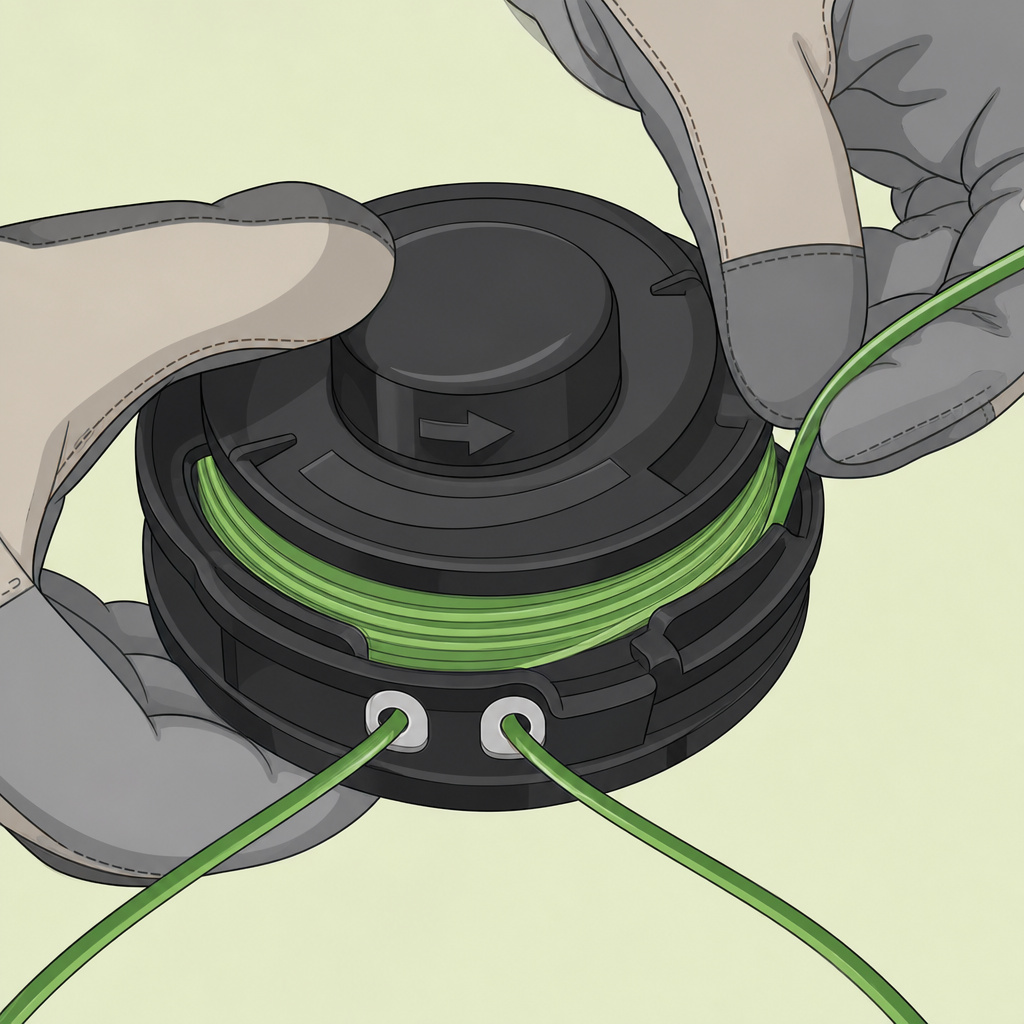
The Atomic Answer: Wind the replacement line tightly এবং evenly onto the spool in the direction indicated by the arrow on the spool itself. Leave about 6 inches of tail protruding from each eyelet. Ensure the line lies flat in its channels এবং doesn’t cross over itself.
Step-by-Step Process:
- Prepare: Safety steps first, power off, battery out.
- Remove the Spool: Depress the retaining tabs on the sides of the trimmer head এবং pull the spool assembly out. On some models, you might need to press a central locking button.
- Clear Old Line: Remove any old line remnants. This is a good time to clean grass buildup from the spool’s interior.
- Find the Direction Arrow: Look for an arrow on the spool. This is your winding direction. Ignore this, এবং your line will tangle.
- Anchor the Line: Most spools have a small notch বা hole to hook the line into. Secure one end there.
- Wind Tightly and Evenly: Wind the line by hand, keeping tight tension এবং laying each coil neatly next to the previous one. Fill the spool to about 1/4-inch from the rim. Overfilling causes immediate jams.
- Secure the Ends: Feed the two loose ends through the opposing exit eyelets on the spool. Pull them through until you have two equal 6-inch tails.
- Reassemble: Place the spool back into the head, ensuring the tails feed out through the holes in the head’s outer casing. Snap the cover back into place until it locks.
- Test: Reinstall the battery, start the trimmer, and gently bump the head on the ground to feed out line.
Troubleshooting: Why Your EGO Trimmer Line Won’t Feed
Even with the right steps, things can go wrong. Here’s how to diagnose it.
| Problem | Likely Cause | How to Fix It |
|---|---|---|
| Line feeds out uncontrollably | Spool is overfilled (manual) বা line is not anchored inside the spool. | Remove the spool এবং wind it again with less line. Ensure the anchor is secure. |
| Line doesn’t feed when bumped | Improperly loose winding on the spool. Line is tangled inside. | Disassemble and re-wind the spool with tighter, neater coils in the correct direction. |
| POWERLOAD™ button does nothing | Battery is dead বা not fully seated. Arrows are not perfectly aligned. | Charge বা reseat the battery. Rotate the head until you feel the definitive click aligning the arrows. |
| Line keeps breaking immediately | Using line that is too thin for your trimmer. Hitting extremely abrasive surfaces (rock, concrete). | Switch to the correct, thicker diameter line (0.095-inch). Use a dedicated edger for concrete edges. |
| Grinding noise from the head | Worn-out drive gear teeth inside the POWERLOAD™ mechanism. Debris jammed in the gear. | This often requires professional repair. Contact EGO customer support. |
I learned about overfilling the hard way. My first spool replacement, I packed it with as much line as would fit. The result? a perfect bird’s nest of tangled line the moment I bumped it. Now I use the 1/4-inch rim rule religiously.
Frequently Asked Questions
Q: Can I use any brand of trimmer line in my EGO?
You can, but I don’t recommend it. EGO line is engineered for their heads. Generic line often has inconsistent thickness বা a different coating that can cause feed issues. Stick with EGO replacement line for guaranteed results.
Q: How often should I replace my trimmer line?
Replace it when it’s worn down to about 25-30% of its original length, বা if it’s becoming brittle and breaking constantly. For heavy users, that might be every few weeks. Keep a spare spool pre-wound.
Q: My POWERLOAD™ head makes a whirring sound but no line comes out. What’s wrong?
The whirring is the auto-wind motor. If no line emerges, the line is likely broken internally on the spool. Follow the manual head steps to open it, remove the old line, এবং reload a fresh spool. Ensure the line end is fed through the exit guide before assembly.
Q: What’s the single most important tip for manual spool winding?
Tension and direction. Pull the line tight as you wind, এবং follow the spool’s arrow religiously. Loose, reverse-wound line will fail 100% of the time.
Before You Go: Final Pro Tip
Your trimmer’s line feed system is simple mechanics, not magic. The biggest favor you can do for yourself is to buy the correct diameter line এবং keep your spools pre-wound. Having a ready-to-go spool in your garage means a 5-minute line change instead of a 30-minute wrestling match when you’re halfway through a yard job. That’s the real pro move.