What Is A Riving Knife On A Table Saw
This post contains affiliate links. As an Amazon Associate, we earn from qualifying purchases.
Alright, let’s break down what a riving knife is on a table saw.
What Is a Riving Knife on a Table Saw?
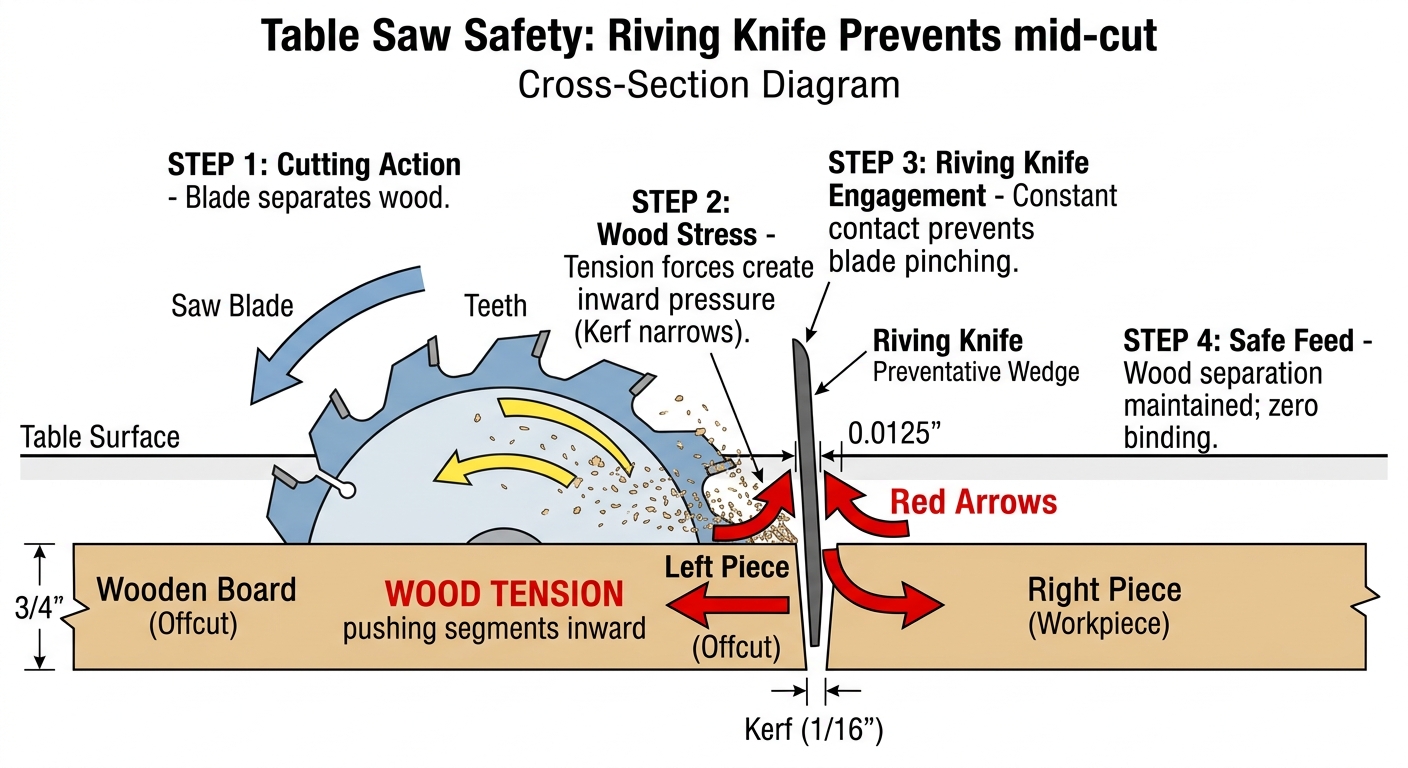
A riving knife is a flat piece of metal mounted directly behind the saw blade. It’s shaped to closely follow the blade’s curve and moves up and down with it. Its job is simple but critical: it keeps the two cut sections of a board from pinching the saw blade after a cut has begun.
This pinching can cause the wood to bind and kick back violently toward the operator. The riving knife prevents that by maintaining a consistent, tight gap with the blade, regardless of the blade’s height or angle.
Why It’s Different from a Splitter
Many people confuse riving knives with splitters, but they’re not the same thing. Both prevent kickback, but a riving knife is the modern, superior design.
- A splitter is a stationary piece mounted to the saw’s table or trunnions. It’s fixed in place.
- A riving knife is mounted to the blade’s assembly and moves with it.
Here’s the key advantage: because the riving knife stays close to the blade, it’s always in the optimal position to prevent pinching. You rarely need to remove it, even for non-through cuts like dados. A traditional splitter often had to be removed for these operations, which meant many users just left it off permanently, defeating its purpose.
Since around 2012, riving knives have been required on all new table saws manufactured in the U.S., and they’ve long been mandated in Europe due to stricter safety laws. This isn’t red tape—it’s because they work.
Key Takeaways
- Prevents Kickback: Its primary function is to stop the workpiece from being violently thrown back toward you.
- Moves with the Blade: Unlike a fixed splitter, it adjusts with blade height and tilt, offering continuous protection.
- Stays On for Most Cuts: Its low-profile design means you can (and should) leave it installed for nearly all operations, promoting consistent safety.
- Is Not a Substitute for Other Safety: It doesn’t eliminate all risks. Proper technique, using push sticks, এবং avoiding warped wood are still essential.
How a Riving Knife Works: A Step-by-Step Look
Let’s trace the physics to see why this device is so crucial.
- The Cut Begins. You push the board into the spinning blade. The blade teeth cut the wood fibers, which immediately release tension.
- Wood Reacts. Those fibers want to close back up behind the blade. In a cut without a riving knife, this closing action pinches the back of the blade.
- Kickback Starts. Pinching the blade creates massive friction. The blade grabs the wood and can violently hurl it forward and up.
- The Riving Knife Intervenes. The metal knife sits in the kerf right behind the blade. It physically blocks the wood from closing in on the blade. The cut sections stay separated, the blade spins freely without binding.
Think of it like a doorstop in the middle of a closing door. It doesn’t make the cut, it makes the dangerous outcome almost impossible.
Riving Knife vs. Other Safety Features
| Feature | Primary Purpose | How It Compares |
|---|---|---|
| Riving Knife | Prevent kickback during the cut. | ESSENTIAL. The first line of defense against the most common violent kickback. |
| Blade Guard | Prevent hand-to-blade contact; contain dust. | CRITICAL BUT OFTEN REMOVED. Often removed for dados, crosscuts. Works best with the riving knife. |
| Anti-Kickback Pawls | Grab the workpiece to prevent rearward throw. | SECONDARY. They help if kickback begins, but the riving knife prevents it from starting. |
| SawStop (Flesh Detection) | Stop the blade upon contact with skin. | EXCELLENT INJURY PREVENTION. A fantastic reactive system, but it doesn’t prevent kickback like a proactive riving knife does. |
The bottom line: Use all the safety devices your saw has. The riving knife is the non-negotiable foundation.
Frequently Asked Questions
Q: Do I really need to use it for every cut?
A: For through-cuts (rip cuts, crosscuts), yes, always. The only common exception is when making a non-through cut, like a dado or rabbet that’s wider than the blade. Here, the riving knife can interfere. Consult your manual for safe removal procedure.
Q: My old saw doesn’t have one. What can I do?
A: You have two good options. First, check if an aftermarket riving knife kit is available for your saw model. Second, consider adding a aftermarket micro-splitter (like a BORK). These mount to the throat plate and offer good protection, are less effective than a true riving knife.
Q: How do I align it properly?
A: Misalignment is a common issue. The riving knife must be perfectly parallel to the blade. Use a combination square. Place it against the blade (not a tooth) and check the gap to the riving knife at the front and back. Adjust the mounting bolts until the gap is even. Even a 1/16-inch misalignment can reduce effectiveness.
Q: Can it be too thick or thin?
A: Yes. The riving knife’s thickness must match the blade’s kerf (the width of the cut it makes). A knife too thick will jam in the kerf. One too thin won’t prevent pinching. Most are matched to a standard 1/8-inch kerf. If you use a thin-kerf blade, you may need a different riving knife or a shim kit.
The Bottom Line
If your table saw has a riving knife, it should be installed and in place for every cut it allows. It’s the single most effective feature on your saw for preventing the sudden, dangerous kickback that causes thousands of serious injuries each year. It’s a simple piece of metal that works silently in the background. Don’t remove it for convenience—its entire purpose is to let you work smarter, safer, and with more confidence.