Why a Fence Belongs on the Left Side of Your Saw: The Truth
This post contains affiliate links. As an Amazon Associate, we earn from qualifying purchases.
Placing the table saw fence on the left side is mandatory for right-tilting saws when making any bevel or angled cut. It keeps the blade tilted away from the fence, preventing the workpiece from being pinched and violently thrown back towards you, the primary cause of table saw kickback.
Most woodworkers set the fence on the right by default. It feels natural if you’re right-handed. That habit works fine for straight 90-degree rips. But the moment you angle the blade for a bevel, that setup becomes a trap. The geometry changes everything.
This guide walks through the three specific scenarios where a left-side fence is not just helpful, but essential. We’ll cover the physics of kickback you can’t ignore, how to set up your saw correctly, and what to do when you have no choice but to cut on the “wrong” side.
Key Takeaways
- For any bevel cut on a right-tilting saw, the fence must be on the left. Angling the blade toward the fence guarantees the workpiece will pinch and kick back.
- Left-handed woodworkers often have better control and visibility with the fence on their dominant side, which is the left. It’s a matter of ergonomics, not just safety.
- Fence alignment is non-negotiable. The fence must be parallel to the blade’s path of travel, or slightly “toed out” at the rear. A fence angled toward the blade will burn the wood and throw chips.
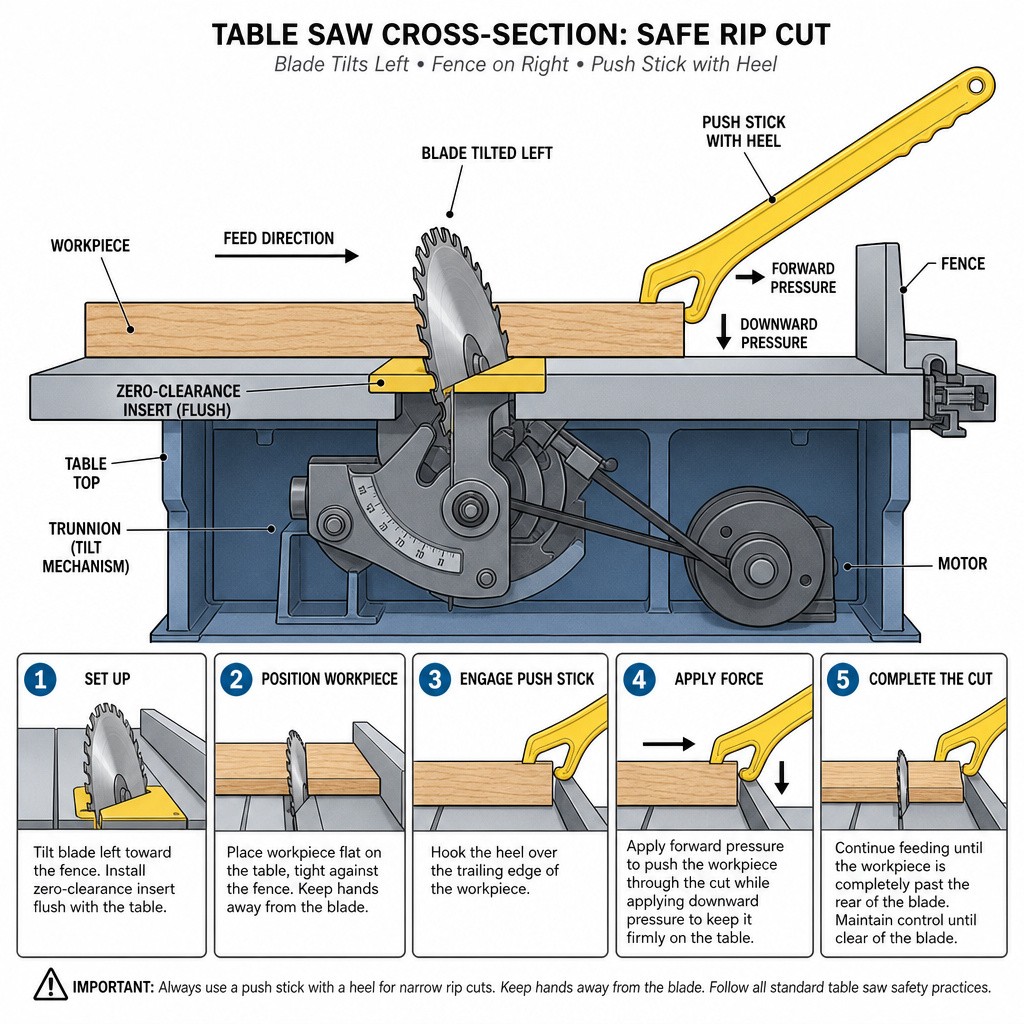
- If you must cut with the fence on the “unsafe” side (blade tilting toward it), use a zero-clearance insert and a dedicated push stick that hooks over the back of the workpiece.
- A “half-fence”, a shop-made auxiliary fence that stops at the blade’s centerline, can be a safer alternative for certain operations, reducing the chance of rear blade contact.
When Should the Fence Go on the Left? (Safety First)
The rule is absolute and mechanical. On a right-tilting table saw, which is about 90% of contractor and hybrid saws on the market, you move the fence to the left side of the blade before making any cut where the blade is not perfectly vertical.
On a right-tilting table saw, tilting the blade left for a bevel cut angles it toward a right-side fence. This creates a narrowing gap between the blade and fence at the rear of the cut. The workpiece binds, gets grabbed by the upward-spinning rear teeth, and launches back toward the operator at high speed. Moving the fence to the left side keeps the blade tilted away, maintaining a consistent or widening gap.
I learned this the hard way on a DeWalt DW745. I was cutting a 30-degree bevel on a 1×6 pine board, fence on the right, blade tilted left. It felt fine for the first six inches.
Then the back of the board touched the rising rear teeth of the blade. The board shot straight back into my gut so fast I didn’t even see it move. It left a bruise that lasted two weeks and snapped the board in half. The motor didn’t even bog down, it just threw it.
The failure happens in under a second. You’ll hear a sharp thwack or a sudden increase in motor whine right before impact.
There are three clear scenarios that demand a left-side fence:
- Any bevel cut on a right-tilting saw. This is the non-negotiable one. The blade tilt direction dictates fence placement.
- When you’re left-handed. Your dominant hand provides better control and feed pressure when it’s on the fence side. For a lefty, that’s the left.
- For specific joinery or angled cuts where the off-cut is on the right. Sometimes the workpiece geometry or a jig setup simply works better with the stock fed from the left.
The first reason is about physics. The second is about control. The third is about convenience. Never let convenience override the physics.
Left-Handed Cuts and Fence Placement
If you’re right-handed, you probably feed stock with your right hand and guide with your left. Your dominant hand does the pushing, which works fine with a right-side fence. Flip that for a left-handed person. Their natural, stronger feeding motion comes from the left hand. Placing the fence on the left lets them apply steady, controlled pressure against it with their dominant side.
It’s more than just strength. It’s about sightlines. When the fence is on your dominant side, your head and eyes naturally align over the workpiece and the leading edge of the cut. You see exactly where the blade will meet the wood. With the fence on your off-side, you’re leaning across your body, which can block your view of that critical intersection.
I’ve watched left-handed woodworkers struggle for years with right-side fences because every tutorial assumes a right-handed audience. They adapt, but their cuts are less confident, their push strokes less smooth. Switching the fence to their left side often instantly improves their accuracy and comfort. It’s a simple fix most guides never mention.
Setting Up a Left-Side Fence Correctly
Putting the fence on the left isn’t a magic trick. You still have to set it up right, or you’ll create new problems. The same alignment rules apply, just mirrored.
First, unplug the saw. Always. Then, raise the blade to its full height and set it to 90 degrees.
Use a reliable combination square or a dial indicator mounted in the miter slot. Check the distance from the blade to the fence at the front and rear of the blade. They must be equal.
Here’s the nuance most people miss: The fence should be perfectly parallel to the miter slot (and thus the blade path), or it can be very slightly toed out at the rear, we’re talking a few thousandths of an inch. Never, ever toe it in. A fence that angles toward the blade at the rear is a kickback machine waiting for fuel.
| Alignment Condition | Front-to-Rear Measurement | Result if Used |
|---|---|---|
| Parallel (Ideal) | Equal distance at front and rear of blade. | Clean, consistent cuts with minimal friction. |
| Toed Out (Acceptable) | Distance at rear is 0.005″–0.010″ greater than at front. | Prevents binding on the backside of the blade; may cause very slight burn on long rips. |
| Toed In (DANGEROUS) | Distance at rear is smaller than at front. | Workpiece pinches against rear of blade, causing kickback, burning, and thrown chips. |
Once aligned, add your safety accessories. A FeatherBoard clamped to the table in front of the blade, pressing the workpiece against the left-side fence, is invaluable. For narrow rips, use a grippy push block like the Grr-Ripper or a simple shop-made one that hooks over the back of the board. Your hand should never be in line with the blade.
What If You Have to Cut on the “Wrong” Side?
Sometimes, the workpiece shape, a jig, or the cut itself forces you to have the fence on the right while the blade tilts left toward it. Maybe you’re cutting a wide panel and the off-cut needs support on the left. This is high-risk territory, but you can manage it with two specific mitigations.
Use a zero-clearance insert. This is a throat plate you make yourself from MDF or buy that has a slot cut only as wide as your blade’s kerf. It supports the wood fibers right up to the blade, preventing the off-cut from dropping down and twisting into the rear teeth, a common kickback trigger. Without it, that small wedge of wood can pivot into the blade.
Employ a dedicated push stick that hooks the workpiece. A standard push stick that just pushes from behind isn’t enough. You need one that reaches over the top of the board and has a heel that hooks onto the trailing edge. This holds the board down and forward, countering any lift or twist at the critical moment it passes the rear of the blade.
If you must make this cut, do a dry run with the saw off. Feel for any point where the workpiece might rock or bind against the fence. If it does, redesign the cut. No piece of wood is worth a trip to the ER.
Another advanced tactic is the half-fence. This is an auxiliary fence you attach to your regular fence that stops at the centerline of the blade. It provides guidance for the front part of the cut but eliminates the dangerous surface behind the blade that can cause pinching. You can make one from a straight piece of hardwood or MDF. It’s a clever solution for dados or rabbets where the full fence is a hazard.
Common Mistakes and How to Avoid Them
The biggest mistake is treating the fence like a permanent fixture on one side. It’s a movable guide. Not moving it for bevel cuts is how accidents happen.
- Assuming “fence on the right” is a universal rule. It’s not. It’s a default for straight cuts on a right-tilting saw. Change the blade angle, change the fence position.
- Neglecting to check fence alignment after moving it. The locking mechanism can shift slightly when you loosen and re-tighten. Always verify parallelism.
- Using a push stick that doesn’t secure the workpiece. A flat stick just pushing from behind can allow the board to lift at the rear. Use a hooked design.
- Forgetting about blade selection. A thin-kerf blade (like a Freud LU83R010) deflects more than a full-kerf blade. Under tension from a misaligned fence, a thin-kerf blade can bend into the cut, increasing friction and the chance of kickback. For left-side fence work with questionable alignment, a stiff full-kerf blade is safer.
One final, physical tip: Sawdust buildup between the fence and the table is a subtle killer. It can tilt the fence just enough to create a toe-in condition. Before any important cut, especially on the left side where you’re less familiar, brush the table clean.
Frequently Asked Questions
Why would anyone put the table saw fence on the left?
The main reason is safety when making bevel cuts on a right-tilting saw. The fence must be on the left to keep the blade tilted away from it, preventing the workpiece from being pinched and causing kickback. Left-handed users also often prefer it for better control.
Is it safe to use the fence on the left for all cuts?
For straight 90-degree rips on a right-tilting saw, it’s perfectly safe as long as the fence is aligned parallel to the blade. The safety rule is about blade tilt, not the fence’s side. For a straight cut, you can use either side, but most right-handed users find the right side more comfortable.
My saw tilts left. Which side should the fence be on for bevel cuts?
If your saw tilts left (less common), the rule reverses. For a left-tilting blade, you would place the fence on the right side for bevel cuts to keep the blade angled away from the fence. The principle is identical: blade tilts away from fence.
Can I just use the miter gauge instead of the fence for angled cuts?
For crosscuts or angled cuts that don’t involve ripping (cutting lengthwise), yes, the miter gauge or a crosscut sled is the correct and safer tool. The fence should never be used as a length guide for crosscutting; that’s a classic kickback scenario. Use the fence only for rip cuts.
What’s the biggest danger of using the fence on the “wrong” side?
Kickback. When the blade tilts toward the fence, the kerf (the cut slot) narrows toward the rear. The workpiece binds against the blade, the rising rear teeth grab it, and it rockets back toward you faster than you can react. It can cause severe injury.
How do I align my fence properly when moving it to the left?
Unplug the saw. Raise the blade fully and set it to 90 degrees. Use a combination square or a dial indicator to measure the distance from the blade to the fence at the front and rear. Adjust until these distances are equal, or set the rear distance 0.005-0.010″ wider than the front (toed out). Never allow it to be closer at the rear.
The Bottom Line
Don’t let habit dictate a dangerous setup. The fence isn’t married to the right side of your table saw. Its position is a deliberate choice based on the blade’s tilt and your own control. For bevel cuts on the most common saws, that choice is simple: left side only. Get in the routine of checking blade angle, then positioning the fence accordingly before you even turn on the saw. That one step, more than any fancy jig or accessory, is what keeps your workshop sessions productive and your fingers intact. The few seconds it takes to move the fence are the cheapest insurance you’ll ever buy.