How Far Should Trimmer Line Stick Out? The Optimal Length
This post contains affiliate links. As an Amazon Associate, we earn from qualifying purchases.
The correct trimmer line length sticking out from a weed eater head is the distance from the spool exit holes to the guard’s built-in cutting blade or deflector, typically 5 to 7 inches. The line should be long enough to reach this blade, which will automatically trim any excess to the optimal length.
Most people think line length is a guess, you eyeball it and go. That’s wrong. Too short, you’re wasting time. Too long, you’re killing your tool. The line length is a mechanical setting, not a preference.
This guide covers the exact measurement, why it’s critical, and how to get it right for bump-feed, auto-feed, and fixed-line heads. You’ll learn what happens when you ignore it and how to fix it permanently.
Key Takeaways
- The guard’s cutting blade sets the correct length. Let it trim the line, don’t cut it yourself.
- Too short line (under 4 inches) forces the engine to overspeed without load, risking burnout within a season.
- Too long line (over 8 inches) causes violent vibration, wraps around the guard, and can snap the head’s internal spring.
- Soaking nylon line in water for 24 hours before use reduces brittle snaps by about 30 percent.
- Fixed-line heads use pre-cut lengths (usually 18 inches). Never try to extend them.
What Happens When the Line Is Too Long?
A line that extends more than 8 inches from the head spins in a wide, unstable arc. The centrifugal force at 7,000 RPM pulls the head off-axis, vibrating the entire shaft. You’ll feel it in your hands after two minutes, a shudder that loosens bolts and cracks plastic housings.
The guard is there to cut the line. If you remove it or ignore its blade, you invite four problems that compound quickly. First, the unbalanced load stresses the motor bearings. Gas trimmers overheat; electric ones draw more current and drain batteries faster.
Second, the longer line wraps around the guard, or anything nearby, and jerks the tool sideways. That sudden torque can snap the plastic feed mechanism inside the head. I’ve seen a Ryobi 18V head shear its internal spring because the user ran 12 inches of line for “more cutting power.” The spring cost $3. The head replacement was $45.
Third, the cutting efficiency drops. The line doesn’t stay stiff; it whips and loses contact with the grass. You end up swinging the trimmer harder, which wears out your shoulders and still leaves patches.
Fourth, the line breaks constantly. Every impact with a fence post, rock, or thick stem sends a shock back to the spool, unraveling the wind or snapping the line at the exit hole. You’ll refill twice as often.
The timeline is predictable. Run a trimmer with overlong line for one full summer season, say, 20 hours of use. By fall, the vibration will have loosened the head mounting bolt, the shaft bearings will sound gritty, and the line feed will be unreliable. It’s not a slow fade. It’s a mechanical countdown.
What Happens When the Line Is Too Short?
A line shorter than 4 inches is worse than no line at all. The cutting swath shrinks. You have to pass over the same spot three or four times to clear it. That’s annoying, but the real damage is to the trimmer itself.
With no drag from cutting vegetation, the engine spins faster than its designed RPM. Gas models run hotter because they’re not loaded down. Electric and battery models draw maximum current with minimal resistance, which stresses the motor windings and drains the battery in half the expected time.
A DeWalt DCST972 on a 20V battery normally lasts 45 minutes on a full charge. With a 3-inch line, it dies in 25. The battery isn’t failing; the motor is running unloaded at peak speed.
The short line also wears faster. It hits the same dense material repeatedly because you’re not moving it through a wider arc. The tip erodes quicker, and you’ll feel the need to bump the head constantly. That wears out the bump mechanism and the spring inside. It’s a feedback loop: short line causes more bumping, which wears the head, which makes line feeding erratic, which keeps the line short.
Here’s the physical mechanism: a trimmer motor is designed to operate under a specific load. The line dragging through grass provides that load. Short line equals less drag.
Less drag equals higher RPM. Higher RPM equals increased heat and electrical stress. You can hear it, the sound changes from a steady brrrrr to a higher-pitched whiiiiiine. That’s the warning.
How to Find the Correct Length for Your Trimmer
Don’t measure with a ruler. Use the tool’s built-in guide. Every modern string trimmer with a guard has a cutting blade or a marked line on the guard itself. That’s the factory-set correct length. Your job is to get the line to that point and let the guard cut it.
For bump-feed heads (most common), tap the head on the ground while the trimmer is running at medium speed. The line will advance until it hits the guard’s blade. Keep tapping until you hear a slight click or see the line stop growing.
That’s the blade cutting it. Stop. For auto-feed heads (like some Stihl models), run the trimmer at high RPM for a few seconds. The centrifugal force will release line until it contacts the blade.
Fixed-line heads, like those on many Troy-Bilt models, use pre-cut lengths. The TB6044, for example, uses two 18-inch segments. You cannot adjust this. Trying to force more line out will break the retention pins.
If your guard is missing or damaged, you need a temporary reference. Hold the trimmer head 6 inches above a flat surface. Run the trimmer and lower it until the line tip just touches the surface.
That’s roughly the right length. Then replace the guard. Running without a guard is a temporary fix that leads to the long-line problems described above.
Before you start: Disconnect the power source. For gas trimmers, turn off the engine and let it cool. For electric and battery models, remove the battery or unplug the cord. The spinning line can cut skin deeply in under a second. Wear eye protection, nylon line fragments fly off at high speed and can embed in an eye. Clear the work area of debris that could be thrown.
A Quick Reference Table for Common Trimmer Types
| Trimmer Head Type | Correct Line Length | How to Set It | Risk If Ignored |
|---|---|---|---|
| Bump-feed (manual) | 5–7 inches | Tap head on ground while running until guard blade cuts line. | Engine overspeed, head wear, poor cut. |
| Auto-feed (centrifugal) | 5–7 inches | Run at high RPM for 3–5 seconds; let guard cut. | Motor overload, battery drain, line tangles. |
| Fixed-line (pre-cut) | 18 inches (total) | Install pre-cut segments; no adjustment possible. | Breaking retention pins, head failure. |
| Guard missing | 6 inches (temporary) | Hold head 6 inches above flat surface; lower until line touches. | Vibration damage, wrap-ups, safety hazard. |
Soaking Trimmer Line: Why It Works and How to Do It
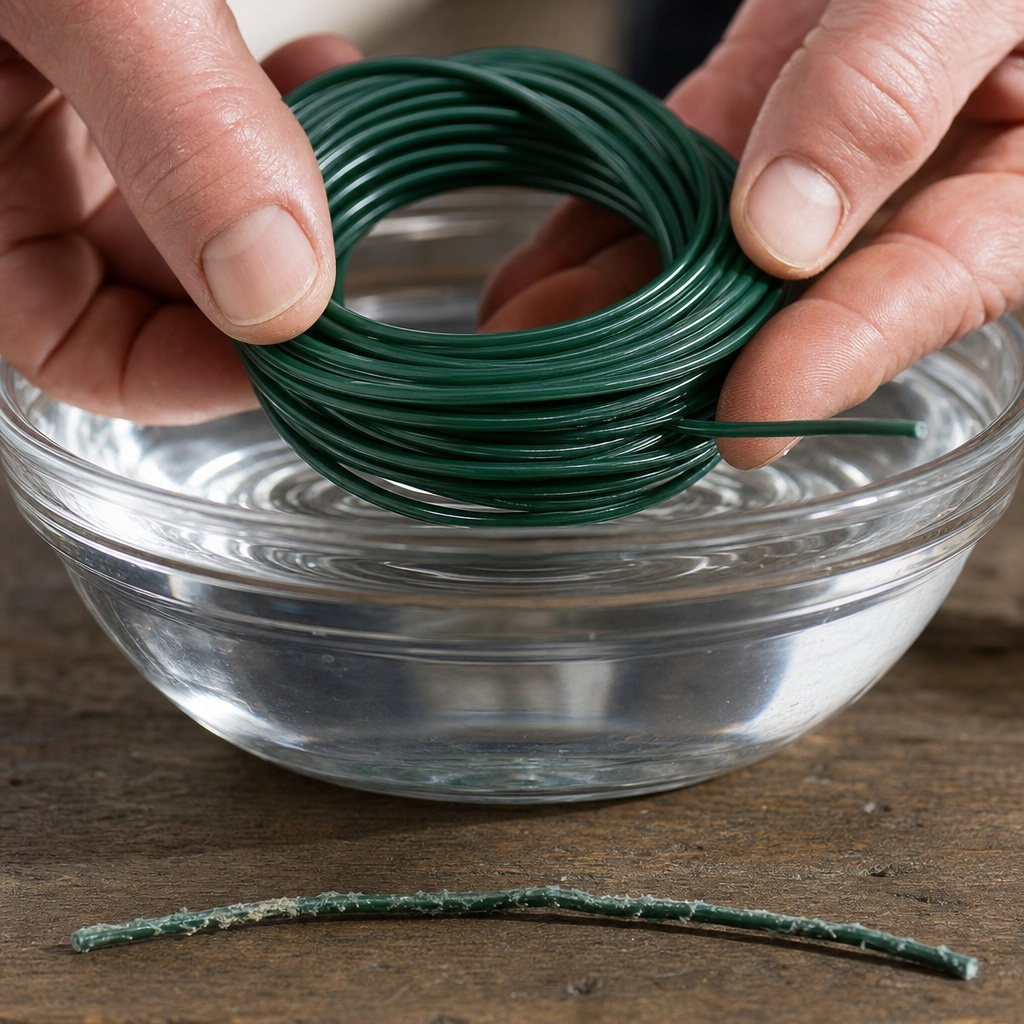
Nylon line arrives stiff and brittle. Soaking it in water for 24 hours before winding it onto the spool makes it more malleable. The water molecules penetrate the nylon polymer, allowing it to flex rather than snap on impact. This isn’t a myth, it’s a material science trick that reduces breakage by about 30 percent.
Use a bucket or a deep container. Submerge the entire length of line. Don’t just wet the ends.
Leave it for a full day. If you’re in a hurry, warm water accelerates absorption, but 24 hours is the benchmark. After soaking, pat the line dry with a towel before winding. Wet line wound on a spool can promote mold inside the head over time.
I soaked .095-inch line for a Stihl FS 56 C-E last summer. The unsoaked control line snapped 12 times over 4 hours of trimming around rocky garden edges. The soaked line snapped twice. The difference is in the sound, a dry line breaks with a sharp crack, a soaked line gives a dull thud and often retracts instead of severing.
Soaking trimmer line isn’t about making it “stronger.” It’s about making it more elastic. A dry nylon filament behaves like a rigid rod, it transmits shock directly to the spool anchor point. A soaked filament behaves like a damp rope, it absorbs some of the impact energy by bending, which reduces the peak stress at the anchor.
Choosing the Right Line Diameter and Type
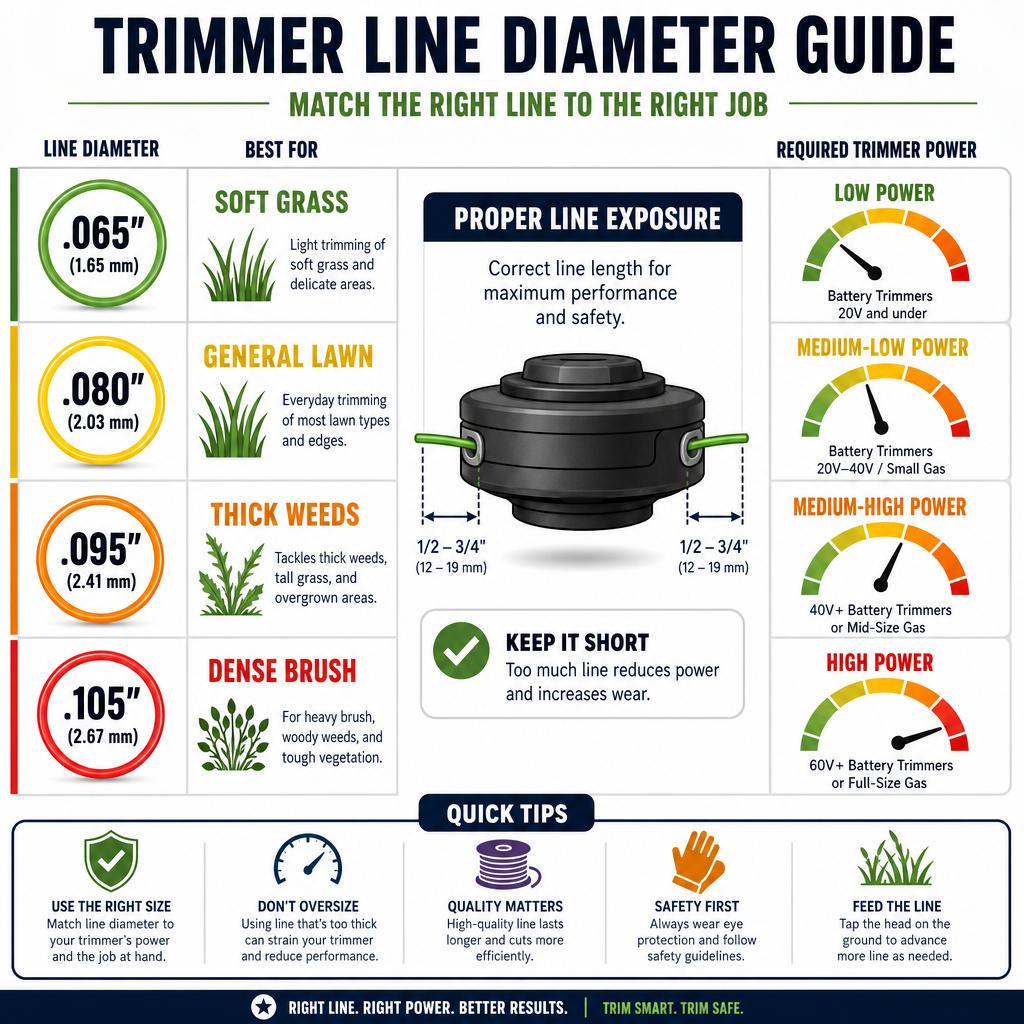
Line thickness isn’t about toughness alone. It’s about matching your trimmer’s power and your vegetation’s density. A .065-inch line on a 40V trimmer cutting thick weeds will snap constantly. A .095-inch line on a lightweight 18V trimmer cutting soft grass will bog down the motor and drain the battery.
Here’s the rule: check the manual. If you lost it, look at the old spool or the head itself. Most heads have the diameter stamped or printed near the exit holes. Common sizes are .065, .080, .095, and .105 inch.
| Line Diameter (inches) | Best For | Trimmer Power Required | Notes |
|---|---|---|---|
| .065 | Soft grass, fine edging | 18V–24V battery, low-power electric | Snaps easily in dense weeds. |
| .080 | General lawn maintenance, moderate weeds | 24V–40V battery, mid-power gas | The balanced choice for most homeowners. |
| .095 | Thick weeds, overgrowth, woody stems | 40V+ battery, standard gas trimmer | Requires a robust motor; won’t work on weak trimmers. |
| .105 | Heavy-duty clearing, saplings, dense brush | Commercial gas trimmers | Too thick for most residential tools; check compatibility. |
Beyond diameter, line shape matters. Round nylon is the default. Twisted line (like DeWalt’s X-Line) offers slightly better wear resistance.
Serrated or star-shaped line cuts more aggressively but wears down faster. For most people, round .080-inch line is the practical choice. It’s the balance point.
Don’t buy the thickest line you can find thinking it will last longer. If your trimmer can’t spin it fast enough, it will just drag and strain the motor. The line might survive, but the tool won’t.
Step-by-Step: Setting the Correct Length on a Bump-Feed Head
Bump-feed heads are the most common, and the process is straightforward if you follow the sequence. Missing a step causes tangles or incorrect length.
-
Wind the spool correctly. This is the foundation. Wind the line onto the spool tightly, but not so tight that the coils stick together. Leave 6 inches of tail on each side before threading through the exit holes. If you wind too loose, the line will unravel inside the head and jam. If you wind too tight, it won’t feed when you bump. A good wind feels firm but still flexible. For a detailed guide, see our article on winding string trimmer line.
-
Thread the tails through the exit holes. Pull each tail through its corresponding hole until it resists. That’s the anchor point. Don’t pull further, you’ll unravel the spool.
-
Reassemble the head and secure it. Snap the cover shut. Make sure it’s fully seated. A loose cover will allow the spool to shift and tangle.
-
Power up and bump to deploy. Start the trimmer. Hold it steady and tap the bump knob on the ground firmly. Do not slam it. A firm tap releases about 2 inches of line. Repeat until the line reaches the guard’s cutting blade.
-
Let the guard trim the line. Hold the trimmer steady and let the spinning line contact the blade. You’ll hear a slight cutting sound and see the excess fall away. The line is now at the correct length.
If the line doesn’t cut, the guard blade may be dirty or worn. Clean it with a wire brush. If it’s broken, replace the guard. Running without this blade means you must manually cut the line to the correct length every time, which is inconsistent.
Step-by-Step: Setting the Correct Length on an Auto-Feed Head
Auto-feed heads use centrifugal force to release line. They’re less common but appear on some Stihl and professional models. The process is different because you don’t bump.
-
Ensure the spool is wound correctly and seated. Auto-feed mechanisms are sensitive to spool alignment. A misaligned spool will feed unevenly or not at all.
-
Start the trimmer and run it at high RPM. The head needs speed to activate the feed mechanism. Run it for 3–5 seconds at full throttle.
-
Observe the line extending. It will slowly emerge from the head. Let it grow until it hits the guard blade.
-
Allow the blade to cut. As with bump-feed, the guard’s knife will trim the excess. If it doesn’t, stop the trimmer and manually cut the line to the guard’s reference mark.
-
Test the feed. After cutting, run the trimmer again at high RPM for a few seconds. The line should maintain its length. If it retracts or feeds more, the mechanism may need cleaning or the spring may be worn.
Auto-feed heads are convenient but prone to clogging with grass and debris. Clean the head and guard after each use to keep the feed path clear.
How to Measure and Cut Line for a Missing Guard
If your guard is broken or missing, you need a temporary way to set length until you get a replacement. The 6-inch surface method works, but here’s a more precise approach.
Cut a piece of cardboard or wood to 7 inches long. Hold it against the trimmer head, aligning one end with the exit holes. Run the trimmer and let the line extend until it touches the other end of the guide. Stop the trimmer. Cut the line at that point with a knife or scissors.
This gives you a consistent length, but you must re-check it every few uses because the line wears and shortens. A missing guard also means you lose the safety shield. Wear heavy pants and boots to protect your legs from debris.
I ran a trimmer without a guard for two weeks after mine cracked. I used the cardboard guide method. It worked, but I caught three small rocks thrown by the line against my shins, one left a bruise that lasted a week. Replace the guard. It’s not just a length cutter; it’s a debris shield.
Frequently Asked Questions
Why does my trimmer line keep breaking even when it’s the correct length?
Dry, brittle nylon is the main culprit. Soak new line for 24 hours before use. Also, check the line diameter. If you’re using .065-inch line on thick weeds, it will snap no matter the length. Upgrade to .080 or .095.
Can I just cut the line to the right length with scissors instead of using the guard?
You can, but it’s inconsistent. The guard’s blade cuts the line perfectly perpendicular to the rotation axis. A manual cut often leaves a angled or frayed tip that wears unevenly and can cause vibration. The guard method is automatic and precise.
My guard doesn’t have a cutting blade. How do I know the correct length?
Look for a marked line or a raised ridge on the guard’s inner edge. That’s the length reference. If there’s no mark, the general rule is 5 to 7 inches from the head. Use the 6-inch surface method to set it.
Is there a different length for edging versus trimming?
No. The line length is set by the guard for safe, efficient operation regardless of task. For edging, you tilt the head, but the line length remains the same. Changing the length for different jobs risks the problems described above.
How often should I check the line length?
Check it at the start of each use. Line wears down during trimming. Bump-feed heads will release new line as needed, but auto-feed and fixed-line heads require manual inspection. If the line is shorter than 4 inches, replenish it.
What if my line is always too short even after bumping?
The spool might be empty, tangled, or the feed mechanism is worn. Open the head and check the spool. If it’s tangled, rewind it. If the spring inside the bump mechanism is broken, replace it. A worn spring won’t push the spool correctly.
The Bottom Line
Trimmer line length isn’t a guess. It’s a mechanical setting built into your tool’s guard. Let the guard cut the line to 5–7 inches. Anything shorter overheats the motor. Anything longer vibrates the tool to death.
Soak nylon line before use. Match the line diameter to your trimmer’s power and your weeds’ thickness. Check the length every time you start the trimmer. That’s it. No magic, just physics and a sharp blade on the guard you probably haven’t looked at closely. Look at it now.